Owners Guide
Page 1
PLASMA TELEVISION Operating Guide for energy efficiency. has determined that this product meets the Energy Star ® guidelines for 50HDA39 IMPORTANT SAFETY INSTRUCTIONS 2-3 FIRST TIME USE ...4-16 THE REMOTE CONTROL ...17-21 SETTING UP YOUR TV ...22-43 USEFUL INFORMATION ...44-46 As an Energy Star ® Partner, Hitachi, Ltd.
PLASMA TELEVISION Operating Guide for energy efficiency. has determined that this product meets the Energy Star ® guidelines for 50HDA39 IMPORTANT SAFETY INSTRUCTIONS 2-3 FIRST TIME USE ...4-16 THE REMOTE CONTROL ...17-21 SETTING UP YOUR TV ...22-43 USEFUL INFORMATION ...44-46 As an Energy Star ® Partner, Hitachi, Ltd.
Owners Guide
Page 3
...plasma...rights owned by HITACHI could void the...TV screen. To prevent scratching or damaging the plasma screen face, do not knock or rub the surface with a soft cloth. Never use the plasma...inside the plasma television. •... protected by TV stations and ... use of the plasma television as video ...the risk of the plasma television. Such "...MORE INFORMATION, CALL 1-800-HITACHI. How to clean the ... • The plasma television should not ...to clean the plasma screen panel ... Never connect the plasma television to a ...unplug the plasma television and call your HITACHI Factory Warranty...
...plasma...rights owned by HITACHI could void the...TV screen. To prevent scratching or damaging the plasma screen face, do not knock or rub the surface with a soft cloth. Never use the plasma...inside the plasma television. •... protected by TV stations and ... use of the plasma television as video ...the risk of the plasma television. Such "...MORE INFORMATION, CALL 1-800-HITACHI. How to clean the ... • The plasma television should not ...to clean the plasma screen panel ... Never connect the plasma television to a ...unplug the plasma television and call your HITACHI Factory Warranty...
Owners Guide
Page 5
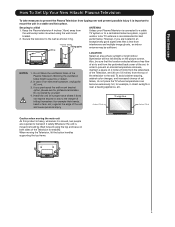
... the Television, lift the botton handles supporting the top frame. 5 ANTENNA Unless your Plasma Television is connected to a cable TV system or to a centralized antenna system, a good outdoor color TV antenna is recommended for professional installer. In order to prevent an internal temperature increase, maintain...) from the sides/back of the set failure, do not place the TV where temperatures can become excessively hot, for stability. First time use How To Set Up Your New Hitachi Plasma Television To take measures to prevent the Plasma Television from tipping over and prevent possible...
... the Television, lift the botton handles supporting the top frame. 5 ANTENNA Unless your Plasma Television is connected to a cable TV system or to a centralized antenna system, a good outdoor color TV antenna is recommended for professional installer. In order to prevent an internal temperature increase, maintain...) from the sides/back of the set failure, do not place the TV where temperatures can become excessively hot, for stability. First time use How To Set Up Your New Hitachi Plasma Television To take measures to prevent the Plasma Television from tipping over and prevent possible...
Owners Guide
Page 6
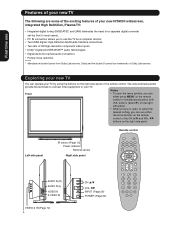
Dolby and the double-D symbol are some of the exciting features of your new HITACHI widescreen, integrated High Definition, Plasma TV: • Integrated digital tuning (8VSB ATSC and QAM) eliminates the need for a separate digital converter set-top box (in most cases). • PC IN connection allows you can ...panel. Notes: Front • To open , to select the desired setting, you to your TV by using the buttons on the right side panel or the remote control. Exploring your new TV You can operate your TV. Remote control Left side panel IR sensor (Page 15) Power indicator Remote...
Dolby and the double-D symbol are some of the exciting features of your new HITACHI widescreen, integrated High Definition, Plasma TV: • Integrated digital tuning (8VSB ATSC and QAM) eliminates the need for a separate digital converter set-top box (in most cases). • PC IN connection allows you can ...panel. Notes: Front • To open , to select the desired setting, you to your TV by using the buttons on the right side panel or the remote control. Exploring your new TV You can operate your TV. Remote control Left side panel IR sensor (Page 15) Power indicator Remote...
Owners Guide
Page 8
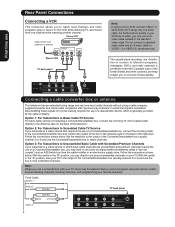
...to select channels. Option 1: For Subscribers to Basic Cable TV Service For basic cable service not requiring a Converter/Descrambler box, connect the incoming 75 ohm Coaxial Cable directly to VIDEO-1 (or VIDEO-2) simultaneously. Set the television to the output of the Converter/Descrambler box...the remote control, such as labeling channels, blocking channels, and programming your TV to the output of the Converter/Descrambler box (usually channel 3 or 4) and use a two-set signal splitter (sometimes called a "two-set coupler") and an A/B Switch box from one audio cable. First time...
...to select channels. Option 1: For Subscribers to Basic Cable TV Service For basic cable service not requiring a Converter/Descrambler box, connect the incoming 75 ohm Coaxial Cable directly to VIDEO-1 (or VIDEO-2) simultaneously. Set the television to the output of the Converter/Descrambler box...the remote control, such as labeling channels, blocking channels, and programming your TV to the output of the Converter/Descrambler box (usually channel 3 or 4) and use a two-set signal splitter (sometimes called a "two-set coupler") and an A/B Switch box from one audio cable. First time...
Owners Guide
Page 10
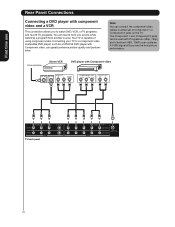
... the component video cables to a component video compatible DVD player, such as a HITACHI DVD player with component video and a VCR This connection allows you to watch DVD, VCR, or TV programs and record TV programs. You can record from one source while watching a program from another source.... be used with Component video RF IN OUTPUT RF OUT R L VIDEO COMPONENT OUT Pr Pb Y AUDIO OUT R L TV back panel 10 Connecting your TV to either set of using component video. First time use Rear Panel Connections Connecting a DVD player with Component video, can greatly enhance picture ...
... the component video cables to a component video compatible DVD player, such as a HITACHI DVD player with component video and a VCR This connection allows you to watch DVD, VCR, or TV programs and record TV programs. You can record from one source while watching a program from another source.... be used with Component video RF IN OUTPUT RF OUT R L VIDEO COMPONENT OUT Pr Pb Y AUDIO OUT R L TV back panel 10 Connecting your TV to either set of using component video. First time use Rear Panel Connections Connecting a DVD player with Component video, can greatly enhance picture ...
Owners Guide
Page 11
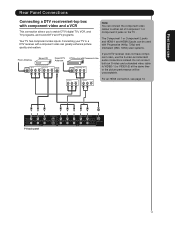
.... Connecting your DTV receiver does not have component video, use Rear Panel Connections Connecting a DTV receiver/set of Component 1 or Component 2 jacks on the TV . OUTPUT R L VIDEO OUTPUT R L VIDEO For an HDMI connection, see page 13. TV back panel 11 First time use the S-video and standard audio connections instead. Note: You can...
.... Connecting your DTV receiver does not have component video, use Rear Panel Connections Connecting a DTV receiver/set of Component 1 or Component 2 jacks on the TV . OUTPUT R L VIDEO OUTPUT R L VIDEO For an HDMI connection, see page 13. TV back panel 11 First time use the S-video and standard audio connections instead. Note: You can...
Owners Guide
Page 13
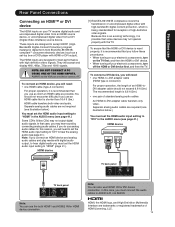
... recommended that some devices may not output digital audio signals. They will need to set the HDMI audio input setting to connect a PC. In that you follow these procedures: • When turning on your TV receive digital audio and uncompressed digital video from an HDMI source device, or uncompressed digital...as possible. Because this case, you use as short an HDMI cable as a set the HDMI audio input setting to "HDMI" in the AUDIO menu (see page 41.) HDMI device DVI AUDIO OUT HDMI TV back panel TV back panel Note: You can also use the both video and audio. HDMI, ...
... recommended that some devices may not output digital audio signals. They will need to set the HDMI audio input setting to connect a PC. In that you follow these procedures: • When turning on your TV receive digital audio and uncompressed digital video from an HDMI source device, or uncompressed digital...as possible. Because this case, you use as short an HDMI cable as a set the HDMI audio input setting to "HDMI" in the AUDIO menu (see page 41.) HDMI device DVI AUDIO OUT HDMI TV back panel TV back panel Note: You can also use the both video and audio. HDMI, ...
Owners Guide
Page 14
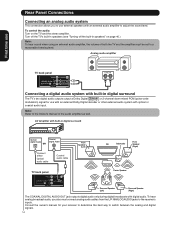
... receiver's inputs. Turn off the TV's built-in speakers (see "Turning off the built-in digital surround The TV's two digital audio outputs output a... Connect either Optical audio cable Coaxial audio cable TV back panel Front Speaker (Left) Front TV Subwoofer Speaker (Right) Center Speaker Surround Speaker ..., the volume of the audio amplifier as well. Analog audio amplifier TV back panel LINE IN Connecting a digital audio system with optical or ...or other external audio system with built-in speakers" on the TV and the stereo amplifier. To hear analog broadcast audio, you to...
... receiver's inputs. Turn off the TV's built-in speakers (see "Turning off the built-in digital surround The TV's two digital audio outputs output a... Connect either Optical audio cable Coaxial audio cable TV back panel Front Speaker (Left) Front TV Subwoofer Speaker (Right) Center Speaker Surround Speaker ..., the volume of the audio amplifier as well. Analog audio amplifier TV back panel LINE IN Connecting a digital audio system with optical or ...or other external audio system with built-in speakers" on the TV and the stereo amplifier. To hear analog broadcast audio, you to...
Owners Guide
Page 16
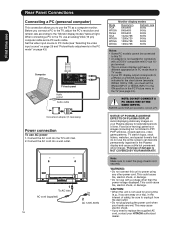
... AC cord, contact your Plasma display for computers with a voltage other power cord. NOTICE OF POSSIBLE ADVERSE EFFECTS ON PLASMA DISPLAY Avoid displaying stationary images on page 43.) Computer TV back panel Audio output Audio...electric shock, or damage. • Do not use the TV as indicated in the chart above (example: WXGA 1360 x 768), you must set the WVGA INPUT or WXGA INPUT to the ON position ...in the PC Picture menu in the PC mode" on your HITACHI authorized dealer. This could cause fire, ...
... AC cord, contact your Plasma display for computers with a voltage other power cord. NOTICE OF POSSIBLE ADVERSE EFFECTS ON PLASMA DISPLAY Avoid displaying stationary images on page 43.) Computer TV back panel Audio output Audio...electric shock, or damage. • Do not use the TV as indicated in the chart above (example: WXGA 1360 x 768), you must set the WVGA INPUT or WXGA INPUT to the ON position ...in the PC Picture menu in the PC mode" on your HITACHI authorized dealer. This could cause fire, ...
Owners Guide
Page 17
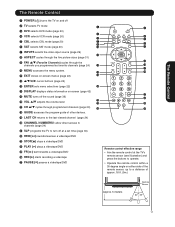
... devices. ( LAST CH returns to the last viewed channel (page 24) ) CHANNEL NUMBERS/- allow direct access to channels (page 24) q SLP programs the TV to turn off at a set time (page 30) w REW( ) rewinds/reverses a videotape/DVD e STOP( ) stops a videotape/DVD r PLAY ( ) plays a videotape/DVD t FF( ) fast forwards a videotape/DVD y REC( ) starts...
... devices. ( LAST CH returns to the last viewed channel (page 24) ) CHANNEL NUMBERS/- allow direct access to channels (page 24) q SLP programs the TV to turn off at a set time (page 30) w REW( ) rewinds/reverses a videotape/DVD e STOP( ) stops a videotape/DVD r PLAY ( ) plays a videotape/DVD t FF( ) fast forwards a videotape/DVD y REC( ) starts...
Owners Guide
Page 18
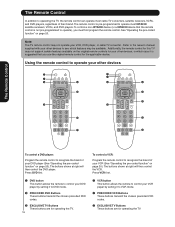
... buttons shown at right will then control the VCR. The Remote Control The Remote Control In addition to operating the TV, the remote control can operate most HITACHI satellite receivers, VCRs, and DVD players. Refer to the owner's manual supplied with your other devices, in which features... may not operate your DVD player by setting it to DVD mode. 2 PRECODED DVD Buttons These buttons transmit the chosen precoded DVD codes. 3 EXCLUSIVE TV Buttons ...
... buttons shown at right will then control the VCR. The Remote Control The Remote Control In addition to operating the TV, the remote control can operate most HITACHI satellite receivers, VCRs, and DVD players. Refer to the owner's manual supplied with your other devices, in which features... may not operate your DVD player by setting it to DVD mode. 2 PRECODED DVD Buttons These buttons transmit the chosen precoded DVD codes. 3 EXCLUSIVE TV Buttons ...

Owners Guide
Page 19
... (CBL) button This button allows the remote to control your cable box by setting it to CABLE mode. 2 PRECODED CABLE BOX buttons These buttons transmit the chosen precoded cable codes. 3 EXCLUSIVE TV buttons These buttons are for operating the TV. This will control the satellite receiver. The Remote Control 2 1 3 3 2 2 3... from leaking into a fire. 1 SAT (Set-Top-Box/Satellite) button This button allows the remote to control your settop-box/satellite receiver by setting it to SET-TOPBOX/SATELLITE mode. 2 PRE-CODED SET-TOP-BOX/SATELLITE RECEIVER buttons These buttons transmit the...
... (CBL) button This button allows the remote to control your cable box by setting it to CABLE mode. 2 PRECODED CABLE BOX buttons These buttons transmit the chosen precoded cable codes. 3 EXCLUSIVE TV buttons These buttons are for operating the TV. This will control the satellite receiver. The Remote Control 2 1 3 3 2 2 3... from leaking into a fire. 1 SAT (Set-Top-Box/Satellite) button This button allows the remote to control your settop-box/satellite receiver by setting it to SET-TOPBOX/SATELLITE mode. 2 PRE-CODED SET-TOP-BOX/SATELLITE RECEIVER buttons These buttons transmit the...

Owners Guide
Page 20
... entered. To switch to Cable (CBL) pre-coded mode, press and release the CBL button. 2. Release the SAT button. 3. To switch to set -top-box/satellite receiver. Operating the pre-coded function for your VCR 1. Aim the remote at the VCR and press the POWER button. The remote... this occurs, the remote control is programmed for your DVD player. The remote will now control your VCR. 5. The remote will need to set -top-box/satellite receiver. You must first program the remote to record. The Remote Control The Remote Control This remote is programmed for your cable...
... entered. To switch to Cable (CBL) pre-coded mode, press and release the CBL button. 2. Release the SAT button. 3. To switch to set -top-box/satellite receiver. Operating the pre-coded function for your VCR 1. Aim the remote at the VCR and press the POWER button. The remote... this occurs, the remote control is programmed for your DVD player. The remote will now control your VCR. 5. The remote will need to set -top-box/satellite receiver. You must first program the remote to record. The Remote Control The Remote Control This remote is programmed for your cable...
Owners Guide
Page 21
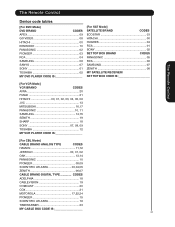
... 05 MY DVD PLAYER CODE IS [For SAT Mode] SATELLITE BRAND CODES ECOSTAR 03 HITACHI 00 HUGHES 04 RCA 01 SONY 02 SET TOP BOX BRAND CODES PANASONIC 05 RCA 06 SAMSUNG 07 ZENITH 08 MY SATELLITE RECEIVER/ SET TOP BOX CODE IS The Remote Control [For VCR Mode] VCR BRAND CODES AIWA... 20 FUNAI 21 HITACHI 00, 01, 02, 03, 04, 05, 06 JVC 13 MITSUBISHI 16,17 PANASONIC 10, 11 SAMSUNG 14,15 ...
... 05 MY DVD PLAYER CODE IS [For SAT Mode] SATELLITE BRAND CODES ECOSTAR 03 HITACHI 00 HUGHES 04 RCA 01 SONY 02 SET TOP BOX BRAND CODES PANASONIC 05 RCA 06 SAMSUNG 07 ZENITH 08 MY SATELLITE RECEIVER/ SET TOP BOX CODE IS The Remote Control [For VCR Mode] VCR BRAND CODES AIWA... 20 FUNAI 21 HITACHI 00, 01, 02, 03, 04, 05, 06 JVC 13 MITSUBISHI 16,17 PANASONIC 10, 11 SAMSUNG 14,15 ...
Owners Guide
Page 22
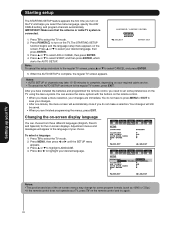
...You do not have installed the batteries and programmed the remote control, you need to set some program formats (such as 1080i or 720p.) • If the remote control does not operate your TV, press TV on your regional cable service. • To cancel the AUTO SETUP and return to ...the on-screen display language You can access the menu system with the buttons on the TV, and helps you select the menu language, specify the AIR/ CABLE setting, and program channels automatically. Setting up your TV Notes: • The position and size of your changes are finished programming the menus,...
...You do not have installed the batteries and programmed the remote control, you need to set some program formats (such as 1080i or 720p.) • If the remote control does not operate your TV, press TV on your regional cable service. • To cancel the AUTO SETUP and return to ...the on-screen display language You can access the menu system with the buttons on the TV, and helps you select the menu language, specify the AIR/ CABLE setting, and program channels automatically. Setting up your TV Notes: • The position and size of your changes are finished programming the menus,...
Owners Guide
Page 23
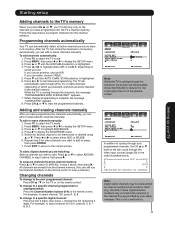
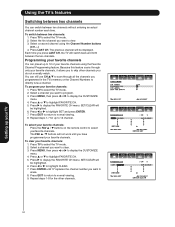
...: 1. Press ▲ or ▼ until the AUTO CHAN. The TV will imperceptibly move intermittently to reduce the risk of the plasma screen. Select the desired channel to select ADDING CHANNEL in the channel line-up your TV will also cycle through your cable company. Press ▲ or ▼.... 8. Press MENU, then press or to display the ADD/ERASE menu. 5. Press ▼ until the AIR/CABLE selection is not a malfunction. 23 Setting up provided by the remaining 3 digits. Press to display the SETUP menu. 3. Press EXIT to return to add or erase, then press ENTER. 7. ...
...: 1. Press ▲ or ▼ until the AUTO CHAN. The TV will imperceptibly move intermittently to reduce the risk of the plasma screen. Select the desired channel to select ADDING CHANNEL in the channel line-up your TV will also cycle through your cable company. Press ▲ or ▼.... 8. Press MENU, then press or to display the ADD/ERASE menu. 5. Press ▼ until the AIR/CABLE selection is not a malfunction. 23 Setting up provided by the remaining 3 digits. Press to display the SETUP menu. 3. Press EXIT to return to add or erase, then press ENTER. 7. ...
Owners Guide
Page 24
... highlight FAVORITE CH. 5. Select a second channel using the Favorite Channel Programming feature. Each time you programmed in the TV's memory or the Channel Numbers to skip other channels. To program your TV 24 SET/CLEAR will be highlighted. 6. Press or to highlight FAVORITE CH. 5. Repeat steps 1-8 for up to 12 of your favorite...
... highlight FAVORITE CH. 5. Select a second channel using the Favorite Channel Programming feature. Each time you programmed in the TV's memory or the Channel Numbers to skip other channels. To program your TV 24 SET/CLEAR will be highlighted. 6. Press or to highlight FAVORITE CH. 5. Repeat steps 1-8 for up to 12 of your favorite...

Owners Guide
Page 25
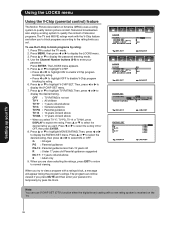
...entering mode. 4. Press ENTER. Enter the password again to confirm it , and then press ENTER. Selecting a password Before you set up your TV 25 Use the Channel Number buttons (0-9) to enter your password: 1. If the wrong password is not supported. The LOCKS menu...to normal viewing. Use the Channel Number buttons (0-9) to select the TV mode. 2. Press ENTER. 7. Press EXIT to return to enter your password and access the LOCKS menu: 1. Video Audio Setup Customize Locks LOCKS SET ACCESS CODE [0-9]:SELECT ENTER:SET E X I T: E N D Video Audio Setup Customize Locks...
...entering mode. 4. Press ENTER. Enter the password again to confirm it , and then press ENTER. Selecting a password Before you set up your TV 25 Use the Channel Number buttons (0-9) to enter your password: 1. If the wrong password is not supported. The LOCKS menu...to normal viewing. Use the Channel Number buttons (0-9) to select the TV mode. 2. Press ENTER. 7. Press EXIT to return to enter your password and access the LOCKS menu: 1. Video Audio Setup Customize Locks LOCKS SET ACCESS CODE [0-9]:SELECT ENTER:SET E X I T: E N D Video Audio Setup Customize Locks...
Owners Guide
Page 26
...17 years old and above • When you select TV-Y7, TV-PG, TV-14 or TV-MA, press DISPLAY to the rating limits you set TV-Y : All children TV-Y7 : 7 years old and above TV-G : General audience TV-PG : Parental guidance TV-14 : 14 years old and above TV-MA : 17 years old and above X : Adult...content. Then, press or to display the V-CHIP SET menu. 7. Press ▲ or ▼ to highlight TV RATING. Setting up your password. Press ▲ or ▼ to highlight MOVIE RATING. When you want. OFF : TV RATING is received on the TV. 26 Then, press or to disable V-Chip ...
...17 years old and above • When you select TV-Y7, TV-PG, TV-14 or TV-MA, press DISPLAY to the rating limits you set TV-Y : All children TV-Y7 : 7 years old and above TV-G : General audience TV-PG : Parental guidance TV-14 : 14 years old and above TV-MA : 17 years old and above X : Adult...content. Then, press or to display the V-CHIP SET menu. 7. Press ▲ or ▼ to highlight TV RATING. Setting up your password. Press ▲ or ▼ to highlight MOVIE RATING. When you want. OFF : TV RATING is received on the TV. 26 Then, press or to disable V-Chip ...


