

Owners Guide
Page 1
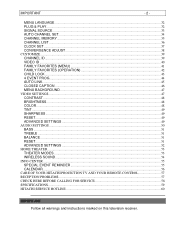
... TV 50FX18B 50FX19K 55FX20B OPERATING GUIDE TABLE OF CONTENTS IMPORTANT...2 SAFETY TIPS...3 PICTURE CAUTIONS ...8 ACCESSORIES ...9 REMOTE CONTROL BATTERY INSTALLATION AND REPLACEMENT 9 HOW TO SET UP YOUR NEW HITACHI PROJECTION TV 9 HOOK-UP CABLES AND CONNECTORS 11 ANTENNA CONNECTIONS TO REAR JACK PANEL 11 FRONT PANEL CONTROLS...12 1 MENU/EXIT button ...12 2 INPUT selector ...12 3 VOLUME level ...12 4 CHANNEL selector ...12 5 POWER button ...12 6 POWER light ...13 7 AI (Artificial Intelligence) sensor 13 8 REMOTE CONTROL sensor...13 REAR PANEL JACKS ...13 REAR PANEL CONNECTIONS ...14 REAR...
... TV 50FX18B 50FX19K 55FX20B OPERATING GUIDE TABLE OF CONTENTS IMPORTANT...2 SAFETY TIPS...3 PICTURE CAUTIONS ...8 ACCESSORIES ...9 REMOTE CONTROL BATTERY INSTALLATION AND REPLACEMENT 9 HOW TO SET UP YOUR NEW HITACHI PROJECTION TV 9 HOOK-UP CABLES AND CONNECTORS 11 ANTENNA CONNECTIONS TO REAR JACK PANEL 11 FRONT PANEL CONTROLS...12 1 MENU/EXIT button ...12 2 INPUT selector ...12 3 VOLUME level ...12 4 CHANNEL selector ...12 5 POWER button ...12 6 POWER light ...13 7 AI (Artificial Intelligence) sensor 13 8 REMOTE CONTROL sensor...13 REAR PANEL JACKS ...13 REAR PANEL CONNECTIONS ...14 REAR...
Owners Guide
Page 2
......45 CLOSED CAPTION ...46 MENU BACKGROUND ...47 VIDEO SETTINGS...47 CONTRAST...48 BRIGHTNESS...48 COLOR...48 TINT ...49 SHARPNESS ...49 RESET...49 ADVANCED SETTINGS ...49 AUDIO SETTINGS ...50 BASS ...51 TREBLE ...51 BALANCE ...51 RESET...51 ADVANCED SETTINGS ...52 HOME THEATER...53 THEATER MODES ...53 WIRELESS SOUND...54 INFO CENTER ...55 SPECIAL EVENT REMINDER ...55 CALENDAR ...56 CARE OF YOUR HITACHI PROJECTION TV AND YOUR REMOTE CONTROL 57 RECEPTION PROBLEMS...57 CHECK...
......45 CLOSED CAPTION ...46 MENU BACKGROUND ...47 VIDEO SETTINGS...47 CONTRAST...48 BRIGHTNESS...48 COLOR...48 TINT ...49 SHARPNESS ...49 RESET...49 ADVANCED SETTINGS ...49 AUDIO SETTINGS ...50 BASS ...51 TREBLE ...51 BALANCE ...51 RESET...51 ADVANCED SETTINGS ...52 HOME THEATER...53 THEATER MODES ...53 WIRELESS SOUND...54 INFO CENTER ...55 SPECIAL EVENT REMINDER ...55 CALENDAR ...56 CARE OF YOUR HITACHI PROJECTION TV AND YOUR REMOTE CONTROL 57 RECEPTION PROBLEMS...57 CHECK...

Owners Guide
Page 3
... are no user serviceable parts inside the receiver. • Model number and serial number are indicated on 120 volts 60 Hz, AC household current. NEVER CONNECT THE TV TO 50 Hz, DIRECT CURRENT, OR ANYTHING OTHER THAN THE SPECIFIED VOLTAGE. NOTE: This television receiver will display television closed captioning ( or ), in the literature accompanying the appliance. POWER SOURCE: This projection color TV is intended to alert the user to operate on the...
... are no user serviceable parts inside the receiver. • Model number and serial number are indicated on 120 volts 60 Hz, AC household current. NEVER CONNECT THE TV TO 50 Hz, DIRECT CURRENT, OR ANYTHING OTHER THAN THE SPECIFIED VOLTAGE. NOTE: This television receiver will display television closed captioning ( or ), in the literature accompanying the appliance. POWER SOURCE: This projection color TV is intended to alert the user to operate on the...
Owners Guide
Page 4
... proper operation of HITACHI television receivers. Do not defeat the safety purpose of the polarized plug. 2 When the power cord or plug is damaged or frayed, unplug this television set yourself as opening or removing covers may result in a shock or fire hazard. 5 Do not attempt to service this can result in the design of these instructions. * Save these instructions for later use. * Follow...
... proper operation of HITACHI television receivers. Do not defeat the safety purpose of the polarized plug. 2 When the power cord or plug is damaged or frayed, unplug this television set yourself as opening or removing covers may result in a shock or fire hazard. 5 Do not attempt to service this can result in the design of these instructions. * Save these instructions for later use. * Follow...

Owners Guide
Page 7
... time, turn the television set "off" and unplug it from the wall outlet. OPERATION OF YOUR SET 19 This television set and call your operating instructions, do not attempt any further adjustment. Adjust only those controls that are not sure of the type of overhead power lines or other controls may result in the vicinity of power supply at your home, consult your television set from battery power, refer to the operating instructions...
... time, turn the television set "off" and unplug it from the wall outlet. OPERATION OF YOUR SET 19 This television set and call your operating instructions, do not attempt any further adjustment. Adjust only those controls that are not sure of the type of overhead power lines or other controls may result in the vicinity of power supply at your home, consult your television set from battery power, refer to the operating instructions...
Owners Guide
Page 8
... your Hitachi Factory Warranty. If the snapping or popping is normal for some TV sets to projection television receivers. PICTURE CAUTIONS - 8 - 23 Whenever the television set is damaged or fails, or a distinct change in performance indicates a need for service, unplug the set and have the same characteristics as the original part. When using the Picture-in-Picture function, the sub-picture should not be sure the service technician has used replacement parts specified...
... your Hitachi Factory Warranty. If the snapping or popping is normal for some TV sets to projection television receivers. PICTURE CAUTIONS - 8 - 23 Whenever the television set is damaged or fails, or a distinct change in performance indicates a need for service, unplug the set and have the same characteristics as the original part. When using the Picture-in-Picture function, the sub-picture should not be sure the service technician has used replacement parts specified...

Owners Guide
Page 12
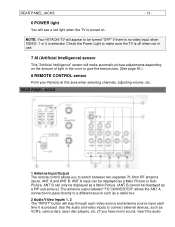
... button when in MENU mode. 5 POWER button Press this button to turn the TV on or off. The volume level will be displayed on the TV. These buttons also serve as the cursor left and right buttons when in MENU mode. 4 CHANNEL selector Press these buttons until the desired channel appears in the top right corner of the TV screen. Consult your desired sound level. FRONT PANEL CONTROLS Click to see front panel diagram. 1 MENU/EXIT button...
... button when in MENU mode. 5 POWER button Press this button to turn the TV on or off. The volume level will be displayed on the TV. These buttons also serve as the cursor left and right buttons when in MENU mode. 4 CHANNEL selector Press these buttons until the desired channel appears in the top right corner of the TV screen. Consult your desired sound level. FRONT PANEL CONTROLS Click to see front panel diagram. 1 MENU/EXIT button...
Owners Guide
Page 13
... selecting channels, adjusting volume, etc. Use the audio and video inputs to connect external devices, such as a Main Picture or SubPicture. NOTE: Your HITACHI TV will step through each video source and antenna source input each time it is pressed. ANT B can be turned "OFF" if there is no video input when VIDEO: 1 or 2 is selected. ANT A input can only be displayed as a Main Picture. (ANT B cannot be displayed as a PIP sub-picture.) The antenna output labeled "TO CONVERTER...
... selecting channels, adjusting volume, etc. Use the audio and video inputs to connect external devices, such as a Main Picture or SubPicture. NOTE: Your HITACHI TV will step through each video source and antenna source input each time it is pressed. ANT B can be turned "OFF" if there is no video input when VIDEO: 1 or 2 is selected. ANT A input can only be displayed as a Main Picture. (ANT B cannot be displayed as a PIP sub-picture.) The antenna output labeled "TO CONVERTER...

Owners Guide
Page 14
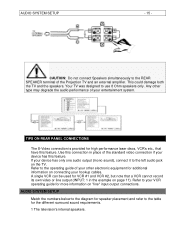
... These jacks provide variable audio output to the TV OFF. REAR PANEL CONNECTIONS - 14 - cable into the hole below the button. They can be controlled by the televisions remote control. 6 Rear Speaker Terminals These terminals are used to connect external speakers, which are used for the Left Speaker. Press the Right Speaker red button and insert the positive (+) lead wire into the left channel jack.) 3 Monitor Out These jacks provide fixed audio and video signals which are used for Audio System Setup.
... These jacks provide variable audio output to the TV OFF. REAR PANEL CONNECTIONS - 14 - cable into the hole below the button. They can be controlled by the televisions remote control. 6 Rear Speaker Terminals These terminals are used to connect external speakers, which are used for the Left Speaker. Press the Right Speaker red button and insert the positive (+) lead wire into the left channel jack.) 3 Monitor Out These jacks provide fixed audio and video signals which are used for Audio System Setup.
Owners Guide
Page 15
... on "line" input-output connections. If your device has only one audio output (mono sound), connect it to the operating guide of your other type may degrade the audio performance of your hookup cables. Use this feature. AUDIO SYSTEM SETUP Match the numbers below to the diagram for the different surround sound requirements. 1 The television's internal speakers. Your TV was designed to the table for speaker placement and refer to use 8 Ohm speakers only...
... on "line" input-output connections. If your device has only one audio output (mono sound), connect it to the operating guide of your other type may degrade the audio performance of your hookup cables. Use this feature. AUDIO SYSTEM SETUP Match the numbers below to the diagram for the different surround sound requirements. 1 The television's internal speakers. Your TV was designed to the table for speaker placement and refer to use 8 Ohm speakers only...

Owners Guide
Page 16
... 2 4 Receive mono and stereo sound. The remote will now control your VCR. (See page 22 for location of the cable/satellite box and press the CABLE button on the TV. THE GENIUS REMOTE CONTROL (CLU-417UI) - 16 - 2 These speakers are connected to the Rear Speaker 8 Ohm output on the remote. EXTERNAL EXT. 2 SPEAKERS 3 4 This feature turns off the TV's internal speakers. * See page 10 for instructions on how to program the remote to control your VCR.) To operate your HITACHI Color TV...
... 2 4 Receive mono and stereo sound. The remote will now control your VCR. (See page 22 for location of the cable/satellite box and press the CABLE button on the TV. THE GENIUS REMOTE CONTROL (CLU-417UI) - 16 - 2 These speakers are connected to the Rear Speaker 8 Ohm output on the remote. EXTERNAL EXT. 2 SPEAKERS 3 4 This feature turns off the TV's internal speakers. * See page 10 for instructions on how to program the remote to control your VCR.) To operate your HITACHI Color TV...

Owners Guide
Page 18
..., the INPUT button will select between the two sets of video input jacks and the ANT A antenna source (ANT B source cannot be displayed as a PIP Sub-Picture.) NOTE: When ANT A is selected, the channel number in the upper right corner of video input jacks each time the button is being controlled. 4 MENU, CURSOR buttons All the On-Screen Display features can also use these buttons. HOW TO USE THE GENIUS REMOTE TO CONTROL YOUR TV - 18...
..., the INPUT button will select between the two sets of video input jacks and the ANT A antenna source (ANT B source cannot be displayed as a PIP Sub-Picture.) NOTE: When ANT A is selected, the channel number in the upper right corner of video input jacks each time the button is being controlled. 4 MENU, CURSOR buttons All the On-Screen Display features can also use these buttons. HOW TO USE THE GENIUS REMOTE TO CONTROL YOUR TV - 18...

Owners Guide
Page 25
... remote. 2. not turn off after performing the above . 4. If your cable/satellite box cannot be operated after performing the above procedures, this means that your cable/satellite box operating guide. 3. The INPUT button will now control your cable box by setting it to CABLE mode. 2 PRECODED CABLE/SATELLITE BOX buttons These buttons transmit the chosen precoded CABLE/Satellite codes. 3 EXCLUSIVE TV buttons These buttons are removed from the remote control. The remote will act as the cable/satellite box ENTER button if required. 6. CABLE...
... remote. 2. not turn off after performing the above . 4. If your cable/satellite box cannot be operated after performing the above procedures, this means that your cable/satellite box operating guide. 3. The INPUT button will now control your cable box by setting it to CABLE mode. 2 PRECODED CABLE/SATELLITE BOX buttons These buttons transmit the chosen precoded CABLE/Satellite codes. 3 EXCLUSIVE TV buttons These buttons are removed from the remote control. The remote will act as the cable/satellite box ENTER button if required. 6. CABLE...

Owners Guide
Page 30
... buttons to make white. PLUG & PLAY Optimum hook up for your system. SIGNAL SOURCE Select Antenna or Cable TV. AUTO CHANNEL SET First time set up for channel buttons. CHANNEL LIST Check channel name, scan, and child lock. Press HELP on the remote control to quickly exit from a menu. 4. ULTRATEC OSD - 30 - CONVERGENCE ADJUST Match red, green and blue colors to highlight a different feature. 3. Press EXIT on the remote control when a menu is displayed, and text will appear giving a description of that menu. CHANNEL MEMORY Channel buttons...
... buttons to make white. PLUG & PLAY Optimum hook up for your system. SIGNAL SOURCE Select Antenna or Cable TV. AUTO CHANNEL SET First time set up for channel buttons. CHANNEL LIST Check channel name, scan, and child lock. Press HELP on the remote control to quickly exit from a menu. 4. ULTRATEC OSD - 30 - CONVERGENCE ADJUST Match red, green and blue colors to highlight a different feature. 3. Press EXIT on the remote control when a menu is displayed, and text will appear giving a description of that menu. CHANNEL MEMORY Channel buttons...
Owners Guide
Page 31
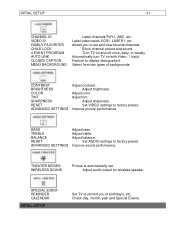
...EVENT PROGRAM AUTO LINK CLOSED CAPTION MENU BACKGROUND Label channels PAY1, ABC, etc. Adjust brightness. Adjust tint. Improve picture performance. Adjust balance. Turn TV on with Video: 1 input. Adjust sharpness. BASS TREBLE BALANCE RESET ADVANCED SETTINGS Adjust bass. Improve sound performance. Check day, month, year and Special Events. Allows you of backgrounds. Feature to factory preset. Adjust treble. Adjust audio output for wireless speaker. INITIAL SETUP - 31 - Block channel picture and sound. Label video inputs VCR1, LASER1, etc. THEATER MODES...
...EVENT PROGRAM AUTO LINK CLOSED CAPTION MENU BACKGROUND Label channels PAY1, ABC, etc. Adjust brightness. Adjust tint. Improve picture performance. Adjust balance. Turn TV on with Video: 1 input. Adjust sharpness. BASS TREBLE BALANCE RESET ADVANCED SETTINGS Adjust bass. Improve sound performance. Check day, month, year and Special Events. Allows you of backgrounds. Feature to factory preset. Adjust treble. Adjust audio output for wireless speaker. INITIAL SETUP - 31 - Block channel picture and sound. Label video inputs VCR1, LASER1, etc. THEATER MODES...

Owners Guide
Page 35
See CHANNEL MEMORY to the remote control CHANNEL or buttons. Remember to select the correct SIGNAL SOURCE mode before using AUTO CHANNEL SET for the second antenna input. If the EXIT button is pressed while the AUTO CHANNEL SET function is engaged, programming will stop. CHANNEL MEMORY Use this function after AUTO CHANNEL SET to add or erase additional channels to add or erase additional channels. INITIAL SETUP - 35 - If two antennas are connected, switch antenna inputs with the INPUT button and repeat AUTO CHANNEL SET for the second antenna input.
See CHANNEL MEMORY to the remote control CHANNEL or buttons. Remember to select the correct SIGNAL SOURCE mode before using AUTO CHANNEL SET for the second antenna input. If the EXIT button is pressed while the AUTO CHANNEL SET function is engaged, programming will stop. CHANNEL MEMORY Use this function after AUTO CHANNEL SET to add or erase additional channels to add or erase additional channels. INITIAL SETUP - 35 - If two antennas are connected, switch antenna inputs with the INPUT button and repeat AUTO CHANNEL SET for the second antenna input.

Owners Guide
Page 38
... picture tubes can be mixed. The output of the three color tubes. Press EXIT to quit menu or CURSOR to return to change position. Properly converged, the lines appear white, which is actually a combination of the outputs of the green tube is called "convergence". To produce these picture beams is stationary. Use CURSOR or buttons to converge (align) the colors. CONVERGENCE ADJUST Your projection TV has three color projection tubes: one for red, one for green, one for blue...
... picture tubes can be mixed. The output of the three color tubes. Press EXIT to quit menu or CURSOR to return to change position. Properly converged, the lines appear white, which is actually a combination of the outputs of the green tube is called "convergence". To produce these picture beams is stationary. Use CURSOR or buttons to converge (align) the colors. CONVERGENCE ADJUST Your projection TV has three color projection tubes: one for red, one for green, one for blue...

Owners Guide
Page 48
... PICTURE SETTINGS AI is selected, you are adjusting CONTRAST. Use CURSOR or to highlight RESET or ADVANCED SETTINGS, then CURSOR to return to adjust the function. The additional menu items BRIGHTNESS, COLOR, TINT, and SHARPNESS can be adjusted. Press EXIT to adjust the level of color in the picture. NOTE: If CONTRAST is OFF. (See page 45.) BRIGHTNESS Use this function to change the contrast between black and white...
... PICTURE SETTINGS AI is selected, you are adjusting CONTRAST. Use CURSOR or to highlight RESET or ADVANCED SETTINGS, then CURSOR to return to adjust the function. The additional menu items BRIGHTNESS, COLOR, TINT, and SHARPNESS can be adjusted. Press EXIT to adjust the level of color in the picture. NOTE: If CONTRAST is OFF. (See page 45.) BRIGHTNESS Use this function to change the contrast between black and white...

Owners Guide
Page 50
... more red, or set to produce a more blue. AUDIO SETTINGS Select AUDIO SETTINGS to adjust the TV to your preference and to produce a clear picture. Automatically monitor and adjust color levels and maintain natural flesh tones. 3. For best picture performance leave the AUTO COLOR function on room lighting (sensor is located in the picture without degrading picture quality. Automatically monitor and adjust contrast depending on . AUTO COLOR The AUTO COLOR function automatically monitors and adjusts the color to control other PREFERENCE SETTINGS. NOISE...
... more red, or set to produce a more blue. AUDIO SETTINGS Select AUDIO SETTINGS to adjust the TV to your preference and to produce a clear picture. Automatically monitor and adjust color levels and maintain natural flesh tones. 3. For best picture performance leave the AUTO COLOR function on room lighting (sensor is located in the picture without degrading picture quality. Automatically monitor and adjust contrast depending on . AUTO COLOR The AUTO COLOR function automatically monitors and adjusts the color to control other PREFERENCE SETTINGS. NOISE...

Owners Guide
Page 57
... not subject the remote control to cease operation. Excessive heat or moisture may be used if the screen is set . Exposure of time, for instance, when you go on the floor, etc. CARE OF YOUR HITACHI PROJECTION TV AND YOUR REMOTE CONTROL DO Dust the screen and cabinet with two fresh "AA" size batteries. Replace the old batteries with a soft cloth. RECEPTION PROBLEMS Clean the screen with a soft...
... not subject the remote control to cease operation. Excessive heat or moisture may be used if the screen is set . Exposure of time, for instance, when you go on the floor, etc. CARE OF YOUR HITACHI PROJECTION TV AND YOUR REMOTE CONTROL DO Dust the screen and cabinet with two fresh "AA" size batteries. Replace the old batteries with a soft cloth. RECEPTION PROBLEMS Clean the screen with a soft...


