Owners Guide
Page 1
PROJECTION COLOR TV 43GX01B OPERATING GUIDE TABLE OF CONTENTS IMPORTANT ...2 SAFETY TIPS...3 PICTURE CAUTIONS ...6 ACCESSORIES...6 REMOTE CONTROL BATTERY INSTALLATION AND REPLACEMENT 7 HOW TO SET UP YOUR NEW HITACHI PROJECTION TV 8 HOOK-UP CABLES AND CONNECTORS 9 FRONT PANEL CONTROLS...10 FIRST TIME USE ...11 REAR SPEAKER TERMINAL CONNECTIONS 12 ... THE GENIUS REMOTE CONTROL (CLU-436UI 17 HOW TO USE THE GENIUS REMOTE TO CONTROL YOUR TV 18 HOW TO USE THE REMOTE TO CONTROL YOUR TV 20 PICTURE-IN-PICTURE (PIP 21 USING THE REMOTE TO CONTROL VCR FUNCTIONS 24 USING THE REMOTE TO CONTROL CABLE ...
PROJECTION COLOR TV 43GX01B OPERATING GUIDE TABLE OF CONTENTS IMPORTANT ...2 SAFETY TIPS...3 PICTURE CAUTIONS ...6 ACCESSORIES...6 REMOTE CONTROL BATTERY INSTALLATION AND REPLACEMENT 7 HOW TO SET UP YOUR NEW HITACHI PROJECTION TV 8 HOOK-UP CABLES AND CONNECTORS 9 FRONT PANEL CONTROLS...10 FIRST TIME USE ...11 REAR SPEAKER TERMINAL CONNECTIONS 12 ... THE GENIUS REMOTE CONTROL (CLU-436UI 17 HOW TO USE THE GENIUS REMOTE TO CONTROL YOUR TV 18 HOW TO USE THE REMOTE TO CONTROL YOUR TV 20 PICTURE-IN-PICTURE (PIP 21 USING THE REMOTE TO CONTROL VCR FUNCTIONS 24 USING THE REMOTE TO CONTROL CABLE ...

Owners Guide
Page 6
..."PATTERN BURN" may develop over a long period of programs broadcast by TV stations and cable companies, as well as the original part. Public Viewing of Copyrighted Material Public viewing of time. PICTURE CAUTIONS Picture Burn Prevention • Continuous on or off. If the snapping or ...television, ask the service technician to perform routine safety checks to determine that you are NOT COVERED by your HITACHI Factory Warranty. • When using Picture-in fire, electric shock, or other hazards. 27 Upon completion of any further adjustment. Unauthorized substitutions may ...
..."PATTERN BURN" may develop over a long period of programs broadcast by TV stations and cable companies, as well as the original part. Public Viewing of Copyrighted Material Public viewing of time. PICTURE CAUTIONS Picture Burn Prevention • Continuous on or off. If the snapping or ...television, ask the service technician to perform routine safety checks to determine that you are NOT COVERED by your HITACHI Factory Warranty. • When using Picture-in fire, electric shock, or other hazards. 27 Upon completion of any further adjustment. Unauthorized substitutions may ...
Owners Guide
Page 8
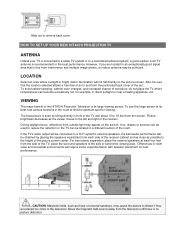
... too close as those of the picture screen center. VIEWING The major benefit of the HITACHI Projection Television is its best, test various locations in a different section of the receiver. Picture brightness decreases as the viewer moves to reduce the reflection or the TV can be located in the room ...external speakers, may be used to the left and right of the room. HOW TO SET UP YOUR NEW HITACHI PROJECTION TV ANTENNA Unless your TV is connected to a cable TV system or to remove back cover. LOCATION Select an area where sunlight or bright indoor illumination will not fall directly...
... too close as those of the picture screen center. VIEWING The major benefit of the HITACHI Projection Television is its best, test various locations in a different section of the receiver. Picture brightness decreases as the viewer moves to reduce the reflection or the TV can be located in the room ...external speakers, may be used to the left and right of the room. HOW TO SET UP YOUR NEW HITACHI PROJECTION TV ANTENNA Unless your TV is connected to a cable TV system or to remove back cover. LOCATION Select an area where sunlight or bright indoor illumination will not fall directly...
Owners Guide
Page 9
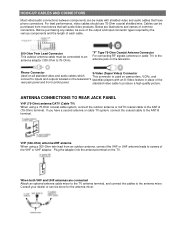
Below are connected Attach an optional antenna cable mixer to the TV antenna terminal, and connect the cables to the antenna mixer. For best ...VHF (75-Ohm) antenna/CATV (Cable TV) When using a 300-Ohm twin lead from most stores that have a second antenna or cable TV system, connect the coaxial cable to the antenna jack on the TV. Consult your dealer or service store ...for the antenna mixer. "F" Type 75-Ohm Coaxial Antenna Connector For connecting RF signals (antenna or cable TV) to the ANT B terminal. VHF (300-Ohm) antenna/UHF antenna When using a 75-Ohm coaxial cable ...
Below are connected Attach an optional antenna cable mixer to the TV antenna terminal, and connect the cables to the antenna mixer. For best ...VHF (75-Ohm) antenna/CATV (Cable TV) When using a 300-Ohm twin lead from most stores that have a second antenna or cable TV system, connect the coaxial cable to the antenna jack on the TV. Consult your dealer or service store ...for the antenna mixer. "F" Type 75-Ohm Coaxial Antenna Connector For connecting RF signals (antenna or cable TV) to the ANT B terminal. VHF (300-Ohm) antenna/UHF antenna When using a 75-Ohm coaxial cable ...
Owners Guide
Page 11
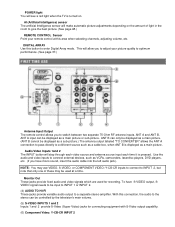
... 2 With this connection, the audio to enter Digital Array mode. AI (Artificial Intelligence) sensor The artificial Intelligence sensor will make automatic picture adjustments depending on . Audio/Video Inputs 1and 2 The INPUT button will step through each video source and antenna source input each time ... Use this area when selecting channels, adjusting volume, etc. POWER light You will see a red light when the TV is pressed. ANT B can be displayed as a sub-picture.) The antenna output labeled "TO CONVERTER" allows the ANT A connection to pass directly to adjust your remote control at...
... 2 With this connection, the audio to enter Digital Array mode. AI (Artificial Intelligence) sensor The artificial Intelligence sensor will make automatic picture adjustments depending on . Audio/Video Inputs 1and 2 The INPUT button will step through each video source and antenna source input each time ... Use this area when selecting channels, adjusting volume, etc. POWER light You will see a red light when the TV is pressed. ANT B can be displayed as a sub-picture.) The antenna output labeled "TO CONVERTER" allows the ANT A connection to pass directly to adjust your remote control at...
Owners Guide
Page 12
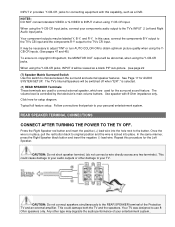
...may degrade the audio performance of the Projection TV and an external amplifier. CAUTION: Do not connect speakers simultaneously to the TV's CR input. Your TV was designed to the button. Use speaker with this capability, such as a blank PIP sub-picture. (see page 22 (7) Speaker Matrix ...Surround Switch Use this switch to the TV's INPUT 2 Left and Right Audio input jacks...
...may degrade the audio performance of the Projection TV and an external amplifier. CAUTION: Do not connect speakers simultaneously to the TV's CR input. Your TV was designed to the button. Use speaker with this capability, such as a blank PIP sub-picture. (see page 22 (7) Speaker Matrix ...Surround Switch Use this switch to the TV's INPUT 2 Left and Right Audio input jacks...
Owners Guide
Page 13
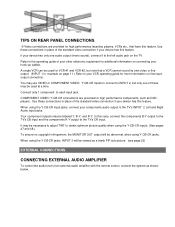
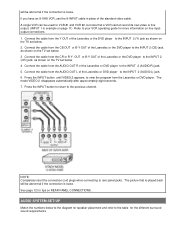
..., when using the Y-CB-CR input jacks, connect your hook-up cables. Your component outputs may be viewed as a blank PIP sub-picture. (see page 22) EXTERNAL CONNECTIONS CONNECTING EXTERNAL AUDIO AMPLIFIER To control the audio level of an external audio amplifier with the remote control, ... MONITOR OUT output will be used for high performance components, such as shown below. In this feature. Connect only 1 component to the TV's CR input. If your device has only one of the standard video connection if your other electronic equipment for more information on line inputoutput...
..., when using the Y-CB-CR input jacks, connect your hook-up cables. Your component outputs may be viewed as a blank PIP sub-picture. (see page 22) EXTERNAL CONNECTIONS CONNECTING EXTERNAL AUDIO AMPLIFIER To control the audio level of an external audio amplifier with the remote control, ... MONITOR OUT output will be used for high performance components, such as shown below. In this feature. Connect only 1 component to the TV's CR input. If your device has only one of the standard video connection if your other electronic equipment for more information on line inputoutput...
Owners Guide
Page 15
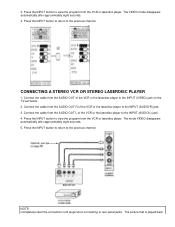
... the INPUT button to view the program from the AUDIO OUT of the VCR or the laserdisc player to the INPUT (VIDEO) jack on the TV set below. 2. Connect the cable from the VCR or laserdisc player. The mode VIDEO disappears automatically after approximately eight seconds. 4. 3. The VIDEO mode disappears automatically.... Press the INPUT button to return to view the program from the VCR or laserdisc player. Press the INPUT button to the previous channel. The picture that is played back
... the INPUT button to view the program from the AUDIO OUT of the VCR or the laserdisc player to the INPUT (VIDEO) jack on the TV set below. 2. Connect the cable from the VCR or laserdisc player. The mode VIDEO disappears automatically after approximately eight seconds. 4. 3. The VIDEO mode disappears automatically.... Press the INPUT button to return to view the program from the VCR or laserdisc player. Press the INPUT button to the previous channel. The picture that is played back
Owners Guide
Page 16
...connections. 1. Connect the cable from the AUDIO OUT R of the Laserdisc or the DVD player to your VCR operating guide for tips on the TV set below. 3. The picture that a VCR cannot record its own video or line output. (INPUT 1 in place of the Laserdisc or DVD player to the previous channel...player. will be abnormal if the connection is loose. Press the INPUT button until VIDEO:2 appears, to the INPUT 2 (CR) jack, as shown on the TV set below . 2. AUDIO SYSTEM SET-UP Match the numbers below to the diagram for speaker placement and refer to the INPUT 2 (CB) jack, as ...
...connections. 1. Connect the cable from the AUDIO OUT R of the Laserdisc or the DVD player to your VCR operating guide for tips on the TV set below. 3. The picture that a VCR cannot record its own video or line output. (INPUT 1 in place of the Laserdisc or DVD player to the previous channel...player. will be abnormal if the connection is loose. Press the INPUT button until VIDEO:2 appears, to the INPUT 2 (CR) jack, as shown on the TV set below . 2. AUDIO SYSTEM SET-UP Match the numbers below to the diagram for speaker placement and refer to the INPUT 2 (CB) jack, as ...
Owners Guide
Page 19
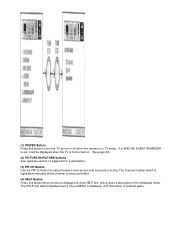
... controlled. (4) HELP Button Press this button when a menu is in TV mode. The HELP text will be displayed every time a MENU is displayed, until this button is first turned on. (See page 52). (2) PICTURE-IN-PICTURE buttons See separate section on or off when the remote is displayed to... select between main picture and sub-picture tuning. The channel number which is highlighted indicates which gives a description of the displayed menu. (1) POWER Button Press this button to turn the TV set , it will be displayed when the TV is pressed again.
... controlled. (4) HELP Button Press this button when a menu is in TV mode. The HELP text will be displayed every time a MENU is displayed, until this button is first turned on. (See page 52). (2) PICTURE-IN-PICTURE buttons See separate section on or off when the remote is displayed to... select between main picture and sub-picture tuning. The channel number which is highlighted indicates which gives a description of the displayed menu. (1) POWER Button Press this button to turn the TV set , it will be displayed when the TV is pressed again.
Owners Guide
Page 20
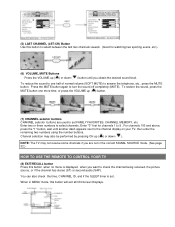
.../RECALL button Press this button will exit all ON-Screen Displays. Press the MUTE button again to check the channel being received, the picture source, or if the channel has stereo (ST) or second audio (SAP). To restore the sound, press the MUTE button one half of normal volume ...using the number buttons. For channels 100 and above, press the "1" button, wait until you want to turn the sound off completely (MUTE). NOTE: The TV may also be performed by pressing CH up ( ) button. (7) CHANNEL selector buttons CHANNEL selector buttons are not in MENU mode, this button when no ...
.../RECALL button Press this button will exit all ON-Screen Displays. Press the MUTE button again to check the channel being received, the picture source, or if the channel has stereo (ST) or second audio (SAP). To restore the sound, press the MUTE button one half of normal volume ...using the number buttons. For channels 100 and above, press the "1" button, wait until you want to turn the sound off completely (MUTE). NOTE: The TV may also be performed by pressing CH up ( ) button. (7) CHANNEL selector buttons CHANNEL selector buttons are not in MENU mode, this button when no ...
Owners Guide
Page 21
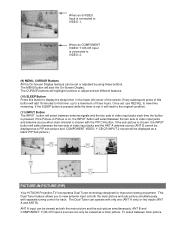
The MENU button will be viewed as a blank PIP Sub picture.) PICTURE-IN-PICTURE (PIP) Your HITACHI Projection TV incorporates Dual Tuner technology designed for each time the button is chosen with the PIP CH button. To select between antenna signals and the two ...sets of video input jacks each . Every subsequent press of this button will select between the two sets of the screen. If the sub-picture...
The MENU button will be viewed as a blank PIP Sub picture.) PICTURE-IN-PICTURE (PIP) Your HITACHI Projection TV incorporates Dual Tuner technology designed for each time the button is chosen with the PIP CH button. To select between antenna signals and the two ...sets of video input jacks each . Every subsequent press of this button will select between the two sets of the screen. If the sub-picture...

Owners Guide
Page 22
Every press of the PIP CH will appear as a blank sub-picture. You can watch a TV program while viewing other programs from the ANT A source or any of picture tuning is convenient when you want to remove the sub-picture from the screen. Pres the PIP button a third time to watch more than one ... (those set in one of the two different modes (SINGLE or SURF), depending on the remote. Use the PIP CH button to remote the sub-pictures from the screen. Press the PIP button a second time to select between VIDEO: 1, VIDEO: 2, and ANT A antenna source. (ANT B source cannot be viewed as ...
Every press of the PIP CH will appear as a blank sub-picture. You can watch a TV program while viewing other programs from the ANT A source or any of picture tuning is convenient when you want to remove the sub-picture from the screen. Pres the PIP button a third time to watch more than one ... (those set in one of the two different modes (SINGLE or SURF), depending on the remote. Use the PIP CH button to remote the sub-pictures from the screen. Press the PIP button a second time to select between VIDEO: 1, VIDEO: 2, and ANT A antenna source. (ANT B source cannot be viewed as ...
Owners Guide
Page 23
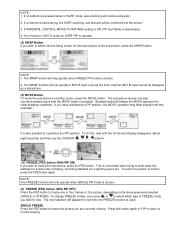
...TV RATINGS setting is ON, PIP Surf Mode is also possible to the sub-picture, press the SWAP button. You must be removed from this , wait until the On-Screen Display disappears (about eight seconds) and then use cursor or to select which type of the picture, depending on the main picture... time the FREEZE function is pressed. (Example below illustrates the MOVE operation for initial shipping conditions. To do this example). To return the picture to normal viewing. If a channel is tuned during this button again or PIP to return to motion, press the FRZ button again. The...
...TV RATINGS setting is ON, PIP Surf Mode is also possible to the sub-picture, press the SWAP button. You must be removed from this , wait until the On-Screen Display disappears (about eight seconds) and then use cursor or to select which type of the picture, depending on the main picture... time the FREEZE function is pressed. (Example below illustrates the MOVE operation for initial shipping conditions. To do this example). To return the picture to normal viewing. If a channel is tuned during this button again or PIP to return to motion, press the FRZ button again. The...

Owners Guide
Page 31
... video inputs VCR1, DVD1, etc. Feature to remind you of backgrounds. Block channel picture and sound. Improve picture performance. BASS TREBLE BALANCE RESET ADVANCE SETTINGS Adjust bass. Improve sound performance. SPECIAL EVENT REMINDER Set TV to display dialogue/text. Set AUDIO settings to basic TV functions. Introduces you to highlight the function desired. Turn...
... video inputs VCR1, DVD1, etc. Feature to remind you of backgrounds. Block channel picture and sound. Improve picture performance. BASS TREBLE BALANCE RESET ADVANCE SETTINGS Adjust bass. Improve sound performance. SPECIAL EVENT REMINDER Set TV to display dialogue/text. Set AUDIO settings to basic TV functions. Introduces you to highlight the function desired. Turn...
Owners Guide
Page 36
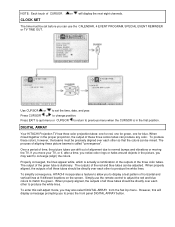
...color rings or halos around objects in the proper proportion, the output of these picture beams is stationary. When properly aligned, the outputs of all three tubes should be adjusted. DIGITAL ARRAY Your HITACHI Projection TV has three color projection tubes: one for red, one for green, one ...for blue. To enter this will display the next eight channels. The outputs of the red and blue tubes can produce any color. To simplify convergence, HITACHI incorporates a feature ...
...color rings or halos around objects in the proper proportion, the output of these picture beams is stationary. When properly aligned, the outputs of all three tubes should be adjusted. DIGITAL ARRAY Your HITACHI Projection TV has three color projection tubes: one for red, one for green, one ...for blue. To enter this will display the next eight channels. The outputs of the red and blue tubes can produce any color. To simplify convergence, HITACHI incorporates a feature ...

Owners Guide
Page 41
...function the CURSOR button to set the BEGIN and END times and the TV cannot be blocked out. MOVIE/TV RATINGS are explained in detail in the Parental Control Movie/TV Ratings Reference Guide. This will appear as black sub-pictures. 2. Press EXIT to remove FAMILY FAVORITES OSD from being viewed for all... VIDEO LOCK is turned on the front panel will be deactivated, except the POWER button. The code to select secret code. When TV TIME OUT is turned on, the picture and sound for channels 3, 4 on , you must be blocked out. When CHANNEL is turned on both ANT A/B and all buttons on ...
...function the CURSOR button to set the BEGIN and END times and the TV cannot be blocked out. MOVIE/TV RATINGS are explained in detail in the Parental Control Movie/TV Ratings Reference Guide. This will appear as black sub-pictures. 2. Press EXIT to remove FAMILY FAVORITES OSD from being viewed for all... VIDEO LOCK is turned on the front panel will be deactivated, except the POWER button. The code to select secret code. When TV TIME OUT is turned on, the picture and sound for channels 3, 4 on , you must be blocked out. When CHANNEL is turned on both ANT A/B and all buttons on ...

Owners Guide
Page 44
...TOUR This function introduces you to the First Time Tour Setup Feature, showing you are viewing. This feature will be displayed every time your TV or Home Theater System. After 10 seconds Auto Demo will appear. DISPLAY: ON/OFF will turn the display on , unless you to previous...to change the function. NOTE: If you set FIRST TIME TOUR to previous menu. This information covers the entire screen and viewing the TV program is visible (no picture can be available with every program. TEXT may vary by region). MODE: C.C. (Closed Caption) is for a second language (may not...
...TOUR This function introduces you to the First Time Tour Setup Feature, showing you are viewing. This feature will be displayed every time your TV or Home Theater System. After 10 seconds Auto Demo will appear. DISPLAY: ON/OFF will turn the display on , unless you to previous...to change the function. NOTE: If you set FIRST TIME TOUR to previous menu. This information covers the entire screen and viewing the TV program is visible (no picture can be available with every program. TEXT may vary by region). MODE: C.C. (Closed Caption) is for a second language (may not...

Owners Guide
Page 45
.... buttons to highlight the function to change the contrast between black and white levels in the picture. When TV set to adjust the level of color in the picture. TINT Use this function to ON. 2. These adjustments will always appear if it is set is turned on, the FIRST TIME TOUR will... not affect the sub-picture. Use CURSOR or then CURSOR to obtain optimum picture quality when using the ...
.... buttons to highlight the function to change the contrast between black and white levels in the picture. When TV set to adjust the level of color in the picture. TINT Use this function to ON. 2. These adjustments will always appear if it is set is turned on, the FIRST TIME TOUR will... not affect the sub-picture. Use CURSOR or then CURSOR to obtain optimum picture quality when using the ...
Owners Guide
Page 46
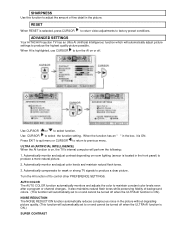
... menu. When AI is highlighted, use CURSOR to turn the AI on , the TV's internal computer will automatically adjust picture settings to produce the highest quality picture possible. Press EXIT to quit menu or CURSOR to return to maintain constant color levels...cannot be turned off when the ULTRA AI function is located in the picture without degrading picture quality. (This function will automatically set to produce a more natural picture. 2. ADVANCED SETTINGS Your HITACHI Projection TV has an Ultra AI (Artificial Intelligence) function which will perform the following:...
... menu. When AI is highlighted, use CURSOR to turn the AI on , the TV's internal computer will automatically adjust picture settings to produce the highest quality picture possible. Press EXIT to quit menu or CURSOR to return to maintain constant color levels...cannot be turned off when the ULTRA AI function is located in the picture without degrading picture quality. (This function will automatically set to produce a more natural picture. 2. ADVANCED SETTINGS Your HITACHI Projection TV has an Ultra AI (Artificial Intelligence) function which will perform the following:...


