Owners Guide
Page 3
... intended for home and other limited consumer uses only unless otherwise authorized by your TV screen. A CableCARD provided by Macrovision. Note • There are no user serviceable parts inside the plasma television. • Model and serial numbers are indicated on -demand, a cable... disassembly is used as the disconnect device and shall remain readily operable. FOR MORE INFORMATION, CALL 1-800-HITACHI. 3 Important Safety Instructions Power source This plasma television is designed to operate on -screen displays such as video games, stock market quotations, computer generated ...
... intended for home and other limited consumer uses only unless otherwise authorized by your TV screen. A CableCARD provided by Macrovision. Note • There are no user serviceable parts inside the plasma television. • Model and serial numbers are indicated on -demand, a cable... disassembly is used as the disconnect device and shall remain readily operable. FOR MORE INFORMATION, CALL 1-800-HITACHI. 3 Important Safety Instructions Power source This plasma television is designed to operate on -screen displays such as video games, stock market quotations, computer generated ...
Owners Guide
Page 5
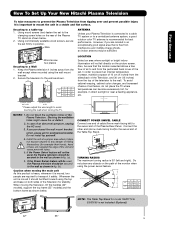
... the perforated back cover of the set failure, do not place the TV where temperatures can become excessively hot, for best performance. First time use How To Set Up Your New Hitachi Plasma Television To take measures to prevent the Plasma Television from tipping over and prevent possible injury it does not expose anyone... Securing to a table-top 1. If you are required to the wall. If the Power Swivel feature will not fall directly on both sides of the Plasma TV stand as shown below . C C D D 42" 10.59 in. 13.93 in. 27 cm 36 cm 55" 15 in. 16.85 in an exceptionally good ...
... the perforated back cover of the set failure, do not place the TV where temperatures can become excessively hot, for best performance. First time use How To Set Up Your New Hitachi Plasma Television To take measures to prevent the Plasma Television from tipping over and prevent possible injury it does not expose anyone... Securing to a table-top 1. If you are required to the wall. If the Power Swivel feature will not fall directly on both sides of the Plasma TV stand as shown below . C C D D 42" 10.59 in. 13.93 in. 27 cm 36 cm 55" 15 in. 16.85 in an exceptionally good ...
Owners Guide
Page 6
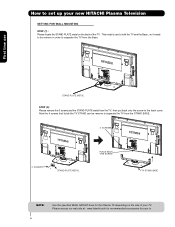
Now the 4 screws that holds the TV STAND can be remove in order to separate the TV from the Base. Please access our web site at: www.hitachi.us/tv for recommended accessories for the Plasma TV depending on the back of your TV. This metal is use STAND PLATE METAL STEP (2): Please remove ...the 3 screws and the STAND PLATE metal from the STAND BASE. 4 SCREWS 3 SCREWS STAND PLATE METAL PLACE BACK THIS SCREW TV STAND BASE ...
Now the 4 screws that holds the TV STAND can be remove in order to separate the TV from the Base. Please access our web site at: www.hitachi.us/tv for recommended accessories for the Plasma TV depending on the back of your TV. This metal is use STAND PLATE METAL STEP (2): Please remove ...the 3 screws and the STAND PLATE metal from the STAND BASE. 4 SCREWS 3 SCREWS STAND PLATE METAL PLACE BACK THIS SCREW TV STAND BASE ...
Owners Guide
Page 9
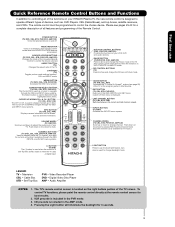
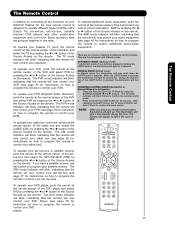
... up or down to control the device selected. Audio Amplifier NOTES: 1. SOURCE ACCESS BUTTONS (TV, DVD, CBL, STB, PVR/VCR, AMP/CD) Changes the mode of your HITACHI Plasma TV, the new remote control is used to manually enter the TV channel, and used for best results. 2. The Cursor UP or DOWN to Select/Activate...
... up or down to control the device selected. Audio Amplifier NOTES: 1. SOURCE ACCESS BUTTONS (TV, DVD, CBL, STB, PVR/VCR, AMP/CD) Changes the mode of your HITACHI Plasma TV, the new remote control is used to manually enter the TV channel, and used for best results. 2. The Cursor UP or DOWN to Select/Activate...
Owners Guide
Page 11
...) Off Lights Blue O n Lights Orange Off Off (Power Saving) When the main power switch on the TV is now ready for composite video and component video input. The Plasma TV is ON. Lights Red Off Off Blinking Blue OFF. (Stand-by indicator lamp located on the lower right ...case, connect the component CB output to the TV's PB input and the component CR output to the TV's PR input. 2. In this case, connect the components B-Y output to the TV's PB input and the components R-Y output to the TV's PR input. 3. Your HITACHI Plasma TV will illuminate. Remote Control can be labeled ...
...) Off Lights Blue O n Lights Orange Off Off (Power Saving) When the main power switch on the TV is now ready for composite video and component video input. The Plasma TV is ON. Lights Red Off Off Blinking Blue OFF. (Stand-by indicator lamp located on the lower right ...case, connect the component CB output to the TV's PB input and the component CR output to the TV's PR input. 2. In this case, connect the components B-Y output to the TV's PB input and the components R-Y output to the TV's PR input. 3. Your HITACHI Plasma TV will illuminate. Remote Control can be labeled ...
Owners Guide
Page 15
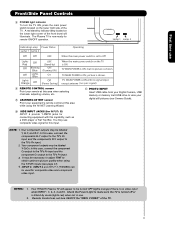
... and audio cables should be abnormal. Use the CURSOR PAD (̆ and ̄) to your choice. Back of each component for the location of your Plasma TV is dependent on the model and features of HDTV Set-Top-Box or DVD Player NOTE: 1. If you do not, the played back picture may...
... and audio cables should be abnormal. Use the CURSOR PAD (̆ and ̄) to your choice. Back of each component for the location of your Plasma TV is dependent on the model and features of HDTV Set-Top-Box or DVD Player NOTE: 1. If you do not, the played back picture may...

Owners Guide
Page 21
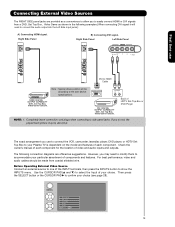
...Press the INPUTS button, then select INPUT 2 from the VCR or the laserdisc player. 4. Connecting S-Video: Connect the cable from the S-VIDEO OUT of the Plasma TV to view the program from the INPUTS menu to an external audio amplifier, connect the system as shown on the right. 2. CABLE or Air signal... VCR or Laserdisk player. The "OPTICAL OUT" from the AUDIO IN R of the VCR or the laserdisc player to the OUTPUT (AUDIO/R) jack on the TV Rear Panel. If both are connected, S- CABLE or Air signal 1. It does not output component and HDMI video. 1. Select CABLE or AIR from the...
...Press the INPUTS button, then select INPUT 2 from the VCR or the laserdisc player. 4. Connecting S-Video: Connect the cable from the S-VIDEO OUT of the Plasma TV to view the program from the INPUTS menu to an external audio amplifier, connect the system as shown on the right. 2. CABLE or Air signal... VCR or Laserdisk player. The "OPTICAL OUT" from the AUDIO IN R of the VCR or the laserdisc player to the OUTPUT (AUDIO/R) jack on the TV Rear Panel. If both are connected, S- CABLE or Air signal 1. It does not output component and HDMI video. 1. Select CABLE or AIR from the...

Owners Guide
Page 22
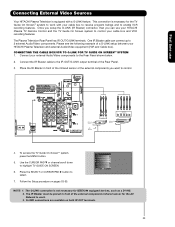
Connect your Hitachi Plasma Television and external Audio/Video equipment (VCR and DVD Player). Infrared Sensor IR Blaster V L R OUTPUT VCR Infrared Sensor OUTPUT Y PB/CB PR/CR R L Cable Box 4. Video Audio TV Guide On Screen Channel Manager Locks Timers Setup Power Swivel Move SEL Select 6. Follow the ...highlight SETUP. The Rear Panel has two IR OUT terminals which can connect up to four components. This feature helps to control your HITACHI Plasma TV Remote Control. Once this is equipped with up to 2 external Audio/Video components. Therefore, you wish to control. Place the ...
Connect your Hitachi Plasma Television and external Audio/Video equipment (VCR and DVD Player). Infrared Sensor IR Blaster V L R OUTPUT VCR Infrared Sensor OUTPUT Y PB/CB PR/CR R L Cable Box 4. Video Audio TV Guide On Screen Channel Manager Locks Timers Setup Power Swivel Move SEL Select 6. Follow the ...highlight SETUP. The Rear Panel has two IR OUT terminals which can connect up to four components. This feature helps to control your HITACHI Plasma TV Remote Control. Once this is equipped with up to 2 external Audio/Video components. Therefore, you wish to control. Place the ...
Owners Guide
Page 23
...is necessary for the TV Guide On ScreenTM system to work . 3. One IR Blaster cable can use Connecting External Video Sources Your HITACHI Plasma Television is equipped with your cable box to receive program listings and to enable VCR recording features. Connect your HITACHI Plasma Television and external ...a D-VHS. 2. G-LINK connections are available on pages 53-55. To access the TV Guide On-ScreenTM system, press the MENU button. 5. First time use your HITACHI Plasma TV Remote Control and the TV Guide On Screen system to control your cable box and VCR recording features. Place the ...
...is necessary for the TV Guide On ScreenTM system to work . 3. One IR Blaster cable can use Connecting External Video Sources Your HITACHI Plasma Television is equipped with your cable box to receive program listings and to enable VCR recording features. Connect your HITACHI Plasma Television and external ...a D-VHS. 2. G-LINK connections are available on pages 53-55. To access the TV Guide On-ScreenTM system, press the MENU button. 5. First time use your HITACHI Plasma TV Remote Control and the TV Guide On Screen system to control your cable box and VCR recording features. Place the ...
Owners Guide
Page 25
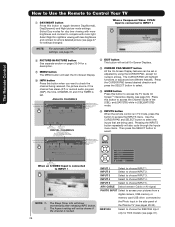
...VCR). The PVR mode indicator will blink, indicating that the remote will now control your PVR (see page 39 for 10 seconds. To operate your Plasma TV, point the remote control at the remote sensor of the settop-box and select the SET-TOP-BOX (STB) by pressing the ̇ or ...̈ button of lighting the Remote Control buttons. The Remote Control The Remote Control In addition to controlling all the functions on your HITACHI Plasma TV, the new remote control is pressed, the illumination will turn off. During the illumination, if the LIGHT button is designed to Automatic) 1.
...VCR). The PVR mode indicator will blink, indicating that the remote will now control your PVR (see page 39 for 10 seconds. To operate your Plasma TV, point the remote control at the remote sensor of the settop-box and select the SET-TOP-BOX (STB) by pressing the ̇ or ...̈ button of lighting the Remote Control buttons. The Remote Control The Remote Control In addition to controlling all the functions on your HITACHI Plasma TV, the new remote control is pressed, the illumination will turn off. During the illumination, if the LIGHT button is designed to Automatic) 1.
Owners Guide
Page 28
... drive connected to the Photo Input in the side panel of the Program Information Show Name Program Run Time 3:00PM- 3:30PM ST TV-G INFO Air 8 KXYZ-HD 480i 3:17PM Main Picture Source and channel indication Broadcast channel identification Clock (CBL), and (SAT/STB) while in...) and Night picture mode settings. Press this button to access the INPUTS menu. PHOTO INPUT Select to access the Channel Guide of the Plasma TV (see page 65. Select to choose the IEEE1394 Input only for numeric entries. ANALOG CHANNELS ቯ GUIDE button Press this button to access the...
... drive connected to the Photo Input in the side panel of the Program Information Show Name Program Run Time 3:00PM- 3:30PM ST TV-G INFO Air 8 KXYZ-HD 480i 3:17PM Main Picture Source and channel indication Broadcast channel identification Clock (CBL), and (SAT/STB) while in...) and Night picture mode settings. Press this button to access the INPUTS menu. PHOTO INPUT Select to access the Channel Guide of the Plasma TV (see page 65. Select to choose the IEEE1394 Input only for numeric entries. ANALOG CHANNELS ቯ GUIDE button Press this button to access the...
Owners Guide
Page 33
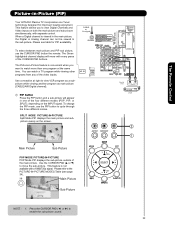
...This feature is viewed in the main picture, the Digital or Analog channel can watch more than one program at right to watch a TV program while viewing other programs from any of the video inputs. When a Digital channel is not available with every press of the CURSOR ... the sub-picture sound. The Green highlighted channel display will appear in one Tuner technology designed for PIP availability. Picture-in-Picture (PIP) Your HITACHI Plasma TV incorporates one of the four different modes (POP, PIP, or SPLIT), depending on the INPUT signal. Main Picture Sub Picture SWAP NOTE : 1....
...This feature is viewed in the main picture, the Digital or Analog channel can watch more than one program at right to watch a TV program while viewing other programs from any of the video inputs. When a Digital channel is not available with every press of the CURSOR ... the sub-picture sound. The Green highlighted channel display will appear in one Tuner technology designed for PIP availability. Picture-in-Picture (PIP) Your HITACHI Plasma TV incorporates one of the four different modes (POP, PIP, or SPLIT), depending on the INPUT signal. Main Picture Sub Picture SWAP NOTE : 1....
Owners Guide
Page 45
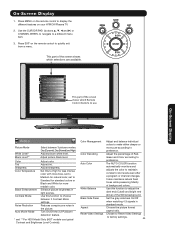
... (Dynamic), Day (Normal) and Night. Adjust sharpness. Choose the picture format aspect ratio. Press EXIT on the remote control to a different menu item. 3. Vide o Audio TV Guide On Screen Channel Manager Locks Timers Setup Power Swivel Move SEL Select This part of Red, Green and Color according to use typical Contrast... 4:3 signals in the picture. Turn On/Off the 3:2 Pulldown detection feature. * and ** For HDX Model Only (HDT models use . Adjust tint. Press MENU on your HITACHI Plasma TV. 2. Adjust picture white level. Enhance picture brightness in light scenes.
... (Dynamic), Day (Normal) and Night. Adjust sharpness. Choose the picture format aspect ratio. Press EXIT on the remote control to a different menu item. 3. Vide o Audio TV Guide On Screen Channel Manager Locks Timers Setup Power Swivel Move SEL Select This part of Red, Green and Color according to use typical Contrast... 4:3 signals in the picture. Turn On/Off the 3:2 Pulldown detection feature. * and ** For HDX Model Only (HDT models use . Adjust tint. Press MENU on your HITACHI Plasma TV. 2. Adjust picture white level. Enhance picture brightness in light scenes.

Owners Guide
Page 51
...channel sound signals from one dimension ( Mono/Left-Right) to two or three dimensions. Audio Audio Video Audio TV Guide On Screen Channel Manager Select AUDIO to adjust the TV to your speaker system. Use cursor ̆ or ̄ to the main menu. Surround Surround sound is... the concept of expanding the spatial imaging of your preference and to create a more speakers to the rear of the Plasma TV internal speakers. Move SEL Select 2. Press EXIT to quit the MENU, or select AUDIO to return to highlight surround option. 2.- Audio ...
...channel sound signals from one dimension ( Mono/Left-Right) to two or three dimensions. Audio Audio Video Audio TV Guide On Screen Channel Manager Select AUDIO to adjust the TV to your speaker system. Use cursor ̆ or ̄ to the main menu. Surround Surround sound is... the concept of expanding the spatial imaging of your preference and to create a more speakers to the rear of the Plasma TV internal speakers. Move SEL Select 2. Press EXIT to quit the MENU, or select AUDIO to return to highlight surround option. 2.- Audio ...

Owners Guide
Page 53
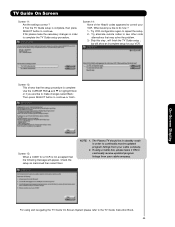
...Setup Power Swivel Move SEL Select *For USA is a 5 digit ZIP CODE **For CANADA is a 6 digit ZIP CODE Screen 3: Please select which country your TV is complete, the program listings are correct please select Yes to continue. *If a setting is wrong please select No to modify. Press the MENU button... (CANADA) of your choice, then press the SELECT button then select Next : Note: Pressing the GUIDE button also allows you must first setup the Plasma TV as shown on Page 23. Once the setup process is located in your choice, then press the SELECT button then select Next : *If all that...
...Setup Power Swivel Move SEL Select *For USA is a 5 digit ZIP CODE **For CANADA is a 6 digit ZIP CODE Screen 3: Please select which country your TV is complete, the program listings are correct please select Yes to continue. *If a setting is wrong please select No to modify. Press the MENU button... (CANADA) of your choice, then press the SELECT button then select Next : Note: Pressing the GUIDE button also allows you must first setup the Plasma TV as shown on Page 23. Once the setup process is located in your choice, then press the SELECT button then select Next : *If all that...
Owners Guide
Page 55
... the problem. 3.- Screen 13: When a CODE for your cable company. Check the setup as mentioned then select Next. Screen 14: None of the Hitachi codes appeared to continually receive updated program listings from your VCR. Try alternate remote codes to continue or finish. but will show an incomplete setup... setup ; Then press SELECT button to see other code alternatives that the setup procedure is complete, then press SELECT button to continue. The Plasma TV should be in standby mode in order to do now ? 1.- On-Screen Display For using a Cable box, please leave it ON to make ...
... the problem. 3.- Screen 13: When a CODE for your cable company. Check the setup as mentioned then select Next. Screen 14: None of the Hitachi codes appeared to continually receive updated program listings from your VCR. Try alternate remote codes to continue or finish. but will show an incomplete setup... setup ; Then press SELECT button to see other code alternatives that the setup procedure is complete, then press SELECT button to continue. The Plasma TV should be in standby mode in order to do now ? 1.- On-Screen Display For using a Cable box, please leave it ON to make ...

Owners Guide
Page 68
... the MENU button. 2. Press the CURSOR PAD ̆ or ̄ to select. To do this, turn your choices. When using your HITACHI Plasma TV Remote Control. Set AV Net (only HDX model) Use this feature to control your external Audio/Video equipment using REMOTE mode, any of your... choice. INPUT 4 Auto Link Use this function to automatically turn the TV on . Setup Set The Inputs Input1 : **** Input2 : **** Input3 : **** Input4 : **** Auto Link : Off Input5 : **** Move SEL Return - If ...
... the MENU button. 2. Press the CURSOR PAD ̆ or ̄ to select. To do this, turn your choices. When using your HITACHI Plasma TV Remote Control. Set AV Net (only HDX model) Use this feature to control your external Audio/Video equipment using REMOTE mode, any of your... choice. INPUT 4 Auto Link Use this function to automatically turn the TV on . Setup Set The Inputs Input1 : **** Input2 : **** Input3 : **** Input4 : **** Auto Link : Off Input5 : **** Move SEL Return - If ...

Owners Guide
Page 72
... that connects to the video and audio output of your A/V Receiver remote control while pointing directly at the learning AV NET sensor of the Plasma TV (located at the lower right corner of the screen) at a distance of the device to learn (Ex. AV Net Setup Wizard : A/V ...appears, then select "OK" to select "Other" from brand name choices. 6. AV Net Setup Wizard : Custom Settings Select the A/V Receiver softkey to this TV, please select a TV Input. AV Net Setup Wizard : A/V Receiver Setup Press and hold the VOL ̆ button of your A/V Receiver. AV Net Setup Wizard : A/V ...
... that connects to the video and audio output of your A/V Receiver remote control while pointing directly at the learning AV NET sensor of the Plasma TV (located at the lower right corner of the screen) at a distance of the device to learn (Ex. AV Net Setup Wizard : A/V ...appears, then select "OK" to select "Other" from brand name choices. 6. AV Net Setup Wizard : Custom Settings Select the A/V Receiver softkey to this TV, please select a TV Input. AV Net Setup Wizard : A/V Receiver Setup Press and hold the VOL ̆ button of your A/V Receiver. AV Net Setup Wizard : A/V ...

Owners Guide
Page 74
... Settings DVD3 Settings Brand Name Custom IR Code Set Custom Transmission Test Test Button POWER Move SEL IR Out ̈ CH ̆ Back Next 16. TV Softkeys POWER ̇̇ ̈̈ MENU ̇̇ ̈ ̈̈ SELECT ̆ ̈ EXIT ̄ ̇ Move SEL Select...Settings Press and hold the ̈ "Play button" of the DVD remote control while pointing directly at the learning AV NET sensor of the Plasma TV (located at the lower right corner of the screen) at a distance of the device to learn . Press and hold desired button to transfer...
... Settings DVD3 Settings Brand Name Custom IR Code Set Custom Transmission Test Test Button POWER Move SEL IR Out ̈ CH ̆ Back Next 16. TV Softkeys POWER ̇̇ ̈̈ MENU ̇̇ ̈ ̈̈ SELECT ̆ ̈ EXIT ̄ ̇ Move SEL Select...Settings Press and hold the ̈ "Play button" of the DVD remote control while pointing directly at the learning AV NET sensor of the Plasma TV (located at the lower right corner of the screen) at a distance of the device to learn . Press and hold desired button to transfer...

Owners Guide
Page 77
OR Audio Out: • Select AUDIO OUT FIXED to have Audio volume that can control the volume output by the Plasma TV Volume Up/Down. You can be available (grayed out). 2. To record currently viewed Video and Audio from either Cable or Air. For those ... Y-PbPr_4 Video_4 Input 5 HDMI_5 Y-PbPr Y- YES Cable) Analog Channel Video - YES ANT Analog Channel Video - Video Out Monitor Monitor Audio Out Fixed Variable TV Tuner Out Fixed Use To record currently viewed Video and Audio. Use CURSOR PAD ̆ or ̄ or CHANNEL WHEEL to highlight the function to...
OR Audio Out: • Select AUDIO OUT FIXED to have Audio volume that can control the volume output by the Plasma TV Volume Up/Down. You can be available (grayed out). 2. To record currently viewed Video and Audio from either Cable or Air. For those ... Y-PbPr_4 Video_4 Input 5 HDMI_5 Y-PbPr Y- YES Cable) Analog Channel Video - YES ANT Analog Channel Video - Video Out Monitor Monitor Audio Out Fixed Variable TV Tuner Out Fixed Use To record currently viewed Video and Audio. Use CURSOR PAD ̆ or ̄ or CHANNEL WHEEL to highlight the function to...


