Owners Guide
Page 2
... unused for wall, shelf or ceiling mounting as power-supply cord or plug is intended to alert the user to the presence of uninsulated "dangerous voltage" within an equilateral triangle, is damaged, liquid has been spilled or objects CAUTION have fallen into your HITACHI plasma television. Follow all warnings and instructions marked on the quality, performance, and ease of service of the...
... unused for wall, shelf or ceiling mounting as power-supply cord or plug is intended to alert the user to the presence of uninsulated "dangerous voltage" within an equilateral triangle, is damaged, liquid has been spilled or objects CAUTION have fallen into your HITACHI plasma television. Follow all warnings and instructions marked on the quality, performance, and ease of service of the...
Owners Guide
Page 5
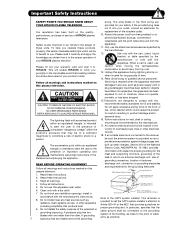
... (b) Power Swivel NOT USED USED * Please adjust the wire length to avoid touching the wall when turning the TV. 10 cm (4 inches) 10 cm (4 inches) NOTES: 1. First time use How To Set Up Your New Hitachi Plasma Television To take measures to prevent the Plasma Television from tipping over and prevent possible injury it should be lifted forward using the top and base on the rear of the Plasma TV stand...
... (b) Power Swivel NOT USED USED * Please adjust the wire length to avoid touching the wall when turning the TV. 10 cm (4 inches) 10 cm (4 inches) NOTES: 1. First time use How To Set Up Your New Hitachi Plasma Television To take measures to prevent the Plasma Television from tipping over and prevent possible injury it should be lifted forward using the top and base on the rear of the Plasma TV stand...

Owners Guide
Page 10
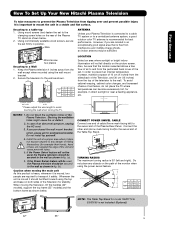
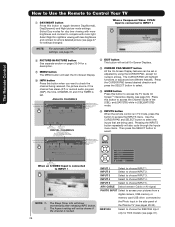
... an HDMI output connection (see page 15 for stand-by mode. It is recommended to leave the "MAIN POWER" to ON condition (lights red) for reference). ብ INPUT/EXIT button Press this button to turn the Plasma Television ON/OFF. These buttons also serve as the SELECT button when in the top right corner of the TV screen. It can also be at stand-by remote control. The Main Power button is set...
... an HDMI output connection (see page 15 for stand-by mode. It is recommended to leave the "MAIN POWER" to ON condition (lights red) for reference). ብ INPUT/EXIT button Press this button to turn the Plasma Television ON/OFF. These buttons also serve as the SELECT button when in the top right corner of the TV screen. It can also be at stand-by remote control. The Main Power button is set...
Owners Guide
Page 11
... as a DVD player or Set Top Box. TV MAIN POWER is set to view your digital still pictures (see page 47). 4. NOTES: 1. Lamp 1 Lamp 2 Indicating Lamp Power Status Lamp 1 Lamp 2 Off Off OFF. Lights Red Off Off Blinking Blue OFF. (Stand-by mode (lights red) when not in use Front/Side Panel Controls ቩ POWER light indicator To turn ON/OFF the "MAIN POWER" of the TV. but no sync. Your component outputs may be used for connecting equipment...
... as a DVD player or Set Top Box. TV MAIN POWER is set to view your digital still pictures (see page 47). 4. NOTES: 1. Lamp 1 Lamp 2 Indicating Lamp Power Status Lamp 1 Lamp 2 Off Off OFF. Lights Red Off Off Blinking Blue OFF. (Stand-by mode (lights red) when not in use Front/Side Panel Controls ቩ POWER light indicator To turn ON/OFF the "MAIN POWER" of the TV. but no sync. Your component outputs may be used for connecting equipment...

Owners Guide
Page 13
... On-Screen Display. ቭ Upgrade Card This card slot is installed, wait until the second screen below ). Hitachi will notify you if a software upgrade is for the CableCARD that will allow you enable video and audio digital data exchange between a compatible device. Acquiring Data. Insert the CableCARD into the CableCARD slot. In order to start your cable service. 13 First time use Rear Panel Connections ቫ IEEE1394 (DV INPUT) (Only for HDX models...
... On-Screen Display. ቭ Upgrade Card This card slot is installed, wait until the second screen below ). Hitachi will notify you if a software upgrade is for the CableCARD that will allow you enable video and audio digital data exchange between a compatible device. Acquiring Data. Insert the CableCARD into the CableCARD slot. In order to start your cable service. 13 First time use Rear Panel Connections ቫ IEEE1394 (DV INPUT) (Only for HDX models...
Owners Guide
Page 15
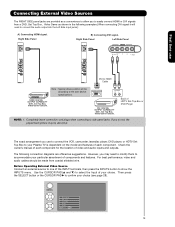
... connection cord plugs when connecting to your choice (see page 28). If you do not, the played back picture may need to connect the audio output into the Left Side Input jacks) : A) Connecting HDMI signal. The following examples (When connecting DVI signal it will be abnormal. Photo Input IEEE 1394 Air /Cable Input 1 Input 2 Move SEL Sel. 15 Before Operating External Video Source Connect an external source to accommodate your choice. HDMI DIGITAL OUTPUT CAPABILITY DVD , Set Top Box, Video Game Console. Back of the INPUT...
... connection cord plugs when connecting to your choice (see page 28). If you do not, the played back picture may need to connect the audio output into the Left Side Input jacks) : A) Connecting HDMI signal. The following examples (When connecting DVI signal it will be abnormal. Photo Input IEEE 1394 Air /Cable Input 1 Input 2 Move SEL Sel. 15 Before Operating External Video Source Connect an external source to accommodate your choice. HDMI DIGITAL OUTPUT CAPABILITY DVD , Set Top Box, Video Game Console. Back of the INPUT...
Owners Guide
Page 19
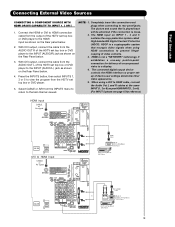
... CABLE or AIR from the HDTV set top box or DVD player to the INPUT (AUDIO/L) jack as shown on the Rear Panel below. 4. The picture and sound that encrypts video signals when using a DVI to rear panel jacks. HDMI is loose. 2. NOTE: 1. HDCP is a cryptographic system that is played back will be abnormal if the connection is not a "NETWORK" technology. The connected digital output device controls the HDMI interface so proper setup of LR HDTV Set-Top-Box or OUTPUT DVD Player or HDTV Set...
... CABLE or AIR from the HDTV set top box or DVD player to the INPUT (AUDIO/L) jack as shown on the Rear Panel below. 4. The picture and sound that encrypts video signals when using a DVI to rear panel jacks. HDMI is loose. 2. NOTE: 1. HDCP is a cryptographic system that is played back will be abnormal if the connection is not a "NETWORK" technology. The connected digital output device controls the HDMI interface so proper setup of LR HDTV Set-Top-Box or OUTPUT DVD Player or HDTV Set...
Owners Guide
Page 20
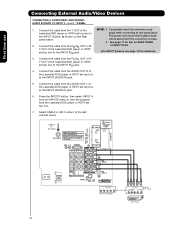
.../DVD player or HDTV set top box to the INPUT (AUDIO/R) jack. 5. Connect the cable from the AUDIO OUT R of the Laserdisc/DVD player or HDTV set top box to the INPUT (AUDIO/L) jack. 6. Connect the cable from the Laserdisc/DVD player or HDTV set top box to plugs when connecting to the last channel tuned. Completely insert the connection cord Laserdisc/DVD player or HDTV set top box. 7. CABLE or Air signal OUTPUT L R Y PB PR HDTV Set-Top Box OUTPUT Back of the NOTE: 1. See page 17 for reference). 3. First time use Connecting External Audio/Video...
.../DVD player or HDTV set top box to the INPUT (AUDIO/R) jack. 5. Connect the cable from the AUDIO OUT R of the Laserdisc/DVD player or HDTV set top box to the INPUT (AUDIO/L) jack. 6. Connect the cable from the Laserdisc/DVD player or HDTV set top box to plugs when connecting to the last channel tuned. Completely insert the connection cord Laserdisc/DVD player or HDTV set top box. 7. CABLE or Air signal OUTPUT L R Y PB PR HDTV Set-Top Box OUTPUT Back of the NOTE: 1. See page 17 for reference). 3. First time use Connecting External Audio/Video...
Owners Guide
Page 23
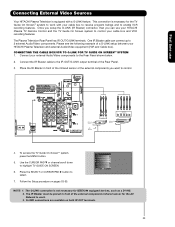
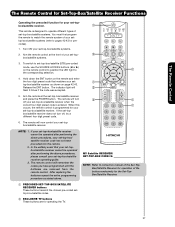
... or CURSOR PAD ̈ button to highlight TV GUIDE ON SCREEN. 6. One IR Blaster cable can use Connecting External Video Sources Your HITACHI Plasma Television is equipped with your cable box to receive program listings and to the Rear Panel shown below. 2. Connect the IR Blaster cable to the IR OUT/G-LINK output terminal of a G-LINK setup between your external Audio/Video components to enable VCR recording features. Video Audio TV Guide On Screen Channel Manager Locks Timers Setup Power Swivel Move SEL Select NOTE...
... or CURSOR PAD ̈ button to highlight TV GUIDE ON SCREEN. 6. One IR Blaster cable can use Connecting External Video Sources Your HITACHI Plasma Television is equipped with your cable box to receive program listings and to the Rear Panel shown below. 2. Connect the IR Blaster cable to the IR OUT/G-LINK output terminal of a G-LINK setup between your external Audio/Video components to enable VCR recording features. Video Audio TV Guide On Screen Channel Manager Locks Timers Setup Power Swivel Move SEL Select NOTE...
Owners Guide
Page 25
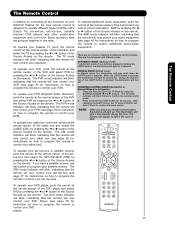
... mode indicator will blink, indicating that the remote will now control your HITACHI Plasma TV, the new remote control is pressed, the illumination will blink 3 times to confirm the mode switch. To operate your set -top-box, satellite receiver, DVD players, and other audio/video equipment with one area. The PVR mode indicator will blink, indicating that the remote will now control your audio equipment (see page 39 for instructions on how to program the remote to control...
... mode indicator will blink, indicating that the remote will now control your HITACHI Plasma TV, the new remote control is pressed, the illumination will blink 3 times to confirm the mode switch. To operate your set -top-box, satellite receiver, DVD players, and other audio/video equipment with one area. The PVR mode indicator will blink, indicating that the remote will now control your audio equipment (see page 39 for instructions on how to program the remote to control...
Owners Guide
Page 28
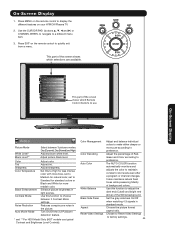
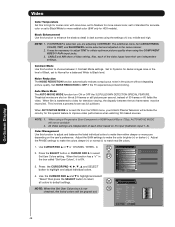
...Auto Closed Caption setting When an S-VIDEO Input is locked. channel has stereo (ST) or second audio program (SAP), the time, CHANNEL ID and if the TIMER is connected to INPUT 3 INFO Y-PBPR: 3 480i 3:17PM Input Signal Format NOTE: For automatic DAY/NIGHT picture mode Auto settings, see page 31). 28 IEEE1394 digital camera, USB memory or memory card USB drive connected to choose INPUT 4. Pressing the INPUTS Closed Caption setting Audio Source Selection DIGITAL CHANNELS Digital Closed Caption This icon will appear only when receiving a Digital Broadcast with room light...
...Auto Closed Caption setting When an S-VIDEO Input is locked. channel has stereo (ST) or second audio program (SAP), the time, CHANNEL ID and if the TIMER is connected to INPUT 3 INFO Y-PBPR: 3 480i 3:17PM Input Signal Format NOTE: For automatic DAY/NIGHT picture mode Auto settings, see page 31). 28 IEEE1394 digital camera, USB memory or memory card USB drive connected to choose INPUT 4. Pressing the INPUTS Closed Caption setting Audio Source Selection DIGITAL CHANNELS Digital Closed Caption This icon will appear only when receiving a Digital Broadcast with room light...
Owners Guide
Page 37
... pre-coded settop-box/satellite codes. ባ EXCLUSIVE TV buttons These buttons are removed from the remote control. After replacing the batteries repeat the entire programming procedure as shown on the remote control to position the LED light to set-top-box/satellite (STB) pre-coded mode, use the SOURCE ACCESS buttons (̇ or ̈) on page 42-43. To switch to the corresponding selection. + ቢ 4. The remote will ባ flash 3 times if the code was...
... pre-coded settop-box/satellite codes. ባ EXCLUSIVE TV buttons These buttons are removed from the remote control. After replacing the batteries repeat the entire programming procedure as shown on the remote control to position the LED light to set-top-box/satellite (STB) pre-coded mode, use the SOURCE ACCESS buttons (̇ or ̈) on page 42-43. To switch to the corresponding selection. + ቢ 4. The remote will ባ flash 3 times if the code was...
Owners Guide
Page 45
...program or channel changes. Adjust picture black level. Color Tint Sharpness Color Temperature Black Enhancement Contrast Mode Noise Reduction Auto Movie Mode Adjust color. Enhance picture brightness in the picture. Turn On/Off the 3:2 Pulldown detection feature. * and ** For HDX Model Only (HDT models use . The AUTO COLOR function automatically monitors and adjusts the color to factory settings. 45 Set the gray side bars On/Off when watching 4:3 signals in standard mode. Choose the picture format aspect ratio. Vide o Audio TV Guide On Screen Channel Manager Locks Timers Setup...
...program or channel changes. Adjust picture black level. Color Tint Sharpness Color Temperature Black Enhancement Contrast Mode Noise Reduction Auto Movie Mode Adjust color. Enhance picture brightness in the picture. Turn On/Off the 3:2 Pulldown detection feature. * and ** For HDX Model Only (HDT models use . The AUTO COLOR function automatically monitors and adjusts the color to factory settings. 45 Set the gray side bars On/Off when watching 4:3 signals in standard mode. Choose the picture format aspect ratio. Vide o Audio TV Guide On Screen Channel Manager Locks Timers Setup...
Owners Guide
Page 46
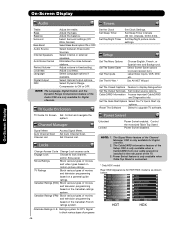
...: 1. On-Screen Display On-Screen Display Audio Timers Treble Bass Balance Surround Bass Boost Audio Source Internal Speakers Auto Noise Cancel Perfect Volume Loudness Language Digital Output DRC Adjust the treble. Adjust the balance. Locks Change Access Code Change Lock access code. Engage Lock Choose to ON or OFF. Alternate Ratings U.S. Select between stations. Set Auto Channel Scan. Movie Ratings Block various types of movies and television programming based on motion picture ratings. Select Optical Output options. NOTE: The Language, Digital Output, and the...
...: 1. On-Screen Display On-Screen Display Audio Timers Treble Bass Balance Surround Bass Boost Audio Source Internal Speakers Auto Noise Cancel Perfect Volume Loudness Language Digital Output DRC Adjust the treble. Adjust the balance. Locks Change Access Code Change Lock access code. Engage Lock Choose to ON or OFF. Alternate Ratings U.S. Select between stations. Set Auto Channel Scan. Movie Ratings Block various types of movies and television programming based on motion picture ratings. Select Optical Output options. NOTE: The Language, Digital Output, and the...
Owners Guide
Page 48
... the SELECT button to return all colors to obtain optimum picture quality when using the COMPONENT VIDEO Y-PBPR input jacks. 3. CABLE and AIR share a Video setting. Auto Movie Mode The AUTO MOVIE MODE function turn ON or OFF the 3:2 PULLDOWN DETECTION SPECIAL FEATURE. Video Noise Reduction Auto Movie Mode Color Management Color Decoding Auto Color White Balance Black Side Panel Aspect Reset Video Settings Move SEL Select Low Off Off Off Video Color Management Set User Colors Magenta Red Yellow Green Cyan Blue Phase Gain...
... the SELECT button to return all colors to obtain optimum picture quality when using the COMPONENT VIDEO Y-PBPR input jacks. 3. CABLE and AIR share a Video setting. Auto Movie Mode The AUTO MOVIE MODE function turn ON or OFF the 3:2 PULLDOWN DETECTION SPECIAL FEATURE. Video Noise Reduction Auto Movie Mode Color Management Color Decoding Auto Color White Balance Black Side Panel Aspect Reset Video Settings Move SEL Select Low Off Off Off Video Color Management Set User Colors Magenta Red Yellow Green Cyan Blue Phase Gain...

Owners Guide
Page 68
... OFF to work. 1. The IR Blaster cable must be properly connected for the AV NET feature to disable this , turn the TV on by AUTO LINK, the TV will substitute for use with your video input device play button. 3. Video Audio TV Guide On Screen Channel Manager Locks Timers Setup Power Swivel Move SEL Select Setup Set The Menu Options OR Set The Screen Saver Set The Inputs Set The AV Net Set The Closed Captions Set The Output Terminals Set The Quick...
... OFF to work. 1. The IR Blaster cable must be properly connected for the AV NET feature to disable this , turn the TV on by AUTO LINK, the TV will substitute for use with your video input device play button. 3. Video Audio TV Guide On Screen Channel Manager Locks Timers Setup Power Swivel Move SEL Select Setup Set The Menu Options OR Set The Screen Saver Set The Inputs Set The AV Net Set The Closed Captions Set The Output Terminals Set The Quick...

Owners Guide
Page 77
... TUNER OUT: Available Monitor Out Signals Input Mode Monitor Out (TV Tuner Out) S-Video Video L/R HiFi ANT Digital No Macrovision S-Video YES YES YES YES (Air or Channel ANT ANT ANT ANT Cable) Macrovision S-Video - - - NOTE: 1. NOTE : Extended Length funtion is selected, VARIABLE AUDIO OUT will select the source of the TV. YES Video_5 - Setup On-Screen Display Set The Output Terminals This feature will not be controlled by changing the volume of the Output...
... TUNER OUT: Available Monitor Out Signals Input Mode Monitor Out (TV Tuner Out) S-Video Video L/R HiFi ANT Digital No Macrovision S-Video YES YES YES YES (Air or Channel ANT ANT ANT ANT Cable) Macrovision S-Video - - - NOTE: 1. NOTE : Extended Length funtion is selected, VARIABLE AUDIO OUT will select the source of the TV. YES Video_5 - Setup On-Screen Display Set The Output Terminals This feature will not be controlled by changing the volume of the Output...

Owners Guide
Page 80
... Insert MMC card before controlling the motorized stand. 2. Use the CURSOR PAD ̇ or ̈ to highlight functions. 2. Before using the remote control. Reset TV Settings : Select "Yes" to return all modes during the next main power on/off. 1. Video Audio TV Guide On Screen Channel Manager Locks Timers Setup Power Swivel Move SEL Select or Power Swivel Select SEL Return Locked NOTE: 1. 2. 3. 4. The Power Swivel has a maximum turning radius of the monitor is connected. 1. Select...
... Insert MMC card before controlling the motorized stand. 2. Use the CURSOR PAD ̇ or ̈ to highlight functions. 2. Before using the remote control. Reset TV Settings : Select "Yes" to return all modes during the next main power on/off. 1. Video Audio TV Guide On Screen Channel Manager Locks Timers Setup Power Swivel Move SEL Select or Power Swivel Select SEL Return Locked NOTE: 1. 2. 3. 4. The Power Swivel has a maximum turning radius of the monitor is connected. 1. Select...

Owners Guide
Page 86
... the Plasma Monitor • Antenna input impedance 75 Ohm • Channel coverage 191ch. Refer to change without prior notice. Control up to -Use On-Screen Menu Control (3 Language) • Downloadable V-Chip • New AV Network System Control (Only HDX models) - Please access www.hitachi.com/tv for detailed specifications and dimensions for your digital camera, USB drive or • memory card USB drive) • Technology • TV Guide On ScreenTM Video: • 1024 x 1080 Display Resolution...
... the Plasma Monitor • Antenna input impedance 75 Ohm • Channel coverage 191ch. Refer to change without prior notice. Control up to -Use On-Screen Menu Control (3 Language) • Downloadable V-Chip • New AV Network System Control (Only HDX models) - Please access www.hitachi.com/tv for detailed specifications and dimensions for your digital camera, USB drive or • memory card USB drive) • Technology • TV Guide On ScreenTM Video: • 1024 x 1080 Display Resolution...
Owners Guide
Page 89
... . You understand and agree that you decide to HITACHI and its licensors and suppliers. You specifically agree not to export or reexport the Software: (i) to any accompanying printed materials, shall belong to install or use any Upgrade, your failure to return such flash card or other media to effect or facilitate an Upgrade, you from participating in and to the...
... . You understand and agree that you decide to HITACHI and its licensors and suppliers. You specifically agree not to export or reexport the Software: (i) to any accompanying printed materials, shall belong to install or use any Upgrade, your failure to return such flash card or other media to effect or facilitate an Upgrade, you from participating in and to the...


