
Owners Guide
Page 1
... 2 VID 1 PIP FREEZE VID 3 PIP CH PIP ACCESS VIDEO SWAP PIP MODE REC CLU-5723TSI Video Audio Aspect Chan. PLASMA TELEVISION AVC (Audio Video Control Center) & Plasma Display Monitor 32HDX60 42HDX60 50HDX60 OPERATING GUIDE Video Audio Ch. Manager Locks Setup Move SEL Sel IMPORTANT SAFETY INSTRUCTIONS 2-3 FIRST TIME USE 4-23 THE REMOTE...
... 2 VID 1 PIP FREEZE VID 3 PIP CH PIP ACCESS VIDEO SWAP PIP MODE REC CLU-5723TSI Video Audio Aspect Chan. PLASMA TELEVISION AVC (Audio Video Control Center) & Plasma Display Monitor 32HDX60 42HDX60 50HDX60 OPERATING GUIDE Video Audio Ch. Manager Locks Setup Move SEL Sel IMPORTANT SAFETY INSTRUCTIONS 2-3 FIRST TIME USE 4-23 THE REMOTE...
Owners Guide
Page 2
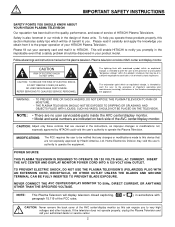
...operating and maintenance (servicing) instructions in the instructions, as this can expose you . Home Electronics Division may be of HITACHI Plasma Televisions. INSERT THE AVC CENTER AND DISPLAY MONITOR POWER CORD INTO A 120 VOLT 60Hz OUTLET. CAUTION: Never remove the back cover of your authorized... TO QUALIFIED SERVICE PERSONNEL. NOTE: • There are no user serviceable parts inside the AVC center/display monitor. • Model and serial numbers are not expressly approved by HITACHI could void the user's authority to very high voltages and other hazards. Safety is also foremost...
...operating and maintenance (servicing) instructions in the instructions, as this can expose you . Home Electronics Division may be of HITACHI Plasma Televisions. INSERT THE AVC CENTER AND DISPLAY MONITOR POWER CORD INTO A 120 VOLT 60Hz OUTLET. CAUTION: Never remove the back cover of your authorized... TO QUALIFIED SERVICE PERSONNEL. NOTE: • There are no user serviceable parts inside the AVC center/display monitor. • Model and serial numbers are not expressly approved by HITACHI could void the user's authority to very high voltages and other hazards. Safety is also foremost...
Owners Guide
Page 4
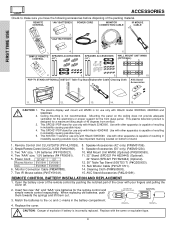
...the battery compartment. 4. Use with Hitachi 50HDX60. Use with Hitachi 32HDX60. Speaker Accessories (42" only) (P#GM01196). 9. Cleaning Cloth (P#MS00803). 15. AVC Stand Accessories (P#QJ01081). REMOTE CONTROL ...AVC EV01841 EV01841 6. Speaker Accessories (50" only) (P#GM01234). 10. Wall Mount Unit WM50 (Optional) (P#QX00563). 11. 32" Stand (SPD321 P# H520443) (Optional). 42" Stand (SPD421 P# H520444) (Optional). 12. 50" Table Top Stand (50STD3 T) (P#QD35633). 13. Insert two new "AA" and "AAA" size batteries for use only with Hitachi 42HDX60 Use with Hitachi model 32HDX60, 42HDX60...
...the battery compartment. 4. Use with Hitachi 50HDX60. Use with Hitachi 32HDX60. Speaker Accessories (42" only) (P#GM01196). 9. Cleaning Cloth (P#MS00803). 15. AVC Stand Accessories (P#QJ01081). REMOTE CONTROL ...AVC EV01841 EV01841 6. Speaker Accessories (50" only) (P#GM01234). 10. Wall Mount Unit WM50 (Optional) (P#QX00563). 11. 32" Stand (SPD321 P# H520443) (Optional). 42" Stand (SPD421 P# H520444) (Optional). 12. 50" Table Top Stand (50STD3 T) (P#QD35633). 13. Insert two new "AA" and "AAA" size batteries for use only with Hitachi 42HDX60 Use with Hitachi model 32HDX60, 42HDX60...
Owners Guide
Page 6
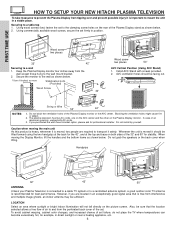
...set firmly in a stable place. Blocking the ventilation holes might cause fire or defect. 2. FIRST TIME USE HOW TO SETUP YOUR NEW HITACHI PLASMA TELEVISION To take measures to prevent the Plasma Display from tipping over and prevent possible injury it is free from interference and multiple ... the Plasma Display monitor. Keep the Plasma Display monitor four inches away from the perforated back cover of the Plasma Display monitor or the AVC center. Caution when moving the Display Monitor, lift the handles and the bottom frame as shown below . Also, be facing out. Using...
...set firmly in a stable place. Blocking the ventilation holes might cause fire or defect. 2. FIRST TIME USE HOW TO SETUP YOUR NEW HITACHI PLASMA TELEVISION To take measures to prevent the Plasma Display from tipping over and prevent possible injury it is free from interference and multiple ... the Plasma Display monitor. Keep the Plasma Display monitor four inches away from the perforated back cover of the Plasma Display monitor or the AVC center. Caution when moving the Display Monitor, lift the handles and the bottom frame as shown below . Also, be facing out. Using...

Owners Guide
Page 8
...ANT B terminal. RGB Input). You must be sure of the output and input connector types required by the various components and the length of the AVC Center (ex. ANTENNA CONNECTIONS TO REAR JACK PANEL VHF (75-Ohm) antenna/CATV (Cable TV) When using a 300-Ohm twin lead from ...75-Ohm coaxial shielded wire. "F" Type 75-Ohm Coaxial Antenna Connector For connecting RF signals (antenna or cable TV) to the subwoofer output of the AVC Center. Subwoofer Cable (Provided) This cable is used to connect the Display Monitor to the ANT A (75-Ohm) terminal. This connection allows your...
...ANT B terminal. RGB Input). You must be sure of the output and input connector types required by the various components and the length of the AVC Center (ex. ANTENNA CONNECTIONS TO REAR JACK PANEL VHF (75-Ohm) antenna/CATV (Cable TV) When using a 300-Ohm twin lead from ...75-Ohm coaxial shielded wire. "F" Type 75-Ohm Coaxial Antenna Connector For connecting RF signals (antenna or cable TV) to the subwoofer output of the AVC Center. Subwoofer Cable (Provided) This cable is used to connect the Display Monitor to the ANT A (75-Ohm) terminal. This connection allows your...
Owners Guide
Page 10
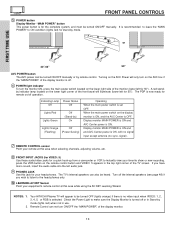
... in use. The TV's internal speakers can not turn ON/OFF the "MAIN POWER" of the TV screen. Display monitor MAIN POWER is ON and AVC Center power is set OFF. NOTES: 1. 2. Your HITACHI Plasma TV will illuminate (lower left for 50"). Display monitor MAIN POWER is ON and and... AVC Center power is ON, with no signal input except antenna (no video input when VIDEO: 1, 2, 3, 4, 5, or RGB is selected. Remote Control can also be turned ...
... in use. The TV's internal speakers can not turn ON/OFF the "MAIN POWER" of the TV screen. Display monitor MAIN POWER is ON and AVC Center power is set OFF. NOTES: 1. 2. Your HITACHI Plasma TV will illuminate (lower left for 50"). Display monitor MAIN POWER is ON and and... AVC Center power is ON, with no signal input except antenna (no video input when VIDEO: 1, 2, 3, 4, 5, or RGB is selected. Remote Control can also be turned ...

Owners Guide
Page 11
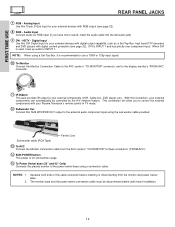
... separate 75-Ohm RF antenna inputs, ANT A and ANT B. NOTES: 1. FIRST TIME USE REAR PANEL JACKS 32"/42" Monitor Bottom View REAR PANEL OF THE AVC CENTER ቦቭ ቢ ቨ ANT B TO CONVERTER ANT A S-VIDEO S-VIDEO VIDEO L VIDEO L/(MONO) R AUDIO MONITOR OUT R AUDIO INPUT ... will be labeled Y-CBCR. Your component outputs may be abnormal, when using the Y-PBPR inputs (See page 45). 5. You may use HITACHI specified cable. INPUT 1 does not accept composite video signal. In this capability, such as VCRs, camcorders, laserdisc players, DVD players etc...
... separate 75-Ohm RF antenna inputs, ANT A and ANT B. NOTES: 1. FIRST TIME USE REAR PANEL JACKS 32"/42" Monitor Bottom View REAR PANEL OF THE AVC CENTER ቦቭ ቢ ቨ ANT B TO CONVERTER ANT A S-VIDEO S-VIDEO VIDEO L VIDEO L/(MONO) R AUDIO MONITOR OUT R AUDIO INPUT ... will be labeled Y-CBCR. Your component outputs may be abnormal, when using the Y-PBPR inputs (See page 45). 5. You may use HITACHI specified cable. INPUT 1 does not accept composite video signal. In this capability, such as VCRs, camcorders, laserdisc players, DVD players etc...
Owners Guide
Page 12
...Power Swivel base (32" and 42" Only) Connects the plasma monitor to INPUT 1. Ferrite Core Sub-woofer cable (RCA Type) ቯ To AVC Connect the Monitor Connection cable from the monitor and power swivel base. When DVI is recommended to use a 1080i or 720p input signal. ቫ...Use this 15-pin D-Sub input for your external components can automatically be disconnected before inserting or disconnecting from the AVC center's "TO MONITOR" to these connectors ("FROM AVC"). ተ SUB-POWER button This power is INPUT 1 and has priority over component input. This connection will allow...
...Power Swivel base (32" and 42" Only) Connects the plasma monitor to INPUT 1. Ferrite Core Sub-woofer cable (RCA Type) ቯ To AVC Connect the Monitor Connection cable from the monitor and power swivel base. When DVI is recommended to use a 1080i or 720p input signal. ቫ...Use this 15-pin D-Sub input for your external components can automatically be disconnected before inserting or disconnecting from the AVC center's "TO MONITOR" to these connectors ("FROM AVC"). ተ SUB-POWER button This power is INPUT 1 and has priority over component input. This connection will allow...
Owners Guide
Page 13
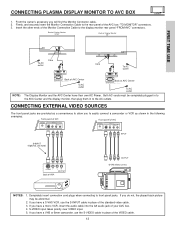
... TIME USE CONNECTING PLASMA DISPLAY MONITOR TO AVC BOX 1. To AC outlet The Display Monitor and the AVC Center have a S-VHS VCR, use HITACHI specified cable. Back of Display Monitor 32/42" Back of SRS Labs, Inc. TO MONITOR Back of AVC Center AC IN TruBass SRS and symbol are...jacks are trademarks of the Monitor Connection Cable to the display monitor rear panel "FROM AVC" connectors. Firmly, and securely insert the Monitor Connection Cable to allow you have a VHS or 8mm camcorder, use HITACHI specified cable. Insert the other ends of SRS Labs, Inc. TO MONITOR AC ...
... TIME USE CONNECTING PLASMA DISPLAY MONITOR TO AVC BOX 1. To AC outlet The Display Monitor and the AVC Center have a S-VHS VCR, use HITACHI specified cable. Back of Display Monitor 32/42" Back of SRS Labs, Inc. TO MONITOR Back of AVC Center AC IN TruBass SRS and symbol are...jacks are trademarks of the Monitor Connection Cable to the display monitor rear panel "FROM AVC" connectors. Firmly, and securely insert the Monitor Connection Cable to allow you have a VHS or 8mm camcorder, use HITACHI specified cable. Insert the other ends of SRS Labs, Inc. TO MONITOR AC ...

Owners Guide
Page 14
... of each component for the location of SRS Labs, Inc. Check the owner's manual of components and features. However, you use HITACHI specified cable. Press the VID2~VID5 button to view the program from coaxial shielded wire. TO MONITOR INPUT 1 R R AUDIO OUT... RGB AC IN TruBass SRS and symbol are offered as suggestions. Rear Panel of AVC Center ANT B TO CONVERTER ANT A S-VIDEO S-VIDEO VIDEO VIDEO L L/(MONO) R AUDIO MONITOR OUT R AUDIO INPUT 4 S-VIDEO VIDEO Y/VIDEO Y L/(MONO)...
... of each component for the location of SRS Labs, Inc. Check the owner's manual of components and features. However, you use HITACHI specified cable. Press the VID2~VID5 button to view the program from coaxial shielded wire. TO MONITOR INPUT 1 R R AUDIO OUT... RGB AC IN TruBass SRS and symbol are offered as suggestions. Rear Panel of AVC Center ANT B TO CONVERTER ANT A S-VIDEO S-VIDEO VIDEO VIDEO L L/(MONO) R AUDIO MONITOR OUT R AUDIO INPUT 4 S-VIDEO VIDEO Y/VIDEO Y L/(MONO)...

Owners Guide
Page 15
.... The VIDEO label disappears automatically after approximately four seconds. 5. Press the ANT button to return to the INPUT (AUDIO/L) jack. 4. Back of AVC Center ANT B TO CONVERTER ANT A S-VIDEO S-VIDEO VIDEO L VIDEO L/(MONO) R AUDIO MONITOR OUT R AUDIO INPUT 4 S-VIDEO VIDEO Y/VIDEO...R AUDIO INPUT 3 IR BLASTER PR R AUDIO INPUT 2 PR R AUDIO INPUT 1 ANALOG INPUT L AUDIO DVI-HDTV L/(MONO) AUDIO Please use HITACHI specified cable. Rear Panel of R L V VCR OUTPUT VCR NOTES: 1. Completely insert the connection cord plugs when connecting to your VCR operating guide ...
.... The VIDEO label disappears automatically after approximately four seconds. 5. Press the ANT button to return to the INPUT (AUDIO/L) jack. 4. Back of AVC Center ANT B TO CONVERTER ANT A S-VIDEO S-VIDEO VIDEO L VIDEO L/(MONO) R AUDIO MONITOR OUT R AUDIO INPUT 4 S-VIDEO VIDEO Y/VIDEO...R AUDIO INPUT 3 IR BLASTER PR R AUDIO INPUT 2 PR R AUDIO INPUT 1 ANALOG INPUT L AUDIO DVI-HDTV L/(MONO) AUDIO Please use HITACHI specified cable. Rear Panel of R L V VCR OUTPUT VCR NOTES: 1. Completely insert the connection cord plugs when connecting to your VCR operating guide ...

Owners Guide
Page 16
...AVC Center ANT B TO CONVERTER ANT A S-VIDEO S-VIDEO VIDEO L VIDEO L/(MONO) R AUDIO MONITOR OUT R AUDIO INPUT 4 S-VIDEO VIDEO Y/VIDEO Y L/(MONO) PB L/(MONO) PB L/(MONO) R AUDIO INPUT 3 IR BLASTER PR R AUDIO INPUT 2 PR R AUDIO INPUT 1 ANALOG INPUT L AUDIO DVI-HDTV L/(MONO) AUDIO Please use HITACHI...AUDIO INPUT 3 IR BLASTER PR R AUDIO INPUT 2 PR R AUDIO INPUT 1 ANALOG INPUT L AUDIO DVI-HDTV L/(MONO) AUDIO Please use HITACHI specified cable. A single VCR can be used for VCR #1 and VCR #2, but note that encrypts video signals when using DVI connections to...
...AVC Center ANT B TO CONVERTER ANT A S-VIDEO S-VIDEO VIDEO L VIDEO L/(MONO) R AUDIO MONITOR OUT R AUDIO INPUT 4 S-VIDEO VIDEO Y/VIDEO Y L/(MONO) PB L/(MONO) PB L/(MONO) R AUDIO INPUT 3 IR BLASTER PR R AUDIO INPUT 2 PR R AUDIO INPUT 1 ANALOG INPUT L AUDIO DVI-HDTV L/(MONO) AUDIO Please use HITACHI...AUDIO INPUT 3 IR BLASTER PR R AUDIO INPUT 2 PR R AUDIO INPUT 1 ANALOG INPUT L AUDIO DVI-HDTV L/(MONO) AUDIO Please use HITACHI specified cable. A single VCR can be used for VCR #1 and VCR #2, but note that encrypts video signals when using DVI connections to...

Owners Guide
Page 17
.../L) jack. 6. OUTPUT L R Y PB PR OR HDTV Set-Top Box DVD Player OUTPUT Back of VIDEO AUDIO DVD Player PR/CR PB/CB Y L R Rear Panel of AVC Center ANT B TO CONVERTER ANT A S-VIDEO S-VIDEO VIDEO L VIDEO L/(MONO) R AUDIO MONITOR OUT R AUDIO INPUT 4 S-VIDEO VIDEO Y/VIDEO Y L/(MONO) PB L/(MONO) PB ...L/(MONO) R AUDIO INPUT 3 IR BLASTER PR R AUDIO INPUT 2 PR R AUDIO INPUT 1 ANALOG INPUT L AUDIO DVI-HDTV L/(MONO) AUDIO Please use HITACHI specified cable. The picture and sound that is played back will be abnormal if the connection is loose. 2.
.../L) jack. 6. OUTPUT L R Y PB PR OR HDTV Set-Top Box DVD Player OUTPUT Back of VIDEO AUDIO DVD Player PR/CR PB/CB Y L R Rear Panel of AVC Center ANT B TO CONVERTER ANT A S-VIDEO S-VIDEO VIDEO L VIDEO L/(MONO) R AUDIO MONITOR OUT R AUDIO INPUT 4 S-VIDEO VIDEO Y/VIDEO Y L/(MONO) PB L/(MONO) PB ...L/(MONO) R AUDIO INPUT 3 IR BLASTER PR R AUDIO INPUT 2 PR R AUDIO INPUT 1 ANALOG INPUT L AUDIO DVI-HDTV L/(MONO) AUDIO Please use HITACHI specified cable. The picture and sound that is played back will be abnormal if the connection is loose. 2.

Owners Guide
Page 18
... audio amplifier, connect the system as shown below. R L V S-VIDEO INPUT Optional, See page 23 VCR or other external components 18 Rear Panel of AVC Center ANT B TO CONVERTER ANT A S-VIDEO S-VIDEO VIDEO L VIDEO L/(MONO) R AUDIO MONITOR OUT R AUDIO INPUT 4 S-VIDEO VIDEO Y/VIDEO Y ... INPUT 3 IR BLASTER PR R AUDIO INPUT 2 PR R AUDIO INPUT 1 ANALOG INPUT L AUDIO DVI-HDTV L/(MONO) AUDIO Please use HITACHI specified cable. FIRST TIME USE CONNECTING EXTERNAL AUDIO/VIDEO DEVICES CONNECTING EXTERNAL AUDIO AMPLIFIER To monitor the audio level of the Plasma TV to INPUT2...
... audio amplifier, connect the system as shown below. R L V S-VIDEO INPUT Optional, See page 23 VCR or other external components 18 Rear Panel of AVC Center ANT B TO CONVERTER ANT A S-VIDEO S-VIDEO VIDEO L VIDEO L/(MONO) R AUDIO MONITOR OUT R AUDIO INPUT 4 S-VIDEO VIDEO Y/VIDEO Y ... INPUT 3 IR BLASTER PR R AUDIO INPUT 2 PR R AUDIO INPUT 1 ANALOG INPUT L AUDIO DVI-HDTV L/(MONO) AUDIO Please use HITACHI specified cable. FIRST TIME USE CONNECTING EXTERNAL AUDIO/VIDEO DEVICES CONNECTING EXTERNAL AUDIO AMPLIFIER To monitor the audio level of the Plasma TV to INPUT2...
Owners Guide
Page 19
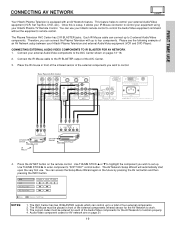
...of the infrared sensor of the external components you wish to control your equipment using your Hitachi remote control to four components. The correct codes must be entered for each of the AVC Center. 3. Audio/Video component codes for the AV Network to control your external Audio/Video... BLASTER output of the Audio/Video components for the AV Network to the AVC Center shown on the remote control. FIRST TIME USE CONNECTING AV NETWORK Your Hitachi Plasma Television is setup, it allows your Hitachi Plasma Television and external Audio/Video equipment (VCR and DVD Player). The ...
...of the infrared sensor of the external components you wish to control your equipment using your Hitachi remote control to four components. The correct codes must be entered for each of the AVC Center. 3. Audio/Video component codes for the AV Network to control your external Audio/Video... BLASTER output of the Audio/Video components for the AV Network to the AVC Center shown on the remote control. FIRST TIME USE CONNECTING AV NETWORK Your Hitachi Plasma Television is setup, it allows your Hitachi Plasma Television and external Audio/Video equipment (VCR and DVD Player). The ...

Owners Guide
Page 23
... line output (INPUT: 4 in place of S-VIDEO type. • When using a DVI input from a Set-Top-Box, it to the left audio jack on the AVC Center. • Refer to each input. Use these , VIDEO or S-VIDEO, may be used for each input jack. • COMPONENT: Y-PBPR (Input 1 & 2) connections are provided...
... line output (INPUT: 4 in place of S-VIDEO type. • When using a DVI input from a Set-Top-Box, it to the left audio jack on the AVC Center. • Refer to each input. Use these , VIDEO or S-VIDEO, may be used for each input jack. • COMPONENT: Y-PBPR (Input 1 & 2) connections are provided...

Owners Guide
Page 24
... 2 VID 1 PIP FREEZE VID 3 PIP CH PIP ACCESS VIDEO SWAP PIP MODE REC CLU-5723TSI REMOTE In addition to controlling all the functions on your HITACHI Plasma TV, the new remote control is designed to control and press the CD, PVR or AMP button. To operate your Plasma TV, point the... sensor of the component you have a satellite receiver, use this button to program your cable box, point the remote at the remote sensor of the AVC box/Display Monitor and press the TV button. The STB button will blink, indicating that the remote will not appear to control your VCR). The...
... 2 VID 1 PIP FREEZE VID 3 PIP CH PIP ACCESS VIDEO SWAP PIP MODE REC CLU-5723TSI REMOTE In addition to controlling all the functions on your HITACHI Plasma TV, the new remote control is designed to control and press the CD, PVR or AMP button. To operate your Plasma TV, point the... sensor of the component you have a satellite receiver, use this button to program your cable box, point the remote at the remote sensor of the AVC box/Display Monitor and press the TV button. The STB button will blink, indicating that the remote will not appear to control your VCR). The...
Owners Guide
Page 28
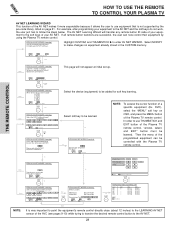
...command... Try again? DVD), select the "MENU" soft key on equipment already stored in memory. BACK Move OK SEL Select THUMB STICK OK SELECT HITACHI AV NET WIZARD (Learning) Select another DVD2 softkey to learn ? The AV NET Learning Wizard will not appear at initial set up. BACK Move...equipment's remote control directly close (about 12 inches) to the LEARNING AV NET sensor of the AVC (see pages 9-10) while trying to transfer the desired remote control button to the AV NET. 28 Yes HITACHI AV NET WIZARD (Learning) Select the device (equipment) to enter AV NET WIZARD. Then ...
...command... Try again? DVD), select the "MENU" soft key on equipment already stored in memory. BACK Move OK SEL Select THUMB STICK OK SELECT HITACHI AV NET WIZARD (Learning) Select another DVD2 softkey to learn ? The AV NET Learning Wizard will not appear at initial set up. BACK Move...equipment's remote control directly close (about 12 inches) to the LEARNING AV NET sensor of the AVC (see pages 9-10) while trying to transfer the desired remote control button to the AV NET. 28 Yes HITACHI AV NET WIZARD (Learning) Select the device (equipment) to enter AV NET WIZARD. Then ...
Owners Guide
Page 32
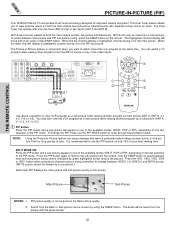
... 4 FREEZE PIP MODE PIP ACCESS SWAP DAY/NIGHT ብ ባ REC VCR Use above connection to use the PIP feature on the last selection of AVC Center ANT B TO CONVERTER ANT A S-VIDEO S-VIDEO VIDEO L VIDEO L/(MONO) R AUDIO MONITOR OUT R AUDIO INPUT 4 S-VIDEO VIDEO Y/VIDEO Y L/(MONO) PB L/(...MODE PIP Press the PIP button and a sub-picture appears in -Picture feature is being controlled, to change the PIP mode, use HITACHI specified cable. Press the PIP button again to watch a TV program while viewing other programs from the screen. THE REMOTE CONTROL MENU ...
... 4 FREEZE PIP MODE PIP ACCESS SWAP DAY/NIGHT ብ ባ REC VCR Use above connection to use the PIP feature on the last selection of AVC Center ANT B TO CONVERTER ANT A S-VIDEO S-VIDEO VIDEO L VIDEO L/(MONO) R AUDIO MONITOR OUT R AUDIO INPUT 4 S-VIDEO VIDEO Y/VIDEO Y L/(MONO) PB L/(...MODE PIP Press the PIP button and a sub-picture appears in -Picture feature is being controlled, to change the PIP mode, use HITACHI specified cable. Press the PIP button again to watch a TV program while viewing other programs from the screen. THE REMOTE CONTROL MENU ...

Owners Guide
Page 67
USING THE RGB INPUT RGB ON SCREEN DISPLAY IMPORTANT: TURN OFF THE AVC BOX, THE DISPLAY MONITOR AND THE EXTERNAL COMPONENT BEFORE CONNECTING OR DISCONNECTING ANY CABLES. 1. AVC rear panel connection to one pixel). Dots correspond to the true resolution in Real Mode of SRS ...PB L/(MONO) R AUDIO INPUT 3 IR BLASTER PR R AUDIO INPUT 2 PR R AUDIO INPUT 1 ANALOG INPUT L AUDIO DVI-HDTV L/(MONO) AUDIO Please use HITACHI specified cable. RGB input signal. Always reset AUTO ADJUST feature when setting new display setting or when changing to a new computer (see page 74). 67...
USING THE RGB INPUT RGB ON SCREEN DISPLAY IMPORTANT: TURN OFF THE AVC BOX, THE DISPLAY MONITOR AND THE EXTERNAL COMPONENT BEFORE CONNECTING OR DISCONNECTING ANY CABLES. 1. AVC rear panel connection to one pixel). Dots correspond to the true resolution in Real Mode of SRS ...PB L/(MONO) R AUDIO INPUT 3 IR BLASTER PR R AUDIO INPUT 2 PR R AUDIO INPUT 1 ANALOG INPUT L AUDIO DVI-HDTV L/(MONO) AUDIO Please use HITACHI specified cable. RGB input signal. Always reset AUTO ADJUST feature when setting new display setting or when changing to a new computer (see page 74). 67...


