Owners Guide
Page 1
... LAST CH GUIDE/TV SCHD VID 4 VID 5 VOL MUTE SVCS VCR PLUS+ VID 2 VID 1 PIP FREEZE VID 3 PIP CH PIP ACCESS VIDEO SWAP PIP MODE REC CLU-5723TSI Video Audio Ch. PLASMA TELEVISION AVC (Audio/Video Control Center) & Plasma Display Monitor 32HDT20 42HDT20 OPERATING GUIDE Video Audio... Ch. Manager Locks Setup Move SEL Sel IMPORTANT SAFETY INSTRUCTIONS 2-3 FIRST TIME USE 4-23 THE REMOTE CONTROL 24-39 ON-SCREEN DISPLAY USING THE RGB INPUT OF THE PLASMA TV 40-63 64-74 USEFUL INFORMATION INDEX ...
... LAST CH GUIDE/TV SCHD VID 4 VID 5 VOL MUTE SVCS VCR PLUS+ VID 2 VID 1 PIP FREEZE VID 3 PIP CH PIP ACCESS VIDEO SWAP PIP MODE REC CLU-5723TSI Video Audio Ch. PLASMA TELEVISION AVC (Audio/Video Control Center) & Plasma Display Monitor 32HDT20 42HDT20 OPERATING GUIDE Video Audio... Ch. Manager Locks Setup Move SEL Sel IMPORTANT SAFETY INSTRUCTIONS 2-3 FIRST TIME USE 4-23 THE REMOTE CONTROL 24-39 ON-SCREEN DISPLAY USING THE RGB INPUT OF THE PLASMA TV 40-63 64-74 USEFUL INFORMATION INDEX ...
Owners Guide
Page 3
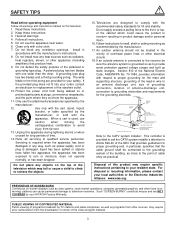
...stock market quotations, computer generated graphics, and other . Use only with the cart, stand, tripod, bracket, or table specified by your HITACHI Factory Warranty. GROUND CLAMP ANTENNA LEAD IN WIRE ANTENNA DISCHARGE UNIT (NEC SECTION 810-20) ELECTRIC SERVICE EQUIPMENT NEC NATIONAL ELECTRICAL CODE GROUNDING ... SYSTEM (NEC ART 250 PART H) Note to the CATV system installer: This reminder is used, use the attachments/accessories specified by TV stations and cable companies, as well as programs from the broadcaster or owner of the polarized or grounding-type plug. Such "SCREEN ...
...stock market quotations, computer generated graphics, and other . Use only with the cart, stand, tripod, bracket, or table specified by your HITACHI Factory Warranty. GROUND CLAMP ANTENNA LEAD IN WIRE ANTENNA DISCHARGE UNIT (NEC SECTION 810-20) ELECTRIC SERVICE EQUIPMENT NEC NATIONAL ELECTRICAL CODE GROUNDING ... SYSTEM (NEC ART 250 PART H) Note to the CATV system installer: This reminder is used, use the attachments/accessories specified by TV stations and cable companies, as well as programs from the broadcaster or owner of the polarized or grounding-type plug. Such "SCREEN ...
Owners Guide
Page 4
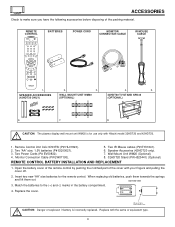
... UNIT WM20 (OPTIONAL) 32HDT20 TV STAND SPD32 (OPTIONAL) 6. 7. 8. Speaker Accesories (42HDT20 only). 7. Insert two new "AA" size batteries for use only with your fingers and pulling the cover off. 2. ACCESSORIES Check to make sure you have the following accessories before disposing of the cover with Hitachi model 32HDT20 and 42HDT20. 1. BOTTOM VIEW 3. Two "AA...
... UNIT WM20 (OPTIONAL) 32HDT20 TV STAND SPD32 (OPTIONAL) 6. 7. 8. Speaker Accesories (42HDT20 only). 7. Insert two new "AA" size batteries for use only with your fingers and pulling the cover off. 2. ACCESSORIES Check to make sure you have the following accessories before disposing of the cover with Hitachi model 32HDT20 and 42HDT20. 1. BOTTOM VIEW 3. Two "AA...
Owners Guide
Page 5
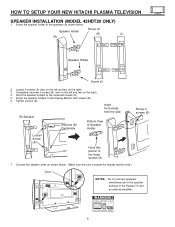
... (A). 5. Completely unscrew 4 screws (B) (two on the left and two on the right). 4. Insert horizontally from the side (R) Speaker Unscrew (B) Completely Bottom View of the Plasma TV and an external amplifier. 5 Screw the speaker holder to the loose screws (A). 7. Connect the speaker wires as shown below . (Make sure the core is toward... this portion to the speakers as shown below . Tighten screws (A). Hook the speaker holders to the Display Monitor with screws (B). 6. HOW TO SETUP YOUR NEW HITACHI PLASMA TELEVISION SPEAKER INSTALLATION (MODEL 42HDT20 ONLY) 1.
... (A). 5. Completely unscrew 4 screws (B) (two on the left and two on the right). 4. Insert horizontally from the side (R) Speaker Unscrew (B) Completely Bottom View of the Plasma TV and an external amplifier. 5 Screw the speaker holder to the loose screws (A). 7. Connect the speaker wires as shown below . (Make sure the core is toward... this portion to the speakers as shown below . Tighten screws (A). Hook the speaker holders to the Display Monitor with screws (B). 6. HOW TO SETUP YOUR NEW HITACHI PLASMA TELEVISION SPEAKER INSTALLATION (MODEL 42HDT20 ONLY) 1.
Owners Guide
Page 6
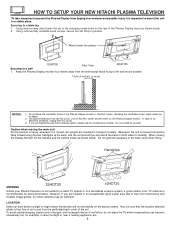
... area that the location selected allows a free flow of the Plasma Display monitor or the AVC center. HOW TO SETUP YOUR NEW HITACHI PLASMA TELEVISION To take measures to prevent the Plasma Display from tipping over and prevent possible injury it is important to mount the unit... a stable place. Using wood screws (two) fasten the set failure, do not place the TV where temperatures can become excessively hot, for stability. In case of set to a wall 1. Handgrips ANTENNA 32HDT20 42HDT20 Unless your Plasma Television is moved, two people are located in position. Also, be sure that...
... area that the location selected allows a free flow of the Plasma Display monitor or the AVC center. HOW TO SETUP YOUR NEW HITACHI PLASMA TELEVISION To take measures to prevent the Plasma Display from tipping over and prevent possible injury it is important to mount the unit... a stable place. Using wood screws (two) fasten the set failure, do not place the TV where temperatures can become excessively hot, for stability. In case of set to a wall 1. Handgrips ANTENNA 32HDT20 42HDT20 Unless your Plasma Television is moved, two people are located in position. Also, be sure that...
Owners Guide
Page 7
... see lip motion that is delayed compared to the side or behind the viewing area. HOW TO SET UP YOUR NEW HITACHI PLASMA TELEVISION VIEWING The major benefit of the HITACHI Plasma Television is functioning. To see image-like when the picture varied. The best picture is not a malfunction. Items... Notes 1 Arching sound from the side of the TV, place the surround speakers to the sound. 13 About the use might be ...
... see lip motion that is delayed compared to the side or behind the viewing area. HOW TO SET UP YOUR NEW HITACHI PLASMA TELEVISION VIEWING The major benefit of the HITACHI Plasma Television is functioning. To see image-like when the picture varied. The best picture is not a malfunction. Items... Notes 1 Arching sound from the side of the TV, place the surround speakers to the sound. 13 About the use might be ...
Owners Guide
Page 8
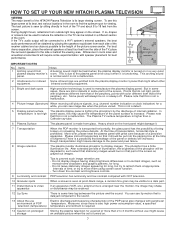
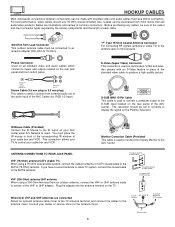
...Stereo Cable (3.5 mm plug to 3.5 mm plug) This cable is used to connect from external audio out to the AVC Center. Consult your TV to the ANT B terminal. Monitor Conection Cable (Provided) This cable is used to connect the Display Monitor to the audio input of common connectors...Plug the adapter into the antenna terminal on the television. "F" Type 75-Ohm Coaxial Antenna Connector For connecting RF signals (antenna or cable TV) to the antenna mixer. To second antenna or cable system To outdoor VHF or UHF antenna When both VHF and UHF antennas are illustrations ...
...Stereo Cable (3.5 mm plug to 3.5 mm plug) This cable is used to connect from external audio out to the AVC Center. Consult your TV to the ANT B terminal. Monitor Conection Cable (Provided) This cable is used to connect the Display Monitor to the audio input of common connectors...Plug the adapter into the antenna terminal on the television. "F" Type 75-Ohm Coaxial Antenna Connector For connecting RF signals (antenna or cable TV) to the antenna mixer. To second antenna or cable system To outdoor VHF or UHF antenna When both VHF and UHF antennas are illustrations ...
Owners Guide
Page 9
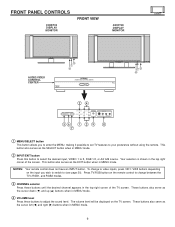
...also serves as the cursor down (̄) and up (̆) buttons when in the top right corner of the screen. To change between the TV's RGB1, and RGB2 modes. ቤ CHANNEL selector Press these buttons until the desired channel appears in MENU mode. ብ VOLUME level Press these .... The volume level will be displayed on the input you to enter the MENU, making it possible to set TV features to (see page 30). FRONT PANEL CONTROLS 32HDT20 DISPLAY MONITOR FRONT VIEW 42HDT20 DISPLAY MONITOR AUDIO/VIDEO CONTROL CENTER STANDBY (RED) ON (GREEN) MAIN POWER ቦ ቨ ቧ...
...also serves as the cursor down (̄) and up (̆) buttons when in the top right corner of the screen. To change between the TV's RGB1, and RGB2 modes. ቤ CHANNEL selector Press these buttons until the desired channel appears in MENU mode. ብ VOLUME level Press these .... The volume level will be displayed on the input you to enter the MENU, making it possible to set TV features to (see page 30). FRONT PANEL CONTROLS 32HDT20 DISPLAY MONITOR FRONT VIEW 42HDT20 DISPLAY MONITOR AUDIO/VIDEO CONTROL CENTER STANDBY (RED) ON (GREEN) MAIN POWER ቦ ቨ ቧ...
Owners Guide
Page 10
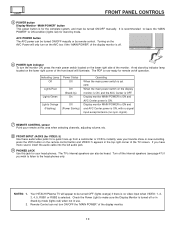
... input except antenna (no video input when VIDEO: 1, 2, 3, 4, 5, RGB1 or RGB2 is selected. NOTES: 1. 2. The PDP is set OFF. Your HITACHI Plasma TV will illuminate. Remote Control can be heard. signal). ቨ REMOTE CONTROL sensor Point your remote at this jack for remote on the lower right side... of the TV screen. AVC POWER button The AVC power can not turn the monitor ON, press the main power switch located on /off the internal speakers...
... input except antenna (no video input when VIDEO: 1, 2, 3, 4, 5, RGB1 or RGB2 is selected. NOTES: 1. 2. The PDP is set OFF. Your HITACHI Plasma TV will illuminate. Remote Control can be heard. signal). ቨ REMOTE CONTROL sensor Point your remote at this jack for remote on the lower right side... of the TV screen. AVC POWER button The AVC power can not turn the monitor ON, press the main power switch located on /off the internal speakers...
Owners Guide
Page 12
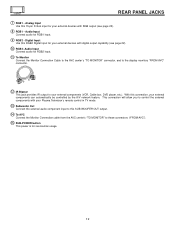
... AVC Connect the Monitor Connection cable from the AVC center's "TO MONITOR" to this connection, your external devices with your Plasma Television's remote control in TV mode. ቯ Subwoofer Out Connect the external audio component input to these connectors ("FROM AVC"). ቱ SUB-POWER button This power is for RGB1 input...
... AVC Connect the Monitor Connection cable from the AVC center's "TO MONITOR" to this connection, your external devices with your Plasma Television's remote control in TV mode. ቯ Subwoofer Out Connect the external audio component input to these connectors ("FROM AVC"). ቱ SUB-POWER button This power is for RGB1 input...
Owners Guide
Page 14
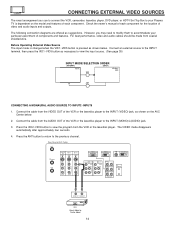
...~VID5 button to the previous channel. CONNECTING EXTERNAL VIDEO SOURCES The exact arrangement you may need to modify them to accommodate your Plasma TV is pressed as necessary to view the input source. (See page 30) INPUT MODE SELECTION ORDER (ANTENNA) (INPUT) Ant A ... (MONO) L PB INPUT 1 AUDIO (MONO) L PR PR R R AUDIO R L AUDIOR L AUDIOR L AUDIO OUT IR BLASTER AUDIO OUT VIDEO OUT VCR Hitachi Model or Similar Model 14 The VIDEO mode disappears automatically after approximately four seconds. 4. The following connection diagrams are offered as shown on the model...
...~VID5 button to the previous channel. CONNECTING EXTERNAL VIDEO SOURCES The exact arrangement you may need to modify them to accommodate your Plasma TV is pressed as necessary to view the input source. (See page 30) INPUT MODE SELECTION ORDER (ANTENNA) (INPUT) Ant A ... (MONO) L PB INPUT 1 AUDIO (MONO) L PR PR R R AUDIO R L AUDIOR L AUDIOR L AUDIO OUT IR BLASTER AUDIO OUT VIDEO OUT VCR Hitachi Model or Similar Model 14 The VIDEO mode disappears automatically after approximately four seconds. 4. The following connection diagrams are offered as shown on the model...

Owners Guide
Page 18
... IR BLASTER RL INPUT To Audio Input Terminal of External Amplifier Stereo System Amplifier The MONITOR OUT terminal outputs video and audio of the Plasma TV to INPUT2, no monitor out is controlled by the amplifier, not by the Plasma Television. If a component device is a fixed output. CONNECTING EXTERNAL AUDIO/VIDEO...
... IR BLASTER RL INPUT To Audio Input Terminal of External Amplifier Stereo System Amplifier The MONITOR OUT terminal outputs video and audio of the Plasma TV to INPUT2, no monitor out is controlled by the amplifier, not by the Plasma Television. If a component device is a fixed output. CONNECTING EXTERNAL AUDIO/VIDEO...
Owners Guide
Page 19
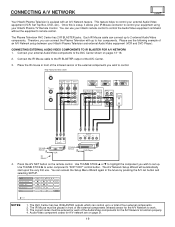
...1. The AVC Center has two IR BLASTER outputs which can use . CONNECTING A/V NETWORK Your Hitachi Plasma Television is setup, it allows your IR Mouse connector to control your equipment using your Hitachi Plasma TV Remote Control. Audio/Video component codes for the A/V Network to work. 3. Please see the...Video components for the A/V Network to enter component's "SOFT KEY" control button. Rear Panel of an A/V Network setup between your Hitachi Plasma Television and external Audio/Video equipment (VCR and DVD Player). The correct codes must be entered for each of four external components. 2....
...1. The AVC Center has two IR BLASTER outputs which can use . CONNECTING A/V NETWORK Your Hitachi Plasma Television is setup, it allows your IR Mouse connector to control your equipment using your Hitachi Plasma TV Remote Control. Audio/Video component codes for the A/V Network to work. 3. Please see the...Video components for the A/V Network to enter component's "SOFT KEY" control button. Rear Panel of an A/V Network setup between your Hitachi Plasma Television and external Audio/Video equipment (VCR and DVD Player). The correct codes must be entered for each of four external components. 2....
Owners Guide
Page 20
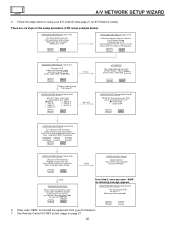
...the equipment from page 21. If connections are six steps in the setup procedure (VCR setup example below). BACK YES 6. HITACHI AV NET Wizard (step 4a of 6) Which TV Rear Panel Input is now conected to connect your VCR respond to trouble shoot settings. HELP TROUBLE SHOOTING Please check connections ... NET Wizard (step 4b of 6) Which RF channel does your VCR use to send video to the TV? (b) Channel 03 ( ) Channel 04 BACK NEXT HITACHI AV NET Wizard (step 5 of 6) Turn ON your VCR then press each of 6) Did your VCR. A/V NETWORK SETUP WIZARD 5. Your VCR is connected ...
...the equipment from page 21. If connections are six steps in the setup procedure (VCR setup example below). BACK YES 6. HITACHI AV NET Wizard (step 4a of 6) Which TV Rear Panel Input is now conected to connect your VCR respond to trouble shoot settings. HELP TROUBLE SHOOTING Please check connections ... NET Wizard (step 4b of 6) Which RF channel does your VCR use to send video to the TV? (b) Channel 03 ( ) Channel 04 BACK NEXT HITACHI AV NET Wizard (step 5 of 6) Turn ON your VCR then press each of 6) Did your VCR. A/V NETWORK SETUP WIZARD 5. Your VCR is connected ...
Owners Guide
Page 22
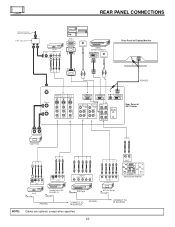
... 10 9 8 7 6 15 14 13 12 11 RGB OUTPUT AUDIO OUT DIGITAL OUTPUT CAPABILITY DIGITAL OUTPUT AUDIO OUT Rear Panel of AVC Center INPUT OUTPUT Cable TV Box LR INPUT S-VIDEO V L R INPUT VCR #2 S-VIDEO V L R OUTPUT Laserdisc player, VCR, camcorder, etc. OUTPUT Y PB/CB PR/CR L R DVD Player Y PB PR L R OUTPUT Stereo System... OUT S-VIDEO INPUT 4 S-VIDEO INPUT 3 S-VIDEO VIDEO VIDEO VIDEO (MONO) (MONO) (MONO) L L L R AUDIO R AUDIO R AUDIO RGB 1 ANALOG INPUT RGB 2 DIGITAL INPUT TO MONITOR Please use Hitachi specified cable.
... 10 9 8 7 6 15 14 13 12 11 RGB OUTPUT AUDIO OUT DIGITAL OUTPUT CAPABILITY DIGITAL OUTPUT AUDIO OUT Rear Panel of AVC Center INPUT OUTPUT Cable TV Box LR INPUT S-VIDEO V L R INPUT VCR #2 S-VIDEO V L R OUTPUT Laserdisc player, VCR, camcorder, etc. OUTPUT Y PB/CB PR/CR L R DVD Player Y PB PR L R OUTPUT Stereo System... OUT S-VIDEO INPUT 4 S-VIDEO INPUT 3 S-VIDEO VIDEO VIDEO VIDEO (MONO) (MONO) (MONO) L L L R AUDIO R AUDIO R AUDIO RGB 1 ANALOG INPUT RGB 2 DIGITAL INPUT TO MONITOR Please use Hitachi specified cable.
Owners Guide
Page 23
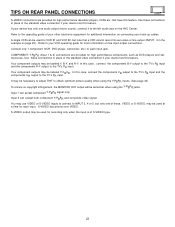
... at a time for each input jack. Your component outputs may use VIDEO or S-VIDEO inputs to connect to the TV's PR input. In this case, connect the components CB output to the TV's PB input and the components CR output to INPUT 3, 4 or 5, but note that have this feature. You... Y-PBPR and composite video signal. Use these , VIDEO or S-VIDEO, may be labeled Y, B-Y, and R-Y. Refer to the TV's PR input. In this case, connect the components B-Y output to the TV's PB input and the components R-Y output to your VCR operating guide for recording only when the input is of your...
... at a time for each input jack. Your component outputs may use VIDEO or S-VIDEO inputs to connect to the TV's PR input. In this case, connect the components CB output to the TV's PB input and the components CR output to INPUT 3, 4 or 5, but note that have this feature. You... Y-PBPR and composite video signal. Use these , VIDEO or S-VIDEO, may be labeled Y, B-Y, and R-Y. Refer to the TV's PR input. In this case, connect the components B-Y output to the TV's PB input and the components R-Y output to your VCR operating guide for recording only when the input is of your...
Owners Guide
Page 24
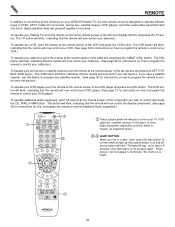
...EXIT CH SELECT ANT TV/RGB MENU LAST CH GUIDE/TV SCHD VID 4 VID 5 VOL MUTE SVCS VCR PLUS+ VID 2 VID 1 PIP FREEZE VID 3 PIP CH PIP ACCESS VIDEO SWAP PIP MODE REC CLU-5723TSI REMOTE In addition to controlling all the functions on your HITACHI Plasma TV, the new remote ...control is designed to operate different types of VCRs, CATV (Cable TV) converters, set-top-box, satellite receiver, DVD players, and other Audio equipment depending on which...
...EXIT CH SELECT ANT TV/RGB MENU LAST CH GUIDE/TV SCHD VID 4 VID 5 VOL MUTE SVCS VCR PLUS+ VID 2 VID 1 PIP FREEZE VID 3 PIP CH PIP ACCESS VIDEO SWAP PIP MODE REC CLU-5723TSI REMOTE In addition to controlling all the functions on your HITACHI Plasma TV, the new remote ...control is designed to operate different types of VCRs, CATV (Cable TV) converters, set-top-box, satellite receiver, DVD players, and other Audio equipment depending on which...
Owners Guide
Page 25
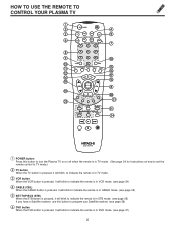
... 2 PIP VID 3 PIP CH VID 4 FREEZE PIP MODE PIP ACCESS SWAP VIDEO ብ ቦ ቨ 23 1 24 REC VOL TV POWER DVD 1 4 VCR CD SOURCETWAPIZEARD CBL 2 STB 7 SLEEP 5 3 AMP ANT 8 6 TV/RGB 0 9 A/V NET MENU INFO MODE ASPECT EXIT SELECT SVCS MUTE VID 2 VID 1 VCR PLUS+ CH PIP LAST CH PIP MODE... ᕃ POWER button Press this button to turn the Plasma TV on or off when the remote is in TV mode. (See page 24 for instructions on how to set the remote control to TV mode.) ባ TV button When the TV button is pressed, it will blink, to indicate the remote ...
... 2 PIP VID 3 PIP CH VID 4 FREEZE PIP MODE PIP ACCESS SWAP VIDEO ብ ቦ ቨ 23 1 24 REC VOL TV POWER DVD 1 4 VCR CD SOURCETWAPIZEARD CBL 2 STB 7 SLEEP 5 3 AMP ANT 8 6 TV/RGB 0 9 A/V NET MENU INFO MODE ASPECT EXIT SELECT SVCS MUTE VID 2 VID 1 VCR PLUS+ CH PIP LAST CH PIP MODE... ᕃ POWER button Press this button to turn the Plasma TV on or off when the remote is in TV mode. (See page 24 for instructions on how to set the remote control to TV mode.) ባ TV button When the TV button is pressed, it will blink, to indicate the remote ...
Owners Guide
Page 26
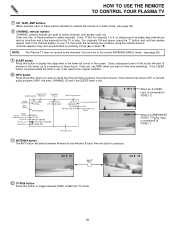
... are not in Audio mode. (see page 58) ቪ SLEEP button Press this button when you wish to tune then wait a few seconds for the TV to select channels. IN: 3 When an S-VIDEO Input is pressed. Enter "0" first for channels 1 to 9, or simply press the single digit channel you want to... Audio Selected Received Broadcast Rating Main Picture Source Audio Broadcast Wide Mode Picture Closed Mode Captioning Off Timer TV Time Out Sleep Timer Stereo (480i) ST/SA 16:9 Standard TV-PG DLSV Ant A 15 PIP TV-PG DLSV ABCDEFG 10:10 AM PIP Ant A 46-1234 Movies C.C. Ant A 10 ANT Ant B 28 &#...
... are not in Audio mode. (see page 58) ቪ SLEEP button Press this button when you wish to tune then wait a few seconds for the TV to select channels. IN: 3 When an S-VIDEO Input is pressed. Enter "0" first for channels 1 to 9, or simply press the single digit channel you want to... Audio Selected Received Broadcast Rating Main Picture Source Audio Broadcast Wide Mode Picture Closed Mode Captioning Off Timer TV Time Out Sleep Timer Stereo (480i) ST/SA 16:9 Standard TV-PG DLSV Ant A 15 PIP TV-PG DLSV ABCDEFG 10:10 AM PIP Ant A 46-1234 Movies C.C. Ant A 10 ANT Ant B 28 &#...
Owners Guide
Page 27
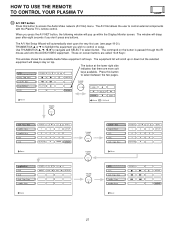
... Top Box POWER CH ̄ CH ̆ SETUP keys available. The equipment list will scroll up within the Display Monitor screen. Cable Box Amplifier DVD TV/VCR b MORE THUMB STICK SELECT MENU SELECT MORE EXIT Move Move SEL Select THUMB STICK SELECT Set Top Box Cable Box Amplifier DVD VCR Move... soft keys. The button at the lower right side indicates that there are called "Soft Keys". HOW TO USE THE REMOTE TO CONTROL YOUR PLASMA TV ቯ A/V NET button Press this button to control or setup. The A/V Net allows the user to control external components with the Plasma...
... Top Box POWER CH ̄ CH ̆ SETUP keys available. The equipment list will scroll up within the Display Monitor screen. Cable Box Amplifier DVD TV/VCR b MORE THUMB STICK SELECT MENU SELECT MORE EXIT Move Move SEL Select THUMB STICK SELECT Set Top Box Cable Box Amplifier DVD VCR Move... soft keys. The button at the lower right side indicates that there are called "Soft Keys". HOW TO USE THE REMOTE TO CONTROL YOUR PLASMA TV ቯ A/V NET button Press this button to control or setup. The A/V Net allows the user to control external components with the Plasma...


