
Owners Guide
Page 1
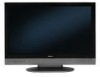
PLASMA MONITOR Operating Guide for 42HDM12 IMPORTANT SAFETY INSTRUCTIONS 1-6 IMAGE RETENTION...7 ACCESSORIES...8 HOW TO SETUP YOUR NEW HITACHI PLASMA MONITOR 9-21 HOW TO USE REMOTE CONTROL TO CONTROL YOUR PLASMA MONITOR 22-24 OSD (ON-SCREEN DISPLAY 25-29 USEFUL INFORMATION ...30-37 0
PLASMA MONITOR Operating Guide for 42HDM12 IMPORTANT SAFETY INSTRUCTIONS 1-6 IMAGE RETENTION...7 ACCESSORIES...8 HOW TO SETUP YOUR NEW HITACHI PLASMA MONITOR 9-21 HOW TO USE REMOTE CONTROL TO CONTROL YOUR PLASMA MONITOR 22-24 OSD (ON-SCREEN DISPLAY 25-29 USEFUL INFORMATION ...30-37 0
Owners Guide
Page 2
... apparatus. Follow all warnings and instructions marked on back side of electric shock to the presence of the Plasma Monitor as vases, shall be of HITACHI Plasma Monitor. REFER SERVICING TO QUALIFIED SERVICE PERSONNEL. NEVER CONNECT THE PLASMA MONITOR TO 50Hz, DIRECT CURRENT, OR ANYTHING OTHER THAN THE SPECIFIED VOLTAGE. Apparatus shall not be of a sufficient magnitude...
... apparatus. Follow all warnings and instructions marked on back side of electric shock to the presence of the Plasma Monitor as vases, shall be of HITACHI Plasma Monitor. REFER SERVICING TO QUALIFIED SERVICE PERSONNEL. NEVER CONNECT THE PLASMA MONITOR TO 50Hz, DIRECT CURRENT, OR ANYTHING OTHER THAN THE SPECIFIED VOLTAGE. Apparatus shall not be of a sufficient magnitude...
Owners Guide
Page 3
... only with the apparatus. A grounding type plug has two blades and a third grounding prong. Do not apply excessive pulling force to the Plasma screen, do not knock or rub the surface with the manufacturer's instructions. 8. Under no circumstances remove the rear cover of the cabinet which...safety standards for home and other . Sometimes the screen might have fallen into your HITACHI Factory Warranty. Use a soft cloth to avoid injury from being walked on the top of this monitor. 1. PUBLIC VIEWING OF COPYRIGHTED MATERIAL Public viewing of programs broadcast by TV stations and...
... only with the apparatus. A grounding type plug has two blades and a third grounding prong. Do not apply excessive pulling force to the Plasma screen, do not knock or rub the surface with the manufacturer's instructions. 8. Under no circumstances remove the rear cover of the cabinet which...safety standards for home and other . Sometimes the screen might have fallen into your HITACHI Factory Warranty. Use a soft cloth to avoid injury from being walked on the top of this monitor. 1. PUBLIC VIEWING OF COPYRIGHTED MATERIAL Public viewing of programs broadcast by TV stations and...
Owners Guide
Page 4
...If the ventilation is broken or damaged, immediately turn off the power, it could result in an injury, and continued use the Plasma Monitor if a problem should enter the projector, immediately turn off the power switch, disconnect the power plug from the power outlet. English...an additional warning (including cautions). This symbol indicates a compulsory action. Do not insert liquids or foreign objects. Do not give the Plasma Monitor any fixed cover. Do not obstruct the ventilation of liquids or foreign objects could result in fire or electrical shock. Incorrect power ...
...If the ventilation is broken or damaged, immediately turn off the power, it could result in an injury, and continued use the Plasma Monitor if a problem should enter the projector, immediately turn off the power switch, disconnect the power plug from the power outlet. English...an additional warning (including cautions). This symbol indicates a compulsory action. Do not insert liquids or foreign objects. Do not give the Plasma Monitor any fixed cover. Do not obstruct the ventilation of liquids or foreign objects could result in fire or electrical shock. Incorrect power ...
Owners Guide
Page 6
...or rub the surface with a dry soft cloth. especially because they would cause discoloration, scratches or cracks. 5 particularly take care of the Plasma Monitor. Relax your eyes may become tired. Clean the screen with a soft cloth moistened with warm water and dry with two persons. •...screen. Do not put anything on carpet or blanket, or near a curtain which has a possibility of obstructing a ventilation hole of the Plasma Monitor. Neglect could result in fire or electrical shock. • Do not place near the kitchen, a humidifier or other parts in direct ...
...or rub the surface with a dry soft cloth. especially because they would cause discoloration, scratches or cracks. 5 particularly take care of the Plasma Monitor. Relax your eyes may become tired. Clean the screen with a soft cloth moistened with warm water and dry with two persons. •...screen. Do not put anything on carpet or blanket, or near a curtain which has a possibility of obstructing a ventilation hole of the Plasma Monitor. Neglect could result in fire or electrical shock. • Do not place near the kitchen, a humidifier or other parts in direct ...
Owners Guide
Page 8
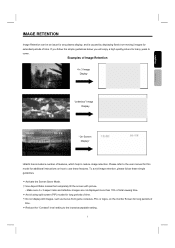
... come. Please refer to the user manual for this model for additional instructions on the monitor Screen for long periods of time. ∞ Reduce the "Contrast" level setting to.... 7 English Français IMAGE RETENTION Image Retention can be an issue for any plasma display, and is caused by displaying fixed (non-moving) images for extended periods of features... image retention. Examples of Image Retention 4 x 3 Image Display "Letterbox" Image Display "On-Screen Display" Hitachi has included a number of time. Make sure 4 x 3 aspect ratio and letterbox images are not displayed ...
... come. Please refer to the user manual for this model for additional instructions on the monitor Screen for long periods of time. ∞ Reduce the "Contrast" level setting to.... 7 English Français IMAGE RETENTION Image Retention can be an issue for any plasma display, and is caused by displaying fixed (non-moving) images for extended periods of features... image retention. Examples of Image Retention 4 x 3 Image Display "Letterbox" Image Display "On-Screen Display" Hitachi has included a number of time. Make sure 4 x 3 aspect ratio and letterbox images are not displayed ...
Owners Guide
Page 9
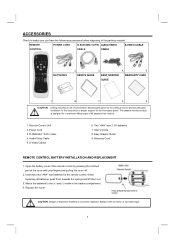
... 5. S-Video Cables 6. When replacing old batteries, push them towards the springs and lift them out. 3. Replace with your fingers and pulling the cover off. 2. This plasma monitor product is incorrectly replaced. Match the batteries to make sure you have the following accessories before disposing of the cover with the same or equivalent...
... 5. S-Video Cables 6. When replacing old batteries, push them towards the springs and lift them out. 3. Replace with your fingers and pulling the cover off. 2. This plasma monitor product is incorrectly replaced. Match the batteries to make sure you have the following accessories before disposing of the cover with the same or equivalent...
Owners Guide
Page 10
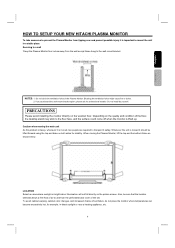
English Français HOW TO SETUP YOUR NEW HITACHI PLASMA MONITOR To take measures to prevent the Plasma Monitor from tipping over and prevent possible injury it safely. Securing to the floor face, and the surface could come off when the monitor is lifted up. Do not block the ventilation holes ... holes might cause fire or defect. 2. Also, be lifted forward using the top and base on the quality and condition of the Plasma Monitor. Do not install by yourself. LOCATION Select an area where sunlight or bright indoor illumination will not fall directly on the wooden floor....
English Français HOW TO SETUP YOUR NEW HITACHI PLASMA MONITOR To take measures to prevent the Plasma Monitor from tipping over and prevent possible injury it safely. Securing to the floor face, and the surface could come off when the monitor is lifted up. Do not block the ventilation holes ... holes might cause fire or defect. 2. Also, be lifted forward using the top and base on the quality and condition of the Plasma Monitor. Do not install by yourself. LOCATION Select an area where sunlight or bright indoor illumination will not fall directly on the wooden floor....
Owners Guide
Page 11
... wait a little before turning ON again. 10 More-over, please treat the plasma panel with peripheral temperature. HOW TO SETUP YOUR NEW HITACHI PLASMA MONITOR VIEWING The major benefit of the HITACHI Plasma Monitor is its best, test various locations in front of the monitor and about 8 to the sound. 13 About the use of the Power ON...
... wait a little before turning ON again. 10 More-over, please treat the plasma panel with peripheral temperature. HOW TO SETUP YOUR NEW HITACHI PLASMA MONITOR VIEWING The major benefit of the HITACHI Plasma Monitor is its best, test various locations in front of the monitor and about 8 to the sound. 13 About the use of the Power ON...

Owners Guide
Page 12
... The resolution should use 75-Ohm coaxial shielded wire. Before purchasing any cables, be set correctly to inputs and outputs located on the Plasma monitor. Phono Connector (Provided) Used on all standard video and audio cables which connect to display the signal on the rear jack panel. ... products. Cables can be purchased from external audio out to the subwoofer output of common connectors. Below are illustrations and names of the Plasma monitor. 11 D-SUB MINI 15-Pin Cable (Provided) This cable is used to connect an external audio component input to the audio input of...
... The resolution should use 75-Ohm coaxial shielded wire. Before purchasing any cables, be set correctly to inputs and outputs located on the Plasma monitor. Phono Connector (Provided) Used on all standard video and audio cables which connect to display the signal on the rear jack panel. ... products. Cables can be purchased from external audio out to the subwoofer output of common connectors. Below are illustrations and names of the Plasma monitor. 11 D-SUB MINI 15-Pin Cable (Provided) This cable is used to connect an external audio component input to the audio input of...
Owners Guide
Page 13
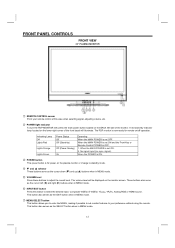
... button This power button is set OFF. This button also serves as the cursor left side of the front bezel will be displayed on the plasma monitor or change to standby mode. ④ À and · selector These buttons serve as the SELECT button when in MENU mode. ⑦ MENU/... ON and the Front Key or Remote Control POWER is now ready for power on the monitor screen. The PDP monitor is OFF. 1. No signal input (no sync. signal). FRONT PANEL CONTROLS FRONT VIEW 42" PLASMA MONITOR ① REMOTE CONTROL sensor Point your preference without using the remote. When the MAIN POWER...
... button This power button is set OFF. This button also serves as the cursor left side of the front bezel will be displayed on the plasma monitor or change to standby mode. ④ À and · selector These buttons serve as the SELECT button when in MENU mode. ⑦ MENU/... ON and the Front Key or Remote Control POWER is now ready for power on the monitor screen. The PDP monitor is OFF. 1. No signal input (no sync. signal). FRONT PANEL CONTROLS FRONT VIEW 42" PLASMA MONITOR ① REMOTE CONTROL sensor Point your preference without using the remote. When the MAIN POWER...
Owners Guide
Page 14
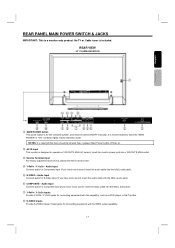
REAR VIEW 42" PLASMA MONITOR ① MAIN POWER button This power button is designed to "ON" ...Y-CBCR Inputs Provide Y-PBPR / Y-CBCR jacks for connecting equipment with S-VIDEO output capability. 13 NOTES: It is a monitor only product. Insert the monitor power cord into the left (L) audio jack). ⑥ COMPOSITE - Audio Input Connect audio for connecting equipment with this capability... AC current. between Main Power button off then on. ② AC IN input This monitor is for Component input (if you have mono sound, insert the audio cable into the left (L) audio jack). ⑤...
REAR VIEW 42" PLASMA MONITOR ① MAIN POWER button This power button is designed to "ON" ...Y-CBCR Inputs Provide Y-PBPR / Y-CBCR jacks for connecting equipment with S-VIDEO output capability. 13 NOTES: It is a monitor only product. Insert the monitor power cord into the left (L) audio jack). ⑥ COMPOSITE - Audio Input Connect audio for connecting equipment with this capability... AC current. between Main Power button off then on. ② AC IN input This monitor is for Component input (if you have mono sound, insert the audio cable into the left (L) audio jack). ⑤...
Owners Guide
Page 16
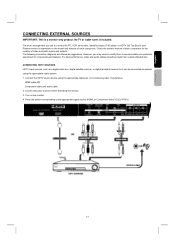
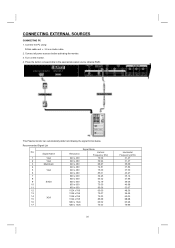
...Box to your particular assortment of preference: HDMI cable OR Component cable and audio cable 2. Connect all power sources before activating the monitor. 3. Check the owner's manual of video and audio inputs and outputs. For best performance, video and audio cables should be .... Connect the HDTV source device using the appropriate cable system. 1. Press the button corresponding to accommodate your Plasma monitor is dependent on the monitor. 4. No TV or Cable tuner is a monitor only product. English Français CONNECTING EXTERNAL SOURCES IMPORTANT: This is included.
...Box to your particular assortment of preference: HDMI cable OR Component cable and audio cable 2. Connect all power sources before activating the monitor. 3. Check the owner's manual of video and audio inputs and outputs. For best performance, video and audio cables should be .... Connect the HDTV source device using the appropriate cable system. 1. Press the button corresponding to accommodate your Plasma monitor is dependent on the monitor. 4. No TV or Cable tuner is a monitor only product. English Français CONNECTING EXTERNAL SOURCES IMPORTANT: This is included.
Owners Guide
Page 21
Press the button corresponding to the appropriate signal source (Analog RGB) This Plasma monitor can automatically defect and display the signal format below. Signal Name 1 VGA 2 VGA 3 Macintosh 4 5 VGA 6 7 8 9 SVGA 10 11 12 13 14 XGA 15 16 17 ....67 48.36 56.48 60.02 68.68 63.98 79.98 Recommended Signal List No. CONNECTING EXTERNAL SOURCES CONNECTING PC 1. Turn on the monitor. 4. Connect all power sources before activating the monitor. 3. Connect the PC using: D-Sub cable and ⌀ 3.5 mm Audio cable 2.
Press the button corresponding to the appropriate signal source (Analog RGB) This Plasma monitor can automatically defect and display the signal format below. Signal Name 1 VGA 2 VGA 3 Macintosh 4 5 VGA 6 7 8 9 SVGA 10 11 12 13 14 XGA 15 16 17 ....67 48.36 56.48 60.02 68.68 63.98 79.98 Recommended Signal List No. CONNECTING EXTERNAL SOURCES CONNECTING PC 1. Turn on the monitor. 4. Connect all power sources before activating the monitor. 3. Connect the PC using: D-Sub cable and ⌀ 3.5 mm Audio cable 2.
Owners Guide
Page 23
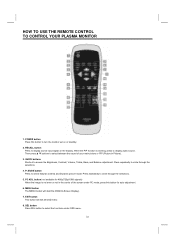
... The MENU button will exit all OSD menu. 8. EXIT button This button will start the OSD(On-Screen Display). 7. QUICK buttons Shortcut to turn the monitor set on the display. POWER button Press this button for 480p/720p/1080i signals) When the image is working, press to circle through the selections..., and Balance adjustment. Press repeatedly to circle through the selections. 5. button (not available for auto adjustment. 6. HOW TO USE THE REMOTE CONTROL TO CONTROL YOUR PLASMA MONITOR 1. P.
... The MENU button will exit all OSD menu. 8. EXIT button This button will start the OSD(On-Screen Display). 7. QUICK buttons Shortcut to turn the monitor set on the display. POWER button Press this button for 480p/720p/1080i signals) When the image is working, press to circle through the selections..., and Balance adjustment. Press repeatedly to circle through the selections. 5. button (not available for auto adjustment. 6. HOW TO USE THE REMOTE CONTROL TO CONTROL YOUR PLASMA MONITOR 1. P.

Owners Guide
Page 24
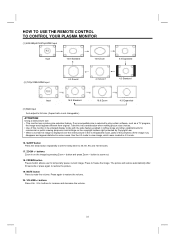
.... PIP source cannot be the same with PIP video signal source. 15. Note: Use this aspect to Zoom-in once while in YPBPR, the monitor will age more rapidly than the gray areas. 4:3 Zoom1/Zoom2 Use these aspect modes to zoom in on conventional (4:3) sources. 16:9 STANDARD Use ... input signal format received, the picture format ratio allows you select in 16:9 aspect. 23 English HOW TO USE THE REMOTE CONTROL TO CONTROL YOUR PLASMA MONITOR 9. ▲ ▼ W X buttons Press Up/Down/Left/Right buttons to different aspects. ATTENTION Using 480i/576i signals: When the input signal is...
.... PIP source cannot be the same with PIP video signal source. 15. Note: Use this aspect to Zoom-in once while in YPBPR, the monitor will age more rapidly than the gray areas. 4:3 Zoom1/Zoom2 Use these aspect modes to zoom in on conventional (4:3) sources. 16:9 STANDARD Use ... input signal format received, the picture format ratio allows you select in 16:9 aspect. 23 English HOW TO USE THE REMOTE CONTROL TO CONTROL YOUR PLASMA MONITOR 9. ▲ ▼ W X buttons Press Up/Down/Left/Right buttons to different aspects. ATTENTION Using 480i/576i signals: When the input signal is...
Owners Guide
Page 25
... to freeze the image. Press to increase and decrease the volume. 24 buttons Press Vol+ / Vol- HOW TO USE THE REMOTE CONTROL TO CONTROL YOUR PLASMA MONITOR (1) 480i/480p/576i/576p/HDMI Input Input 16:9 Standard 16:9 Zoom 4:3 Expanded (2) 720p/1080i/HDMI Input 4:3 Zoom2 4:3 Zoom1 4:3 Standard Input 16:9 ... to full size. (Aspect ratio is displayed over the entire picture in the 4:3 Expanded mode, parts of the periphery of this monitor in its enlarged display mode with the wide feature enabled in some cases. The picture will restore automatically after 60 seconds or press ...
... to freeze the image. Press to increase and decrease the volume. 24 buttons Press Vol+ / Vol- HOW TO USE THE REMOTE CONTROL TO CONTROL YOUR PLASMA MONITOR (1) 480i/480p/576i/576p/HDMI Input Input 16:9 Standard 16:9 Zoom 4:3 Expanded (2) 720p/1080i/HDMI Input 4:3 Zoom2 4:3 Zoom1 4:3 Standard Input 16:9 ... to full size. (Aspect ratio is displayed over the entire picture in the 4:3 Expanded mode, parts of the periphery of this monitor in its enlarged display mode with the wide feature enabled in some cases. The picture will restore automatically after 60 seconds or press ...
Owners Guide
Page 26
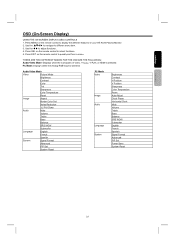
... ON-SCREEN DISPLAY (OSD) CONTROLS 1. PC Mode: Displays when the Analog RGB input is selected. Use the W X to different menu item. 3. Press SEL on your HITACHI Plasma Monitor. 2.
... ON-SCREEN DISPLAY (OSD) CONTROLS 1. PC Mode: Displays when the Analog RGB input is selected. Use the W X to different menu item. 3. Press SEL on your HITACHI Plasma Monitor. 2.
Owners Guide
Page 31
... cause physical damage to shocks such as dropping it on or near a heater. Remove the plug from the wall outlet if your Plasma Monitor away from the accessories pack. Do not place rubber or vinyl products or cellophane tape on vacation. Do not leave it wet. ... screen with strong cleaners, polishes or a chemically treated cloth. Replace the old batteries with a new battery. USEFUL INFORMATION CARE OF YOUR HITACHI PLASMA MONITOR AND YOUR REMOTE CONTROL DO Dust the screen and frame with a cleaning cloth from extreme heat, humidity, and extremely dusty places. Avoid ...
... cause physical damage to shocks such as dropping it on or near a heater. Remove the plug from the wall outlet if your Plasma Monitor away from the accessories pack. Do not place rubber or vinyl products or cellophane tape on vacation. Do not leave it wet. ... screen with strong cleaners, polishes or a chemically treated cloth. Replace the old batteries with a new battery. USEFUL INFORMATION CARE OF YOUR HITACHI PLASMA MONITOR AND YOUR REMOTE CONTROL DO Dust the screen and frame with a cleaning cloth from extreme heat, humidity, and extremely dusty places. Avoid ...

Owners Guide
Page 34
... norme NMB-003 du Canada. 33 This Class B digital apparatus complies with computer, peripherals (including monitors) and operating system. TRADEMARK ACKNOWLEDGMENT DDCTM is capable for the plug & play. The Monitor sends back a string of the U.S.A. VESA is powered on, it sends a command to a... Standard Association. Plug & Play is a system with Canadian ICES-003. English Français USEFUL INFORMATION PLUG and PLAY This Plasma Monitor complies with VESA DDC2B specifications; When a Plug and Play PC is a trademark of Video Electronics Standard Association. IBM PC/AT ...
... norme NMB-003 du Canada. 33 This Class B digital apparatus complies with computer, peripherals (including monitors) and operating system. TRADEMARK ACKNOWLEDGMENT DDCTM is capable for the plug & play. The Monitor sends back a string of the U.S.A. VESA is powered on, it sends a command to a... Standard Association. Plug & Play is a system with Canadian ICES-003. English Français USEFUL INFORMATION PLUG and PLAY This Plasma Monitor complies with VESA DDC2B specifications; When a Plug and Play PC is a trademark of Video Electronics Standard Association. IBM PC/AT ...


