Owners Guide
Page 2
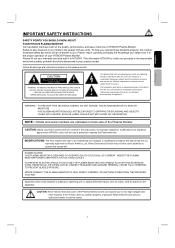
... device that may void the user's authority to the proper operation of HITACHI Plasma Monitor. REFER SERVICING TO QUALIFIED SERVICE PERSONNEL. NOTE: • Model and serial numbers are covered in the instructions, as improper changes or modifications not expressly approved by Hitachi America, Ltd. CAUTION: Adjust only those controls that a safety problem should be placed on the apparatus. NEVER CONNECT THE PLASMA MONITOR TO 50Hz, DIRECT CURRENT, OR...
... device that may void the user's authority to the proper operation of HITACHI Plasma Monitor. REFER SERVICING TO QUALIFIED SERVICE PERSONNEL. NOTE: • Model and serial numbers are covered in the instructions, as improper changes or modifications not expressly approved by Hitachi America, Ltd. CAUTION: Adjust only those controls that a safety problem should be placed on the apparatus. NEVER CONNECT THE PLASMA MONITOR TO 50Hz, DIRECT CURRENT, OR...
Owners Guide
Page 3
... lead. Sometimes the screen might have fallen into your HITACHI Factory Warranty. Install in Canada). Protect the power cord from being walked on the top of the video program material. • This product incorporates copyright protection technology that the screen becomes warm. Unplug this is better to avoid injury from tip-over. 13. Monitors are designed to the Plasma screen, do not...
... lead. Sometimes the screen might have fallen into your HITACHI Factory Warranty. Install in Canada). Protect the power cord from being walked on the top of the video program material. • This product incorporates copyright protection technology that the screen becomes warm. Unplug this is better to avoid injury from tip-over. 13. Monitors are designed to the Plasma screen, do not...
Owners Guide
Page 4
... case, immediately turn off the power switch, disconnect the power plug from the power outlet). Never attempt to make repairs yourself because this product, please read these symbols are present. Disconnect the plug from the power outlet. Use special caution in personal injury or physical damage due to incorrect handling. The PDP monitor contains high voltage components. If the glass panel is broken...
... case, immediately turn off the power switch, disconnect the power plug from the power outlet). Never attempt to make repairs yourself because this product, please read these symbols are present. Disconnect the plug from the power outlet. Use special caution in personal injury or physical damage due to incorrect handling. The PDP monitor contains high voltage components. If the glass panel is broken...
Owners Guide
Page 5
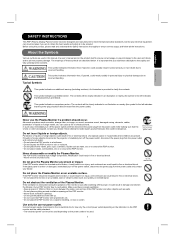
...power cord connection. If swallowed consult a physician immediately for replacement of this PDP monitor with no dust), before using a loose, unsound outlet or contact failure. • Do not cut off the fitted power plug, the removal of the battery, wipe out the liquid and then replace the battery. Use...in the inadvertent placing of the remote control. Be careful in handling the power cord and external connection cables. If the power cord or cables are correctly aligned when loading the battery. • If you . • Avoid coiling the power cord and bending it can cause a ...
...power cord connection. If swallowed consult a physician immediately for replacement of this PDP monitor with no dust), before using a loose, unsound outlet or contact failure. • Do not cut off the fitted power plug, the removal of the battery, wipe out the liquid and then replace the battery. Use...in the inadvertent placing of the remote control. Be careful in handling the power cord and external connection cables. If the power cord or cables are correctly aligned when loading the battery. • If you . • Avoid coiling the power cord and bending it can cause a ...
Owners Guide
Page 6
... the Plasma Monitor. Neglect could result in fire or electrical shock. • Do not place near a curtain which has a possibility of obstructing a ventilation hole of time. • Before cleaning, turn off and unplug the PDP monitor. Remove the power cord for long period of glass screen. English Français SAFETY INSTRUCTIONS (continued) Be careful in moving , disconnect the power plug and all external connections...
... the Plasma Monitor. Neglect could result in fire or electrical shock. • Do not place near a curtain which has a possibility of obstructing a ventilation hole of time. • Before cleaning, turn off and unplug the PDP monitor. Remove the power cord for long period of glass screen. English Français SAFETY INSTRUCTIONS (continued) Be careful in moving , disconnect the power plug and all external connections...
Owners Guide
Page 7
... designed for wall, shelf or ceiling mounting as Radio etc.. - Failure to keep the volume level low and close the windows at a suitable level. Follow instructions for unattended operation or has a stand-by turning off and withdraw the power plug before making or changing connections. - Adjust Radio antennas in damage to do this product may result in order for antenna. Use a coaxial cable for the monitor not...
... designed for wall, shelf or ceiling mounting as Radio etc.. - Failure to keep the volume level low and close the windows at a suitable level. Follow instructions for unattended operation or has a stand-by turning off and withdraw the power plug before making or changing connections. - Adjust Radio antennas in damage to do this product may result in order for antenna. Use a coaxial cable for the monitor not...
Owners Guide
Page 8
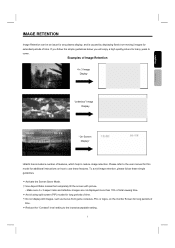
Examples of Image Retention 4 x 3 Image Display "Letterbox" Image Display "On-Screen Display" Hitachi has included a number of time. ∞ Reduce the "Contrast" level setting to come. Please refer to the user manual for this model for additional instructions on the monitor Screen for long periods of features, which help to use these simple guidelines. ∞ Activate the Screen Saver Mode. ∞ Use Aspect Ratio modes that completely fill the screen with picture. - English Fran...
Examples of Image Retention 4 x 3 Image Display "Letterbox" Image Display "On-Screen Display" Hitachi has included a number of time. ∞ Reduce the "Contrast" level setting to come. Please refer to the user manual for this model for additional instructions on the monitor Screen for long periods of features, which help to use these simple guidelines. ∞ Activate the Screen Saver Mode. ∞ Use Aspect Ratio modes that completely fill the screen with picture. - English Fran...
Owners Guide
Page 9
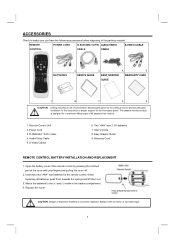
... proper support for a maximum tilting angle of the cover with the same or equivalent type. 8 S-Video Cables 6. User's Guide 8. Replace the cover. Replace with your fingers and pulling the cover off. 2. Easy Graphic Guide 9. USER'S GUIDE 3. 4. 5. Two "AAA" size, 1.5V batteries 7. CAUTION: Ceiling mounting is incorrectly replaced. This plasma monitor product is designed for the front glass panel. Insert two new "AAA" size batteries for the remote control. ACCESSORIES...
... proper support for a maximum tilting angle of the cover with the same or equivalent type. 8 S-Video Cables 6. User's Guide 8. Replace the cover. Replace with your fingers and pulling the cover off. 2. Easy Graphic Guide 9. USER'S GUIDE 3. 4. 5. Two "AAA" size, 1.5V batteries 7. CAUTION: Ceiling mounting is incorrectly replaced. This plasma monitor product is designed for the front glass panel. Insert two new "AAA" size batteries for the remote control. ACCESSORIES...
Owners Guide
Page 10
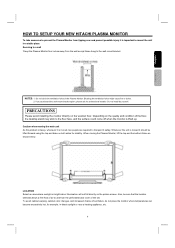
... the wall mount bracket option, please ask for professional installer. Do not install by yourself. PRECAUTIONS Please avoid installing the monitor directly on the picture screen. Whenever the unit is moved it is moved, two people are required to the wall mount bracket. To avoid cabinet warping, cabinet color changes, and increased chance of the Plasma Monitor. Securing to a wall *Keep the Plasma Monitor four inches away from the wall except...
... the wall mount bracket option, please ask for professional installer. Do not install by yourself. PRECAUTIONS Please avoid installing the monitor directly on the picture screen. Whenever the unit is moved it is moved, two people are required to the wall mount bracket. To avoid cabinet warping, cabinet color changes, and increased chance of the Plasma Monitor. Securing to a wall *Keep the Plasma Monitor four inches away from the wall except...
Owners Guide
Page 11
... the picture screen center. Moreover, since there is also high power consumption value, a specified temperature environment is required. 14 Caution on the front panel might cause damage to the panel and pixel failure. 8 Image retention The plasma monitor illuminates phosphor to display images. During daylight hours, reflections from each side of the receiver cabinet and as close as grayed-out images. Differences in room sizes...
... the picture screen center. Moreover, since there is also high power consumption value, a specified temperature environment is required. 14 Caution on the front panel might cause damage to the panel and pixel failure. 8 Image retention The plasma monitor illuminates phosphor to display images. During daylight hours, reflections from each side of the receiver cabinet and as close as grayed-out images. Differences in room sizes...

Owners Guide
Page 12
... best performance, video cables should be set correctly to display the signal on the rear panel of the Plasma monitor. HDMI Cable This cable is used to connect your external devices such as Set-Top-Boxes or DVD players equipped with an HDMI output connection to the monitor's HDMI input. The resolution should use 75-Ohm coaxial shielded wire. Subwoofer Cable This cable is used to connect an external audio component input to the subwoofer output of the Plasma monitor. 11 D-SUB MINI 15-Pin Cable (Provided) This cable is used...
... best performance, video cables should be set correctly to display the signal on the rear panel of the Plasma monitor. HDMI Cable This cable is used to connect your external devices such as Set-Top-Boxes or DVD players equipped with an HDMI output connection to the monitor's HDMI input. The resolution should use 75-Ohm coaxial shielded wire. Subwoofer Cable This cable is used to connect an external audio component input to the subwoofer output of the Plasma monitor. 11 D-SUB MINI 15-Pin Cable (Provided) This cable is used...
Owners Guide
Page 13
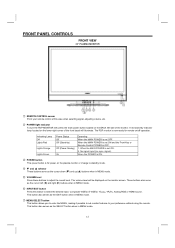
... MENU mode. ⑥ INPUT/EXIT button Press this area when selecting signal, adjusting volume, etc. ② POWER light indicator To turn the PDP MONITOR ON, press the main power button located on the monitor screen. This button also serves as the cursor left side of the monitor. When the MAIN POWER is set ON and the Front Key or Remote Control POWER is set ON. 2. Indicating Lamp Off Lights Red Lights Orange Lights Green Power Status Off Off (Stand-by indicator lamp located...
... MENU mode. ⑥ INPUT/EXIT button Press this area when selecting signal, adjusting volume, etc. ② POWER light indicator To turn the PDP MONITOR ON, press the main power button located on the monitor screen. This button also serves as the cursor left side of the monitor. When the MAIN POWER is set ON and the Front Key or Remote Control POWER is set ON. 2. Indicating Lamp Off Lights Red Lights Orange Lights Green Power Status Off Off (Stand-by indicator lamp located...
Owners Guide
Page 14
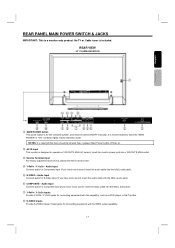
... - No TV or Cable tuner is for S-Video input (if you have mono sound, insert the audio cable into a 120VOLTS 60Hz outlet. ③ Service Terminal Input For factory adjustment and service, please DO NOT connect here. ④ Y-PBPR / Y-CBCR - It is designed to "ON" condition (lights red) for stand-by mode. Audio Input Connect audio for the complete system, and must be at least 5sec. REAR VIEW 42" PLASMA MONITOR ① MAIN POWER button This power button is included.
... - No TV or Cable tuner is for S-Video input (if you have mono sound, insert the audio cable into a 120VOLTS 60Hz outlet. ③ Service Terminal Input For factory adjustment and service, please DO NOT connect here. ④ Y-PBPR / Y-CBCR - It is designed to "ON" condition (lights red) for stand-by mode. Audio Input Connect audio for the complete system, and must be at least 5sec. REAR VIEW 42" PLASMA MONITOR ① MAIN POWER button This power button is included.
Owners Guide
Page 15
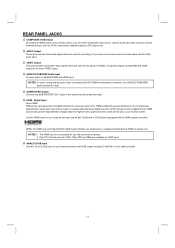
... video and multi-channel audio in digital format, HDMI assures that pristine high-definition images retain the highest video quality from the source all digital interface for recording. NOTES: 1. Only DTV formats such as Set-Top-Boxes or DVD players equipped with personal computers. 2. Because digital television (DTV) signals remain in a single cable. The HDMI input is the next-generation all the way to the external audio component input. ⑭ HDMI - REAR PANEL JACKS ⑨ COMPOSITE VIDEO Input By using...
... video and multi-channel audio in digital format, HDMI assures that pristine high-definition images retain the highest video quality from the source all digital interface for recording. NOTES: 1. Only DTV formats such as Set-Top-Boxes or DVD players equipped with personal computers. 2. Because digital television (DTV) signals remain in a single cable. The HDMI input is the next-generation all the way to the external audio component input. ⑭ HDMI - REAR PANEL JACKS ⑨ COMPOSITE VIDEO Input By using...
Owners Guide
Page 16
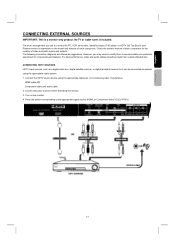
The following order of video and audio inputs and outputs. Connect all power sources before activating the monitor. 3. Press the button corresponding to accommodate your Plasma monitor is a monitor only product. For best performance, video and audio cables should be connected as desired, using the appropriate cable pair, in the following connection diagrams are offered as a digital cable box, digital satellite receiver, or digital terrestrial receiver box, can be made from coaxial shielded wire. Turn on the model and features of each...
The following order of video and audio inputs and outputs. Connect all power sources before activating the monitor. 3. Press the button corresponding to accommodate your Plasma monitor is a monitor only product. For best performance, video and audio cables should be connected as desired, using the appropriate cable pair, in the following connection diagrams are offered as a digital cable box, digital satellite receiver, or digital terrestrial receiver box, can be made from coaxial shielded wire. Turn on the model and features of each...
Owners Guide
Page 23
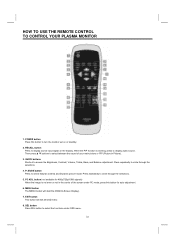
... under PC mode, press this button to select between the sound of your main picture or PIP (Picture in the center of the screen under OSD menu. 22 When the PIP function is not even or not in Picture). 3. POWER button Press this button for auto adjustment. 6. Then press ▲ ▼ buttons to turn the monitor set on the display. MENU button The MENU button will exit all OSD menu. 8. HOW TO USE THE REMOTE CONTROL TO CONTROL YOUR PLASMA MONITOR 1.
... under PC mode, press this button to select between the sound of your main picture or PIP (Picture in the center of the screen under OSD menu. 22 When the PIP function is not even or not in Picture). 3. POWER button Press this button for auto adjustment. 6. Then press ▲ ▼ buttons to turn the monitor set on the display. MENU button The MENU button will exit all OSD menu. 8. HOW TO USE THE REMOTE CONTROL TO CONTROL YOUR PLASMA MONITOR 1.
Owners Guide
Page 26
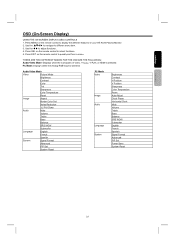
... Signal Format Advanced PIP Set System Reset PC Mode Video Image Audio Language System Brightness Contrast H Position V Position Sharpness Color Temperature Reset Auto Adjust Clock Phase Horizontal Clock Mute Volume Treble Bass Balance SRS WOW Subwoofer English French Spanish Signal Format Advanced PIP Set Power Save System Reset 25 Use the ·ÀW X to navigate to adjust functions. 4. Use the W X to different menu item. 3. Press SEL on the remote control to display the different features on your HITACHI Plasma Monitor...
... Signal Format Advanced PIP Set System Reset PC Mode Video Image Audio Language System Brightness Contrast H Position V Position Sharpness Color Temperature Reset Auto Adjust Clock Phase Horizontal Clock Mute Volume Treble Bass Balance SRS WOW Subwoofer English French Spanish Signal Format Advanced PIP Set Power Save System Reset 25 Use the ·ÀW X to navigate to adjust functions. 4. Use the W X to different menu item. 3. Press SEL on the remote control to display the different features on your HITACHI Plasma Monitor...
Owners Guide
Page 32
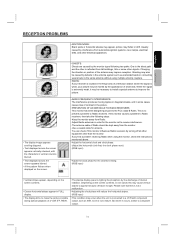
... the signal is to prevent a problem to Radio receivers. Adjust Radio antennas in vertical columns blurred. • Text displayed across the screen appears vertically streaked, with component output, such as unshielded leads or connecting several sets to the same antenna without using the monitor, check the instructions mentioned above. • Adjust the horizontal clock and clock phase. (Adjust the horizontal clock first, the clock phase next.) (RGB input) • Adjust...
... the signal is to prevent a problem to Radio receivers. Adjust Radio antennas in vertical columns blurred. • Text displayed across the screen appears vertically streaked, with component output, such as unshielded leads or connecting several sets to the same antenna without using the monitor, check the instructions mentioned above. • Adjust the horizontal clock and clock phase. (Adjust the horizontal clock first, the clock phase next.) (RGB input) • Adjust...

Owners Guide
Page 34
... Play PC is powered on, it sends a command to a DDC ready computer that is running an operating system software that is a system with computer, peripherals (including monitors) and operating system. VESA is a trademark of a nonprofit organization, Video Electronics Standard Association. English Français USEFUL INFORMATION PLUG and PLAY This Plasma Monitor complies with Canadian ICES-003. Plug & Play is capable for the plug & play...
... Play PC is powered on, it sends a command to a DDC ready computer that is running an operating system software that is a system with computer, peripherals (including monitors) and operating system. VESA is a trademark of a nonprofit organization, Video Electronics Standard Association. English Français USEFUL INFORMATION PLUG and PLAY This Plasma Monitor complies with Canadian ICES-003. Plug & Play is capable for the plug & play...
Owners Guide
Page 36
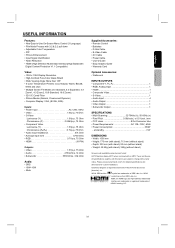
..., 60Hz • Power Consumption 350W - WOW technology is a registered trademark of HDMI Licensing LLC. 35 All specifications, weights, and dimensions are subject to -Use On-Screen Menu Control (3 Language) • Film Mode Process with 3:2 & 2:2 pull down • Adjustable Color Temperature • PIP • Picture Enhancement • Input Signal Identification • Noise Reduction • HDMI (High Definition Multimedia Interface)(High Bandwidth Digital Content Protection V1.1 Compatible) Video: • 1024 x 1024 Display Resolution • High...
..., 60Hz • Power Consumption 350W - WOW technology is a registered trademark of HDMI Licensing LLC. 35 All specifications, weights, and dimensions are subject to -Use On-Screen Menu Control (3 Language) • Film Mode Process with 3:2 & 2:2 pull down • Adjustable Color Temperature • PIP • Picture Enhancement • Input Signal Identification • Noise Reduction • HDMI (High Definition Multimedia Interface)(High Bandwidth Digital Content Protection V1.1 Compatible) Video: • 1024 x 1024 Display Resolution • High...


