Wall-Mounting your HP TouchSmart User Guide
Page 6
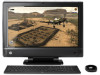
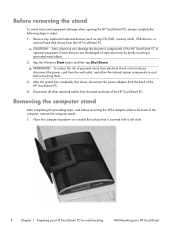
Remove any media and external devices (such as any CD, DVD, memory cards, USB devices, or external hard disk drives) from the back of the HP TouchSmart PC. 4. Place the computer facedown on a stable flat surface that you are discharged of the computer, remove the computer stand. ... preceding steps, and before touching them. 3. Ensure that is covered with a soft cloth. 2 Chapter 1 Preparing your HP TouchSmart PC for wall-mounting Wall-Mounting your HP TouchSmart To reduce the risk of personal injury from electrical shock or hot surfaces, disconnect the power cord from the back and...
Remove any media and external devices (such as any CD, DVD, memory cards, USB devices, or external hard disk drives) from the back of the HP TouchSmart PC. 4. Place the computer facedown on a stable flat surface that you are discharged of the computer, remove the computer stand. ... preceding steps, and before touching them. 3. Ensure that is covered with a soft cloth. 2 Chapter 1 Preparing your HP TouchSmart PC for wall-mounting Wall-Mounting your HP TouchSmart To reduce the risk of personal injury from electrical shock or hot surfaces, disconnect the power cord from the back and...

Wall-Mounting your HP TouchSmart User Guide
Page 15
...the VESA adapter plate on a stable flat surface covered with a clean soft cloth. Carefully remove the HP TouchSmart PC from the HP TouchSmart PC. Remove any media and external devices (such as any CD, DVD, memory cards, USB devices, or external hard disk drives) from the wall and place facedown on the... HP TouchSmart PC. Tap the Windows Start button and then tap Shut Down. Wall-Mounting your HP TouchSmart PC for removal from the back and side of...
...the VESA adapter plate on a stable flat surface covered with a clean soft cloth. Carefully remove the HP TouchSmart PC from the HP TouchSmart PC. Remove any media and external devices (such as any CD, DVD, memory cards, USB devices, or external hard disk drives) from the wall and place facedown on the... HP TouchSmart PC. Tap the Windows Start button and then tap Shut Down. Wall-Mounting your HP TouchSmart PC for removal from the back and side of...
Troubleshooting & Maintenance Guide
Page 2
... by copyright law. Turn on the hard disk drive at a time. Confirm the Total Installed Memory. HP assumes no responsibility for system resources. and other intellectual property rights. This limitation is not limited to HP and Compaq systems. The memory above 3 GB may be photocopied, reproduced, or translated to another language without the prior...
... by copyright law. Turn on the hard disk drive at a time. Confirm the Total Installed Memory. HP assumes no responsibility for system resources. and other intellectual property rights. This limitation is not limited to HP and Compaq systems. The memory above 3 GB may be photocopied, reproduced, or translated to another language without the prior...
Getting Started Guide
Page 3
...Internet 8 Transferring files and settings to your new computer 9 Computer orientation 10 Connecting a game console 11 HP My Display TouchSmart Edition 13 Using Beats Audio 14 Using the HP TouchSmart with safety and comfort 14 4 Troubleshooting and maintenance 16 Computer does not start 16 Power 17 Display (...screen 17 Keyboard and mouse (with cable 18 Keyboard and mouse (wireless 20 Speakers and sound 21 Internet access 21 Memory 23 Gaming ...
...Internet 8 Transferring files and settings to your new computer 9 Computer orientation 10 Connecting a game console 11 HP My Display TouchSmart Edition 13 Using Beats Audio 14 Using the HP TouchSmart with safety and comfort 14 4 Troubleshooting and maintenance 16 Computer does not start 16 Power 17 Display (...screen 17 Keyboard and mouse (with cable 18 Keyboard and mouse (wireless 20 Speakers and sound 21 Internet access 21 Memory 23 Gaming ...
Getting Started Guide
Page 11
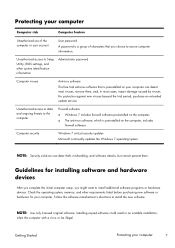
.... NOTE: Security solutions can detect most cases, repair damage caused by viruses. Follow the software manufacturer's directions to secure computer information. Check the operating system, memory, and other system identification information Administrator password Computer viruses Antivirus software The free trial antivirus software that you might want to the computer Firewall software...
.... NOTE: Security solutions can detect most cases, repair damage caused by viruses. Follow the software manufacturer's directions to secure computer information. Check the operating system, memory, and other system identification information Administrator password Computer viruses Antivirus software The free trial antivirus software that you might want to the computer Firewall software...
Getting Started Guide
Page 13
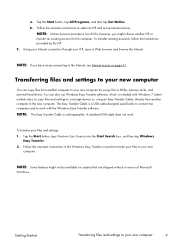
... software. A standard USB cable does not work with Windows 7 (select models only), to copy files and settings to a storage device or, using CDs or DVDs, memory sticks, and external hard drives. Tap the Start button, type Windows Easy Transfer into the Start Search box, and then tap Windows Easy Transfer. 2. Getting...
... software. A standard USB cable does not work with Windows 7 (select models only), to copy files and settings to a storage device or, using CDs or DVDs, memory sticks, and external hard drives. Tap the Start button, type Windows Easy Transfer into the Start Search box, and then tap Windows Easy Transfer. 2. Getting...
Getting Started Guide
Page 27
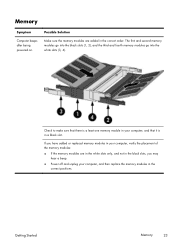
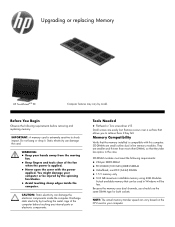
.... ● Power off and unplug your computer, and that it is a least one memory module in your computer, and then replace the memory modules in the correct order. Possible Solution Make sure the memory modules are in the white slots only, and not in the black slots, you have ...added or replaced memory modules in your computer, verify the placement of the memory modules: ● If the memory modules are added in the correct positions. Getting Started Memory 23 The first and second memory modules go into the black slots (1, 2), and the third...
.... ● Power off and unplug your computer, and that it is a least one memory module in your computer, and then replace the memory modules in the correct order. Possible Solution Make sure the memory modules are in the white slots only, and not in the black slots, you have ...added or replaced memory modules in your computer, verify the placement of the memory modules: ● If the memory modules are added in the correct positions. Getting Started Memory 23 The first and second memory modules go into the black slots (1, 2), and the third...

Getting Started (For 3D Models Only)
Page 4
Display (screen 29 Keyboard and mouse (with cable 29 Keyboard and mouse (wireless 31 Speakers and sound 32 Internet access 32 Memory ...34 Software troubleshooting 34 3D Cinema Technology troubleshooting 38 Maintenance 39 System Recovery 42 Recovery media 45 Index ...47 iv Getting Started
Display (screen 29 Keyboard and mouse (with cable 29 Keyboard and mouse (wireless 31 Speakers and sound 32 Internet access 32 Memory ...34 Software troubleshooting 34 3D Cinema Technology troubleshooting 38 Maintenance 39 System Recovery 42 Recovery media 45 Index ...47 iv Getting Started
Getting Started (For 3D Models Only)
Page 12
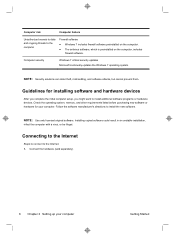
... to the Internet: 1. NOTE: Use only licensed original software. Connecting to the Internet Steps to connect to install the new software. Check the operating system, memory, and other requirements listed before purchasing new software or hardware for installing software and hardware devices After you complete the initial computer setup, you might...
... to the Internet: 1. NOTE: Use only licensed original software. Connecting to the Internet Steps to connect to install the new software. Check the operating system, memory, and other requirements listed before purchasing new software or hardware for installing software and hardware devices After you complete the initial computer setup, you might...

Getting Started (For 3D Models Only)
Page 14
... and settings: 1. Follow the on-screen instructions in the Windows Easy Transfer wizard to transfer your files to a storage device or, using CDs or DVDs, memory sticks, and external hard drives. The Easy Transfer Cable is included with the Windows Easy Transfer software. To transfer your new computer. NOTE: Some features...
... and settings: 1. Follow the on-screen instructions in the Windows Easy Transfer wizard to transfer your files to a storage device or, using CDs or DVDs, memory sticks, and external hard drives. The Easy Transfer Cable is included with the Windows Easy Transfer software. To transfer your new computer. NOTE: Some features...
Getting Started (For 3D Models Only)
Page 38
... If you may hear a beep. ● Power off and unplug your computer, verify the placement of the memory modules: ● If the memory modules are added in the correct order. Make sure the memory modules are in the white slots only, and not in the black slots, you have added or replaced... memory modules in your computer, and then replace the memory modules in a black slot. Check to make sure that there is in the correct positions. Software troubleshooting Some software repairs are as simple as...
... If you may hear a beep. ● Power off and unplug your computer, verify the placement of the memory modules: ● If the memory modules are added in the correct order. Make sure the memory modules are in the white slots only, and not in the black slots, you have added or replaced... memory modules in your computer, and then replace the memory modules in a black slot. Check to make sure that there is in the correct positions. Software troubleshooting Some software repairs are as simple as...
Getting Started (For 3D Models Only)
Page 51
... 29 drivers reinstalling for hardware 36 updating 35 F features 4 G games 3D stereoscopic 38 playing in 3D 22 H hardware installing devices 8 reinstalling driver 36 HP TouchSmart 12 I installing hardware devices 8 software 8 internet connecting to 8 troubleshooting 32 M maintenance 39, 40 memory troubleshooting 34 N nose pieces identifying 20 using 23 P photosensitive epileptic seizures 15 Index 47
... 29 drivers reinstalling for hardware 36 updating 35 F features 4 G games 3D stereoscopic 38 playing in 3D 22 H hardware installing devices 8 reinstalling driver 36 HP TouchSmart 12 I installing hardware devices 8 software 8 internet connecting to 8 troubleshooting 32 M maintenance 39, 40 memory troubleshooting 34 N nose pieces identifying 20 using 23 P photosensitive epileptic seizures 15 Index 47
Getting Started (For 3D Models Only)
Page 52
... computer does not start 27 Display screen 29 flickering 39 internet access 32 keyboard and wired mouse issues 29 keyboard and wireless mouse issues 31 memory 34 Power 28 software 34 48 Index speakers and sound issues 32 supported 3D formats 38 synching issues 26 U updating drivers 35 Getting Started
... computer does not start 27 Display screen 29 flickering 39 internet access 32 keyboard and wired mouse issues 29 keyboard and wireless mouse issues 31 memory 34 Power 28 software 34 48 Index speakers and sound issues 32 supported 3D formats 38 synching issues 26 U updating drivers 35 Getting Started

Upgrading and Servicing Guide
Page 1
Removing and Replacing a CD/DVD Drive .......2 Removing the CD/DVD Drive 2 Installing a New CD/DVD Drive 5 Removing and Replacing a Hard Disk Drive ....9 Removing the Hard Disk Drive 9 Installing a New Hard Disk Drive 11 Upgrading or Replacing Memory 16 Removing the Memory 16 Installing a New Memory Card 18 Troubleshooting 21 UPGRADING AND SERVICING GUIDE HPTouchSmart610 PC Computer features may vary by model.
Removing and Replacing a CD/DVD Drive .......2 Removing the CD/DVD Drive 2 Installing a New CD/DVD Drive 5 Removing and Replacing a Hard Disk Drive ....9 Removing the Hard Disk Drive 9 Installing a New Hard Disk Drive 11 Upgrading or Replacing Memory 16 Removing the Memory 16 Installing a New Memory Card 18 Troubleshooting 21 UPGRADING AND SERVICING GUIDE HPTouchSmart610 PC Computer features may vary by model.
Upgrading and Servicing Guide
Page 17
Upgrading or replacing Memory HP TouchSmart610 PC Computer features may vary by touching the metal cage of... Static electricity can damage the electronic components inside the computer. . Remove screws over a surface that the memory installed is extremely sensitive to retrieve them if they take less space in your hands away from the moving...fan. Keep fingers and tools clear of the computer before removing and replacing memory. NOTE: The actual memory transfer speed can be used in the case. Discharge static electricity by model. WARNING: ...
Upgrading or replacing Memory HP TouchSmart610 PC Computer features may vary by touching the metal cage of... Static electricity can damage the electronic components inside the computer. . Remove screws over a surface that the memory installed is extremely sensitive to retrieve them if they take less space in your hands away from the moving...fan. Keep fingers and tools clear of the computer before removing and replacing memory. NOTE: The actual memory transfer speed can be used in the case. Discharge static electricity by model. WARNING: ...
Upgrading and Servicing Guide
Page 18
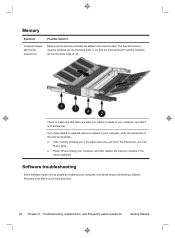
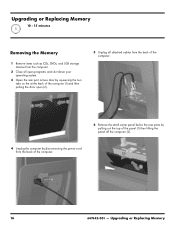
Upgrading or Replacing Memory Upgrading or Replacing Memory 10 - 15 minutes Removing the Memory 1 Remove items such as CDs, DVDs, and USB storage devices from the computer. 2 Close all open programs and shut down your operating system. 3 Open the ...
Upgrading or Replacing Memory Upgrading or Replacing Memory 10 - 15 minutes Removing the Memory 1 Remove items such as CDs, DVDs, and USB storage devices from the computer. 2 Close all open programs and shut down your operating system. 3 Open the ...

Upgrading and Servicing Guide
Page 19
...from scratches or other damage. Remove 1 before 2. 647642-001 - Make sure the stand extends beyond the edge of the flat surface. 10 Slide the memory access panel toward the center of the computer until it stops (approximately 5 cm or 1/5 inch). 8 Remove the screw cover from the... memory access panel by lifting it . 9 Remove the screw at the top of the memory access panel using a flathead or Torx screwdriver. IMPORTANT: If you must remove the upper one before removing the ...
...from scratches or other damage. Remove 1 before 2. 647642-001 - Make sure the stand extends beyond the edge of the flat surface. 10 Slide the memory access panel toward the center of the computer until it stops (approximately 5 cm or 1/5 inch). 8 Remove the screw cover from the... memory access panel by lifting it . 9 Remove the screw at the top of the memory access panel using a flathead or Torx screwdriver. IMPORTANT: If you must remove the upper one before removing the ...
Upgrading and Servicing Guide
Page 20
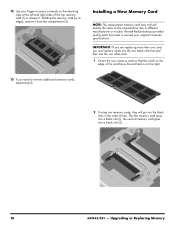
... on the right. 13 If you must replace cards into the two black slots first and then into the two white slots. 1 Orient the new memory card so that meet or exceed your fingers to press outwards on the retaining clips at the left and right sides of the top... memory card (1) to different manufacturers or models. Upgrading or Replacing Memory Holding the memory card by its edges, remove it . Installing a New Memory Card NOTE: The replacement memory card may not look exactly the same as the original drive due to...
... on the right. 13 If you must replace cards into the two black slots first and then into the two white slots. 1 Orient the new memory card so that meet or exceed your fingers to press outwards on the retaining clips at the left and right sides of the top... memory card (1) to different manufacturers or models. Upgrading or Replacing Memory Holding the memory card by its edges, remove it . Installing a New Memory Card NOTE: The replacement memory card may not look exactly the same as the original drive due to...
Upgrading and Servicing Guide
Page 21
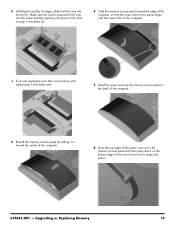
... its edges, slide it all the way into the socket and then gently push down on the card to snap it into place (2). 6 Slide the memory access panel toward the edge of the computer, so that the screw hole on the panel aligns with the screw hole on the computer. 4 If... you are replacing more than one memory card, repeat step 3 with each card. 7 Install the screw securing the memory access panel to the back of the computer. 5 Rinstall the memory access panel by sliding it in toward the center of the computer. 8 Press the...
... its edges, slide it all the way into the socket and then gently push down on the card to snap it into place (2). 6 Slide the memory access panel toward the edge of the computer, so that the screw hole on the panel aligns with the screw hole on the computer. 4 If... you are replacing more than one memory card, repeat step 3 with each card. 7 Install the screw securing the memory access panel to the back of the computer. 5 Rinstall the memory access panel by sliding it in toward the center of the computer. 8 Press the...

Upgrading and Servicing Guide
Page 22
9 Place the computer in an upright position. 12 Plug the power cord into the back of the computer. 10 Replace the back cover on the computer. 13 Close the rear port access door at the back of the computer. 11 Reconnect all the cables at the back of the computer. 14 Press the power button to turn on the computer. 20 647642-001 - Upgrading or Replacing Memory
9 Place the computer in an upright position. 12 Plug the power cord into the back of the computer. 10 Replace the back cover on the computer. 13 Close the rear port access door at the back of the computer. 11 Reconnect all the cables at the back of the computer. 14 Press the power button to turn on the computer. 20 647642-001 - Upgrading or Replacing Memory


