Wall-Mounting your HP TouchSmart User Guide
Page 5
1 Preparing your HP TouchSmart PC for wall-mounting This document provides instructions for connection to an "IT" power system (an AC distribution system with no direct connection to the earth, according to reinstall the computer stand. Should you decide to switch your system to desktop unit, instructions are also ... computer. WARNING! The computer is attached to do so before removing the computer stand. The VESA adapter plate is heavy. Always disconnect the HP TouchSmart PC from 508 mm to 582 mm (20 inches to 22.9 inches) diagonal, and weighing up to 22.7 kg (50 lb) Safety...
1 Preparing your HP TouchSmart PC for wall-mounting This document provides instructions for connection to an "IT" power system (an AC distribution system with no direct connection to the earth, according to reinstall the computer stand. Should you decide to switch your system to desktop unit, instructions are also ... computer. WARNING! The computer is attached to do so before removing the computer stand. The VESA adapter plate is heavy. Always disconnect the HP TouchSmart PC from 508 mm to 582 mm (20 inches to 22.9 inches) diagonal, and weighing up to 22.7 kg (50 lb) Safety...
Wall-Mounting your HP TouchSmart User Guide
Page 10
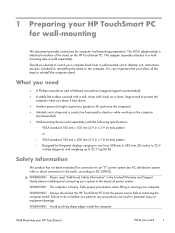
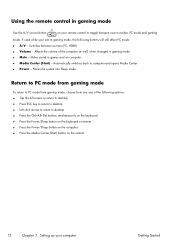
Follow all the steps in Reinstalling the stand on your HP TouchSmart PC on the bottom of the computer stand in order to a desktop unit in the future. Save the computer stand, stand cover, and four screws, so that you can convert your HP TouchSmart 8. NOTE: If the computer stand is ever replaced on the computer, the VESA adapter plate must be replaced on page 10. 6 Chapter 1 Preparing your HP TouchSmart PC for wall-mounting Wall-Mounting your HP TouchSmart PC back to properly support the computer. Lift the computer stand away from the computer. 9.
Follow all the steps in Reinstalling the stand on your HP TouchSmart PC on the bottom of the computer stand in order to a desktop unit in the future. Save the computer stand, stand cover, and four screws, so that you can convert your HP TouchSmart 8. NOTE: If the computer stand is ever replaced on the computer, the VESA adapter plate must be replaced on page 10. 6 Chapter 1 Preparing your HP TouchSmart PC for wall-mounting Wall-Mounting your HP TouchSmart PC back to properly support the computer. Lift the computer stand away from the computer. 9.

Wall-Mounting your HP TouchSmart User Guide
Page 14
... no direct connection to the earth, according to IEC 60950). WARNING! Always disconnect the HP TouchSmart PC from a wall-mounted unit back to a desktop unit. Avoid touching sharp edges inside the computer. 10 Chapter 2 Reinstalling the stand on your HP TouchSmart PC Wall-Mounting your computer. Please read "Additional Safety Information" in personal injury or...
... no direct connection to the earth, according to IEC 60950). WARNING! Always disconnect the HP TouchSmart PC from a wall-mounted unit back to a desktop unit. Avoid touching sharp edges inside the computer. 10 Chapter 2 Reinstalling the stand on your HP TouchSmart PC Wall-Mounting your computer. Please read "Additional Safety Information" in personal injury or...

Troubleshooting & Maintenance Guide
Page 15
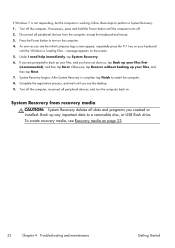
... a removable disc or USB flash drive. Click Start, click All Programs, click Recovery Manager, and then click Recovery Manager. As soon as you see the desktop. 10. message appears on the computer. 4. If the computer is working , follow these steps to perform a System Recovery. 1.
... a removable disc or USB flash drive. Click Start, click All Programs, click Recovery Manager, and then click Recovery Manager. As soon as you see the desktop. 10. message appears on the computer. 4. If the computer is working , follow these steps to perform a System Recovery. 1.

Troubleshooting & Maintenance Guide
Page 16
... disc, do so. 11. Recovery media Recovery media can be created on your files, and then click Next. 10. To create recovery media, see the desktop. 9. Disconnect all the data files you have not done so, select Back up your computer at the factory. Create recovery media from the drive tray...
... disc, do so. 11. Recovery media Recovery media can be created on your files, and then click Next. 10. To create recovery media, see the desktop. 9. Disconnect all the data files you have not done so, select Back up your computer at the factory. Create recovery media from the drive tray...

Getting Started Guide
Page 8
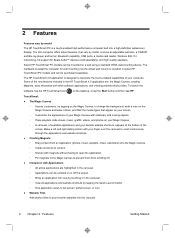
..., a media card reader, Wireless 802.11n networking, full support for wall mounting (not the actual wall mount) is included in the HP TouchSmart 4.0 application are highlighted in the carousel. ◦ Applications can be scrolled on or off the screen. ◦ Bring an application into...VESA wall-mounting device. Some of the new features included in select HP TouchSmart PC models and can be purchased. To launch the software, tap the HP TouchSmart icon on the desktop, or tap the Start button and then tap HP TouchSmart. ● The Magic Canvas ◦ Access a submenu, by model...
..., a media card reader, Wireless 802.11n networking, full support for wall mounting (not the actual wall mount) is included in the HP TouchSmart 4.0 application are highlighted in the carousel. ◦ Applications can be scrolled on or off the screen. ◦ Bring an application into...VESA wall-mounting device. Some of the new features included in select HP TouchSmart PC models and can be purchased. To launch the software, tap the HP TouchSmart icon on the desktop, or tap the Start button and then tap HP TouchSmart. ● The Magic Canvas ◦ Access a submenu, by model...
Getting Started Guide
Page 16
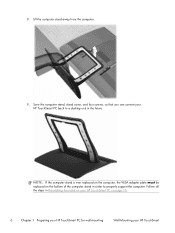
... in gaming mode Use the A/V source button on your are in gaming mode, the following options: ● Tap the full screen to return to desktop ● Press ESC key to return to desktop ● Left click mouse to return to PC mode from gaming mode, choose from gaming mode To return to... desktop ● Press the Ctrl+Alt+Del buttons simultaneously on the keyboard ● Press the Power/Sleep button on the keyboard or remote ● Press the ...
... in gaming mode Use the A/V source button on your are in gaming mode, the following options: ● Tap the full screen to return to desktop ● Press ESC key to return to desktop ● Left click mouse to return to PC mode from gaming mode, choose from gaming mode To return to... desktop ● Press the Ctrl+Alt+Del buttons simultaneously on the keyboard ● Press the Power/Sleep button on the keyboard or remote ● Press the ...
Getting Started Guide
Page 17
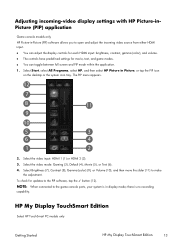
...(4), Movie (5), or Text (6). 4. NOTE: When connected to make the adjustment. Adjusting incoming-video display settings with HP Picture-inPicture (PIP) application Game console models only HP Picture-in-Picture (PIP) software allows you to open and adjust the incoming video source from either HDMI input....the PIP software, tap the ✓ button (12). HP My Display TouchSmart Edition Select HP TouchSmart PC models only Getting Started HP My Display TouchSmart Edition 13 there is in Picture, or tap the PIP icon on the desktop or the system icon tray. Select Start, select All ...
...(4), Movie (5), or Text (6). 4. NOTE: When connected to make the adjustment. Adjusting incoming-video display settings with HP Picture-inPicture (PIP) application Game console models only HP Picture-in-Picture (PIP) software allows you to open and adjust the incoming video source from either HDMI input....the PIP software, tap the ✓ button (12). HP My Display TouchSmart Edition Select HP TouchSmart PC models only Getting Started HP My Display TouchSmart Edition 13 there is in Picture, or tap the PIP icon on the desktop or the system icon tray. Select Start, select All ...
Getting Started Guide
Page 18
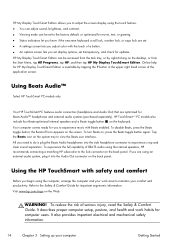
Online help for HP My Display TouchSmart Edition is plug the Beats Audio headphones into the Audio Out connector on the desktop, or from the task tray, or by tapping the ? HP TouchSmart610 PC models also include four Beats-optimized internal speakers and a Beats toggle button on the system tray to view ...keyboard scroll lock, number lock, or caps lock are set transparency, and check for updates. To turn Beats on the Web. Using the HP TouchSmart with safety and comfort Before you begin using an external audio system, plug it into the side headphone connector to do is available by ...
Online help for HP My Display TouchSmart Edition is plug the Beats Audio headphones into the Audio Out connector on the desktop, or from the task tray, or by tapping the ? HP TouchSmart610 PC models also include four Beats-optimized internal speakers and a Beats toggle button on the system tray to view ...keyboard scroll lock, number lock, or caps lock are set transparency, and check for updates. To turn Beats on the Web. Using the HP TouchSmart with safety and comfort Before you begin using an external audio system, plug it into the side headphone connector to do is available by ...

Getting Started Guide
Page 35
... the computer. 9. Otherwise, tap Recover without backing up any important data to a removable disc. Complete the registration process, and wait until you will see the desktop. 10. Tap the Start button, tap All Programs, tap Recovery Manager, and then tap Recovery Manager. Tap Yes, and then tap Next. When the computer...
... the computer. 9. Otherwise, tap Recover without backing up any important data to a removable disc. Complete the registration process, and wait until you will see the desktop. 10. Tap the Start button, tap All Programs, tap Recovery Manager, and then tap Recovery Manager. Tap Yes, and then tap Next. When the computer...
Getting Started Guide
Page 36
..., tap Finish to perform a System Recovery. 1. As soon as you created or installed. Otherwise, tap Recover without backing up your files, and you see the desktop. 9. Turn off the computer, reconnect all peripheral devices from recovery media CAUTION: System Recovery deletes all data and programs you see Recovery media on your...
..., tap Finish to perform a System Recovery. 1. As soon as you created or installed. Otherwise, tap Recover without backing up your files, and you see the desktop. 9. Turn off the computer, reconnect all peripheral devices from recovery media CAUTION: System Recovery deletes all data and programs you see Recovery media on your...
Getting Started (For 3D Models Only)
Page 8
...high quality speakers. The slim computer offers select features, that appear on your screen. ◦ Customize the appearance of the screen. The HP TouchSmart 4.0 application is designed to prevent them from an application (photos, music, playlists, notes, calendars) onto the Magic Canvas. ◦ Create... and photos on a wall using a standard VESA wall-mounting device. To launch the software, tap the HP TouchSmart icon on the desktop, or tap the Start button and then tap HP TouchSmart. ● The Magic Canvas ◦ Access a submenu, by tapping the Quick Launch button. ◦...
...high quality speakers. The slim computer offers select features, that appear on your screen. ◦ Customize the appearance of the screen. The HP TouchSmart 4.0 application is designed to prevent them from an application (photos, music, playlists, notes, calendars) onto the Magic Canvas. ◦ Create... and photos on a wall using a standard VESA wall-mounting device. To launch the software, tap the HP TouchSmart icon on the desktop, or tap the Start button and then tap HP TouchSmart. ● The Magic Canvas ◦ Access a submenu, by tapping the Quick Launch button. ◦...

Getting Started (For 3D Models Only)
Page 16
...transparency, and check for Beats Audio™ headphones and external audio systems (purchased separately). Using Beats Audio™ Select HP TouchSmart PC models only Your HP TouchSmart PC features audio connectors (headphone and Audio Out ) that are using an external audio system, plug it into the... separation, plug the Beats Audio headphones into the Audio Out connector on the desktop, or from the Start Menu, tap All Programs, tap HP, and then tap HP My Display TouchSmart Edition. HP TouchSmart620 PC models also include four Beats-optimized internal speakers and a Beats toggle...
...transparency, and check for Beats Audio™ headphones and external audio systems (purchased separately). Using Beats Audio™ Select HP TouchSmart PC models only Your HP TouchSmart PC features audio connectors (headphone and Audio Out ) that are using an external audio system, plug it into the... separation, plug the Beats Audio headphones into the Audio Out connector on the desktop, or from the Start Menu, tap All Programs, tap HP, and then tap HP My Display TouchSmart Edition. HP TouchSmart620 PC models also include four Beats-optimized internal speakers and a Beats toggle...

Getting Started (For 3D Models Only)
Page 25
... running at the top right of the glasses. This can begin viewing 3D cinema content! ● Double-click the 3D demo icon on the computer desktop and select a 3D clip from the menu. ● Insert a Blu-ray 3D movie (purchased separately) into place. The 3D glasses turn on page 15 and...
... running at the top right of the glasses. This can begin viewing 3D cinema content! ● Double-click the 3D demo icon on the computer desktop and select a 3D clip from the menu. ● Insert a Blu-ray 3D movie (purchased separately) into place. The 3D glasses turn on page 15 and...

Getting Started (For 3D Models Only)
Page 47
Your computer restarts. NOTE: If your files, and then tap Next. 8. When the computer restarts, you will see the desktop. 10. Turn off the computer. 2. Tap the Start button, tap All Programs, tap Recovery Manager, and then tap Recovery Manager. Under I need help immediately, tap ...
Your computer restarts. NOTE: If your files, and then tap Next. 8. When the computer restarts, you will see the desktop. 10. Turn off the computer. 2. Tap the Start button, tap All Programs, tap Recovery Manager, and then tap Recovery Manager. Under I need help immediately, tap ...

Getting Started (For 3D Models Only)
Page 48
... Getting Started If necessary, press and hold the Power button until the computer turns off the computer, reconnect all data and programs you see the desktop. 9. Press the Power button to restart the computer. 8. As soon as you have not done so, tap Back up your files, and you see Recovery...
... Getting Started If necessary, press and hold the Power button until the computer turns off the computer, reconnect all data and programs you see the desktop. 9. Press the Power button to restart the computer. 8. As soon as you have not done so, tap Back up your files, and you see Recovery...

