Limited Warranty Statement
Page 5
...one -stop source for 3 years. It is FCLSD-0703. • Product name (HP Photosmart R840 series Digital Camera); Get award winning assistance, 24x7 at www.hp.com/support Upgraded warranty option HP offers a range of warranty upgrade options that provide you reside: • United States:...on the region where you with the Product name or Product number. Materials disposal This HP product contains the following products: • Product name (HP Photosmart R830 series Digital Camera); Product number (L2466A, L2467A, L2468A, L2469A, L2470A, L2471A); Grant Customer additional ...
...one -stop source for 3 years. It is FCLSD-0703. • Product name (HP Photosmart R840 series Digital Camera); Get award winning assistance, 24x7 at www.hp.com/support Upgraded warranty option HP offers a range of warranty upgrade options that provide you reside: • United States:...on the region where you with the Product name or Product number. Materials disposal This HP product contains the following products: • Product name (HP Photosmart R830 series Digital Camera); Product number (L2466A, L2467A, L2468A, L2469A, L2470A, L2471A); Grant Customer additional ...
Limited Warranty Statement
Page 6
... Regulatory model number for your product is replaced by HP for your camera's warranty. Additional regulatory information is SNPRB-0706. • Product name (HP Photosmart R930 series Digital Camera); do not open the camera case or attempt to the instructions. 4 R740 series: Your camera uses a rechargeable HP Photosmart LI40 battery (Q6277A); Dispose of a non-approved power adapter, USB cable, charger...
... Regulatory model number for your product is replaced by HP for your camera's warranty. Additional regulatory information is SNPRB-0706. • Product name (HP Photosmart R930 series Digital Camera); do not open the camera case or attempt to the instructions. 4 R740 series: Your camera uses a rechargeable HP Photosmart LI40 battery (Q6277A); Dispose of a non-approved power adapter, USB cable, charger...
User Guide
Page 3
...language...7 Set the region...7 Set the date and time...7 Install and format an optional memory card 8 Install the software...8 Using your camera...9 2 Taking pictures and recording video clips Taking pictures...10 Recording video clips...11 Instant Review...11 Auto focus and exposure...11 Focusing on... the subject...11 Optimizing focus...12 Using Focus Lock...12 Optimizing exposure...13 Using zoom...13 Optical zoom...13 Digital zoom...13 3 Setting options for taking pictures and recording video clips Setting the flash...15 Red eye...15 Using the shooting modes...15...
...language...7 Set the region...7 Set the date and time...7 Install and format an optional memory card 8 Install the software...8 Using your camera...9 2 Taking pictures and recording video clips Taking pictures...10 Recording video clips...11 Instant Review...11 Auto focus and exposure...11 Focusing on... the subject...11 Optimizing focus...12 Using Focus Lock...12 Optimizing exposure...13 Using zoom...13 Optical zoom...13 Digital zoom...13 3 Setting options for taking pictures and recording video clips Setting the flash...15 Red eye...15 Using the shooting modes...15...
User Guide
Page 6
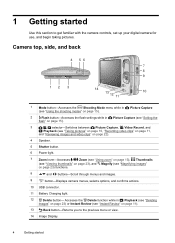
... Magnify (see "Instant Review" on page 23) functions. 8 and buttons-Scroll through menus and images. 9 button-Displays camera menus, selects options, and confirms actions. 10 USB connector. 11 Battery Charging light. 12 Delete button- Camera top, side, and back 4 56 7 8 9 12 3 14 13 12 11 10 1 Mode button-Accesses the Shooting Mode... (see "Deleting images" on page 23) or Instant Review (see "Magnifying images" on page 11). 13 Back button-Returns you to get familiar with the camera controls, set up your digital camera for use, and begin taking pictures.
... Magnify (see "Instant Review" on page 23) functions. 8 and buttons-Scroll through menus and images. 9 button-Displays camera menus, selects options, and confirms actions. 10 USB connector. 11 Battery Charging light. 12 Delete button- Camera top, side, and back 4 56 7 8 9 12 3 14 13 12 11 10 1 Mode button-Accesses the Shooting Mode... (see "Deleting images" on page 23) or Instant Review (see "Magnifying images" on page 11). 13 Back button-Returns you to get familiar with the camera controls, set up your digital camera for use, and begin taking pictures.

User Guide
Page 10
... format the card. With the camera turned on the camera. Always format new memory cards before formatting (see the HewlettPackard Technical Support website for modifying stored images (remove red eyes, rotate, crop, resize, and more information: www.hp.com/support. Use to 8GB. 1. To install the HP Photosmart Software, your digital photography 8 Getting started Install the...
... format the card. With the camera turned on the camera. Always format new memory cards before formatting (see the HewlettPackard Technical Support website for modifying stored images (remove red eyes, rotate, crop, resize, and more information: www.hp.com/support. Use to 8GB. 1. To install the HP Photosmart Software, your digital photography 8 Getting started Install the...
User Guide
Page 15
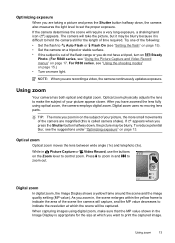
...When you have a tripod, turn on Steady Photo. (For R840 series, see "Setting the flash" on page 15). • Set the camera on more light. Digital zoom uses no moving lens parts. To reduce potential blur, see "Using the shooting modes" on page 15.) • Turn on a tripod... of your picture appear closer. When capturing images using optical zoom, the camera employs digital zoom. The camera will require a very long exposure, a shaking hand icon ( ) appears. Using zoom Your camera has both optical and digital zoom. Using zoom 13 While in , the scene enlarges within the yellow...
...When you have a tripod, turn on Steady Photo. (For R840 series, see "Setting the flash" on page 15). • Set the camera on more light. Digital zoom uses no moving lens parts. To reduce potential blur, see "Using the shooting modes" on page 15.) • Turn on a tripod... of your picture appear closer. When capturing images using optical zoom, the camera employs digital zoom. The camera will require a very long exposure, a shaking hand icon ( ) appears. Using zoom Your camera has both optical and digital zoom. Using zoom 13 While in , the scene enlarges within the yellow...
User Guide
Page 40
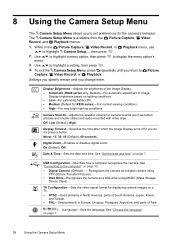
... date and time. See "Connecting to highlight a setting, then press . 4. Use to the computer" on page 32. • Digital Camera (Default)--Recognizes the camera as a digital camera using PTP (Picture Transfer Protocol). • Disk Drive-Recognizes the camera as button presses and shutter clicks) and audio recorded with video clips. See "Choose the language" on lighting...
... date and time. See "Connecting to highlight a setting, then press . 4. Use to the computer" on page 32. • Digital Camera (Default)--Recognizes the camera as a digital camera using PTP (Picture Transfer Protocol). • Disk Drive-Recognizes the camera as button presses and shutter clicks) and audio recorded with video clips. See "Choose the language" on lighting...

User Guide
Page 41
... your camera does not respond when you may have a photo printer? To optimize your digital photography experience, periodically check the Hewlett-Packard Technical Support website (www.hp.com/support) for updates to set the date and time (see "Problems and solutions" on page 39). Use the Buy Prints Online feature on the Photosmart Express...
... your camera does not respond when you may have a photo printer? To optimize your digital photography experience, periodically check the Hewlett-Packard Technical Support website (www.hp.com/support) for updates to set the date and time (see "Problems and solutions" on page 39). Use the Buy Prints Online feature on the Photosmart Express...

User Guide
Page 48
... the software. • Refer to the camera's Help screens. 2. Post-warranty period. 10 Product support Use this section to find support information for your camera). 3. The Hewlett-Packard Technical Support website is available online at www.hp.com/support, or contact the store where you register your digital camera, including links to helpful websites and...
... the software. • Refer to the camera's Help screens. 2. Post-warranty period. 10 Product support Use this section to find support information for your camera). 3. The Hewlett-Packard Technical Support website is available online at www.hp.com/support, or contact the store where you register your digital camera, including links to helpful websites and...

User Guide
Page 59
... Manager of Corporate Product Regulations Hewlett-Packard Company 3000 Hanover Street Palo Alto, Ca 94304 (650) 857-1501 HP Photosmart R830/R840 series Digital Camera Declaration of the following measures: • Reorient or relocate the receiving antenna. • Increase the separation between ... circuit different from that the product: Product name: Product number(s): Regulatory model: Product Options Power adapter: HP Photosmart R830/R840 series Digital Camera (may cause harmful interference to radio communications. This equipment generates, uses and can be brought to the ...
... Manager of Corporate Product Regulations Hewlett-Packard Company 3000 Hanover Street Palo Alto, Ca 94304 (650) 857-1501 HP Photosmart R830/R840 series Digital Camera Declaration of the following measures: • Reorient or relocate the receiving antenna. • Increase the separation between ... circuit different from that the product: Product name: Product number(s): Regulatory model: Product Options Power adapter: HP Photosmart R830/R840 series Digital Camera (may cause harmful interference to radio communications. This equipment generates, uses and can be brought to the ...
Quick Start Guide
Page 4
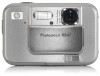
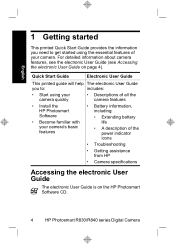
... • Descriptions of the power indicator icons • Troubleshooting • Getting assistance from HP • Camera specifications Accessing the electronic User Guide The electronic User Guide is on page 4). For detailed information about camera features, see the electronic User Guide (see Accessing the electronic User Guide on the HP Photosmart Software CD. 4 HP Photosmart R830/R840 series Digital Camera
... • Descriptions of the power indicator icons • Troubleshooting • Getting assistance from HP • Camera specifications Accessing the electronic User Guide The electronic User Guide is on page 4). For detailed information about camera features, see the electronic User Guide (see Accessing the electronic User Guide on the HP Photosmart Software CD. 4 HP Photosmart R830/R840 series Digital Camera

Quick Start Guide
Page 6
Camera top, side, and back 4 56 English 12 3 7 8 9 14 13 12 11 10 1 Mode button-Accesses the Shooting Mode menu while in Picture Capture. Settings are ... Auto, Flash On, Flash Off. 3 selector-Switches between Picture Capture, Video Record, and Playback (see Picture Capture, Video Record, and Playback on page 20). 4 Speaker. 6 HP Photosmart R830/R840 series Digital Camera
Camera top, side, and back 4 56 English 12 3 7 8 9 14 13 12 11 10 1 Mode button-Accesses the Shooting Mode menu while in Picture Capture. Settings are ... Auto, Flash On, Flash Off. 3 selector-Switches between Picture Capture, Video Record, and Playback (see Picture Capture, Video Record, and Playback on page 20). 4 Speaker. 6 HP Photosmart R830/R840 series Digital Camera

Quick Start Guide
Page 8
Camera dock insert If you purchase an optional HP Photosmart dock, it will come with the black triangle tag. When setting up the dock for use with this camera, use the dock insert with multiple plastic inserts. For instructions, see the documentation that came with your dock. 8 HP Photosmart R830/R840 series Digital Camera English 1 Microphone. 2 Flash. 3 Self-Timer/Focus Assist light. 4 Lens. 5 Lens cover/Power switch-Turns the camera on and off and protects the lens while the camera is off. 6 Dock connector. 7 Tripod mount. 8 Battery/Memory Card door.
Camera dock insert If you purchase an optional HP Photosmart dock, it will come with the black triangle tag. When setting up the dock for use with this camera, use the dock insert with multiple plastic inserts. For instructions, see the documentation that came with your dock. 8 HP Photosmart R830/R840 series Digital Camera English 1 Microphone. 2 Flash. 3 Self-Timer/Focus Assist light. 4 Lens. 5 Lens cover/Power switch-Turns the camera on and off and protects the lens while the camera is off. 6 Dock connector. 7 Tripod mount. 8 Battery/Memory Card door.

Quick Start Guide
Page 10
... the lens cover closed until it clicks, covering the lens. Plug the small end of the lens. The camera's blinking Battery Charging light indicates that you want, then press . 10 HP Photosmart R830/R840 series Digital Camera Plug the power adapter into the power adapter, as shown. 2. Turn on solid (approximately 2-3 hours). To turn on...
... the lens cover closed until it clicks, covering the lens. Plug the small end of the lens. The camera's blinking Battery Charging light indicates that you want, then press . 10 HP Photosmart R830/R840 series Digital Camera Plug the power adapter into the power adapter, as shown. 2. Turn on solid (approximately 2-3 hours). To turn on...
Quick Start Guide
Page 12
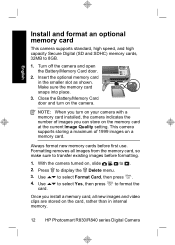
... . 4. Use card. to select Yes, then press to transfer existing images before first use. Insert the optional memory card in internal memory. 12 HP Photosmart R830/R840 series Digital Camera Formatting removes all new images and video clips are stored on a memory card. Use to display the Delete menu. 3. Always format new memory cards...
... . 4. Use card. to select Yes, then press to transfer existing images before first use. Insert the optional memory card in internal memory. 12 HP Photosmart R830/R840 series Digital Camera Formatting removes all new images and video clips are stored on a memory card. Use to display the Delete menu. 3. Always format new memory cards...

Quick Start Guide
Page 14
Double-click the installer icon, then follow the onscreen instructions. Once installation is complete and you connect your camera to your computer, System Preferences automatically opens to the HP Photosmart Camera settings. You may change settings so the HP Photosmart Software starts automatically when you have restarted your Macintosh (for more information, click the help button on the HP Photosmart Camera settings dialog). 14 HP Photosmart R830/R840 series Digital Camera English 3.
Double-click the installer icon, then follow the onscreen instructions. Once installation is complete and you connect your camera to your computer, System Preferences automatically opens to the HP Photosmart Camera settings. You may change settings so the HP Photosmart Software starts automatically when you have restarted your Macintosh (for more information, click the help button on the HP Photosmart Camera settings dialog). 14 HP Photosmart R830/R840 series Digital Camera English 3.
Quick Start Guide
Page 16
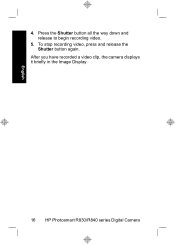
Press the Shutter button all the way down and release to begin recording video. 5. To stop recording video, press and release the Shutter button again. After you have recorded a video clip, the camera displays it briefly in the Image Display. 16 HP Photosmart R830/R840 series Digital Camera English 4.
Press the Shutter button all the way down and release to begin recording video. 5. To stop recording video, press and release the Shutter button again. After you have recorded a video clip, the camera displays it briefly in the Image Display. 16 HP Photosmart R830/R840 series Digital Camera English 4.
Quick Start Guide
Page 18
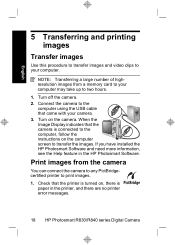
... more information, see the Help feature in the printer, and there are no printer error messages. 18 HP Photosmart R830/R840 series Digital Camera NOTE: Transferring a large number of highresolution images from the camera You can connect the camera to any PictBridgecertified printer to transfer the images. English 5 Transferring and printing images Transfer images Use this...
... more information, see the Help feature in the printer, and there are no printer error messages. 18 HP Photosmart R830/R840 series Digital Camera NOTE: Transferring a large number of highresolution images from the camera You can connect the camera to any PictBridgecertified printer to transfer the images. English 5 Transferring and printing images Transfer images Use this...
Quick Start Guide
Page 20
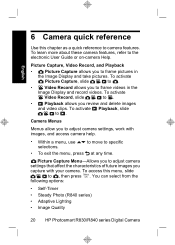
... to frame pictures in the Image Display and record videos. To activate Picture Capture, slide to . • Video Record allows you to camera features. Picture Capture Menu-Allows you to frame videos in the Image Display and take pictures. to move to . Picture Capture, Video Record...select from the following options: • Self-Timer • Steady Photo (R840 series) • Adaptive Lighting • Image Quality 20 HP Photosmart R830/R840 series Digital Camera To activate Video Record, slide to . • Playback allows you to the electronic User Guide or on...
... to frame pictures in the Image Display and record videos. To activate Picture Capture, slide to . • Video Record allows you to camera features. Picture Capture Menu-Allows you to frame videos in the Image Display and take pictures. to move to . Picture Capture, Video Record...select from the following options: • Self-Timer • Steady Photo (R840 series) • Adaptive Lighting • Image Quality 20 HP Photosmart R830/R840 series Digital Camera To activate Video Record, slide to . • Playback allows you to the electronic User Guide or on...
Quick Start Guide
Page 22
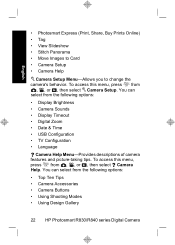
.... To access this menu, press from the following options: • Top Ten Tips • Camera Accessories • Camera Buttons • Using Shooting Modes • Using Design Gallery 22 HP Photosmart R830/R840 series Digital Camera English • Photosmart Express (Print, Share, Buy Prints Online) • Tag • View Slideshow • Stitch Panorama • Move Images to Card...
.... To access this menu, press from the following options: • Top Ten Tips • Camera Accessories • Camera Buttons • Using Shooting Modes • Using Design Gallery 22 HP Photosmart R830/R840 series Digital Camera English • Photosmart Express (Print, Share, Buy Prints Online) • Tag • View Slideshow • Stitch Panorama • Move Images to Card...


