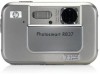
Quick Start Guide
Page 5
...Turn on the camera 10 Choose the language 10 Set the region 11 Set the date and time 11 Install and format an optional memory card 12 Install the software 13 3 Taking pictures and recording video clips 15 Take a still picture 15 Record a video clip 15 4 Reviewing and deleting images... and video clips 17 Review images and video clips 17 Delete an image 17 5 Transferring and printing images 18 Transfer images 18 Print images from the...
...Turn on the camera 10 Choose the language 10 Set the region 11 Set the date and time 11 Install and format an optional memory card 12 Install the software 13 3 Taking pictures and recording video clips 15 Take a still picture 15 Record a video clip 15 4 Reviewing and deleting images... and video clips 17 Review images and video clips 17 Delete an image 17 5 Transferring and printing images 18 Transfer images 18 Print images from the...

Quick Start Guide
Page 19
Use to select an image or video clip. 3. Use to select This Image, then press . Reviewing and deleting images and video clips 17 Use to . 2. Slide to scroll through your images and video clips. Delete an image You can review images and video clips in Playback. 1. Press to . 2. To play a video clip, press once the first screen of the clip appears on the Image Display. Slide to display the Delete sub-menu. 4. 4 Reviewing and deleting images and video clips Review images and video clips You can delete individual images during Playback: 1.
Use to select an image or video clip. 3. Use to select This Image, then press . Reviewing and deleting images and video clips 17 Use to . 2. Slide to scroll through your images and video clips. Delete an image You can review images and video clips in Playback. 1. Press to . 2. To play a video clip, press once the first screen of the clip appears on the Image Display. Slide to display the Delete sub-menu. 4. 4 Reviewing and deleting images and video clips Review images and video clips You can delete individual images during Playback: 1.
Quick Start Guide
Page 22
... review and delete images and video clips. Camera Menus Menus allow you to specific selections. ● To exit the menu, press at any time. You can select from the following options: ● Self-Timer 20 HP Photosmart R837 Digital Camera To learn more about these camera features..., refer to . Picture Capture Menu-Allows you to adjust camera settings that affect the characteristics of future images you capture with images, ...
... review and delete images and video clips. Camera Menus Menus allow you to specific selections. ● To exit the menu, press at any time. You can select from the following options: ● Self-Timer 20 HP Photosmart R837 Digital Camera To learn more about these camera features..., refer to . Picture Capture Menu-Allows you to adjust camera settings that affect the characteristics of future images you capture with images, ...
Quick Start Guide
Page 25
menu, press from the following options: ● Top Ten Tips ● Camera Accessories ● Camera Buttons ● Using Shooting Modes ● Using Design Gallery ● Using Photosmart Express ● Printing Images ● Recording Video Clips ● Reviewing Pictures and Video ● Tagging Images ● Deleting Images ● Transferring Images ● Managing Batteries ● Getting Assistance ● Tour Camera Features ● Camera Shortcuts ● About Camera quick reference 23 You can select from , , or , then select Camera Help.
menu, press from the following options: ● Top Ten Tips ● Camera Accessories ● Camera Buttons ● Using Shooting Modes ● Using Design Gallery ● Using Photosmart Express ● Printing Images ● Recording Video Clips ● Reviewing Pictures and Video ● Tagging Images ● Deleting Images ● Transferring Images ● Managing Batteries ● Getting Assistance ● Tour Camera Features ● Camera Shortcuts ● About Camera quick reference 23 You can select from , , or , then select Camera Help.
User Guide
Page 3
... 8 Set the date and time 8 Install and format an optional memory card 9 Install the software 9 Using your camera 10 2 Taking pictures and recording video clips 11 Taking pictures...11 Recording video clips 12 Instant Review...12 Auto focus and exposure 12 Focusing on the subject 12 Optimizing focus 13 Using Focus Lock... menus 18 Using the Self-Timer settings 21 Using the Burst setting 21 Adaptive Lighting 22 Exposure Compensation 22 White Balance 22 ISO speed...22 HP Photosmart R837 Digital Camera 3
... 8 Set the date and time 8 Install and format an optional memory card 9 Install the software 9 Using your camera 10 2 Taking pictures and recording video clips 11 Taking pictures...11 Recording video clips 12 Instant Review...12 Auto focus and exposure 12 Focusing on the subject 12 Optimizing focus 13 Using Focus Lock... menus 18 Using the Self-Timer settings 21 Using the Burst setting 21 Adaptive Lighting 22 Exposure Compensation 22 White Balance 22 ISO speed...22 HP Photosmart R837 Digital Camera 3
User Guide
Page 4
4 Reviewing images and video clips 24 Using Playback...24 Deleting images 25 Viewing thumbnails 25 Magnifying images 25 Using the Playback Menu 26 Tagging images 26 ... card reader 33 Printing directly to a printer 33 7 Using HP Photosmart Express 36 Using the Photosmart Express Menu 36 Marking images for printing 36 Buying prints online 37 Sharing images...37 Setting up online destinations in the camera 38 Sending images to online destinations 38 8 Using the Camera Setup Menu 39 9 Troubleshooting 41 Resetting the...
4 Reviewing images and video clips 24 Using Playback...24 Deleting images 25 Viewing thumbnails 25 Magnifying images 25 Using the Playback Menu 26 Tagging images 26 ... card reader 33 Printing directly to a printer 33 7 Using HP Photosmart Express 36 Using the Photosmart Express Menu 36 Marking images for printing 36 Buying prints online 37 Sharing images...37 Setting up online destinations in the camera 38 Sending images to online destinations 38 8 Using the Camera Setup Menu 39 9 Troubleshooting 41 Resetting the...
User Guide
Page 5
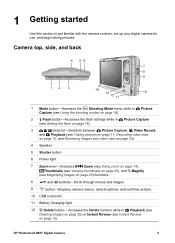
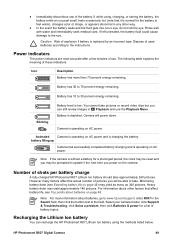
...), Thumbnails (see Viewing thumbnails on page 25), and Magnify (see Instant Review on page 25) functions. 8 and buttons-Scroll through menus and images. 9 button-Displays camera menus, selects options, and confirms actions. 10 USB connector. 11 Battery Charging light. 12 Delete button- HP Photosmart R837 Digital Camera 5 1 Getting started Use this section to get familiar with the...
...), Thumbnails (see Viewing thumbnails on page 25), and Magnify (see Instant Review on page 25) functions. 8 and buttons-Scroll through menus and images. 9 button-Displays camera menus, selects options, and confirms actions. 10 USB connector. 11 Battery Charging light. 12 Delete button- HP Photosmart R837 Digital Camera 5 1 Getting started Use this section to get familiar with the...

User Guide
Page 10
... can take and review pictures and video clips. For information on setting picture capture See Setting options for computers running Windows XP or x64 with HP Photosmart Software on transferring images from your camera to a printer on page 24. For information on enhancing your camera Now that came with your camera contains HP Photosmart Software for taking pictures...
... can take and review pictures and video clips. For information on setting picture capture See Setting options for computers running Windows XP or x64 with HP Photosmart Software on transferring images from your camera to a printer on page 24. For information on enhancing your camera Now that came with your camera contains HP Photosmart Software for taking pictures...

User Guide
Page 12
... button all the way down to begin recording video. 5. Chapter 2 Recording video clips You can record a video clip when the camera is locked (see Optimizing exposure on page 13). Instant Review After you auto focus: Indicator Green focus brackets Red focus brackets (shaking hand icon) Description Focus found (see Optimizing focus on...
... button all the way down to begin recording video. 5. Chapter 2 Recording video clips You can record a video clip when the camera is locked (see Optimizing exposure on page 13). Instant Review After you auto focus: Indicator Green focus brackets Red focus brackets (shaking hand icon) Description Focus found (see Optimizing focus on...
User Guide
Page 18
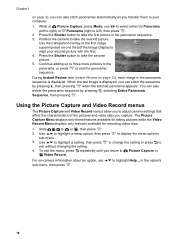
Position the camera to left), then press . 2. During Instant Review (see Instant Review on page 12), each image in Picture Capture, press Mode, use sub-menu, then press . When the last image is displayed. Use to highlight a setting, ... clips. 1. Using the Picture Capture and Video Record menus The Picture Capture and Video Record menus allow you to adjust camera settings that affect the characteristics of the first image superimposed on -camera information about an option, use to select either Panorama (left to right) or Panorama (right to take the second...
Position the camera to left), then press . 2. During Instant Review (see Instant Review on page 12), each image in Picture Capture, press Mode, use sub-menu, then press . When the last image is displayed. Use to highlight a setting, ... clips. 1. Using the Picture Capture and Video Record menus The Picture Capture and Video Record menus allow you to adjust camera settings that affect the characteristics of the first image superimposed on -camera information about an option, use to select either Panorama (left to right) or Panorama (right to take the second...

User Guide
Page 20
...set of the scene. Exposure Bracketing ( only)-Creates a set for scene illuminance. For best results, use Focus Lock (see Instant Review on page 12), you are about to capture brighter, press to increase the value. ● To make the images you are ...images, see Exposure Compensation on page 22. ● To make the images you can delete the entire bracketing sequence. Exposure Compensation-Overrides the camera's automatic exposure setting. For more information, see Deleting images on lighting conditions. AE Metering-Specifies which region of image. Chapter 3 (continued...
...set of the scene. Exposure Bracketing ( only)-Creates a set for scene illuminance. For best results, use Focus Lock (see Instant Review on page 12), you are about to capture brighter, press to increase the value. ● To make the images you are ...images, see Exposure Compensation on page 22. ● To make the images you can delete the entire bracketing sequence. Exposure Compensation-Overrides the camera's automatic exposure setting. For more information, see Deleting images on lighting conditions. AE Metering-Specifies which region of image. Chapter 3 (continued...
User Guide
Page 21
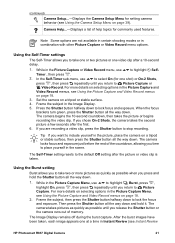
...highlight Burst, press , highlight On, press , then press repeatedly until you to stop recording. The camera takes pictures as quickly as possible when you return to Picture Capture. While in Instant Review (see Using the Picture Capture and Video Record menus on page 18. 2. If you release the... the Shutter button all the way down to include yourself in the Picture Capture and Video Record menus, see Instant Review HP Photosmart R837 Digital Camera 21 Tip If you want to lock the focus and exposure. Frame the subject, then press the Shutter button halfway down .
...highlight Burst, press , highlight On, press , then press repeatedly until you to stop recording. The camera takes pictures as quickly as possible when you return to Picture Capture. While in Instant Review (see Using the Picture Capture and Video Record menus on page 18. 2. If you release the... the Shutter button all the way down to include yourself in the Picture Capture and Video Record menus, see Instant Review HP Photosmart R837 Digital Camera 21 Tip If you want to lock the focus and exposure. Frame the subject, then press the Shutter button halfway down .
User Guide
Page 22
...Backlit scenes where the subject is too far away for the flash to reach, or is set to the default Auto setting, the camera selects the best ISO speed for this, reproducing colors more accurately and ensuring that a flash wouldn't reach. Exposure Compensation You can ...also adjust the white balance to override the camera's automatic exposure setting. For a scene with a flash, Adaptive Lighting can delete the entire burst sequence in Instant Review. You can use Exposure Compensation to produce creative effects. ISO speed This setting ...
...Backlit scenes where the subject is too far away for the flash to reach, or is set to the default Auto setting, the camera selects the best ISO speed for this, reproducing colors more accurately and ensuring that a flash wouldn't reach. Exposure Compensation You can ...also adjust the white balance to override the camera's automatic exposure setting. For a scene with a flash, Adaptive Lighting can delete the entire burst sequence in Instant Review. You can use Exposure Compensation to produce creative effects. ISO speed This setting ...

User Guide
Page 24
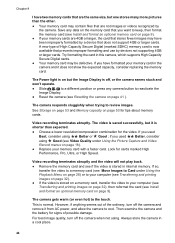
... video clips You can review and manipulate images and video clips in a panoramic sequence. 6 Tagged image (see Tagging images on page 26). Use to resume playing the video. press to ...
... video clips You can review and manipulate images and video clips in a panoramic sequence. 6 Tagged image (see Tagging images on page 26). Use to resume playing the video. press to ...
User Guide
Page 44
...camera, which supports High Capacity Secure Digital cards. ● Your memory card may have formatted your memory card in the camera and it does not show the expected capacity, consider replacing the memory card. Video recording terminates abruptly. The camera gets warm (or even hot) to review images. Always store the camera..., then format the memory card (see Resetting the camera on page 9). ● If your memory card with a faster card. Then examine the camera and the battery for signs of High Capacity Secure Digital (marked SDHC) memory card is shorter than the...
...camera, which supports High Capacity Secure Digital cards. ● Your memory card may have formatted your memory card in the camera and it does not show the expected capacity, consider replacing the memory card. Video recording terminates abruptly. The camera gets warm (or even hot) to review images. Always store the camera..., then format the memory card (see Resetting the camera on page 9). ● If your memory card with a faster card. Then examine the camera and the battery for signs of High Capacity Secure Digital (marked SDHC) memory card is shorter than the...

User Guide
Page 46
... updates, purchase HP supplies and accessories www.hp.com Under Learn about:, click Digital Photography Customers with disabilities www.hp.com/hpinfo/community/accessibility (English only) Hewlett-Packard Technical Support; support information www.hp.com/support Getting assistance To get the best from your camera). 3. Review Troubleshooting on page 41 in this camera. Refer to all HP customers. After...
... updates, purchase HP supplies and accessories www.hp.com Under Learn about:, click Digital Photography Customers with disabilities www.hp.com/hpinfo/community/accessibility (English only) Hewlett-Packard Technical Support; support information www.hp.com/support Getting assistance To get the best from your camera). 3. Review Troubleshooting on page 41 in this camera. Refer to all HP customers. After...
User Guide
Page 49
Dispose of used batteries according to the eye. Animated Camera is operating on AC power and is operating on AC power. Recharging the Lithium Ion battery You can still review images in any other factors that it the next time you power on page 48..., the clock may yield approximately 140 pictures. HP Photosmart R837 Digital Camera 49 Note For more than 70 percent energy remaining. Note If the camera is depleted. You cannot take approximately 240 pictures. Battery has 10 to 70 percent energy remaining. Camera is operating on page 48. The following table...
Dispose of used batteries according to the eye. Animated Camera is operating on AC power and is operating on AC power. Recharging the Lithium Ion battery You can still review images in any other factors that it the next time you power on page 48..., the clock may yield approximately 140 pictures. HP Photosmart R837 Digital Camera 49 Note For more than 70 percent energy remaining. Note If the camera is depleted. You cannot take approximately 240 pictures. Battery has 10 to 70 percent energy remaining. Camera is operating on page 48. The following table...
User Guide
Page 55
...tagging 26 transfer to computer 32 install memory card 9 install software 9 Instant Review 12, 18, 22 interfaces 53 internal memory 11, 53 ISO Speed 20, 22 L Landscape mode 17 Language 8, 40 LEDs 5 lens 6 lights on camera 5 Lithium Ion battery 48, 50 M Magnify control 5 magnifying images 25... 53 card 11 card door 6 memory card 9, 53 Menu/OK button 5 menus Camera Setup 39 Design Gallery 28 Photosmart Express 36 Picture Capture 18 Playback 26 Video Record 18 microphone 6 modifying colors 30 Move Images to Card 26 N Night Portrait mode 17 number of pictures 54 HP Photosmart R837 Digital Camera 55
...tagging 26 transfer to computer 32 install memory card 9 install software 9 Instant Review 12, 18, 22 interfaces 53 internal memory 11, 53 ISO Speed 20, 22 L Landscape mode 17 Language 8, 40 LEDs 5 lens 6 lights on camera 5 Lithium Ion battery 48, 50 M Magnify control 5 magnifying images 25... 53 card 11 card door 6 memory card 9, 53 Menu/OK button 5 menus Camera Setup 39 Design Gallery 28 Photosmart Express 36 Picture Capture 18 Playback 26 Video Record 18 microphone 6 modifying colors 30 Move Images to Card 26 N Night Portrait mode 17 number of pictures 54 HP Photosmart R837 Digital Camera 55
User Guide
Page 56
... remaining 11 O on/off 7 online destinations 37, 38 print buying 37 optical zoom 14 P Panorama mode 17, 27 parts of camera 5, 6 Photosmart Express Menu buying prints online 37 marking images for printing 36 sharing images 37 Picture Capture Menu 18 pictures 11, 21 Playback 24 Playback...41 product support 46 R record video clips 12 red-eye removal 16, 28 Region 8 remaining pictures count 11 removing red eyes 28 reset camera 41 resolution 52 reviewing images 24 S safety precautions for batteries 48, 50 selecting images for destinations 37, 38 selecting images for printing 36 Self-Timer light 6 ...
... remaining 11 O on/off 7 online destinations 37, 38 print buying 37 optical zoom 14 P Panorama mode 17, 27 parts of camera 5, 6 Photosmart Express Menu buying prints online 37 marking images for printing 36 sharing images 37 Picture Capture Menu 18 pictures 11, 21 Playback 24 Playback...41 product support 46 R record video clips 12 red-eye removal 16, 28 Region 8 remaining pictures count 11 removing red eyes 28 reset camera 41 resolution 52 reviewing images 24 S safety precautions for batteries 48, 50 selecting images for destinations 37, 38 selecting images for printing 36 Self-Timer light 6 ...

