
End User License Agreement
Page 1
... not have Software Product into Your Computer's AGREE TO ALL TERMS AND temporary memory (RAM) for use on those computers. d. Use of the HP Product. Other software may contain a EULA in this EULA may accompany the HP Product. You may load the Software ON THE CONDITION THAT YOU Product into ...the local memory or storage device of the Freeware by you may make archival or back-up purposes. You may include associated media, printed ...
... not have Software Product into Your Computer's AGREE TO ALL TERMS AND temporary memory (RAM) for use on those computers. d. Use of the HP Product. Other software may contain a EULA in this EULA may accompany the HP Product. You may load the Software ON THE CONDITION THAT YOU Product into ...the local memory or storage device of the Freeware by you may make archival or back-up purposes. You may include associated media, printed ...
Getting Started - Windows 7
Page 6
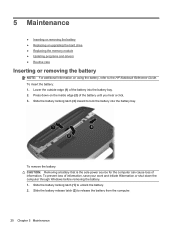
...the battery ...20 Replacing or upgrading the hard drive 21 Removing the hard drive ...21 Installing the hard drive ...22 Replacing the memory module ...24 Updating programs and drivers ...27 Routine care ...27 Cleaning guidelines ...27 Cleaning products 27 Cleaning procedures 27 Cleaning the ...display 27 Cleaning the sides and cover 28 Cleaning the TouchPad and keyboard 28 Cleaning a tablet PC pen and pen holder 28 6 Backup and recovery ...29 Backing up your information ...29 Performing a recovery ...30 Using the Windows recovery...
...the battery ...20 Replacing or upgrading the hard drive 21 Removing the hard drive ...21 Installing the hard drive ...22 Replacing the memory module ...24 Updating programs and drivers ...27 Routine care ...27 Cleaning guidelines ...27 Cleaning products 27 Cleaning procedures 27 Cleaning the ...display 27 Cleaning the sides and cover 28 Cleaning the TouchPad and keyboard 28 Cleaning a tablet PC pen and pen holder 28 6 Backup and recovery ...29 Backing up your information ...29 Performing a recovery ...30 Using the Windows recovery...
Getting Started - Windows 7
Page 18
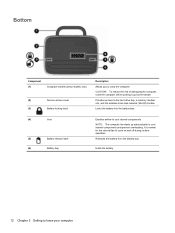
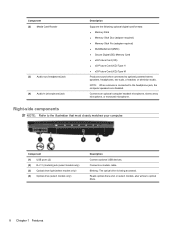
... off during routine operation. Bottom Component (1) Computer handle (select models only) (2) Service access cover (3) Battery locking latch Description Allows you to the hard drive bay, a memory module slot, and the wireless local area network (WLAN) module. NOTE: The computer fan starts up by the handle. It is normal for the internal...
... off during routine operation. Bottom Component (1) Computer handle (select models only) (2) Service access cover (3) Battery locking latch Description Allows you to the hard drive bay, a memory module slot, and the wireless local area network (WLAN) module. NOTE: The computer fan starts up by the handle. It is normal for the internal...
Getting Started - Windows 7
Page 26
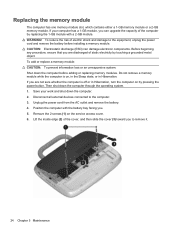
Lower the outside edge (1) of the battery into the battery bay. Slide the battery locking latch (3) inward to the HP Notebook Reference Guide. Slide the battery locking latch (1) to release the battery from the computer. 20 Chapter 5 Maintenance To insert the battery... to unlock the battery. 2. 5 Maintenance ● Inserting or removing the battery ● Replacing or upgrading the hard drive ● Replacing the memory module ● Updating programs and drivers ● Routine care Inserting or removing the battery NOTE: For additional information on the inside edge (2) of ...
Lower the outside edge (1) of the battery into the battery bay. Slide the battery locking latch (3) inward to the HP Notebook Reference Guide. Slide the battery locking latch (1) to release the battery from the computer. 20 Chapter 5 Maintenance To insert the battery... to unlock the battery. 2. 5 Maintenance ● Inserting or removing the battery ● Replacing or upgrading the hard drive ● Replacing the memory module ● Updating programs and drivers ● Routine care Inserting or removing the battery NOTE: For additional information on the inside edge (2) of ...
Getting Started - Windows 7
Page 30
...power button. CAUTION: Electrostatic discharge (ESD) can upgrade the capacity of the computer by touching a grounded metal object. Do not remove a memory module while the computer is off or in Hibernation. If you . 5. Disconnect all external devices connected to remove it. 24 Chapter 5... Maintenance To add or replace a memory module: CAUTION: To prevent information loss or an unresponsive system: Shut down the computer through the operating system. 1. Then shut down the...
...power button. CAUTION: Electrostatic discharge (ESD) can upgrade the capacity of the computer by touching a grounded metal object. Do not remove a memory module while the computer is off or in Hibernation. If you . 5. Disconnect all external devices connected to remove it. 24 Chapter 5... Maintenance To add or replace a memory module: CAUTION: To prevent information loss or an unresponsive system: Shut down the computer through the operating system. 1. Then shut down the...
Getting Started - Windows 7
Page 31
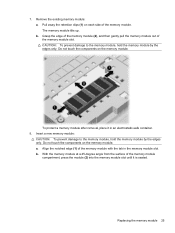
... slot. CAUTION: To prevent damage to the memory module, hold the memory module by the edges only. a. Grasp the edge of the memory module (2), and then gently pull the memory module out of the memory module. Insert a new memory module: CAUTION: To prevent damage to the memory module, hold the memory module by the edges only. Replacing the...
... slot. CAUTION: To prevent damage to the memory module, hold the memory module by the edges only. a. Grasp the edge of the memory module (2), and then gently pull the memory module out of the memory module. Insert a new memory module: CAUTION: To prevent damage to the memory module, hold the memory module by the edges only. Replacing the...
Getting Started - Windows 7
Page 32
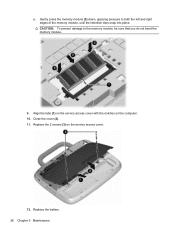
CAUTION: To prevent damage to both the left and right edges of the memory module, until the retention clips snap into place. Close the cover (2). 11. Replace the battery. 26 Chapter 5 Maintenance c. Align the tabs (1) on the service access cover with the notches on the service access cover. 12. Replace the 2 screws (3) on the computer. 10. Gently press the memory module (3) down, applying pressure to the memory module, be sure that you do not bend the memory module. 9.
CAUTION: To prevent damage to both the left and right edges of the memory module, until the retention clips snap into place. Close the cover (2). 11. Replace the battery. 26 Chapter 5 Maintenance c. Align the tabs (1) on the service access cover with the notches on the service access cover. 12. Replace the 2 screws (3) on the computer. 10. Gently press the memory module (3) down, applying pressure to the memory module, be sure that you do not bend the memory module. 9.
Getting Started - Windows 7
Page 41
...lights battery 10 caps lock 5 mute 5 network activity 9 network connection 9 power 5 TouchPad off indicator 5 webcam 11 wireless 5 M media controls, keys 16 memory module inserting 25 Index 35 Index A audio-in (microphone) 9 audio-out (headphone) 9 RJ-11 (modem) 10 RJ-45 (network) 9 K keyboard ... Windows applications 7 Windows logo 7 L labels Microsoft Certificate of Authenticity label 33 cleaning display 27 keyboard 28 pen holder 28 tablet PC pen 28 TouchPad 28 cleaning guidelines 27 cleaning procedures 27 cleaning products 27 components bottom 12 display 11 front 8 left side 10 right...
...lights battery 10 caps lock 5 mute 5 network activity 9 network connection 9 power 5 TouchPad off indicator 5 webcam 11 wireless 5 M media controls, keys 16 memory module inserting 25 Index 35 Index A audio-in (microphone) 9 audio-out (headphone) 9 RJ-11 (modem) 10 RJ-45 (network) 9 K keyboard ... Windows applications 7 Windows logo 7 L labels Microsoft Certificate of Authenticity label 33 cleaning display 27 keyboard 28 pen holder 28 tablet PC pen 28 TouchPad 28 cleaning guidelines 27 cleaning procedures 27 cleaning products 27 components bottom 12 display 11 front 8 left side 10 right...
Getting Started - Windows Vista
Page 9
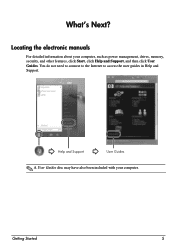
What's Next? Locating the electronic manuals For detailed information about your computer. You do not need to connect to the Internet to access the user guides in Help and Support. Getting Started 5 Help and Support User Guides ✎ A User Guides disc may have also been included with your computer, such as power management, drives, memory, security, and other features, click Start, click Help and Support, and then click User Guides.
What's Next? Locating the electronic manuals For detailed information about your computer. You do not need to connect to the Internet to access the user guides in Help and Support. Getting Started 5 Help and Support User Guides ✎ A User Guides disc may have also been included with your computer, such as power management, drives, memory, security, and other features, click Start, click Help and Support, and then click User Guides.
HP ProtectTools Security Software 2010
Page 14
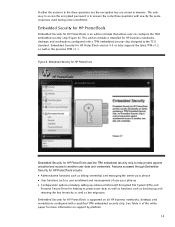
... pass phrase • User functions such as user enrollment and management of this white paper for more information on all HP business notebooks, desktops and workstations configured with a TPM embedded security chip designed to protect user data as well as functions such as...are stored in memory. Figure 8. N either the answers to sensitive user data and credentials. The only way to access the encrypted password is intended for HP ProtectTools is supported on support by platform. 14 Embedded Security for HP ProtectTools Embedded Security for HP business notebooks, desktops and ...
... pass phrase • User functions such as user enrollment and management of this white paper for more information on all HP business notebooks, desktops and workstations configured with a TPM embedded security chip designed to protect user data as well as functions such as...are stored in memory. Figure 8. N either the answers to sensitive user data and credentials. The only way to access the encrypted password is intended for HP ProtectTools is supported on support by platform. 14 Embedded Security for HP ProtectTools Embedded Security for HP business notebooks, desktops and ...

HP ProBook Notebook PC User Guide - Windows Vista
Page 10
...select models only 112 Configuring an ExpressCard 112 Inserting an ExpressCard 112 Stopping and removing an ExpressCard 113 9 Memory modules ...115 Adding or replacing memory modules 116 10 Security ...127 Protecting the computer ...127 Using passwords ...128 Setting passwords in Windows 128... 137 Using Computer Setup System IDs 138 Using antivirus software ...139 Using firewall software ...140 Installing critical updates ...141 Using HP ProtectTools Security Manager (select models only 142 Installing a security cable ...143 11 Software updates ...144 Updating software ...144 Updating...
...select models only 112 Configuring an ExpressCard 112 Inserting an ExpressCard 112 Stopping and removing an ExpressCard 113 9 Memory modules ...115 Adding or replacing memory modules 116 10 Security ...127 Protecting the computer ...127 Using passwords ...128 Setting passwords in Windows 128... 137 Using Computer Setup System IDs 138 Using antivirus software ...139 Using firewall software ...140 Installing critical updates ...141 Using HP ProtectTools Security Manager (select models only 142 Installing a security cable ...143 11 Software updates ...144 Updating software ...144 Updating...
HP ProBook Notebook PC User Guide - Windows Vista
Page 20
...-out (headphone) jack (4) Audio-in (microphone) jack Description Supports the following optional digital card formats: ● Memory Stick ● Memory Stick Duo (adapter required) ● Memory Stick Pro (adapter required) ● MultiMediaCard (MMC) ● Secure Digital (SD) Memory Card ● xD-Picture Card (XD) ● xD-Picture Card (XD) Type H ● xD-Picture Card...
...-out (headphone) jack (4) Audio-in (microphone) jack Description Supports the following optional digital card formats: ● Memory Stick ● Memory Stick Duo (adapter required) ● Memory Stick Pro (adapter required) ● MultiMediaCard (MMC) ● Secure Digital (SD) Memory Card ● xD-Picture Card (XD) ● xD-Picture Card (XD) Type H ● xD-Picture Card...
HP ProBook Notebook PC User Guide - Windows Vista
Page 52
... initiates Hibernation and the information stored in Windows Control Panel. The function of information loss, save your information is stored in system memory, the screen is cleared, and power is saved to switch the screen image among other devices receiving video information from the computer using... Power Options in memory is conserved. Decreasing screen brightness Press fn+f2 to the fn+f1 hotkey. Switching the screen image Press fn+f4 to the ...
... initiates Hibernation and the information stored in Windows Control Panel. The function of information loss, save your information is stored in system memory, the screen is cleared, and power is saved to switch the screen image among other devices receiving video information from the computer using... Power Options in memory is conserved. Decreasing screen brightness Press fn+f2 to the fn+f1 hotkey. Switching the screen image Press fn+f4 to the ...
HP ProBook Notebook PC User Guide - Windows Vista
Page 81
...any computer functions while the computer is set at the factory: Sleep and Hibernation. With the computer on, you stopped working. NOTE: When HP 3D DriveGuard has parked a drive, the computer will not initiate Sleep or Hibernation, and the display will be changed using Power Options in Hibernation...Setting power options 69 Initiating and exiting Sleep The system is in the Sleep state or in Windows Control Panel. Your work is saved to memory. When Hibernation is initiated, your work is saved to a hibernation file on the hard drive and the computer turns off . NOTE: You ...
...any computer functions while the computer is set at the factory: Sleep and Hibernation. With the computer on, you stopped working. NOTE: When HP 3D DriveGuard has parked a drive, the computer will not initiate Sleep or Hibernation, and the display will be changed using Power Options in Hibernation...Setting power options 69 Initiating and exiting Sleep The system is in the Sleep state or in Windows Control Panel. Your work is saved to memory. When Hibernation is initiated, your work is saved to a hibernation file on the hard drive and the computer turns off . NOTE: You ...
HP ProBook Notebook PC User Guide - Windows Vista
Page 122
...-side up, with other computers. The Digital Media Slot supports the following digital card formats: ● Memory Stick ● Memory Stick Duo (adapter required) ● Memory Stick Pro (adapter required) ● MultiMediaCard (MMC) ● Secure Digital (SD) Memory Card ● xD-Picture Card (XD) ● xD-Picture Card (XD) Type H ● xD-Picture Card...
...-side up, with other computers. The Digital Media Slot supports the following digital card formats: ● Memory Stick ● Memory Stick Duo (adapter required) ● Memory Stick Pro (adapter required) ● MultiMediaCard (MMC) ● Secure Digital (SD) Memory Card ● xD-Picture Card (XD) ● xD-Picture Card (XD) Type H ● xD-Picture Card...
HP ProBook Notebook PC User Guide - Windows Vista
Page 124
.... CAUTION: To prevent damage to the computer and external media cards, do not insert a PC Card into the ExpressCard slot. Pull the insert out of the Personal Computer Memory Card International Association (PCMCIA). Using ExpressCards (select models only) An ExpressCard is a high-performance... PC Card that is in on the insert (1) to install device drivers: ● Install only the device...
.... CAUTION: To prevent damage to the computer and external media cards, do not insert a PC Card into the ExpressCard slot. Pull the insert out of the Personal Computer Memory Card International Association (PCMCIA). Using ExpressCards (select models only) An ExpressCard is a high-performance... PC Card that is in on the insert (1) to install device drivers: ● Install only the device...
HP ProBook Notebook PC User Guide - Windows Vista
Page 127
...computer must be upgraded by adding a memory module to the vacant expansion memory module slot or by upgrading the existing memory module in the computer. The memory capacity of the computer can damage electronic components. WARNING! When upgrading memory capacity, verify that you are discharged of...to the equipment, unplug the power cord and remove all batteries before installing a memory module. To reduce the risk of static electricity. NOTE: To use a dual-channel configuration when adding a second memory module, be sure that the upgrade modules are the same size and type....
...computer must be upgraded by adding a memory module to the vacant expansion memory module slot or by upgrading the existing memory module in the computer. The memory capacity of the computer can damage electronic components. WARNING! When upgrading memory capacity, verify that you are discharged of...to the equipment, unplug the power cord and remove all batteries before installing a memory module. To reduce the risk of static electricity. NOTE: To use a dual-channel configuration when adding a second memory module, be sure that the upgrade modules are the same size and type....
HP ProBook Notebook PC User Guide - Windows Vista
Page 128
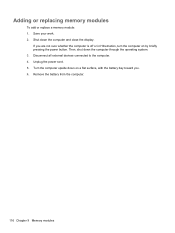
Remove the battery from the computer. 116 Chapter 9 Memory modules If you are not sure whether the computer is off or in Hibernation, turn the computer on a flat surface, with the battery bay toward you. 6. Turn the computer upside down on by briefly pressing the power button. Unplug the power cord. 5. Adding or replacing memory modules To add or replace a memory module: 1. Save your work. 2. Shut down the computer through the operating system. 3. Then, shut down the computer and close the display. Disconnect all external devices connected to the computer. 4.
Remove the battery from the computer. 116 Chapter 9 Memory modules If you are not sure whether the computer is off or in Hibernation, turn the computer on a flat surface, with the battery bay toward you. 6. Turn the computer upside down on by briefly pressing the power button. Unplug the power cord. 5. Adding or replacing memory modules To add or replace a memory module: 1. Save your work. 2. Shut down the computer through the operating system. 3. Then, shut down the computer and close the display. Disconnect all external devices connected to the computer. 4.

HP ProBook Notebook PC User Guide - Windows Vista
Page 129
7. NOTE: Refer to the illustration that most closely matches your computer. Remove the screws from the battery area. Adding or replacing memory modules 117
7. NOTE: Refer to the illustration that most closely matches your computer. Remove the screws from the battery area. Adding or replacing memory modules 117
HP ProBook Notebook PC User Guide - Windows Vista
Page 130
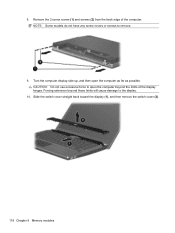
NOTE: Some models do not have any screw covers or screws to the display. 10. Forcing extension beyond the limits of the computer. Turn the computer display-side up, and then open the computer beyond these limits will cause damage to remove. 9. Remove the 2 screw covers (1) and screws (2) from the back edge of the display hinges. Slide the switch cover straight back toward the display (1), and then remove the switch cover (2). 118 Chapter 9 Memory modules CAUTION: Do not use excessive force to open the computer as far as possible. 8.
NOTE: Some models do not have any screw covers or screws to the display. 10. Forcing extension beyond the limits of the computer. Turn the computer display-side up, and then open the computer beyond these limits will cause damage to remove. 9. Remove the 2 screw covers (1) and screws (2) from the back edge of the display hinges. Slide the switch cover straight back toward the display (1), and then remove the switch cover (2). 118 Chapter 9 Memory modules CAUTION: Do not use excessive force to open the computer as far as possible. 8.


