Getting Started - Windows 7
Page 6
... 21 Removing the hard drive ...21 Installing the hard drive ...22 Replacing the memory module ...24 Updating programs and drivers ...27 Routine care ...27 Cleaning guidelines ...27 Cleaning products 27 Cleaning procedures 27 Cleaning the display 27 Cleaning the sides and cover 28 Cleaning the TouchPad and keyboard 28 Cleaning a tablet PC pen...
... 21 Removing the hard drive ...21 Installing the hard drive ...22 Replacing the memory module ...24 Updating programs and drivers ...27 Routine care ...27 Cleaning guidelines ...27 Cleaning products 27 Cleaning procedures 27 Cleaning the display 27 Cleaning the sides and cover 28 Cleaning the TouchPad and keyboard 28 Cleaning a tablet PC pen...
Getting Started - Windows 7
Page 34
... or use a rotating motion around the opening of the notebook, use a vacuum cleaner attachment to aid in an up and down motion to remove dust, lint, and particles trapped beneath the keys, use a can deposit household debris on the keyboard surface. CAUTION: Do not put any fluid or insert...soft microfiber cloth or chamois or use an acceptable germicidal disposable wipe: ● To clean the pen, rub the pen in removing dirt and debris. Cleaning a tablet PC pen and pen holder Using one of the cleaning solutions listed previously, or use an acceptable germicidal disposable wipe. ● To ...
... or use a rotating motion around the opening of the notebook, use a vacuum cleaner attachment to aid in an up and down motion to remove dust, lint, and particles trapped beneath the keys, use a can deposit household debris on the keyboard surface. CAUTION: Do not put any fluid or insert...soft microfiber cloth or chamois or use an acceptable germicidal disposable wipe: ● To clean the pen, rub the pen in removing dirt and debris. Cleaning a tablet PC pen and pen holder Using one of the cleaning solutions listed previously, or use an acceptable germicidal disposable wipe. ● To ...
Getting Started - Windows 7
Page 37
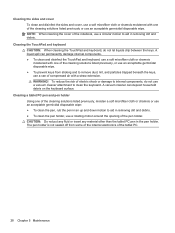
...drive is complete, the recovery process helps you have created and any keyboard key. 4. When prompted, press any software installed on -screen instructions. Click Next. 6. Follow the on the computer are permanently removed. To order a Windows 7 operating system DVD, go to the Worldwide... Telephone Numbers booklet included with the computer. For contact information, refer to http://www.hp.com/support, select your computer. 7. If possible, back up...
...drive is complete, the recovery process helps you have created and any keyboard key. 4. When prompted, press any software installed on -screen instructions. Click Next. 6. Follow the on the computer are permanently removed. To order a Windows 7 operating system DVD, go to the Worldwide... Telephone Numbers booklet included with the computer. For contact information, refer to http://www.hp.com/support, select your computer. 7. If possible, back up...
Getting Started - Windows 7
Page 41
...left TouchPad 4 power 6 right TouchPad 4 C caps lock light, identifying 5 Certificate of Authenticity label 33 cleaning display 27 keyboard 28 pen holder 28 tablet PC pen 28 TouchPad 28 cleaning guidelines 27 cleaning procedures 27 cleaning products 27 components bottom 12 display 11 front 8 left side ...16 E external monitor port, identifying 10 F fn key, identifying function keys identifying 7 7, 16 H handle, identifying 12 hard drive installing 22 removing 21 headphone (audio-out) jack 9 Help and Support hotkey 16 hotkeys adjusting volume 17 audio CD, DVD, or BD controls 16 decrease screen...
...left TouchPad 4 power 6 right TouchPad 4 C caps lock light, identifying 5 Certificate of Authenticity label 33 cleaning display 27 keyboard 28 pen holder 28 tablet PC pen 28 TouchPad 28 cleaning guidelines 27 cleaning procedures 27 cleaning products 27 components bottom 12 display 11 front 8 left side ...16 E external monitor port, identifying 10 F fn key, identifying function keys identifying 7 7, 16 H handle, identifying 12 hard drive installing 22 removing 21 headphone (audio-out) jack 9 Help and Support hotkey 16 hotkeys adjusting volume 17 audio CD, DVD, or BD controls 16 decrease screen...

Getting Started - Windows Vista
Page 15
... display. A vacuum cleaner can cause the pointer to jump around and under the keys to loosen and remove debris. Clean the keyboard regularly to prevent keys from sticking and to remove dust, lint, and particles that can help you fix a problem when the computer is resolved: 1. ... an antistatic screen cleaner. Getting Started 11 If the screen requires additional cleaning, use a vacuum cleaner attachment to clean the keyboard. To avoid this chapter. 2. To remove smudges and lint, frequently clean the display with a soft, damp, lint-free cloth. Refer to "Quick troubleshooting," the...
... display. A vacuum cleaner can cause the pointer to jump around and under the keys to loosen and remove debris. Clean the keyboard regularly to prevent keys from sticking and to remove dust, lint, and particles that can help you fix a problem when the computer is resolved: 1. ... an antistatic screen cleaner. Getting Started 11 If the screen requires additional cleaning, use a vacuum cleaner attachment to clean the keyboard. To avoid this chapter. 2. To remove smudges and lint, frequently clean the display with a soft, damp, lint-free cloth. Refer to "Quick troubleshooting," the...
Getting Started - Windows Vista
Page 16
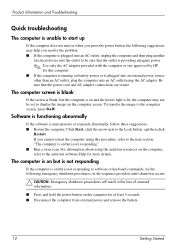
... adequate power. ✎ Use only the AC adapter provided with the computer or one approved by HP for this procedure, refer to the next section, "The computer is on battery power or is unresponsive... on the computer for at least 5 seconds. ■ Disconnect the computer from external power and remove the battery. 12 Getting Started Click Start, click the arrow next to the computer screen, press ... cannot restart the computer using the antivirus resources on the computer, refer to software or keyboard commands, try the following suggestions may not be sure that the power cord and AC ...
... adequate power. ✎ Use only the AC adapter provided with the computer or one approved by HP for this procedure, refer to the next section, "The computer is on battery power or is unresponsive... on the computer for at least 5 seconds. ■ Disconnect the computer from external power and remove the battery. 12 Getting Started Click Start, click the arrow next to the computer screen, press ... cannot restart the computer using the antivirus resources on the computer, refer to software or keyboard commands, try the following suggestions may not be sure that the power cord and AC ...
HP ProBook Notebook PC User Guide - Windows Vista
Page 7
... the embedded numeric keypad 44 Switching key functions on the embedded numeric keypad 44 Using an optional external numeric keypad 45 Cleaning the TouchPad and keyboard 46 4 Multimedia ...47 Multimedia features ...47 Identifying your multimedia components 47 Adjusting the volume ...48 Multimedia software ...49 Opening preinstalled multimedia software 50 Using ... AutoPlay ...58 Changing DVD region settings 59 Observing the copyright warning 59 Copying a CD or DVD ...59 Creating (burning) a CD, DVD, or BD 60 Removing an optical disc (CD, DVD, or BD 60 Troubleshooting ...61 vii
... the embedded numeric keypad 44 Switching key functions on the embedded numeric keypad 44 Using an optional external numeric keypad 45 Cleaning the TouchPad and keyboard 46 4 Multimedia ...47 Multimedia features ...47 Identifying your multimedia components 47 Adjusting the volume ...48 Multimedia software ...49 Opening preinstalled multimedia software 50 Using ... AutoPlay ...58 Changing DVD region settings 59 Observing the copyright warning 59 Copying a CD or DVD ...59 Creating (burning) a CD, DVD, or BD 60 Removing an optical disc (CD, DVD, or BD 60 Troubleshooting ...61 vii

HP ProBook Notebook PC User Guide - Windows Vista
Page 58
...hands frequently when using the computer. Cleaning the TouchPad and keyboard Dirt and grease on the TouchPad can cause the pointer to jump around and under the keys to loosen and remove debris. 46 Chapter 3 Pointing devices and keyboard To avoid this, clean the TouchPad with a straw ...extension can be used to remove dust, lint, and particles that can deposit household debris on the keyboard surface. Clean the keyboard regularly to prevent keys from ...
...hands frequently when using the computer. Cleaning the TouchPad and keyboard Dirt and grease on the TouchPad can cause the pointer to jump around and under the keys to loosen and remove debris. 46 Chapter 3 Pointing devices and keyboard To avoid this, clean the TouchPad with a straw ...extension can be used to remove dust, lint, and particles that can deposit household debris on the keyboard surface. Clean the keyboard regularly to prevent keys from ...

HP ProBook Notebook PC User Guide - Windows Vista
Page 98
... devices that check carry-on and then shut it . Do not touch the connector pins on a removable drive or on the keyboard or move a computer that the battery is sufficiently charged before removing the drive from the drive bay, or traveling with, shipping, or storing a drive. Do not ...use X-rays instead of magnetism and will not damage a drive. 86 Chapter 6 Drives Remove media from a drive before writing...
... devices that check carry-on and then shut it . Do not touch the connector pins on a removable drive or on the keyboard or move a computer that the battery is sufficiently charged before removing the drive from the drive bay, or traveling with, shipping, or storing a drive. Do not ...use X-rays instead of magnetism and will not damage a drive. 86 Chapter 6 Drives Remove media from a drive before writing...

HP ProBook Notebook PC User Guide - Windows Vista
Page 106
11. NOTE: Refer to the illustration that most closely matches your computer. 94 Chapter 6 Drives Remove the screws from the keyboard.
11. NOTE: Refer to the illustration that most closely matches your computer. 94 Chapter 6 Drives Remove the screws from the keyboard.

HP ProBook Notebook PC User Guide - Windows Vista
Page 108
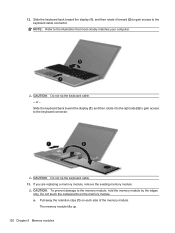
NOTE: Refer to which the keyboard cable is attached, disconnect the keyboard cable (2) from the system board by pulling upward, and then remove the keyboard from the computer (3). 13. Release the ZIF connector (1) to the illustration that most closely matches your computer. 96 Chapter 6 Drives
NOTE: Refer to which the keyboard cable is attached, disconnect the keyboard cable (2) from the system board by pulling upward, and then remove the keyboard from the computer (3). 13. Release the ZIF connector (1) to the illustration that most closely matches your computer. 96 Chapter 6 Drives

HP ProBook Notebook PC User Guide - Windows Vista
Page 117
...USB hub provides additional USB ports that can be used with the device. Stopping and removing a USB device CAUTION: To prevent loss of information or an unresponsive system, stop a USB device before removing it. Your computer model has 4 USB ports, which is usually included with the computer... area to let you know the device is a hardware interface that can be used to connect an optional external device, such as a USB keyboard, mouse, drive, printer, scanner, or hub. 7 External devices Using a USB device Universal Serial Bus (USB) is recognized by the computer...
...USB hub provides additional USB ports that can be used with the device. Stopping and removing a USB device CAUTION: To prevent loss of information or an unresponsive system, stop a USB device before removing it. Your computer model has 4 USB ports, which is usually included with the computer... area to let you know the device is a hardware interface that can be used to connect an optional external device, such as a USB keyboard, mouse, drive, printer, scanner, or hub. 7 External devices Using a USB device Universal Serial Bus (USB) is recognized by the computer...

HP ProBook Notebook PC User Guide - Windows Vista
Page 118
To stop and remove a USB device: 1. Double-click the Safely Remove Hardware icon in the notification area, at the far right of the taskbar. CAUTION: To prevent damage to remove the USB device. Then follow the instructions on the cable to a USB connector, do not pull on the screen. NOTE: To display the Safely Remove Hardware icon, click the Show Hidden Icons icon (< or Save Changes and Exit. Your preferences go into effect when the computer restarts. 106 Chapter 7 External devices
To stop and remove a USB device: 1. Double-click the Safely Remove Hardware icon in the notification area, at the far right of the taskbar. CAUTION: To prevent damage to remove the USB device. Then follow the instructions on the cable to a USB connector, do not pull on the screen. NOTE: To display the Safely Remove Hardware icon, click the Show Hidden Icons icon (< or Save Changes and Exit. Your preferences go into effect when the computer restarts. 106 Chapter 7 External devices
HP ProBook Notebook PC User Guide - Windows Vista
Page 127
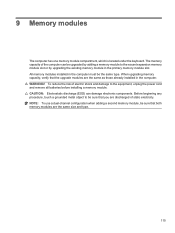
... a grounded metal object to be the same type. 9 Memory modules The computer has one memory module compartment, which is located under the keyboard. The memory capacity of electric shock and damage to the vacant expansion memory module slot or by adding a memory module to the equipment, ...unplug the power cord and remove all batteries before installing a memory module. WARNING! NOTE: To use a dual-channel configuration when adding a second memory module, be sure that...
... a grounded metal object to be the same type. 9 Memory modules The computer has one memory module compartment, which is located under the keyboard. The memory capacity of electric shock and damage to the vacant expansion memory module slot or by adding a memory module to the equipment, ...unplug the power cord and remove all batteries before installing a memory module. WARNING! NOTE: To use a dual-channel configuration when adding a second memory module, be sure that...

HP ProBook Notebook PC User Guide - Windows Vista
Page 131
Adding or replacing memory modules 119 Remove the screws from the keyboard. NOTE: Refer to the illustration that most closely matches your computer. 11.
Adding or replacing memory modules 119 Remove the screws from the keyboard. NOTE: Refer to the illustration that most closely matches your computer. 11.
HP ProBook Notebook PC User Guide - Windows Vista
Page 132
If you are replacing a memory module, remove the existing memory module: CAUTION: To prevent damage to the illustration that most closely matches your computer. Pull away the retention clips (1) on the memory module. or - Slide the keyboard back toward the display (1), and then rotate it to the ...right side (2) to gain access to the keyboard cable connector. a. The memory module tilts up. 120 Chapter 9 Memory modules CAUTION: Do...
If you are replacing a memory module, remove the existing memory module: CAUTION: To prevent damage to the illustration that most closely matches your computer. Pull away the retention clips (1) on the memory module. or - Slide the keyboard back toward the display (1), and then rotate it to the ...right side (2) to gain access to the keyboard cable connector. a. The memory module tilts up. 120 Chapter 9 Memory modules CAUTION: Do...
HP ProBook Notebook PC User Guide - Windows Vista
Page 188
... screen image 40 using 39 volume mute 48 HP 3D DriveGuard 88 HP Client Configuration Manager 170, 172 HP Client Manager for Altiris 170 HP Connection Manager software 18 HP Mobile Broadband Module 22 HP QuickLook 160 HP SpareKey enrollment 158 HP System Software Manager 170, 173 hubs 105 I...19 J jacks audio-in (microphone) 8, 48 audio-out (headphone) 8, 48 RJ-11 (modem) 8, 9 RJ-45 (network) 10 K keyboard removing 95, 120 keyboard hotkeys, identifying 38 keypad keys, identifying 7 keypad, embedded enabling and disabling 44 switching key functions 44 using 44 keypad, external num lock 45 using...
... screen image 40 using 39 volume mute 48 HP 3D DriveGuard 88 HP Client Configuration Manager 170, 172 HP Client Manager for Altiris 170 HP Connection Manager software 18 HP Mobile Broadband Module 22 HP QuickLook 160 HP SpareKey enrollment 158 HP System Software Manager 170, 173 hubs 105 I...19 J jacks audio-in (microphone) 8, 48 audio-out (headphone) 8, 48 RJ-11 (modem) 8, 9 RJ-45 (network) 10 K keyboard removing 95, 120 keyboard hotkeys, identifying 38 keypad keys, identifying 7 keypad, embedded enabling and disabling 44 switching key functions 44 using 44 keypad, external num lock 45 using...
HP ProBook Notebook PC User Guide - Linux
Page 100
..., 20 J jacks audio-in (microphone) 6, 20 audio-out (headphone) 6, 20 RJ-11 (modem) 7 RJ-45 (network 8, 9 K keyboard removing 47, 69 keyboard hotkeys, identifying 14 keypad keys, identifying 6 keypad, embedded enabling and disabling 17 switching key functions 17 using 17 keypad, external num lock 17 using... 17 keys embedded keypad 5 esc 5, 6 fn 5, 6 function 5, 6 keypad 6 L labels Bluetooth 13 HP Mobile Broadband Module ...
..., 20 J jacks audio-in (microphone) 6, 20 audio-out (headphone) 6, 20 RJ-11 (modem) 7 RJ-45 (network 8, 9 K keyboard removing 47, 69 keyboard hotkeys, identifying 14 keypad keys, identifying 6 keypad, embedded enabling and disabling 17 switching key functions 17 using 17 keypad, external num lock 17 using... 17 keys embedded keypad 5 esc 5, 6 fn 5, 6 function 5, 6 keypad 6 L labels Bluetooth 13 HP Mobile Broadband Module ...
HP ProBook Notebook PC User Guide - Windows 7
Page 192
... screen image 42 using 41 volume mute 50 HP 3D DriveGuard 90 HP Client Configuration Manager 174, 176 HP Client Manager for Altiris 174 HP Connection Manager software 18 HP Mobile Broadband Module 23 HP QuickLook 164 HP SpareKey enrollment 162 HP System Software Manager 174, 177 hubs 107 I...20 J jacks audio-in (microphone) 8, 50 audio-out (headphone) 8, 50 RJ-11 (modem) 8, 9 RJ-45 (network) 10 K keyboard removing 97, 122 keyboard hotkeys, identifying 40 keypad keys, identifying 7 keypad, embedded enabling and disabling 46 switching key functions 46 using 46 keypad, external num lock 47 using...
... screen image 42 using 41 volume mute 50 HP 3D DriveGuard 90 HP Client Configuration Manager 174, 176 HP Client Manager for Altiris 174 HP Connection Manager software 18 HP Mobile Broadband Module 23 HP QuickLook 164 HP SpareKey enrollment 162 HP System Software Manager 174, 177 hubs 107 I...20 J jacks audio-in (microphone) 8, 50 audio-out (headphone) 8, 50 RJ-11 (modem) 8, 9 RJ-45 (network) 10 K keyboard removing 97, 122 keyboard hotkeys, identifying 40 keypad keys, identifying 7 keypad, embedded enabling and disabling 46 switching key functions 46 using 46 keypad, external num lock 47 using...
HP ProBook Notebook PC User Guide - Windows XP
Page 186
... screen image 41 using 40 volume mute 48 HP 3D DriveGuard 86 HP Client Configuration Manager 168, 170 HP Client Manager for Altiris 168 HP Connection Manager software 18 HP Mobile Broadband Module 22 HP QuickLook 158 HP SpareKey enrollment 156 HP System Software Manager 168, 171 hubs 103 I...19 J jacks audio-in (microphone) 8, 48 audio-out (headphone) 8, 48 RJ-11 (modem) 8, 9 RJ-45 (network) 10 K keyboard removing 93, 118 keyboard hotkeys, identifying 39 keypad keys, identifying 7 keypad, embedded enabling and disabling 44 switching key functions 44 using 44 keypad, external num lock 45 using...
... screen image 41 using 40 volume mute 48 HP 3D DriveGuard 86 HP Client Configuration Manager 168, 170 HP Client Manager for Altiris 168 HP Connection Manager software 18 HP Mobile Broadband Module 22 HP QuickLook 158 HP SpareKey enrollment 156 HP System Software Manager 168, 171 hubs 103 I...19 J jacks audio-in (microphone) 8, 48 audio-out (headphone) 8, 48 RJ-11 (modem) 8, 9 RJ-45 (network) 10 K keyboard removing 93, 118 keyboard hotkeys, identifying 39 keypad keys, identifying 7 keypad, embedded enabling and disabling 44 switching key functions 44 using 44 keypad, external num lock 45 using...


