Worldwide Limited Warranty and Technical Support - (1 Year)
Page 7
...HP UNDER THIS LIMITED WARRANTY IS EXPRESSLY LIMITED TO THE LESSER OF THE PRICE YOU HAVE PAID FOR THE PRODUCT OR THE COST OF REPAIR OR REPLACEMENT OF ANY HARDWARE COMPONENTS THAT MALFUNCTION IN CONDITIONS OF NORMAL USE. YOU SHOULD MAKE PERIODIC BACKUP COPIES OF THE DATA STORED ON YOUR HARD DRIVE... OR OTHER STORAGE DEVICES AS A PRECAUTION AGAINST POSSIBLE FAILURES, ALTERATION, OR LOSS OF THE DATA. or (3) parts intended for any interoperability or compatibility issues that may arise when (1) products, software, or options not supported by HP are used ; (2) ...
...HP UNDER THIS LIMITED WARRANTY IS EXPRESSLY LIMITED TO THE LESSER OF THE PRICE YOU HAVE PAID FOR THE PRODUCT OR THE COST OF REPAIR OR REPLACEMENT OF ANY HARDWARE COMPONENTS THAT MALFUNCTION IN CONDITIONS OF NORMAL USE. YOU SHOULD MAKE PERIODIC BACKUP COPIES OF THE DATA STORED ON YOUR HARD DRIVE... OR OTHER STORAGE DEVICES AS A PRECAUTION AGAINST POSSIBLE FAILURES, ALTERATION, OR LOSS OF THE DATA. or (3) parts intended for any interoperability or compatibility issues that may arise when (1) products, software, or options not supported by HP are used ; (2) ...

Worldwide Limited Warranty and Technical Support - (1 Year)
Page 10
... options, and/or substituting options. „ Make periodic backup copies of your files, data, or programs stored on your hard drive or other actions that HP may reasonably request in order to best perform the warranty support. If you choose not to deploy available remote support capabilities, ..., proprietary, or personal information. „ Remove any external options or accessories that would be subject to loss during the repair or replacement process. „ Perform additional tasks as defined within each type of warranty service listed below are not due to defects in attempting to...
... options, and/or substituting options. „ Make periodic backup copies of your files, data, or programs stored on your hard drive or other actions that HP may reasonably request in order to best perform the warranty support. If you choose not to deploy available remote support capabilities, ..., proprietary, or personal information. „ Remove any external options or accessories that would be subject to loss during the repair or replacement process. „ Perform additional tasks as defined within each type of warranty service listed below are not due to defects in attempting to...

Worldwide Limited Warranty and Technical Support - (3 Year)
Page 7
...FAILS TO WORK AS WARRANTED ABOVE, THE MAXIMUM LIABILITY OF HP UNDER THIS LIMITED WARRANTY IS EXPRESSLY LIMITED TO THE LESSER OF THE PRICE YOU HAVE PAID FOR THE PRODUCT OR THE COST OF REPAIR OR REPLACEMENT OF ANY HARDWARE COMPONENTS THAT MALFUNCTION IN CONDITIONS OF NORMAL USE... TERMS AND CONDITIONS CONSTITUTE THE COMPLETE AND EXCLUSIVE WARRANTY AGREEMENT BETWEEN YOU AND HP REGARDING THE HP HARDWARE PRODUCT YOU HAVE PURCHASED OR LEASED. YOU SHOULD MAKE PERIODIC BACKUP COPIES OF THE DATA STORED ON YOUR HARD DRIVE OR OTHER STORAGE DEVICES AS A PRECAUTION AGAINST POSSIBLE FAILURES, ALTERATION, OR ...
...FAILS TO WORK AS WARRANTED ABOVE, THE MAXIMUM LIABILITY OF HP UNDER THIS LIMITED WARRANTY IS EXPRESSLY LIMITED TO THE LESSER OF THE PRICE YOU HAVE PAID FOR THE PRODUCT OR THE COST OF REPAIR OR REPLACEMENT OF ANY HARDWARE COMPONENTS THAT MALFUNCTION IN CONDITIONS OF NORMAL USE... TERMS AND CONDITIONS CONSTITUTE THE COMPLETE AND EXCLUSIVE WARRANTY AGREEMENT BETWEEN YOU AND HP REGARDING THE HP HARDWARE PRODUCT YOU HAVE PURCHASED OR LEASED. YOU SHOULD MAKE PERIODIC BACKUP COPIES OF THE DATA STORED ON YOUR HARD DRIVE OR OTHER STORAGE DEVICES AS A PRECAUTION AGAINST POSSIBLE FAILURES, ALTERATION, OR ...
Worldwide Limited Warranty and Technical Support - (3 Year)
Page 10
... stored on your hard drive or other actions that HP may reasonably request in attempting to resolve the problem using online chat or telephone. HP strongly encourages you to use available support technologies provided by HP while HP works on permanent solutions. „ Use HP remote support solutions where...proprietary, or personal information. „ Remove any external options or accessories that would be subject to loss during the repair or replacement process. „ Perform additional tasks as defined within each type of warranty service listed below are the types of warranty support...
... stored on your hard drive or other actions that HP may reasonably request in attempting to resolve the problem using online chat or telephone. HP strongly encourages you to use available support technologies provided by HP while HP works on permanent solutions. „ Use HP remote support solutions where...proprietary, or personal information. „ Remove any external options or accessories that would be subject to loss during the repair or replacement process. „ Perform additional tasks as defined within each type of warranty service listed below are the types of warranty support...
Getting Started - Windows 7
Page 6
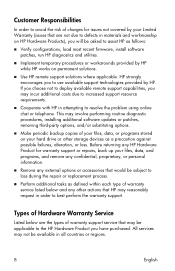
5 Maintenance ...20 Inserting or removing the battery ...20 Replacing or upgrading the hard drive 21 Removing the hard drive ...21 Installing the hard drive ...22 Replacing the memory module ...24 Updating programs and drivers ...27 Routine ...care ...27 Cleaning guidelines ...27 Cleaning products 27 Cleaning procedures 27 Cleaning the display 27 Cleaning the sides and cover 28 Cleaning the TouchPad and keyboard 28 Cleaning a tablet PC...
5 Maintenance ...20 Inserting or removing the battery ...20 Replacing or upgrading the hard drive 21 Removing the hard drive ...21 Installing the hard drive ...22 Replacing the memory module ...24 Updating programs and drivers ...27 Routine ...care ...27 Cleaning guidelines ...27 Cleaning products 27 Cleaning procedures 27 Cleaning the display 27 Cleaning the sides and cover 28 Cleaning the TouchPad and keyboard 28 Cleaning a tablet PC...
Getting Started - Windows 7
Page 26
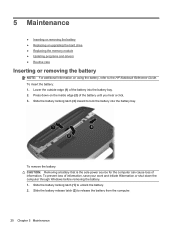
... to lock the battery into the battery bay. 2. 5 Maintenance ● Inserting or removing the battery ● Replacing or upgrading the hard drive ● Replacing the memory module ● Updating programs and drivers ● Routine care Inserting or removing the battery NOTE: For additional... battery from the computer. 20 Chapter 5 Maintenance To prevent loss of information. Slide the battery locking latch (3) inward to the HP Notebook Reference Guide. Slide the battery release latch (2) to unlock the battery. 2. Press down the computer through Windows before removing the ...
... to lock the battery into the battery bay. 2. 5 Maintenance ● Inserting or removing the battery ● Replacing or upgrading the hard drive ● Replacing the memory module ● Updating programs and drivers ● Routine care Inserting or removing the battery NOTE: For additional... battery from the computer. 20 Chapter 5 Maintenance To prevent loss of information. Slide the battery locking latch (3) inward to the HP Notebook Reference Guide. Slide the battery release latch (2) to unlock the battery. 2. Press down the computer through Windows before removing the ...
Getting Started - Windows 7
Page 27
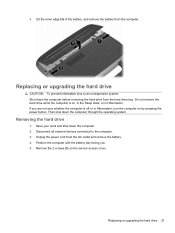
... the operating system. Then shut down the computer before removing the hard drive from the hard drive bay. Save your work and shut down the computer. 2. Disconnect all external devices connected to the computer. 3. Replacing or upgrading the hard drive 21 Unplug the power cord from the computer. If you .... inner edge (3) of the battery, and remove the battery from the AC outlet and remove the battery. 4. Removing the hard drive 1. Do not remove the hard drive while the computer is off or in Hibernation, turn the computer on , in the Sleep state, or in Hibernation. Remove...
... the operating system. Then shut down the computer before removing the hard drive from the hard drive bay. Save your work and shut down the computer. 2. Disconnect all external devices connected to the computer. 3. Replacing or upgrading the hard drive 21 Unplug the power cord from the computer. If you .... inner edge (3) of the battery, and remove the battery from the AC outlet and remove the battery. 4. Removing the hard drive 1. Do not remove the hard drive while the computer is off or in Hibernation, turn the computer on , in the Sleep state, or in Hibernation. Remove...
Getting Started - Windows 7
Page 29
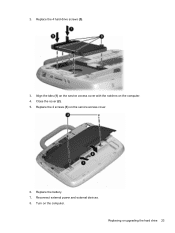
Replace the 2 screws (3) on the computer. Replacing or upgrading the hard drive 23 Close the cover (2). 5. Reconnect external power and external devices. 8. Turn on the service access cover. 6. 2. Align the tabs (1) on the service access cover with the notches on the computer. 4. Replace the 4 hard drive screws (3). 3. Replace the battery. 7.
Replace the 2 screws (3) on the computer. Replacing or upgrading the hard drive 23 Close the cover (2). 5. Reconnect external power and external devices. 8. Turn on the service access cover. 6. 2. Align the tabs (1) on the service access cover with the notches on the computer. 4. Replace the 4 hard drive screws (3). 3. Replace the battery. 7.
Getting Started - Windows 7
Page 41
..., keys 16 memory module inserting 25 Index 35 identifying 12 battery release latch 12 battery, replacing 20 buttons left TouchPad 4 power 6 right TouchPad 4 C caps lock light, identifying 5... Certificate of Authenticity label 33 cleaning display 27 keyboard 28 pen holder 28 tablet PC pen 28 TouchPad 28 cleaning guidelines 27 cleaning procedures 27 cleaning products 27 components bottom...identifying 10 F fn key, identifying function keys identifying 7 7, 16 H handle, identifying 12 hard drive installing 22 removing 21 headphone (audio-out) jack 9 Help and Support hotkey 16 hotkeys adjusting...
..., keys 16 memory module inserting 25 Index 35 identifying 12 battery release latch 12 battery, replacing 20 buttons left TouchPad 4 power 6 right TouchPad 4 C caps lock light, identifying 5... Certificate of Authenticity label 33 cleaning display 27 keyboard 28 pen holder 28 tablet PC pen 28 TouchPad 28 cleaning guidelines 27 cleaning procedures 27 cleaning products 27 components bottom...identifying 10 F fn key, identifying function keys identifying 7 7, 16 H handle, identifying 12 hard drive installing 22 removing 21 headphone (audio-out) jack 9 Help and Support hotkey 16 hotkeys adjusting...
HP ProtectTools Security Software 2010
Page 17
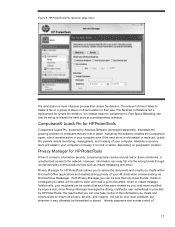
...hard drive is that are lost or stolen, depending on your IM chats when communicating via Microsoft Live Messenger. File Sanitizer is more intensive process than simple file deletion. Computrace® LoJack Pro for HP ProtectTools W hen it comes to information security, concerns typically revolve around lost or stolen notebooks... just on geographic location. The amount of files is lost or stolen. HP ProtectTools File Sanitizer setup menu File sanitization is therefore not a replacement for HP ProtectTools allows you to secure the documents and emails you create and communicate ...
...hard drive is that are lost or stolen, depending on your IM chats when communicating via Microsoft Live Messenger. File Sanitizer is more intensive process than simple file deletion. Computrace® LoJack Pro for HP ProtectTools W hen it comes to information security, concerns typically revolve around lost or stolen notebooks... just on geographic location. The amount of files is lost or stolen. HP ProtectTools File Sanitizer setup menu File sanitization is therefore not a replacement for HP ProtectTools allows you to secure the documents and emails you create and communicate ...

HP ProBook Notebook PC User Guide - Windows Vista
Page 9
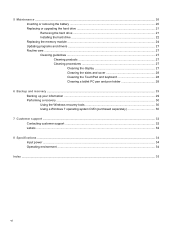
... Shutting down the computer ...83 6 Drives ...85 Identifying installed drives ...85 Handling drives ...85 Improving hard drive performance ...87 Using Disk Defragmenter 87 Using Disk Cleanup ...87 Using HP 3D DriveGuard ...88 Identifying HP 3D DriveGuard status 88 Using HP 3D DriveGuard software 89 Using external drives ...90 Using optional external devices 90 Replacing the hard drive ...91 7 External devices ...105 Using...
... Shutting down the computer ...83 6 Drives ...85 Identifying installed drives ...85 Handling drives ...85 Improving hard drive performance ...87 Using Disk Defragmenter 87 Using Disk Cleanup ...87 Using HP 3D DriveGuard ...88 Identifying HP 3D DriveGuard status 88 Using HP 3D DriveGuard software 89 Using external drives ...90 Using optional external devices 90 Replacing the hard drive ...91 7 External devices ...105 Using...
HP ProBook Notebook PC User Guide - Windows Vista
Page 103
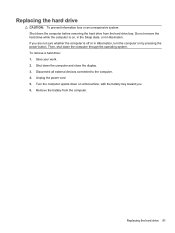
...the computer. 4. Replacing the hard drive CAUTION: To prevent information loss or an unresponsive system: Shut down the computer before removing the hard drive from the computer. Then, shut down the computer and close the display. 3. Save your work. 2. Do not remove the hard drive while the computer is... state, or in Hibernation. If you . 6. Shut down the computer through the operating system. Remove the battery from the hard drive bay. Replacing the hard drive 91 Turn the computer upside down on a flat surface, with the battery bay toward you are not sure whether the computer ...
...the computer. 4. Replacing the hard drive CAUTION: To prevent information loss or an unresponsive system: Shut down the computer before removing the hard drive from the computer. Then, shut down the computer and close the display. 3. Save your work. 2. Do not remove the hard drive while the computer is... state, or in Hibernation. If you . 6. Shut down the computer through the operating system. Remove the battery from the hard drive bay. Replacing the hard drive 91 Turn the computer upside down on a flat surface, with the battery bay toward you are not sure whether the computer ...
HP ProBook Notebook PC User Guide - Windows Vista
Page 105
Slide the switch cover straight back toward the display (1), and then remove the switch cover (2). 8. Remove the 2 screw covers (1) and screws (2) from the back edge of the display hinges. Replacing the hard drive 93 CAUTION: Do not use excessive force to open the computer as far as possible. Forcing extension beyond the limits of the computer. NOTE: Some models do not have any screw covers or screws to the display. 10. Turn the computer display-side up, and then open the computer beyond these limits will cause damage to remove. 9.
Slide the switch cover straight back toward the display (1), and then remove the switch cover (2). 8. Remove the 2 screw covers (1) and screws (2) from the back edge of the display hinges. Replacing the hard drive 93 CAUTION: Do not use excessive force to open the computer as far as possible. Forcing extension beyond the limits of the computer. NOTE: Some models do not have any screw covers or screws to the display. 10. Turn the computer display-side up, and then open the computer beyond these limits will cause damage to remove. 9.
HP ProBook Notebook PC User Guide - Windows Vista
Page 107
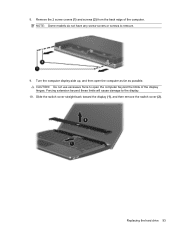
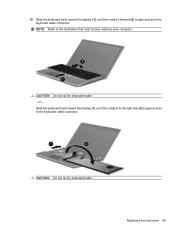
or - 12. Slide the keyboard back toward the display (1), and then rotate it forward (2) to gain access to the keyboard cable connector. Replacing the hard drive 95 NOTE: Refer to the keyboard cable connector. CAUTION: Do not rip the keyboard cable. - Slide the keyboard back toward the display (1), and then rotate it to the right side (2) to gain access to the illustration that most closely matches your computer. CAUTION: Do not rip the keyboard cable.
or - 12. Slide the keyboard back toward the display (1), and then rotate it forward (2) to gain access to the keyboard cable connector. Replacing the hard drive 95 NOTE: Refer to the keyboard cable connector. CAUTION: Do not rip the keyboard cable. - Slide the keyboard back toward the display (1), and then rotate it to the right side (2) to gain access to the illustration that most closely matches your computer. CAUTION: Do not rip the keyboard cable.

HP ProBook Notebook PC User Guide - Windows Vista
Page 109
14. Remove the screws from the base enclosure (1), and then rest the palm rest on the hard drive to slide the hard drive to the right to the right until it from the system board. Slide the palm rest to disconnect it disengages from the palm rest. 15. Remove the 2 hard drive screws (1), and then loosen the captive screw (2) that secures the hard drive. 17. Replacing the hard drive 97 Use the Mylar tab (3) on the computer (2). 16.
14. Remove the screws from the base enclosure (1), and then rest the palm rest on the hard drive to slide the hard drive to the right to the right until it from the system board. Slide the palm rest to disconnect it disengages from the palm rest. 15. Remove the 2 hard drive screws (1), and then loosen the captive screw (2) that secures the hard drive. 17. Replacing the hard drive 97 Use the Mylar tab (3) on the computer (2). 16.

HP ProBook Notebook PC User Guide - Windows Vista
Page 110
18. Use the Mylar tab (2) on the hard drive to slide the hard drive to the left to connect it to the computer. 98 Chapter 6 Drives Replace the 2 hard drive screws (3), and then tighten the captive screw (4) to secure the hard drive to the system board. 3. To install a hard drive: 1. Insert the hard drive into the hard drive bay (1). 2. Lift the hard drive (4) out of the hard drive bay.
18. Use the Mylar tab (2) on the hard drive to slide the hard drive to the left to connect it to the computer. 98 Chapter 6 Drives Replace the 2 hard drive screws (3), and then tighten the captive screw (4) to secure the hard drive to the system board. 3. To install a hard drive: 1. Insert the hard drive into the hard drive bay (1). 2. Lift the hard drive (4) out of the hard drive bay.

HP ProBook Notebook PC User Guide - Windows Vista
Page 111
Replace the screws in the palm rest tray, and then slide the palm rest to the left to reconnect it to the base enclosure (2). 5. 4. Place the keyboard upside down on the palm rest of the computer (1). Turn over the palm rest (1), resting it in the palm rest. 6. Replacing the hard drive 99
Replace the screws in the palm rest tray, and then slide the palm rest to the left to reconnect it to the base enclosure (2). 5. 4. Place the keyboard upside down on the palm rest of the computer (1). Turn over the palm rest (1), resting it in the palm rest. 6. Replacing the hard drive 99

HP ProBook Notebook PC User Guide - Windows Vista
Page 113
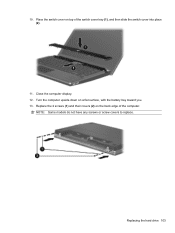
Turn over the keyboard (1) into the keyboard tray, and then slide the keyboard (2) into place. NOTE: Refer to the illustration that most closely matches your computer. 8. Replacing the hard drive 101
Turn over the keyboard (1) into the keyboard tray, and then slide the keyboard (2) into place. NOTE: Refer to the illustration that most closely matches your computer. 8. Replacing the hard drive 101
HP ProBook Notebook PC User Guide - Windows Vista
Page 115
Turn the computer upside down on top of the computer. Replace the 2 screws (1) and their covers (2) on the back edge of the switch cover tray (1), and then slide the switch cover into place (2). 11. NOTE: Some models do not have any screws or screw covers to replace. Replacing the hard drive 103 10. Place the switch cover on a flat surface, with the battery bay toward you. 13. Close the computer display. 12.
Turn the computer upside down on top of the computer. Replace the 2 screws (1) and their covers (2) on the back edge of the switch cover tray (1), and then slide the switch cover into place (2). 11. NOTE: Some models do not have any screws or screw covers to replace. Replacing the hard drive 103 10. Place the switch cover on a flat surface, with the battery bay toward you. 13. Close the computer display. 12.

HP ProBook Notebook PC User Guide - Windows Vista
Page 169
...and restart the computer. Replace the configuration settings in this Set up Test-Verifies the system components needed for starting the computer. ● Run-In Test-Runs a comprehensive check on system memory. ● Hard Disk Test-Runs a comprehensive self-test on any hard drive in the system. ...any errors have occurred. Security menu NOTE: Some of the menu items listed in Computer Setup with the original factory settings. (Hard drive mode, password settings, and security settings are not changed when you restore the factory settings.) Restore the BIOS security settings to factory...
...and restart the computer. Replace the configuration settings in this Set up Test-Verifies the system components needed for starting the computer. ● Run-In Test-Runs a comprehensive check on system memory. ● Hard Disk Test-Runs a comprehensive self-test on any hard drive in the system. ...any errors have occurred. Security menu NOTE: Some of the menu items listed in Computer Setup with the original factory settings. (Hard drive mode, password settings, and security settings are not changed when you restore the factory settings.) Restore the BIOS security settings to factory...


