Getting Started - Windows 7
Page 8
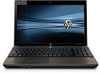
...) updates ● Accessories available for the device Limited Warranty* Warranty information To access the warranty: Select Start > All Programs > HP > HP Documentation. - Go to the safe and proper handling of the power supply, battery, and power cord. 2 Chapter 1 Welcome Box 200, Alexandra Post Office, Singapore 911507 Please include your product number, warranty period (found on...
...) updates ● Accessories available for the device Limited Warranty* Warranty information To access the warranty: Select Start > All Programs > HP > HP Documentation. - Go to the safe and proper handling of the power supply, battery, and power cord. 2 Chapter 1 Welcome Box 200, Alexandra Post Office, Singapore 911507 Please include your product number, warranty period (found on...
Getting Started - Windows 7
Page 27
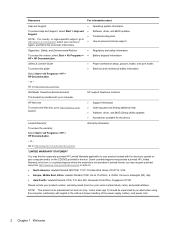
... operating system. Then shut down the computer before removing the hard drive from the hard drive bay. Remove the 2 screws (1) on by pressing the power button. Unplug the power cord from the computer. Removing the hard drive 1. Save your work and shut down the computer. 2. Position the computer with the battery bay facing...
... operating system. Then shut down the computer before removing the hard drive from the hard drive bay. Remove the 2 screws (1) on by pressing the power button. Unplug the power cord from the computer. Removing the hard drive 1. Save your work and shut down the computer. 2. Position the computer with the battery bay facing...
Getting Started - Windows 7
Page 30
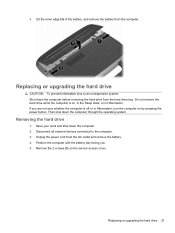
... 1-GB module with the battery bay facing you are discharged of static electricity by pressing the power button. Disconnect all external devices connected to the equipment, unplug the power cord and remove the battery before adding or replacing memory modules. Remove the 2 screws (1) on ...memory module: CAUTION: To prevent information loss or an unresponsive system: Shut down the computer through the operating system. 1. Unplug the power cord from the AC outlet and remove the battery. 4. Then shut down the computer before installing a memory module. Replacing the memory module...
... 1-GB module with the battery bay facing you are discharged of static electricity by pressing the power button. Disconnect all external devices connected to the equipment, unplug the power cord and remove the battery before adding or replacing memory modules. Remove the 2 screws (1) on ...memory module: CAUTION: To prevent information loss or an unresponsive system: Shut down the computer through the operating system. 1. Unplug the power cord from the AC outlet and remove the battery. 4. Then shut down the computer before installing a memory module. Replacing the memory module...

Getting Started - Windows Vista
Page 5
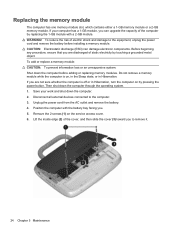
Component Component 1 AC adapter 3 Battery* 2 Computer 4 Power cord* *Batteries and power cords vary in this guide may vary by country or region. Getting Started 1 The illustrations in appearance by computer model. Basic Setup 1 Unpack the box ✎ Computer color, features, and options may look slightly different from your computer.
Component Component 1 AC adapter 3 Battery* 2 Computer 4 Power cord* *Batteries and power cords vary in this guide may vary by country or region. Getting Started 1 The illustrations in appearance by computer model. Basic Setup 1 Unpack the box ✎ Computer color, features, and options may look slightly different from your computer.

Getting Started - Windows Vista
Page 6
... computer). ■ If provided with the computer, or a replacement AC adapter or battery provided by HP. 3 Connect the computer to external power Å WARNING: To reduce the risk of electric shock or damage to your power cord, plug the cord into an AC outlet that is an important safety feature. 2 Getting Started Basic Setup 2 Insert...
... computer). ■ If provided with the computer, or a replacement AC adapter or battery provided by HP. 3 Connect the computer to external power Å WARNING: To reduce the risk of electric shock or damage to your power cord, plug the cord into an AC outlet that is an important safety feature. 2 Getting Started Basic Setup 2 Insert...
Getting Started - Windows Vista
Page 7
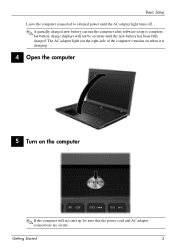
Basic Setup Leave the computer connected to external power until the new battery has been fully charged. The AC adapter light (on the right-side of the computer) remains on when it is complete, but battery charge displays will not start up, be accurate until the AC adapter light turns off. ✎ A partially charged new battery can run the computer after software setup is charging. 4 Open the computer 5 Turn on the computer ✎ If the computer will not be sure that the power cord and AC adapter connections are secure. Getting Started 3
Basic Setup Leave the computer connected to external power until the new battery has been fully charged. The AC adapter light (on the right-side of the computer) remains on when it is complete, but battery charge displays will not start up, be accurate until the AC adapter light turns off. ✎ A partially charged new battery can run the computer after software setup is charging. 4 Open the computer 5 Turn on the computer ✎ If the computer will not be sure that the power cord and AC adapter connections are secure. Getting Started 3

Getting Started - Windows Vista
Page 15
To remove smudges and lint, frequently clean the display with a straw extension can cause the pointer to jump around and under the keys to power the computer with a voltage converter kit sold for appliances. A vacuum cleaner can help you fix a problem when the computer is resolved:...Refer to "Quick troubleshooting," the next section in this , clean the TouchPad with a damp cloth, and wash your itinerary. ❏ Check the power cord and adapter requirements for each location in the sequence provided until the problem is offline. Click Start, and then click Help and Support. ✎...
To remove smudges and lint, frequently clean the display with a straw extension can cause the pointer to jump around and under the keys to power the computer with a voltage converter kit sold for appliances. A vacuum cleaner can help you fix a problem when the computer is resolved:...Refer to "Quick troubleshooting," the next section in this , clean the TouchPad with a damp cloth, and wash your itinerary. ❏ Check the power cord and adapter requirements for each location in the sequence provided until the problem is offline. Click Start, and then click Help and Support. ✎...
Getting Started - Windows Vista
Page 16
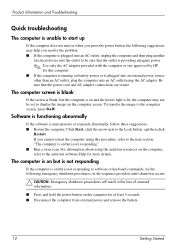
... computer does not turn on when you press the power button, the following emergency shutdown procedures, in the ... the power button on the computer for this procedure, refer to the next section, "The computer is providing adequate power. ...✎ Use only the AC adapter provided with the computer or one approved by HP for at least 5 seconds. ■ Disconnect the computer from external power... the computer is running on battery power or is plugged into an external power source other than an AC outlet,...blank, but the computer is on and the power light is lit, the computer may help you ...
... computer does not turn on when you press the power button, the following emergency shutdown procedures, in the ... the power button on the computer for this procedure, refer to the next section, "The computer is providing adequate power. ...✎ Use only the AC adapter provided with the computer or one approved by HP for at least 5 seconds. ■ Disconnect the computer from external power... the computer is running on battery power or is plugged into an external power source other than an AC outlet,...blank, but the computer is on and the power light is lit, the computer may help you ...
Getting Started - Windows Vista
Page 17
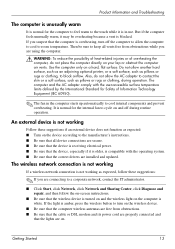
...working Follow these suggestions: ✎ If you suspect that the correct drivers are secure. ■ Be sure that the device is receiving electrical power. ■ Be sure that the device, especially if it is older, is compatible with the user-accessible surface temperature limits defined by the...manufacturer's instructions. ■ Be sure that all vents free from obstructions. ■ Be sure that the cable or DSL modem and its power cord are on the computer is overheating, turn on and off the computer to allow the computer to cool to room temperature. Then be overheating ...
...working Follow these suggestions: ✎ If you suspect that the correct drivers are secure. ■ Be sure that the device is receiving electrical power. ■ Be sure that the device, especially if it is older, is compatible with the user-accessible surface temperature limits defined by the...manufacturer's instructions. ■ Be sure that all vents free from obstructions. ■ Be sure that the cable or DSL modem and its power cord are on the computer is overheating, turn on and off the computer to allow the computer to cool to room temperature. Then be overheating ...

HP ProBook Notebook PC User Guide - Windows Vista
Page 26
This is an alphanumeric number that is the product name affixed to the front of your notebook. ◦ Serial number (s/n) (2). This number provides specific information about the product's hardware components. This is unique to the ...◦ Product name (1). The part number helps a service technician to DC power. *Batteries and power cords vary in appearance by country or region. Additional hardware components Component Description (1) Power cord* Connects an AC adapter to an AC outlet. (2) Battery* Powers the computer when the computer is not plugged into an external...
This is an alphanumeric number that is the product name affixed to the front of your notebook. ◦ Serial number (s/n) (2). This number provides specific information about the product's hardware components. This is unique to the ...◦ Product name (1). The part number helps a service technician to DC power. *Batteries and power cords vary in appearance by country or region. Additional hardware components Component Description (1) Power cord* Connects an AC adapter to an AC outlet. (2) Battery* Powers the computer when the computer is not plugged into an external...
HP ProBook Notebook PC User Guide - Windows Vista
Page 34
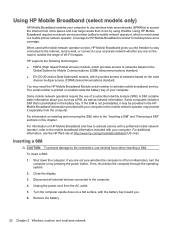
... (SIM). If you are not sure whether the computer is similar to mobile phone voice coverage. Unplug the power cord from more places and over larger areas than it can by pressing the power button. HP supports the following technologies: ● HSPA (High Speed Packet Access) module, which provides access to networks based on...
... (SIM). If you are not sure whether the computer is similar to mobile phone voice coverage. Unplug the power cord from more places and over larger areas than it can by pressing the power button. HP supports the following technologies: ● HSPA (High Speed Packet Access) module, which provides access to networks based on...
HP ProBook Notebook PC User Guide - Windows Vista
Page 35
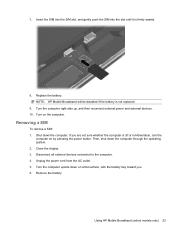
Turn the computer right-side up, and then reconnect external power and external devices. 10. Turn on by pressing the power button. Shut down the computer through the operating system. 2. If you . 6. Unplug the power cord from the AC outlet. 5. Remove the battery. Removing a SIM To remove a SIM: 1. Then, ...shut down the computer. Insert the SIM into the SIM slot, and gently push the SIM into the slot until it is not replaced. 9. NOTE: HP Mobile Broadband will be disabled ...
Turn the computer right-side up, and then reconnect external power and external devices. 10. Turn on by pressing the power button. Shut down the computer through the operating system. 2. If you . 6. Unplug the power cord from the AC outlet. 5. Remove the battery. Removing a SIM To remove a SIM: 1. Then, ...shut down the computer. Insert the SIM into the SIM slot, and gently push the SIM into the slot until it is not replaced. 9. NOTE: HP Mobile Broadband will be disabled ...

HP ProBook Notebook PC User Guide - Windows Vista
Page 84
... WARNING! Plug the AC adapter into the AC adapter (2). 72 Chapter 5 Power management Disconnect power from the computer by unplugging the power cord from the AC outlet (not by unplugging the power cord from HP. ● Approved AC adapter ● Optional docking device or expansion product ... a 3-pin attachment plug on , the battery meter icon in the notification area changes appearance. Do not disable the power cord grounding pin, for example, by HP, or a compatible AC adapter purchased from the computer). If provided with the computer, a replacement AC adapter provided by...
... WARNING! Plug the AC adapter into the AC adapter (2). 72 Chapter 5 Power management Disconnect power from the computer by unplugging the power cord from the AC outlet (not by unplugging the power cord from HP. ● Approved AC adapter ● Optional docking device or expansion product ... a 3-pin attachment plug on , the battery meter icon in the notification area changes appearance. Do not disable the power cord grounding pin, for example, by HP, or a compatible AC adapter purchased from the computer). If provided with the computer, a replacement AC adapter provided by...

HP ProBook Notebook PC User Guide - Windows Vista
Page 85
... . When the computer is running on how you disconnect AC power. To increase display brightness, use only the battery provided with the computer, a replacement battery provided by HP, or a compatible battery purchased from external power. WARNING! If the computer contains a charged battery and is ...work in the computer and the computer is plugged into external power, the computer runs on AC power. Using battery power When a charged battery is in case of the power cord into external AC power, the computer runs on battery power. 3. To reduce potential safety issues, use the fn+...
... . When the computer is running on how you disconnect AC power. To increase display brightness, use only the battery provided with the computer, a replacement battery provided by HP, or a compatible battery purchased from external power. WARNING! If the computer contains a charged battery and is ...work in the computer and the computer is plugged into external power, the computer runs on AC power. Using battery power When a charged battery is in case of the power cord into external AC power, the computer runs on battery power. 3. To reduce potential safety issues, use the fn+...

HP ProBook Notebook PC User Guide - Windows Vista
Page 102
...on the device. If you are connecting a powered device, plug the device power cord into a grounded AC outlet. 3. Connect the device to the manufacturer's instructions. Turn on an optional docking device (select models only). To disconnect a powered external device, turn off the device, disconnect... it from the computer, and then unplug the AC power cord. 90 Chapter 6 Drives USB drives include the following types: ● 1.44-megabyte...
...on the device. If you are connecting a powered device, plug the device power cord into a grounded AC outlet. 3. Connect the device to the manufacturer's instructions. Turn on an optional docking device (select models only). To disconnect a powered external device, turn off the device, disconnect... it from the computer, and then unplug the AC power cord. 90 Chapter 6 Drives USB drives include the following types: ● 1.44-megabyte...
HP ProBook Notebook PC User Guide - Windows Vista
Page 103
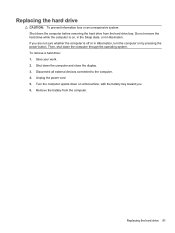
Replacing the hard drive CAUTION: To prevent information loss or an unresponsive system: Shut down the computer and close the display. 3. Unplug the power cord. 5. Remove the battery from the hard drive bay. Shut down the computer before removing the hard drive from the computer. Do not remove the hard ... the computer. 4. Then, shut down on a flat surface, with the battery bay toward you are not sure whether the computer is on by pressing the power button.
Replacing the hard drive CAUTION: To prevent information loss or an unresponsive system: Shut down the computer and close the display. 3. Unplug the power cord. 5. Remove the battery from the hard drive bay. Shut down the computer before removing the hard drive from the computer. Do not remove the hard ... the computer. 4. Then, shut down on a flat surface, with the battery bay toward you are not sure whether the computer is on by pressing the power button.

HP ProBook Notebook PC User Guide - Windows Vista
Page 121
...refer to a USB port on the device. If you are connecting a powered device, plug the device power cord into a grounded AC outlet. 3. A USB drive can be sure that the device is turned off and the AC power cord is unplugged. 1. To connect an external device to the computer: CAUTION:... device, turn off the device, disconnect it from the computer, and then unplug the AC power cord. Using external drives 109 Connect the device to the equipment when connecting a powered device, be added by connecting the drive to the manufacturer's instructions. Using external drives Removable ...
...refer to a USB port on the device. If you are connecting a powered device, plug the device power cord into a grounded AC outlet. 3. A USB drive can be sure that the device is turned off and the AC power cord is unplugged. 1. To connect an external device to the computer: CAUTION:... device, turn off the device, disconnect it from the computer, and then unplug the AC power cord. Using external drives 109 Connect the device to the equipment when connecting a powered device, be added by connecting the drive to the manufacturer's instructions. Using external drives Removable ...
HP ProBook Notebook PC User Guide - Windows Vista
Page 127
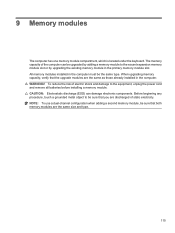
... memory module slot or by upgrading the existing memory module in the computer must be upgraded by adding a memory module to the equipment, unplug the power cord and remove all batteries before installing a memory module. All memory modules installed in the primary memory module slot. CAUTION: Electrostatic discharge (ESD) can be the...
... memory module slot or by upgrading the existing memory module in the computer must be upgraded by adding a memory module to the equipment, unplug the power cord and remove all batteries before installing a memory module. All memory modules installed in the primary memory module slot. CAUTION: Electrostatic discharge (ESD) can be the...
HP ProBook Notebook PC User Guide - Windows Vista
Page 128
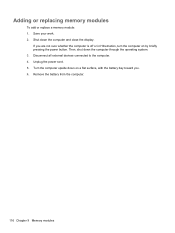
Shut down the computer through the operating system. 3. Then, shut down the computer and close the display. Save your work. 2. Remove the battery from the computer. 116 Chapter 9 Memory modules Turn the computer upside down on by briefly pressing the power button. Disconnect all external devices connected to the computer. 4. Adding or replacing memory modules To add or replace a memory module: 1. If you are not sure whether the computer is off or in Hibernation, turn the computer on a flat surface, with the battery bay toward you. 6. Unplug the power cord. 5.
Shut down the computer through the operating system. 3. Then, shut down the computer and close the display. Save your work. 2. Remove the battery from the computer. 116 Chapter 9 Memory modules Turn the computer upside down on by briefly pressing the power button. Disconnect all external devices connected to the computer. 4. Adding or replacing memory modules To add or replace a memory module: 1. If you are not sure whether the computer is off or in Hibernation, turn the computer on a flat surface, with the battery bay toward you. 6. Unplug the power cord. 5.
HP ProBook Notebook PC User Guide - Windows Vista
Page 159
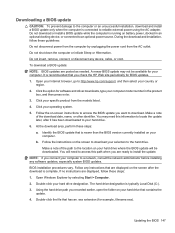
...you are displayed on the screen after it has been downloaded to an optional power source. If no instructions are posted as needed. Using the hard drive path you check the HP Web site periodically for example, filename.exe). Do not insert, remove, connect,...download is complete. During the download and installation, follow these steps: a. Open Windows Explorer by unplugging the power cord from the models listed. 4. Follow any device, cable, or cord. Click your hard drive designation. Do not download or install a BIOS update while the computer is typically Local...
...you are displayed on the screen after it has been downloaded to an optional power source. If no instructions are posted as needed. Using the hard drive path you check the HP Web site periodically for example, filename.exe). Do not insert, remove, connect,...download is complete. During the download and installation, follow these steps: a. Open Windows Explorer by unplugging the power cord from the models listed. 4. Follow any device, cable, or cord. Click your hard drive designation. Do not download or install a BIOS update while the computer is typically Local...


