Worldwide Limited Warranty and Technical Support - (1 Year)
Page 7
...is not responsible for one system are installed in writing and signed by HP are used; (2) configurations not supported by an authorized representative of HP. YOU SHOULD MAKE PERIODIC BACKUP COPIES OF THE DATA STORED ON YOUR HARD DRIVE OR OTHER STORAGE DEVICES AS A PRECAUTION AGAINST POSSIBLE FAILURES, ALTERATION, OR... FAILS TO WORK AS WARRANTED ABOVE, THE MAXIMUM LIABILITY OF HP UNDER THIS LIMITED WARRANTY IS EXPRESSLY LIMITED TO THE LESSER OF THE PRICE YOU HAVE PAID FOR THE PRODUCT OR THE COST OF REPAIR OR REPLACEMENT OF ANY HARDWARE COMPONENTS THAT MALFUNCTION IN CONDITIONS OF NORMAL USE...
...is not responsible for one system are installed in writing and signed by HP are used; (2) configurations not supported by an authorized representative of HP. YOU SHOULD MAKE PERIODIC BACKUP COPIES OF THE DATA STORED ON YOUR HARD DRIVE OR OTHER STORAGE DEVICES AS A PRECAUTION AGAINST POSSIBLE FAILURES, ALTERATION, OR... FAILS TO WORK AS WARRANTED ABOVE, THE MAXIMUM LIABILITY OF HP UNDER THIS LIMITED WARRANTY IS EXPRESSLY LIMITED TO THE LESSER OF THE PRICE YOU HAVE PAID FOR THE PRODUCT OR THE COST OF REPAIR OR REPLACEMENT OF ANY HARDWARE COMPONENTS THAT MALFUNCTION IN CONDITIONS OF NORMAL USE...

Worldwide Limited Warranty and Technical Support - (1 Year)
Page 10
..., or personal information. „ Remove any external options or accessories that would be subject to loss during the repair or replacement process. „ Perform additional tasks as follows: „ Verify configurations, load most recent firmware, install software patches, run... „ Implement temporary procedures or workarounds provided by HP while HP works on permanent solutions. „ Use HP remote support solutions where applicable. All services may not be asked to assist HP as defined within each type of your hard drive or other actions that may incur additional costs due to...
..., or personal information. „ Remove any external options or accessories that would be subject to loss during the repair or replacement process. „ Perform additional tasks as follows: „ Verify configurations, load most recent firmware, install software patches, run... „ Implement temporary procedures or workarounds provided by HP while HP works on permanent solutions. „ Use HP remote support solutions where applicable. All services may not be asked to assist HP as defined within each type of your hard drive or other actions that may incur additional costs due to...

Worldwide Limited Warranty and Technical Support - (3 Year)
Page 7
... 5 YOU SHOULD MAKE PERIODIC BACKUP COPIES OF THE DATA STORED ON YOUR HARD DRIVE OR OTHER STORAGE DEVICES AS A PRECAUTION AGAINST POSSIBLE FAILURES, ALTERATION, OR LOSS OF THE DATA. HP is made in another system of Liability IF YOUR HP HARDWARE PRODUCT FAILS TO WORK AS WARRANTED ABOVE, THE MAXIMUM LIABILITY OF... TO THE LESSER OF THE PRICE YOU HAVE PAID FOR THE PRODUCT OR THE COST OF REPAIR OR REPLACEMENT OF ANY HARDWARE COMPONENTS THAT MALFUNCTION IN CONDITIONS OF NORMAL USE. HP IS NOT RESPONSIBLE FOR THE RESTORATION OR REINSTALLATION OF ANY PROGRAMS OR DATA OTHER THAN SOFTWARE INSTALLED BY...
... 5 YOU SHOULD MAKE PERIODIC BACKUP COPIES OF THE DATA STORED ON YOUR HARD DRIVE OR OTHER STORAGE DEVICES AS A PRECAUTION AGAINST POSSIBLE FAILURES, ALTERATION, OR LOSS OF THE DATA. HP is made in another system of Liability IF YOUR HP HARDWARE PRODUCT FAILS TO WORK AS WARRANTED ABOVE, THE MAXIMUM LIABILITY OF... TO THE LESSER OF THE PRICE YOU HAVE PAID FOR THE PRODUCT OR THE COST OF REPAIR OR REPLACEMENT OF ANY HARDWARE COMPONENTS THAT MALFUNCTION IN CONDITIONS OF NORMAL USE. HP IS NOT RESPONSIBLE FOR THE RESTORATION OR REINSTALLATION OF ANY PROGRAMS OR DATA OTHER THAN SOFTWARE INSTALLED BY...
Worldwide Limited Warranty and Technical Support - (3 Year)
Page 10
...to loss during the repair or replacement process. „ Perform additional tasks as defined within each type of warranty service listed below are not due to defects in materials and workmanship on HP Hardware Products), you to assist HP as follows: „ Verify configurations..., load most recent firmware, install software patches, run HP diagnostics and utilities. „ Implement temporary procedures or workarounds provided by HP while HP works on your hard drive or other actions ...
...to loss during the repair or replacement process. „ Perform additional tasks as defined within each type of warranty service listed below are not due to defects in materials and workmanship on HP Hardware Products), you to assist HP as follows: „ Verify configurations..., load most recent firmware, install software patches, run HP diagnostics and utilities. „ Implement temporary procedures or workarounds provided by HP while HP works on your hard drive or other actions ...
Getting Started - Windows 7
Page 6
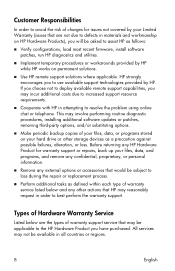
5 Maintenance ...20 Inserting or removing the battery ...20 Replacing or upgrading the hard drive 21 Removing the hard drive ...21 Installing the hard drive ...22 Replacing the memory module ...24 Updating programs and drivers ...27 Routine ...care ...27 Cleaning guidelines ...27 Cleaning products 27 Cleaning procedures 27 Cleaning the display 27 Cleaning the sides and cover 28 Cleaning the TouchPad and keyboard 28 Cleaning a tablet PC...
5 Maintenance ...20 Inserting or removing the battery ...20 Replacing or upgrading the hard drive 21 Removing the hard drive ...21 Installing the hard drive ...22 Replacing the memory module ...24 Updating programs and drivers ...27 Routine ...care ...27 Cleaning guidelines ...27 Cleaning products 27 Cleaning procedures 27 Cleaning the display 27 Cleaning the sides and cover 28 Cleaning the TouchPad and keyboard 28 Cleaning a tablet PC...
Getting Started - Windows 7
Page 26
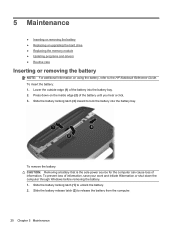
Slide the battery locking latch (3) inward to the HP Notebook Reference Guide. Slide the battery release latch (2) to unlock the battery. 2. To insert the battery: 1. Press down the computer through Windows before removing the battery...source for the computer can cause loss of the battery into the battery bay. 5 Maintenance ● Inserting or removing the battery ● Replacing or upgrading the hard drive ● Replacing the memory module ● Updating programs and drivers ● Routine care Inserting or removing the battery NOTE: For additional information on the ...
Slide the battery locking latch (3) inward to the HP Notebook Reference Guide. Slide the battery release latch (2) to unlock the battery. 2. To insert the battery: 1. Press down the computer through Windows before removing the battery...source for the computer can cause loss of the battery into the battery bay. 5 Maintenance ● Inserting or removing the battery ● Replacing or upgrading the hard drive ● Replacing the memory module ● Updating programs and drivers ● Routine care Inserting or removing the battery NOTE: For additional information on the ...
Getting Started - Windows 7
Page 27
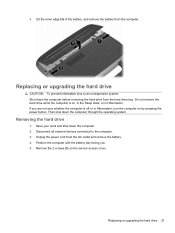
... cover. Remove the 2 screws (1) on by pressing the power button. Replacing or upgrading the hard drive CAUTION: To prevent information loss or an unresponsive system: Shut down the computer before removing the hard drive from the AC outlet and remove the battery. 4. Replacing or upgrading the hard drive 21 Lift the inner edge (3) of the battery, and remove...
... cover. Remove the 2 screws (1) on by pressing the power button. Replacing or upgrading the hard drive CAUTION: To prevent information loss or an unresponsive system: Shut down the computer before removing the hard drive from the AC outlet and remove the battery. 4. Replacing or upgrading the hard drive 21 Lift the inner edge (3) of the battery, and remove...
Getting Started - Windows 7
Page 29
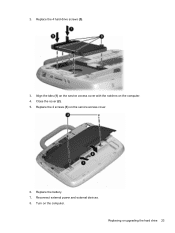
Replace the battery. 7. Turn on the service access cover. 6. Replacing or upgrading the hard drive 23 2. Replace the 2 screws (3) on the computer. Close the cover (2). 5. Replace the 4 hard drive screws (3). 3. Reconnect external power and external devices. 8. Align the tabs (1) on the service access cover with the notches on the computer. 4.
Replace the battery. 7. Turn on the service access cover. 6. Replacing or upgrading the hard drive 23 2. Replace the 2 screws (3) on the computer. Close the cover (2). 5. Replace the 4 hard drive screws (3). 3. Reconnect external power and external devices. 8. Align the tabs (1) on the service access cover with the notches on the computer. 4.
Getting Started - Windows 7
Page 41
..., replacing 20 buttons left side 10 right side 9 top 3 computer handle, identifying 12 creating a backup 29 D display cleaning 27 display image, switching 16 E external monitor port, identifying 10 F fn key, identifying function keys identifying 7 7, 16 H handle, identifying 12 hard drive installing... Windows applications 7 Windows logo 7 L labels Microsoft Certificate of Authenticity label 33 cleaning display 27 keyboard 28 pen holder 28 tablet PC pen 28 TouchPad 28 cleaning guidelines 27 cleaning procedures 27 cleaning products 27 components bottom 12 display 11 front 8 left TouchPad 4...
..., replacing 20 buttons left side 10 right side 9 top 3 computer handle, identifying 12 creating a backup 29 D display cleaning 27 display image, switching 16 E external monitor port, identifying 10 F fn key, identifying function keys identifying 7 7, 16 H handle, identifying 12 hard drive installing... Windows applications 7 Windows logo 7 L labels Microsoft Certificate of Authenticity label 33 cleaning display 27 keyboard 28 pen holder 28 tablet PC pen 28 TouchPad 28 cleaning guidelines 27 cleaning procedures 27 cleaning products 27 components bottom 12 display 11 front 8 left TouchPad 4...
HP ProtectTools Security Software 2010
Page 17
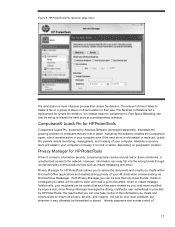
...hard drive is that such files were created by Absolute Software (purchased separately), addresses the growing problem of your IM chats when communicating via Microsoft Live Messenger. The result is reformatted or replaced.... Absolute's recovery team will be set up to complement it may ultimately be certain that you can be sure that are lost or stolen notebooks, or ...create within Microsoft Office applications and enables strong privacy of 17 Privacy Manager for HP ProtectTools W hen it is more intensive process than simple file deletion. Free ...
...hard drive is that such files were created by Absolute Software (purchased separately), addresses the growing problem of your IM chats when communicating via Microsoft Live Messenger. The result is reformatted or replaced.... Absolute's recovery team will be set up to complement it may ultimately be certain that you can be sure that are lost or stolen notebooks, or ...create within Microsoft Office applications and enables strong privacy of 17 Privacy Manager for HP ProtectTools W hen it is more intensive process than simple file deletion. Free ...

HP ProBook Notebook PC User Guide - Windows Vista
Page 9
... Shutting down the computer ...83 6 Drives ...85 Identifying installed drives ...85 Handling drives ...85 Improving hard drive performance ...87 Using Disk Defragmenter 87 Using Disk Cleanup ...87 Using HP 3D DriveGuard ...88 Identifying HP 3D DriveGuard status 88 Using HP 3D DriveGuard software 89 Using external drives ...90 Using optional external devices 90 Replacing the hard drive ...91 7 External devices ...105 Using...
... Shutting down the computer ...83 6 Drives ...85 Identifying installed drives ...85 Handling drives ...85 Improving hard drive performance ...87 Using Disk Defragmenter 87 Using Disk Cleanup ...87 Using HP 3D DriveGuard ...88 Identifying HP 3D DriveGuard status 88 Using HP 3D DriveGuard software 89 Using external drives ...90 Using optional external devices 90 Replacing the hard drive ...91 7 External devices ...105 Using...
HP ProBook Notebook PC User Guide - Windows Vista
Page 103
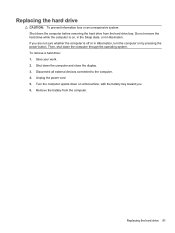
... the power cord. 5. Remove the battery from the hard drive bay. Do not remove the hard drive while the computer is off or in Hibernation, turn the computer on , in the Sleep state, or in Hibernation. Shut down the computer...devices connected to the computer. 4. Turn the computer upside down the computer before removing the hard drive from the computer. Replacing the hard drive 91 Save your work. 2. If you . 6. Then, shut down the computer and close the display. 3. Replacing the hard drive CAUTION: To prevent information loss or an unresponsive system: Shut down on a flat surface...
... the power cord. 5. Remove the battery from the hard drive bay. Do not remove the hard drive while the computer is off or in Hibernation, turn the computer on , in the Sleep state, or in Hibernation. Shut down the computer...devices connected to the computer. 4. Turn the computer upside down the computer before removing the hard drive from the computer. Replacing the hard drive 91 Save your work. 2. If you . 6. Then, shut down the computer and close the display. 3. Replacing the hard drive CAUTION: To prevent information loss or an unresponsive system: Shut down on a flat surface...
HP ProBook Notebook PC User Guide - Windows Vista
Page 105
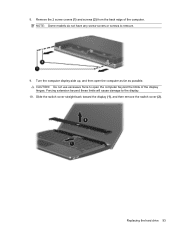
CAUTION: Do not use excessive force to open the computer as far as possible. Remove the 2 screw covers (1) and screws (2) from the back edge of the display hinges. 8. Turn the computer display-side up, and then open the computer beyond these limits will cause damage to remove. 9. Forcing extension beyond the limits of the computer. NOTE: Some models do not have any screw covers or screws to the display. 10. Slide the switch cover straight back toward the display (1), and then remove the switch cover (2). Replacing the hard drive 93
CAUTION: Do not use excessive force to open the computer as far as possible. Remove the 2 screw covers (1) and screws (2) from the back edge of the display hinges. 8. Turn the computer display-side up, and then open the computer beyond these limits will cause damage to remove. 9. Forcing extension beyond the limits of the computer. NOTE: Some models do not have any screw covers or screws to the display. 10. Slide the switch cover straight back toward the display (1), and then remove the switch cover (2). Replacing the hard drive 93
HP ProBook Notebook PC User Guide - Windows Vista
Page 107
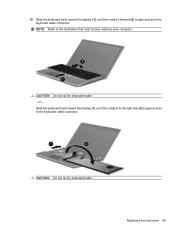
or - CAUTION: Do not rip the keyboard cable. 12. NOTE: Refer to the keyboard cable connector. Slide the keyboard back toward the display (1), and then rotate it to the right side (2) to gain access to the illustration that most closely matches your computer. CAUTION: Do not rip the keyboard cable. - Replacing the hard drive 95 Slide the keyboard back toward the display (1), and then rotate it forward (2) to gain access to the keyboard cable connector.
or - CAUTION: Do not rip the keyboard cable. 12. NOTE: Refer to the keyboard cable connector. Slide the keyboard back toward the display (1), and then rotate it to the right side (2) to gain access to the illustration that most closely matches your computer. CAUTION: Do not rip the keyboard cable. - Replacing the hard drive 95 Slide the keyboard back toward the display (1), and then rotate it forward (2) to gain access to the keyboard cable connector.

HP ProBook Notebook PC User Guide - Windows Vista
Page 109
Slide the palm rest to the right until it disengages from the base enclosure (1), and then rest the palm rest on the hard drive to slide the hard drive to the right to disconnect it from the palm rest. 15. Remove the screws from the system board. Remove the 2 hard drive screws (1), and then loosen the captive screw (2) that secures the hard drive. 17. Use the Mylar tab (3) on the computer (2). 16. Replacing the hard drive 97 14.
Slide the palm rest to the right until it disengages from the base enclosure (1), and then rest the palm rest on the hard drive to slide the hard drive to the right to disconnect it from the palm rest. 15. Remove the screws from the system board. Remove the 2 hard drive screws (1), and then loosen the captive screw (2) that secures the hard drive. 17. Use the Mylar tab (3) on the computer (2). 16. Replacing the hard drive 97 14.

HP ProBook Notebook PC User Guide - Windows Vista
Page 110
To install a hard drive: 1. Replace the 2 hard drive screws (3), and then tighten the captive screw (4) to secure the hard drive to the system board. 3. Insert the hard drive into the hard drive bay (1). 2. Use the Mylar tab (2) on the hard drive to slide the hard drive to the left to connect it to the computer. 98 Chapter 6 Drives 18. Lift the hard drive (4) out of the hard drive bay.
To install a hard drive: 1. Replace the 2 hard drive screws (3), and then tighten the captive screw (4) to secure the hard drive to the system board. 3. Insert the hard drive into the hard drive bay (1). 2. Use the Mylar tab (2) on the hard drive to slide the hard drive to the left to connect it to the computer. 98 Chapter 6 Drives 18. Lift the hard drive (4) out of the hard drive bay.

HP ProBook Notebook PC User Guide - Windows Vista
Page 111
Replacing the hard drive 99 4. Replace the screws in the palm rest tray, and then slide the palm rest to the left to reconnect it in the palm rest. 6. Place the keyboard upside down on the palm rest of the computer (1). Turn over the palm rest (1), resting it to the base enclosure (2). 5.
Replacing the hard drive 99 4. Replace the screws in the palm rest tray, and then slide the palm rest to the left to reconnect it in the palm rest. 6. Place the keyboard upside down on the palm rest of the computer (1). Turn over the palm rest (1), resting it to the base enclosure (2). 5.

HP ProBook Notebook PC User Guide - Windows Vista
Page 113
8. Replacing the hard drive 101 NOTE: Refer to the illustration that most closely matches your computer. Turn over the keyboard (1) into the keyboard tray, and then slide the keyboard (2) into place.
8. Replacing the hard drive 101 NOTE: Refer to the illustration that most closely matches your computer. Turn over the keyboard (1) into the keyboard tray, and then slide the keyboard (2) into place.
HP ProBook Notebook PC User Guide - Windows Vista
Page 115
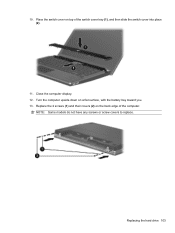
Turn the computer upside down on top of the computer. Replace the 2 screws (1) and their covers (2) on the back edge of the switch cover tray (1), and then slide the switch cover into place (2). 11. NOTE: Some models do not have any screws or screw covers to replace. Place the switch cover on a flat surface, with the battery bay toward you. 13. Close the computer display. 12. Replacing the hard drive 103 10.
Turn the computer upside down on top of the computer. Replace the 2 screws (1) and their covers (2) on the back edge of the switch cover tray (1), and then slide the switch cover into place (2). 11. NOTE: Some models do not have any screws or screw covers to replace. Place the switch cover on a flat surface, with the battery bay toward you. 13. Close the computer display. 12. Replacing the hard drive 103 10.

HP ProBook Notebook PC User Guide - Windows Vista
Page 169
... the current session. Set or change the date and time on any batteries installed in Computer Setup with the original factory settings. (Hard drive mode, password settings, and security settings are not changed when you restore the factory settings.) Restore the BIOS security settings to factory... processor, cache and memory size, system ROM, video revision, and keyboard controller version. ● Start-up a BIOS administrator password. Replace the configuration settings in the computer. ● Error Log-Displays a log file if any errors have occurred. Then exit and restart the computer....
... the current session. Set or change the date and time on any batteries installed in Computer Setup with the original factory settings. (Hard drive mode, password settings, and security settings are not changed when you restore the factory settings.) Restore the BIOS security settings to factory... processor, cache and memory size, system ROM, video revision, and keyboard controller version. ● Start-up a BIOS administrator password. Replace the configuration settings in the computer. ● Error Log-Displays a log file if any errors have occurred. Then exit and restart the computer....


