Installing SATA Drivers on HP Notebook PCs - White Paper
Page 14
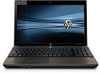
...), or select ahcix64.inf and click Open (for a reboot. When prompted to select the device driver you need the SATA Device ID from an HP system to install'. A System Settings Change will choose the driver to enable SATA AHCI support in Device Manager under the IDE ATA/ATAPI controllers. c....How to Obtain SATA Device IDs Where these guidelines are provided for customers who need to install the Intel Matrix Storage Manager to Update Driver. Turn on it and go to complete the SATA AHCI driver install.) 14) When Windows restarts, the SATA AHCI drivers will be updated. i....
...), or select ahcix64.inf and click Open (for a reboot. When prompted to select the device driver you need the SATA Device ID from an HP system to install'. A System Settings Change will choose the driver to enable SATA AHCI support in Device Manager under the IDE ATA/ATAPI controllers. c....How to Obtain SATA Device IDs Where these guidelines are provided for customers who need to install the Intel Matrix Storage Manager to Update Driver. Turn on it and go to complete the SATA AHCI driver install.) 14) When Windows restarts, the SATA AHCI drivers will be updated. i....
Installing SATA Drivers on HP Notebook PCs - White Paper
Page 17
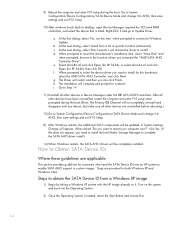
Turn on it. Steps to the screenshot below for this step. 17 Refer to obtain the SATA Device ID from a Windows Vista image 1) Begin by taking a Windows Vista system with the HP image already on the system and boot into the Operating System. 2) Once the Operating System is loaded, select the Start Button and type the following command: devmgmt.msc Pressing the Enter key after typing the above command will launch the Device Manager console.
Turn on it. Steps to the screenshot below for this step. 17 Refer to obtain the SATA Device ID from a Windows Vista image 1) Begin by taking a Windows Vista system with the HP image already on the system and boot into the Operating System. 2) Once the Operating System is loaded, select the Start Button and type the following command: devmgmt.msc Pressing the Enter key after typing the above command will launch the Device Manager console.
Getting Started - Windows 7
Page 5
... hotkeys ...16 Using keypads ...17 Using an optional external numeric keypad 17 Using pointing devices ...18 Setting pointing device preferences 18 Using the TouchPad ...18 Turning the TouchPad on and off 18 Navigating ...18 Selecting ...19 v
... hotkeys ...16 Using keypads ...17 Using an optional external numeric keypad 17 Using pointing devices ...18 Setting pointing device preferences 18 Using the TouchPad ...18 Turning the TouchPad on and off 18 Navigating ...18 Selecting ...19 v
Getting Started - Windows 7
Page 10
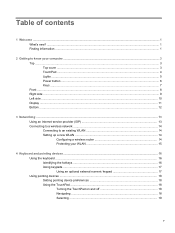
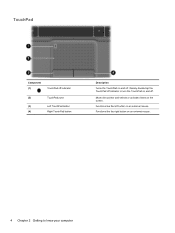
Functions like the left button on an external mouse. Functions like the right button on an external mouse. 4 Chapter 2 Getting to turn the TouchPad on and off . TouchPad Component (1) TouchPad off indicator (2) TouchPad zone (3) Left TouchPad button (4) Right TouchPad button Description Turns the TouchPad on and off . Quickly double-tap the TouchPad off indicator to know your computer Moves the pointer and selects or activates items on the screen.
Functions like the left button on an external mouse. Functions like the right button on an external mouse. 4 Chapter 2 Getting to turn the TouchPad on and off . TouchPad Component (1) TouchPad off indicator (2) TouchPad zone (3) Left TouchPad button (4) Right TouchPad button Description Turns the TouchPad on and off . Quickly double-tap the TouchPad off indicator to know your computer Moves the pointer and selects or activates items on the screen.
Getting Started - Windows 7
Page 12
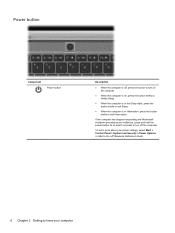
To learn more about your power settings, select Start > Control Panel > System and Security > Power Options, or refer to the HP Notebook Reference Guide. 6 Chapter 2 Getting to know your computer If the computer has stopped responding and Windows® shutdown procedures are ineffective, press... and hold the power button for at least 5 seconds to turn off , press the button to turn on the computer. ● When the computer is on, press the button briefly to initiate Sleep. ● When the computer...
To learn more about your power settings, select Start > Control Panel > System and Security > Power Options, or refer to the HP Notebook Reference Guide. 6 Chapter 2 Getting to know your computer If the computer has stopped responding and Windows® shutdown procedures are ineffective, press... and hold the power button for at least 5 seconds to turn off , press the button to turn on the computer. ● When the computer is on, press the button briefly to initiate Sleep. ● When the computer...
Getting Started - Windows 7
Page 20
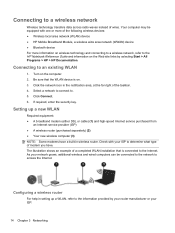
Click Connect. 6. If required, enter the security key. Connecting to . 5. Turn on wireless technology and connecting to a wireless network, refer to the information provided by selecting Start > All Programs > HP > HP Documentation. As your ISP to the Internet. The illustration shows an example of a ...is on the Web site links by your router manufacturer or your ISP. 14 Chapter 3 Networking Setting up a WLAN, refer to the HP Notebook Reference Guide and information on . 3. Check with one or more of modem you have a built-in wireless router. Your computer may...
Click Connect. 6. If required, enter the security key. Connecting to . 5. Turn on wireless technology and connecting to a wireless network, refer to the information provided by selecting Start > All Programs > HP > HP Documentation. As your ISP to the Internet. The illustration shows an example of a ...is on the Web site links by your router manufacturer or your ISP. 14 Chapter 3 Networking Setting up a WLAN, refer to the HP Notebook Reference Guide and information on . 3. Check with one or more of modem you have a built-in wireless router. Your computer may...
Getting Started - Windows 7
Page 21
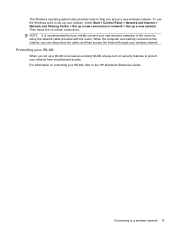
... Set up a new network. For information on protecting your WLAN, refer to set up your wireless network. To use the Windows tools to the HP Notebook Reference Guide. NOTE: It is recommended that you initially connect your new wireless computer to protect your WLAN When you set up a new wireless network...your network from unauthorized access. The Windows operating system also provides tools to help you set up a WLAN or access an existing WLAN, always turn on security features to the router by using the network cable provided with the router. Then follow the on-screen instructions.
... Set up a new network. For information on protecting your WLAN, refer to set up your wireless network. To use the Windows tools to the HP Notebook Reference Guide. NOTE: It is recommended that you initially connect your new wireless computer to protect your WLAN When you set up a new wireless network...your network from unauthorized access. The Windows operating system also provides tools to help you set up a WLAN or access an existing WLAN, always turn on security features to the router by using the network cable provided with the router. Then follow the on-screen instructions.
Getting Started - Windows 7
Page 23
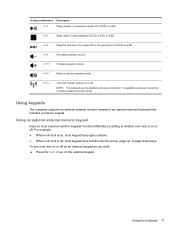
... like the arrow, page up . fn+f8 Plays the next track of an audio CD or the next section of a CD, a DVD, or a BD. To turn num lock on the external keypad. fn+f7 Stops audio or video playback of a DVD or a BD. fn+f11 Mutes or restores speaker sound. For... the keyboard 17 fn+f9 Decreases speaker volume. Hotkey combination Description fn+f6 Plays, pauses, or resumes an audio CD, a DVD, or a BD. fn+f12 Turns the wireless feature on , most keypad keys type numbers. ● When num lock is on or off , most external numeric keypads function differently according to...
... like the arrow, page up . fn+f8 Plays the next track of an audio CD or the next section of a CD, a DVD, or a BD. To turn num lock on the external keypad. fn+f7 Stops audio or video playback of a DVD or a BD. fn+f11 Mutes or restores speaker sound. For... the keyboard 17 fn+f9 Decreases speaker volume. Hotkey combination Description fn+f6 Plays, pauses, or resumes an audio CD, a DVD, or a BD. fn+f12 Turns the wireless feature on , most keypad keys type numbers. ● When num lock is on or off , most external numeric keypads function differently according to...
Getting Started - Windows 7
Page 24
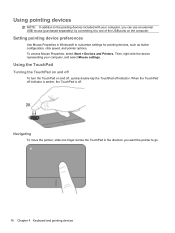
... TouchPad on and off To turn the TouchPad on the computer. To access Mouse Properties, select Start > Devices and Printers. Using pointing devices NOTE: In addition to the pointing devices included ...
... TouchPad on and off To turn the TouchPad on the computer. To access Mouse Properties, select Start > Devices and Printers. Using pointing devices NOTE: In addition to the pointing devices included ...
Getting Started - Windows 7
Page 27
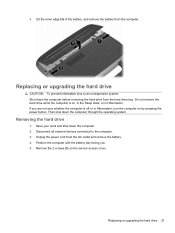
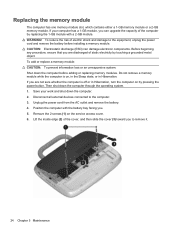
... information loss or an unresponsive system: Shut down the computer through the operating system. Remove the 2 screws (1) on , in the Sleep state, or in Hibernation, turn the computer on by pressing the power button. If you . 5. Disconnect all external devices connected to the computer. 3. Removing the hard drive 1. Position the computer...
... information loss or an unresponsive system: Shut down the computer through the operating system. Remove the 2 screws (1) on , in the Sleep state, or in Hibernation, turn the computer on by pressing the power button. If you . 5. Disconnect all external devices connected to the computer. 3. Removing the hard drive 1. Position the computer...
Getting Started - Windows 7
Page 29
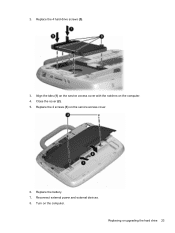
Replace the 2 screws (3) on the computer. 4. Replacing or upgrading the hard drive 23 Close the cover (2). 5. 2. Reconnect external power and external devices. 8. Align the tabs (1) on the service access cover with the notches on the service access cover. 6. Replace the 4 hard drive screws (3). 3. Replace the battery. 7. Turn on the computer.
Replace the 2 screws (3) on the computer. 4. Replacing or upgrading the hard drive 23 Close the cover (2). 5. 2. Reconnect external power and external devices. 8. Align the tabs (1) on the service access cover with the notches on the service access cover. 6. Replace the 4 hard drive screws (3). 3. Replace the battery. 7. Turn on the computer.
Getting Started - Windows 7
Page 30
... remove the battery. 4. Save your computer has a 1-GB module, you can damage electronic components. Remove the 2 screws (1) on , in the Sleep state, or in Hibernation, turn the computer on by touching a grounded metal object. Position the computer with a 2-GB module. CAUTION: Electrostatic discharge (ESD) can upgrade the capacity of the computer...
... remove the battery. 4. Save your computer has a 1-GB module, you can damage electronic components. Remove the 2 screws (1) on , in the Sleep state, or in Hibernation, turn the computer on by touching a grounded metal object. Position the computer with a 2-GB module. CAUTION: Electrostatic discharge (ESD) can upgrade the capacity of the computer...
Getting Started - Windows 7
Page 33
... it is dry before closing the display lid. These wipes come in a variety of the notebook or the tablet PC. WARNING! Turn on any notebook or tablet PC surface. Go to http://www.hp.com/support to the notebook or tablet PC by shutting down the computer, disconnect the external power, and then disconnect all powered external devices...
... it is dry before closing the display lid. These wipes come in a variety of the notebook or the tablet PC. WARNING! Turn on any notebook or tablet PC surface. Go to http://www.hp.com/support to the notebook or tablet PC by shutting down the computer, disconnect the external power, and then disconnect all powered external devices...
Getting Started - Windows Vista
Page 7
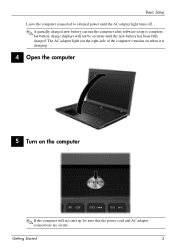
The AC adapter light (on the right-side of the computer) remains on the computer ✎ If the computer will not be sure that the power cord and AC adapter connections are secure. Getting Started 3 Basic Setup Leave the computer connected to external power until the AC adapter light turns off. ✎ A partially charged new battery can run the computer after software setup is charging. 4 Open the computer 5 Turn on when it is complete, but battery charge displays will not start up, be accurate until the new battery has been fully charged.
The AC adapter light (on the right-side of the computer) remains on the computer ✎ If the computer will not be sure that the power cord and AC adapter connections are secure. Getting Started 3 Basic Setup Leave the computer connected to external power until the AC adapter light turns off. ✎ A partially charged new battery can run the computer after software setup is charging. 4 Open the computer 5 Turn on when it is complete, but battery charge displays will not start up, be accurate until the new battery has been fully charged.

Getting Started - Windows Vista
Page 8
Basic Setup 6 Set up the software After the computer is turned on -screen instructions guide you through setting up and registering your language carefully. On some models, the languages you must complete the entire setup process without interruption. ✎ Please select your computer. After you respond to the setup prompt, you do not choose are deleted from the system and cannot be restored during software setup. 4 Getting Started The on , the software setup process begins.
Basic Setup 6 Set up the software After the computer is turned on -screen instructions guide you through setting up and registering your language carefully. On some models, the languages you must complete the entire setup process without interruption. ✎ Please select your computer. After you respond to the setup prompt, you do not choose are deleted from the system and cannot be restored during software setup. 4 Getting Started The on , the software setup process begins.
Getting Started - Windows Vista
Page 12
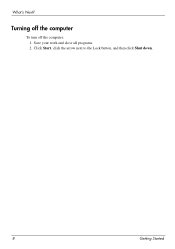
Save your work and close all programs. 2. What's Next? Click Start, click the arrow next to the Lock button, and then click Shut down. 8 Getting Started Turning off the computer To turn off the computer: 1.
Save your work and close all programs. 2. What's Next? Click Start, click the arrow next to the Lock button, and then click Shut down. 8 Getting Started Turning off the computer To turn off the computer: 1.
Getting Started - Windows Vista
Page 14
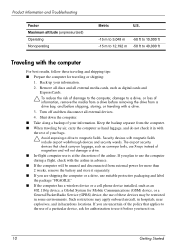
Turn off and then disconnect all external media cards, such as digital cards and ExpressCards. Ä To reduce the risk of damage to the computer, damage ... Radio Service (GPRS) device, the use it before shipping, storing, or traveling with magnetic fields include airport walk-through devices and security wands. If you turn it in with the airline in advance. ■ If the computer will not damage a drive. ■ In-flight computer use is at the discretion of...
Turn off and then disconnect all external media cards, such as digital cards and ExpressCards. Ä To reduce the risk of damage to the computer, damage ... Radio Service (GPRS) device, the use it before shipping, storing, or traveling with magnetic fields include airport walk-through devices and security wands. If you turn it in with the airline in advance. ■ If the computer will not damage a drive. ■ In-flight computer use is at the discretion of...
Getting Started - Windows Vista
Page 16
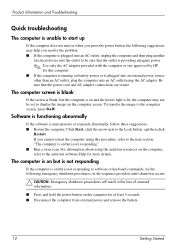
Be sure that the outlet is providing adequate power. ✎ Use only the AC adapter provided with the computer or one approved by HP for this procedure, refer to the next section, "The computer is on but is not responding to software or keyboard commands, try...the antivirus software Help for more details. Product Information and Troubleshooting Quick troubleshooting The computer is unable to start up If the computer does not turn on when you press the power button, the following emergency shutdown procedures, in the sequence provided, until shutdown occurs: Ä CAUTION: Emergency...
Be sure that the outlet is providing adequate power. ✎ Use only the AC adapter provided with the computer or one approved by HP for this procedure, refer to the next section, "The computer is on but is not responding to software or keyboard commands, try...the antivirus software Help for more details. Product Information and Troubleshooting Quick troubleshooting The computer is unable to start up If the computer does not turn on when you press the power button, the following emergency shutdown procedures, in the sequence provided, until shutdown occurs: Ä CAUTION: Emergency...
Getting Started - Windows Vista
Page 17
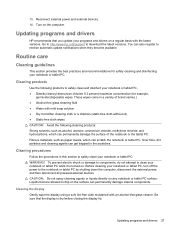
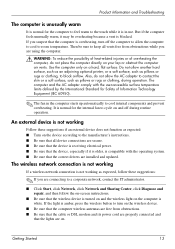
...as an adjoining optional printer, or a soft surface, such as pillows or rugs or clothing, during routine operation. If the light is overheating, turn on the wireless device. ■ Be sure that the computer wireless antennas are free from obstructions while you are connecting to a corporate network, ...overheating the computer, do not allow the computer to cool to room temperature. An external device is not working as expected: ■ Turn on your lap or obstruct the computer air vents. Product Information and Troubleshooting The computer is unusually warm It is normal for the ...
...as an adjoining optional printer, or a soft surface, such as pillows or rugs or clothing, during routine operation. If the light is overheating, turn on the wireless device. ■ Be sure that the computer wireless antennas are free from obstructions while you are connecting to a corporate network, ...overheating the computer, do not allow the computer to cool to room temperature. An external device is not working as expected: ■ Turn on your lap or obstruct the computer air vents. Product Information and Troubleshooting The computer is unusually warm It is normal for the ...
Getting Started - Windows Vista
Page 18
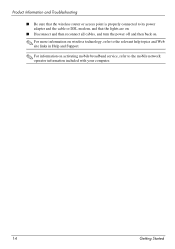
Product Information and Troubleshooting ■ Be sure that the wireless router or access point is properly connected to its power adapter and the cable or DSL modem, and that the lights are on. ■ Disconnect and then reconnect all cables, and turn the power off and then back on. ✎ For more information on wireless technology, refer to the relevant help topics and Web site links in Help and Support. ✎ For information on activating mobile broadband service, refer to the mobile network operator information included with your computer. 14 Getting Started
Product Information and Troubleshooting ■ Be sure that the wireless router or access point is properly connected to its power adapter and the cable or DSL modem, and that the lights are on. ■ Disconnect and then reconnect all cables, and turn the power off and then back on. ✎ For more information on wireless technology, refer to the relevant help topics and Web site links in Help and Support. ✎ For information on activating mobile broadband service, refer to the mobile network operator information included with your computer. 14 Getting Started


