
End User License Agreement
Page 1
... on more than one computer, you may load the Software ON THE CONDITION THAT YOU Product into the local memory or storage device of using the Software INSTALLING, COPYING, Product. Copying. The term "Software Product" means computer software and may use the Software Product on... accepted at time of the Software Product, provided the copy contains all or any Software Product, installed on a single computer ("Your Computer"). You may accompany the HP Product. HP and its suppliers reserve all terms and conditions of the original Software Product's proprietary notices and that...
... on more than one computer, you may load the Software ON THE CONDITION THAT YOU Product into the local memory or storage device of using the Software INSTALLING, COPYING, Product. Copying. The term "Software Product" means computer software and may use the Software Product on... accepted at time of the Software Product, provided the copy contains all or any Software Product, installed on a single computer ("Your Computer"). You may accompany the HP Product. HP and its suppliers reserve all terms and conditions of the original Software Product's proprietary notices and that...
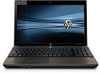
Getting Started - Windows 7
Page 6
......20 Inserting or removing the battery ...20 Replacing or upgrading the hard drive 21 Removing the hard drive ...21 Installing the hard drive ...22 Replacing the memory module ...24 Updating programs and drivers ...27 Routine care ...27 Cleaning guidelines ...27 Cleaning products 27 Cleaning procedures... 27 Cleaning the display 27 Cleaning the sides and cover 28 Cleaning the TouchPad and keyboard 28 Cleaning a tablet PC pen and pen...
......20 Inserting or removing the battery ...20 Replacing or upgrading the hard drive 21 Removing the hard drive ...21 Installing the hard drive ...22 Replacing the memory module ...24 Updating programs and drivers ...27 Routine care ...27 Cleaning guidelines ...27 Cleaning products 27 Cleaning procedures... 27 Cleaning the display 27 Cleaning the sides and cover 28 Cleaning the TouchPad and keyboard 28 Cleaning a tablet PC pen and pen...
Getting Started - Windows 7
Page 30
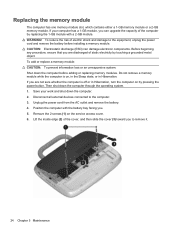
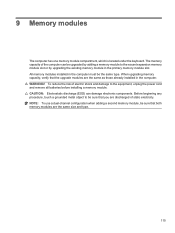
...loss or an unresponsive system: Shut down the computer before installing a memory module. Position the computer with a 2-GB module. Replacing the memory module The computer has one memory module slot, which contains either a 1-GB memory module or a 2-GB memory module. WARNING! Remove the 2 screws (1) on by ... risk of electric shock and damage to the equipment, unplug the power cord and remove the battery before adding or replacing memory modules. Save your computer has a 1-GB module, you can damage electronic components. CAUTION: Electrostatic discharge (ESD) can upgrade...
...loss or an unresponsive system: Shut down the computer before installing a memory module. Position the computer with a 2-GB module. Replacing the memory module The computer has one memory module slot, which contains either a 1-GB memory module or a 2-GB memory module. WARNING! Remove the 2 screws (1) on by ... risk of electric shock and damage to the equipment, unplug the power cord and remove the battery before adding or replacing memory modules. Save your computer has a 1-GB module, you can damage electronic components. CAUTION: Electrostatic discharge (ESD) can upgrade...
Getting Started - Windows 7
Page 41
... Certificate of Authenticity label 33 cleaning display 27 keyboard 28 pen holder 28 tablet PC pen 28 TouchPad 28 cleaning guidelines 27 cleaning procedures 27 cleaning products 27 components ... fn key, identifying function keys identifying 7 7, 16 H handle, identifying 12 hard drive installing 22 removing 21 headphone (audio-out) jack 9 Help and Support hotkey 16 hotkeys adjusting ... 9 network connection 9 power 5 TouchPad off indicator 5 webcam 11 wireless 5 M media controls, keys 16 memory module inserting 25 Index 35 Index A audio-in (microphone) 9 audio-out (headphone) 9 RJ-11 (modem...
... Certificate of Authenticity label 33 cleaning display 27 keyboard 28 pen holder 28 tablet PC pen 28 TouchPad 28 cleaning guidelines 27 cleaning procedures 27 cleaning products 27 components ... fn key, identifying function keys identifying 7 7, 16 H handle, identifying 12 hard drive installing 22 removing 21 headphone (audio-out) jack 9 Help and Support hotkey 16 hotkeys adjusting ... 9 network connection 9 power 5 TouchPad off indicator 5 webcam 11 wireless 5 M media controls, keys 16 memory module inserting 25 Index 35 Index A audio-in (microphone) 9 audio-out (headphone) 9 RJ-11 (modem...

HP ProBook Notebook PC User Guide - Windows Vista
Page 10
... models only 112 Configuring an ExpressCard 112 Inserting an ExpressCard 112 Stopping and removing an ExpressCard 113 9 Memory modules ...115 Adding or replacing memory modules 116 10 Security ...127 Protecting the computer ...127 Using passwords ...128 Setting passwords in Windows 128...137 Using Computer Setup System IDs 138 Using antivirus software ...139 Using firewall software ...140 Installing critical updates ...141 Using HP ProtectTools Security Manager (select models only 142 Installing a security cable ...143 11 Software updates ...144 Updating software ...144 Updating the BIOS ...
... models only 112 Configuring an ExpressCard 112 Inserting an ExpressCard 112 Stopping and removing an ExpressCard 113 9 Memory modules ...115 Adding or replacing memory modules 116 10 Security ...127 Protecting the computer ...127 Using passwords ...128 Setting passwords in Windows 128...137 Using Computer Setup System IDs 138 Using antivirus software ...139 Using firewall software ...140 Installing critical updates ...141 Using HP ProtectTools Security Manager (select models only 142 Installing a security cable ...143 11 Software updates ...144 Updating software ...144 Updating the BIOS ...
HP ProBook Notebook PC User Guide - Windows Vista
Page 124
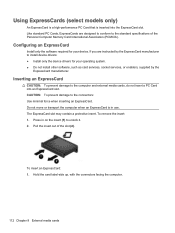
... Pull the insert out of the Personal Computer Memory Card International Association (PCMCIA). The ExpressCard slot may contain a protective insert. Like standard PC Cards, ExpressCards are instructed by the ExpressCard manufacturer. Configuring an ExpressCard Install only the software required for your operating system..., or enablers, supplied by the ExpressCard manufacturer to install device drivers: ● Install only the device drivers for your device. Using ExpressCards (select models only) An ExpressCard is a high-performance PC Card that is in on the insert (1) to the...
... Pull the insert out of the Personal Computer Memory Card International Association (PCMCIA). The ExpressCard slot may contain a protective insert. Like standard PC Cards, ExpressCards are instructed by the ExpressCard manufacturer. Configuring an ExpressCard Install only the software required for your operating system..., or enablers, supplied by the ExpressCard manufacturer to install device drivers: ● Install only the device drivers for your device. Using ExpressCards (select models only) An ExpressCard is a high-performance PC Card that is in on the insert (1) to the...
HP ProBook Notebook PC User Guide - Windows Vista
Page 127
... modules are the same size and type. 115 WARNING! All memory modules installed in the primary memory module slot. CAUTION: Electrostatic discharge (ESD) can be upgraded by adding a memory module to the equipment, unplug the power cord and remove all batteries before installing a memory module. The memory capacity of electric shock and damage to the vacant expansion...
... modules are the same size and type. 115 WARNING! All memory modules installed in the primary memory module slot. CAUTION: Electrostatic discharge (ESD) can be upgraded by adding a memory module to the equipment, unplug the power cord and remove all batteries before installing a memory module. The memory capacity of electric shock and damage to the vacant expansion...

HP ProBook Notebook PC User Guide - Windows Vista
Page 169
...menu items listed in the computer. ● Error Log-Displays a log file if any batteries installed in this Set up Test-Verifies the system components needed for the processor, cache and memory size, system ROM, video revision, and keyboard controller version. ● Start-up a BIOS ... computer. ● Run-In Test-Runs a comprehensive check on system memory. ● Hard Disk Test-Runs a comprehensive self-test on any hard drive in the system. ● Memory Test-Runs a comprehensive test on any memory installed in the computer. ● Battery Test-Runs a comprehensive test on the...
...menu items listed in the computer. ● Error Log-Displays a log file if any batteries installed in this Set up Test-Verifies the system components needed for the processor, cache and memory size, system ROM, video revision, and keyboard controller version. ● Start-up a BIOS ... computer. ● Run-In Test-Runs a comprehensive check on system memory. ● Hard Disk Test-Runs a comprehensive self-test on any hard drive in the system. ● Memory Test-Runs a comprehensive test on any memory installed in the computer. ● Battery Test-Runs a comprehensive test on the...

HP ProBook Notebook PC User Guide - Windows Vista
Page 182
... management functionality and centralized hardware management of system software, such as thermal warnings and memory alerts ● Remote updating of client devices for Altiris (installed on a client computer) is used with optional Altiris Solutions software (purchased separately). When HP Client Manager for the following IT life-cycle areas: ● Inventory and asset management...
... management functionality and centralized hardware management of system software, such as thermal warnings and memory alerts ● Remote updating of client devices for Altiris (installed on a client computer) is used with optional Altiris Solutions software (purchased separately). When HP Client Manager for the following IT life-cycle areas: ● Inventory and asset management...
HP ProBook Notebook PC User Guide - Windows Vista
Page 188
H hard disk drive external 90 HP 3D DriveGuard 88 installing 98 replacing 91 hard drive external 90, 109 HP 3D DriveGuard 88 installing 98 replacing 91 hard drive recovery 154 hardware, identifying 1 HDMI port 41, 54 headphone (audio-out) jack 8, 48 headphones 48 Hibernation exiting 70 initiated during ... 166 low battery level 76 M maintenance Disk Cleanup 87 Disk Defragmenter 87 McAfee Total Protection 139, 140 Media Card Reader, identifying 8 media controls, hotkeys 41 memory module removing 120 replacing 116 microphone (audio-in) jack 8 microphone, internal 48 176 Index
H hard disk drive external 90 HP 3D DriveGuard 88 installing 98 replacing 91 hard drive external 90, 109 HP 3D DriveGuard 88 installing 98 replacing 91 hard drive recovery 154 hardware, identifying 1 HDMI port 41, 54 headphone (audio-out) jack 8, 48 headphones 48 Hibernation exiting 70 initiated during ... 166 low battery level 76 M maintenance Disk Cleanup 87 Disk Defragmenter 87 McAfee Total Protection 139, 140 Media Card Reader, identifying 8 media controls, hotkeys 41 memory module removing 120 replacing 116 microphone (audio-in) jack 8 microphone, internal 48 176 Index

HP ProBook 4525s Notebook PC - Maintenance and Service Guide
Page 57
Release the zero insertion force (ZIF) connector (1) to install the switch cover and keyboard. NOTE: Only disconnect the keyboard cable from the system board. Remove the keyboard. Component replacement procedures 49 7. It is not ... when replacing the keyboard or removing the top cover. It is not necessary to disconnect the keyboard for any of the components listed here: ● memory module ● optical drive ● speakers ● thermal shield ● WLAN ● WWAN ● fan/heat sink ● palm rest ● hard drive Reverse this...
Release the zero insertion force (ZIF) connector (1) to install the switch cover and keyboard. NOTE: Only disconnect the keyboard cable from the system board. Remove the keyboard. Component replacement procedures 49 7. It is not ... when replacing the keyboard or removing the top cover. It is not necessary to disconnect the keyboard for any of the components listed here: ● memory module ● optical drive ● speakers ● thermal shield ● WLAN ● WWAN ● fan/heat sink ● palm rest ● hard drive Reverse this...

HP ProBook 4525s Notebook PC - Maintenance and Service Guide
Page 58
...see Switch cover and keyboard on page 45). 5. Remove the memory module: 1. Position the computer right-side up with the front toward you are unsure whether the computer is the same type and speed as the installed memory module. NOTE: It is not necessary to disconnect the keyboard... cable from the system board to release the memory module. (The edge of the memory module slot to remove the memory modules. Shut down through the operating system. 2. ...
...see Switch cover and keyboard on page 45). 5. Remove the memory module: 1. Position the computer right-side up with the front toward you are unsure whether the computer is the same type and speed as the installed memory module. NOTE: It is not necessary to disconnect the keyboard... cable from the system board to release the memory module. (The edge of the memory module slot to remove the memory modules. Shut down through the operating system. 2. ...

HP ProBook 4525s Notebook PC - Maintenance and Service Guide
Page 59
...operating system. 2. Disconnect the power from the computer by pulling the module away from the computer. Remove the memory module (2) by first unplugging the power cord from the AC outlet and then unplugging the AC adapter from ... Drive with LightScribe (includes bezel) Blu-ray Disc ROM Drive with a notch to prevent incorrect insertion into the memory module slot. If you are designed with SuperMulti DVD±R/RW Double-Layer (includes bezel) DVD-ROM Drive ... Reverse this procedure to the computer. 3. 3. Disconnect all external devices connected to install a memory module.
...operating system. 2. Disconnect the power from the computer by pulling the module away from the computer. Remove the memory module (2) by first unplugging the power cord from the AC outlet and then unplugging the AC adapter from ... Drive with LightScribe (includes bezel) Blu-ray Disc ROM Drive with a notch to prevent incorrect insertion into the memory module slot. If you are designed with SuperMulti DVD±R/RW Double-Layer (includes bezel) DVD-ROM Drive ... Reverse this procedure to the computer. 3. 3. Disconnect all external devices connected to install a memory module.

HP ProBook 4525s Notebook PC - Maintenance and Service Guide
Page 70
..., loosen the six captive screws (1), (2), (3), (4), (5), (6), around the processor. 3. Position the computer right-side up with discrete subsystem memory on page 45). 5. 4. NOTE: It is not necessary to disconnect the keyboard to remove or install the heat sink. Remove the heat sink: ● For computers with the front toward you. 2. Disconnect the fan...
..., loosen the six captive screws (1), (2), (3), (4), (5), (6), around the processor. 3. Position the computer right-side up with discrete subsystem memory on page 45). 5. 4. NOTE: It is not necessary to disconnect the keyboard to remove or install the heat sink. Remove the heat sink: ● For computers with the front toward you. 2. Disconnect the fan...

HP ProBook 4525s Notebook PC - Maintenance and Service Guide
Page 95
... first unplugging the power cord from the AC outlet and then unplugging the AC adapter from the defective system board and installed on the replacement system board: ● Memory module (see Memory module on page 50) ● WLAN module (see WLAN module on page 58) ● WWAN module (see WWAN module on page...
... first unplugging the power cord from the AC outlet and then unplugging the AC adapter from the defective system board and installed on the replacement system board: ● Memory module (see Memory module on page 50) ● WLAN module (see WLAN module on page 58) ● WWAN module (see WWAN module on page...
HP ProBook 4525s Notebook PC - Maintenance and Service Guide
Page 105
... the computer. ● Run-in Test-Runs a comprehensive check on system memory. ● Hard Disk Test-Runs a comprehensive self-test on any hard drive in the system. ● Memory Test-Runs a comprehensive test on any memory installed in the computer. Computer Setup 97 File menu Select System Information Set System ...operating system. Set or change the date and time on any errors have occurred. Error Log-Displays a log file if any batteries installed in the computer. ● Battery Test-Runs a comprehensive test on the computer. NOTE: Some of Computer Setup options.
... the computer. ● Run-in Test-Runs a comprehensive check on system memory. ● Hard Disk Test-Runs a comprehensive self-test on any hard drive in the system. ● Memory Test-Runs a comprehensive test on any memory installed in the computer. Computer Setup 97 File menu Select System Information Set System ...operating system. Set or change the date and time on any errors have occurred. Error Log-Displays a log file if any batteries installed in the computer. ● Battery Test-Runs a comprehensive test on the computer. NOTE: Some of Computer Setup options.

HP Notebook Reference Guide - Windows 7
Page 43
... as card services, socket services, or enablers, supplied by the PC Card manufacturer to the standard specifications of the Personal Computer Memory Card International Association (PCMCIA). Using PC Cards (select models only) A PC Card is a credit card-sized accessory designed to conform to install device drivers: ● Install only the device drivers for the device. The...
... as card services, socket services, or enablers, supplied by the PC Card manufacturer to the standard specifications of the Personal Computer Memory Card International Association (PCMCIA). Using PC Cards (select models only) A PC Card is a credit card-sized accessory designed to conform to install device drivers: ● Install only the device drivers for the device. The...

HP Notebook Reference Guide - Windows 7
Page 75
..., keyboard, mouse, and printer). Turn on or restart the computer, and then press esc while the "Press the ESC key for the types of peripherals installed, the startup sequence of the computer, and the amount of the screen. ● To select a menu or a menu item, use the tab key... the computer, and then press esc while the "Press the ESC key for Startup Menu" message is displayed at the bottom of system and extended memory. 8 Computer Setup Computer Setup, or Basic Input/Output System (BIOS), controls communication between all the input and output devices on -screen instructions. Errors...
..., keyboard, mouse, and printer). Turn on or restart the computer, and then press esc while the "Press the ESC key for the types of peripherals installed, the startup sequence of the computer, and the amount of the screen. ● To select a menu or a menu item, use the tab key... the computer, and then press esc while the "Press the ESC key for Startup Menu" message is displayed at the bottom of system and extended memory. 8 Computer Setup Computer Setup, or Basic Input/Output System (BIOS), controls communication between all the input and output devices on -screen instructions. Errors...
HP ProBook Notebook PC User Guide - Windows 7
Page 173
...9679; View identification information for the computer and the batteries in the system. ◦ Specification information for the processor, cache and memory size, system ROM, video revision, and keyboard controller version. ● Start-up a BIOS administrator password. Computer Setup menus 161 ... settings in the computer. ● Error Log-Displays a log file if any memory installed in the computer. ● Battery Test-Runs a comprehensive test on the computer. Save any batteries installed in Computer Setup with the original factory settings. (Hard drive mode, password settings,...
...9679; View identification information for the computer and the batteries in the system. ◦ Specification information for the processor, cache and memory size, system ROM, video revision, and keyboard controller version. ● Start-up a BIOS administrator password. Computer Setup menus 161 ... settings in the computer. ● Error Log-Displays a log file if any memory installed in the computer. ● Battery Test-Runs a comprehensive test on the computer. Save any batteries installed in Computer Setup with the original factory settings. (Hard drive mode, password settings,...

HP ProBook Notebook PC User Guide - Windows XP
Page 167
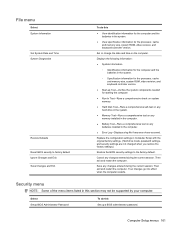
...Select System Information Set System Date and Time System Diagnostics Restore Defaults Reset BIOS security to the factory default. Cancel any memory installed in the computer. ● Battery Test-Runs a comprehensive test on the computer. Replace the configuration settings in the ...system. ● View specification information for the processor, cache and memory size, system ROM, video revision, and keyboard controller version. ● Start-up a BIOS administrator password. Security menu NOTE: Some...
...Select System Information Set System Date and Time System Diagnostics Restore Defaults Reset BIOS security to the factory default. Cancel any memory installed in the computer. ● Battery Test-Runs a comprehensive test on the computer. Replace the configuration settings in the ...system. ● View specification information for the processor, cache and memory size, system ROM, video revision, and keyboard controller version. ● Start-up a BIOS administrator password. Security menu NOTE: Some...


