Getting Started - Windows 7
Page 5
Table of contents 1 Welcome ...1 What's new? ...1 Finding information ...1 2 Getting to know your computer ...3 Top ...3 Top cover ...3 TouchPad ...4 Lights ...5 Power button ...6 Keys ...7 Front ...8 Right side ...9 Left side ...10 Display ...11 Bottom ...12 3 Networking ...13 Using an Internet service provider (ISP 13 Connecting to a ... Identifying the hotkeys ...16 Using keypads ...17 Using an optional external numeric keypad 17 Using pointing devices ...18 Setting pointing device preferences 18 Using the TouchPad ...18 Turning the TouchPad on and off 18 Navigating ...18 Selecting ...19 v
Table of contents 1 Welcome ...1 What's new? ...1 Finding information ...1 2 Getting to know your computer ...3 Top ...3 Top cover ...3 TouchPad ...4 Lights ...5 Power button ...6 Keys ...7 Front ...8 Right side ...9 Left side ...10 Display ...11 Bottom ...12 3 Networking ...13 Using an Internet service provider (ISP 13 Connecting to a ... Identifying the hotkeys ...16 Using keypads ...17 Using an optional external numeric keypad 17 Using pointing devices ...18 Setting pointing device preferences 18 Using the TouchPad ...18 Turning the TouchPad on and off 18 Navigating ...18 Selecting ...19 v
Getting Started - Windows 7
Page 6
... care ...27 Cleaning guidelines ...27 Cleaning products 27 Cleaning procedures 27 Cleaning the display 27 Cleaning the sides and cover 28 Cleaning the TouchPad and keyboard 28 Cleaning a tablet PC pen and pen holder 28 6 Backup and recovery ...29 Backing up your information ...29 Performing a recovery ...30 Using the Windows recovery tools...
... care ...27 Cleaning guidelines ...27 Cleaning products 27 Cleaning procedures 27 Cleaning the display 27 Cleaning the sides and cover 28 Cleaning the TouchPad and keyboard 28 Cleaning a tablet PC pen and pen holder 28 6 Backup and recovery ...29 Backing up your information ...29 Performing a recovery ...30 Using the Windows recovery tools...
Getting Started - Windows 7
Page 10
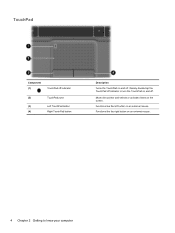
Quickly double-tap the TouchPad off indicator to know your computer Functions like the right button on an external mouse. 4 Chapter 2 Getting to turn the TouchPad on and off . Functions like the left button on an external mouse. TouchPad Component (1) TouchPad off indicator (2) TouchPad zone (3) Left TouchPad button (4) Right TouchPad button Description Turns the TouchPad on and off . Moves the pointer and selects or activates items on the screen.
Quickly double-tap the TouchPad off indicator to know your computer Functions like the right button on an external mouse. 4 Chapter 2 Getting to turn the TouchPad on and off . Functions like the left button on an external mouse. TouchPad Component (1) TouchPad off indicator (2) TouchPad zone (3) Left TouchPad button (4) Right TouchPad button Description Turns the TouchPad on and off . Moves the pointer and selects or activates items on the screen.

Getting Started - Windows 7
Page 11
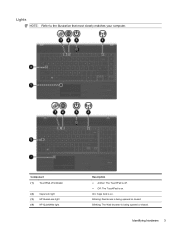
... indicator (2) Caps lock light (3) Power light (4) Mute light (5) Wireless light Description ● On: The TouchPad is off. ● Off: The TouchPad is on. ● On: Caps lock is on. ● Off: Caps lock is off. ● On: The computer is on. ● Blinking: The computer is ...
... indicator (2) Caps lock light (3) Power light (4) Mute light (5) Wireless light Description ● On: The TouchPad is off. ● Off: The TouchPad is on. ● On: Caps lock is on. ● Off: Caps lock is off. ● On: The computer is on. ● Blinking: The computer is ...
Getting Started - Windows 7
Page 24
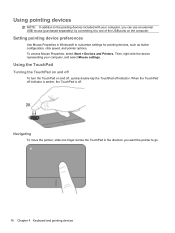
...Navigating To move the pointer, slide one of the USB ports on and off, quickly double-tap the TouchPad off . Using the TouchPad Turning the TouchPad on and off To turn the TouchPad on the computer. Then, right-click the device representing your computer, you can use an external USB... mouse (purchased separately) by connecting it to one finger across the TouchPad in Windows® to go. 18 Chapter 4 Keyboard and pointing devices When the TouchPad off indicator is amber, the TouchPad is off indicator. Setting pointing device preferences Use Mouse Properties in the direction...
...Navigating To move the pointer, slide one of the USB ports on and off, quickly double-tap the TouchPad off . Using the TouchPad Turning the TouchPad on and off To turn the TouchPad on the computer. Then, right-click the device representing your computer, you can use an external USB... mouse (purchased separately) by connecting it to one finger across the TouchPad in Windows® to go. 18 Chapter 4 Keyboard and pointing devices When the TouchPad off indicator is amber, the TouchPad is off indicator. Setting pointing device preferences Use Mouse Properties in the direction...

Getting Started - Windows 7
Page 25
Using pointing devices 19 Selecting Use the left and right TouchPad buttons like the corresponding buttons on an external mouse.
Using pointing devices 19 Selecting Use the left and right TouchPad buttons like the corresponding buttons on an external mouse.
Getting Started - Windows 7
Page 34
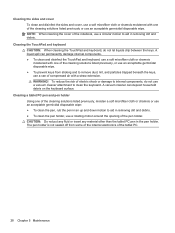
NOTE: When cleaning the cover of the notebook, use a circular motion to remove dust, lint, and particles trapped beneath the keys, use a can of compressed air with a straw extension. Cleaning the TouchPad and keyboard CAUTION: When cleaning the TouchPad and keyboard, do not use a vacuum cleaner attachment... previously, or use an acceptable germicidal disposable wipe. ● To prevent keys from some of the internal electronics of the tablet PC. 28 Chapter 5 Maintenance To reduce the risk of electric shock or damage to internal components, do not let liquids drip between the...
NOTE: When cleaning the cover of the notebook, use a circular motion to remove dust, lint, and particles trapped beneath the keys, use a can of compressed air with a straw extension. Cleaning the TouchPad and keyboard CAUTION: When cleaning the TouchPad and keyboard, do not use a vacuum cleaner attachment... previously, or use an acceptable germicidal disposable wipe. ● To prevent keys from some of the internal electronics of the tablet PC. 28 Chapter 5 Maintenance To reduce the risk of electric shock or damage to internal components, do not let liquids drip between the...
Getting Started - Windows 7
Page 41
... lock light, identifying 5 Certificate of Authenticity label 33 cleaning display 27 keyboard 28 pen holder 28 tablet PC pen 28 TouchPad 28 cleaning guidelines 27 cleaning procedures 27 cleaning products 27 components bottom 12 display 11 front 8 left side 10 right side 9 top 3 computer handle, identifying ... number 32 wireless certification 33 WLAN 33 latches battery locking 12 battery release 12 lights battery 10 caps lock 5 mute 5 network activity 9 network connection 9 power 5 TouchPad off indicator 5 webcam 11 wireless 5 M media controls, keys 16 memory module inserting 25 Index 35
... lock light, identifying 5 Certificate of Authenticity label 33 cleaning display 27 keyboard 28 pen holder 28 tablet PC pen 28 TouchPad 28 cleaning guidelines 27 cleaning procedures 27 cleaning products 27 components bottom 12 display 11 front 8 left side 10 right side 9 top 3 computer handle, identifying ... number 32 wireless certification 33 WLAN 33 latches battery locking 12 battery release 12 lights battery 10 caps lock 5 mute 5 network activity 9 network connection 9 power 5 TouchPad off indicator 5 webcam 11 wireless 5 M media controls, keys 16 memory module inserting 25 Index 35
Getting Started - Windows 7
Page 42
... number, computer 32 service access cover identifying 12 removing 21 replacing 26 setup of WLAN 14 slots security cable 9 speaker, identifying 8 T TouchPad buttons 4 cleaning 28 using 18 TouchPad off indicator, identifying 4 TouchPad zone, identifying 4 traveling with the computer 33 U USB port, identifying 9, 10 V vents, identifying 8, 10, 12 volume keys, identifying 17 W webcam light...
... number, computer 32 service access cover identifying 12 removing 21 replacing 26 setup of WLAN 14 slots security cable 9 speaker, identifying 8 T TouchPad buttons 4 cleaning 28 using 18 TouchPad off indicator, identifying 4 TouchPad zone, identifying 4 traveling with the computer 33 U USB port, identifying 9, 10 V vents, identifying 8, 10, 12 volume keys, identifying 17 W webcam light...

Getting Started - Windows Vista
Page 15
... fluids, or chemicals on the keyboard surface. If the screen requires additional cleaning, use the computer. Getting Started 11 Cleaning the TouchPad and keyboard Dirt and grease on the TouchPad can deposit household debris on the display. Refer to blow air around on your hands frequently when using the computer. Å WARNING... prevent keys from sticking and to remove dust, lint, and particles that can be used to "Quick troubleshooting," the next section in this , clean the TouchPad with a soft, damp, lint-free cloth.
... fluids, or chemicals on the keyboard surface. If the screen requires additional cleaning, use the computer. Getting Started 11 Cleaning the TouchPad and keyboard Dirt and grease on the TouchPad can deposit household debris on the display. Refer to blow air around on your hands frequently when using the computer. Å WARNING... prevent keys from sticking and to remove dust, lint, and particles that can be used to "Quick troubleshooting," the next section in this , clean the TouchPad with a soft, damp, lint-free cloth.
HP ProBook Notebook PC User Guide - Windows Vista
Page 5
Table of contents 1 Features ...1 Identifying hardware ...1 Top components ...1 TouchPad ...1 Lights ...3 Buttons, speakers, switches, and fingerprint reader (select models only 4 Keys ...6 Front components ...7 Right-side components ...8 Left-side components ...9 Bottom components ...... 18 Using a WLAN ...19 Setting up a WLAN ...19 Protecting your WLAN ...19 Connecting to a WLAN ...21 Roaming to another network 21 Using HP Mobile Broadband (select models only 22 Inserting a SIM ...22 Removing a SIM ...23 Using Bluetooth wireless devices (select models only 25 Bluetooth and Internet ...
Table of contents 1 Features ...1 Identifying hardware ...1 Top components ...1 TouchPad ...1 Lights ...3 Buttons, speakers, switches, and fingerprint reader (select models only 4 Keys ...6 Front components ...7 Right-side components ...8 Left-side components ...9 Bottom components ...... 18 Using a WLAN ...19 Setting up a WLAN ...19 Protecting your WLAN ...19 Connecting to a WLAN ...21 Roaming to another network 21 Using HP Mobile Broadband (select models only 22 Inserting a SIM ...22 Removing a SIM ...23 Using Bluetooth wireless devices (select models only 25 Bluetooth and Internet ...

HP ProBook Notebook PC User Guide - Windows Vista
Page 6
... network (LAN 33 3 Pointing devices and keyboard ...34 Using pointing devices ...34 Setting pointing device preferences 34 Using the TouchPad ...34 Turning the TouchPad on and off 34 Navigating ...34 Selecting ...35 Using TouchPad gestures 36 Scrolling 36 Pinching/Zooming 36 Rotating 37 Three-finger flick 37 Connecting an external mouse 38 Using...
... network (LAN 33 3 Pointing devices and keyboard ...34 Using pointing devices ...34 Setting pointing device preferences 34 Using the TouchPad ...34 Turning the TouchPad on and off 34 Navigating ...34 Selecting ...35 Using TouchPad gestures 36 Scrolling 36 Pinching/Zooming 36 Rotating 37 Three-finger flick 37 Connecting an external mouse 38 Using...
HP ProBook Notebook PC User Guide - Windows Vista
Page 7
... and disabling the embedded numeric keypad 44 Switching key functions on the embedded numeric keypad 44 Using an optional external numeric keypad 45 Cleaning the TouchPad and keyboard 46 4 Multimedia ...47 Multimedia features ...47 Identifying your multimedia components 47 Adjusting the volume ...48 Multimedia software ...49 Opening preinstalled multimedia software 50...
... and disabling the embedded numeric keypad 44 Switching key functions on the embedded numeric keypad 44 Using an optional external numeric keypad 45 Cleaning the TouchPad and keyboard 46 4 Multimedia ...47 Multimedia features ...47 Identifying your multimedia components 47 Adjusting the volume ...48 Multimedia software ...49 Opening preinstalled multimedia software 50...

HP ProBook Notebook PC User Guide - Windows Vista
Page 13
... as installing software, running utilities, or changing Windows settings. Refer to improve the security of hardware installed in the computer, follow these steps: 1. Top components TouchPad Identifying hardware 1 You may be prompted for more information. NOTE: Windows® includes the User Account Control feature to Windows Help and Support for your...
... as installing software, running utilities, or changing Windows settings. Refer to improve the security of hardware installed in the computer, follow these steps: 1. Top components TouchPad Identifying hardware 1 You may be prompted for more information. NOTE: Windows® includes the User Account Control feature to Windows Help and Support for your...

HP ProBook Notebook PC User Guide - Windows Vista
Page 14
... device preferences, select Start > Control Panel > Hardware and Sound > Mouse. 2 Chapter 1 Features Component Description (1) TouchPad off indicator. NOTE: When the TouchPad zone is active, the light is off. (2) TouchPad zone* Moves the pointer and selects or activates items on the screen. (3) Left TouchPad button* Functions like the left button on an external mouse. (4) Right...
... device preferences, select Start > Control Panel > Hardware and Sound > Mouse. 2 Chapter 1 Features Component Description (1) TouchPad off indicator. NOTE: When the TouchPad zone is active, the light is off. (2) TouchPad zone* Moves the pointer and selects or activates items on the screen. (3) Left TouchPad button* Functions like the left button on an external mouse. (4) Right...
HP ProBook Notebook PC User Guide - Windows Vista
Page 15
Lights NOTE: Refer to the illustration that most closely matches your computer. Blinking: The Web browser is being opened or closed . Blinking: QuickLook is being opened or closed . Component (1) TouchPad off indicator (2) Caps lock light (3) HP QuickLook light (4) HP QuickWeb light Description ● Amber: The TouchPad is off. ● Off: The TouchPad is on . Identifying hardware 3 On: Caps lock is on .
Lights NOTE: Refer to the illustration that most closely matches your computer. Blinking: The Web browser is being opened or closed . Blinking: QuickLook is being opened or closed . Component (1) TouchPad off indicator (2) Caps lock light (3) HP QuickLook light (4) HP QuickWeb light Description ● Amber: The TouchPad is off. ● Off: The TouchPad is on . Identifying hardware 3 On: Caps lock is on .

HP ProBook Notebook PC User Guide - Windows Vista
Page 46
... off indicator. To scroll up or down using the TouchPad, touch and slide your finger across the TouchPad in Windows to go. Using the TouchPad Turning the TouchPad on and off, quickly double-tap the TouchPad off . When the TouchPad zone is active, the light is turned on an external mouse.... Navigating To move the pointer, touch and slide your finger up and down over the TouchPad. 34 Chapter 3 Pointing devices and keyboard 3 Pointing devices and keyboard Using pointing devices Setting pointing device preferences Use Mouse Properties in the...
... off indicator. To scroll up or down using the TouchPad, touch and slide your finger across the TouchPad in Windows to go. Using the TouchPad Turning the TouchPad on and off, quickly double-tap the TouchPad off . When the TouchPad zone is active, the light is turned on an external mouse.... Navigating To move the pointer, touch and slide your finger up and down over the TouchPad. 34 Chapter 3 Pointing devices and keyboard 3 Pointing devices and keyboard Using pointing devices Setting pointing device preferences Use Mouse Properties in the...

HP ProBook Notebook PC User Guide - Windows Vista
Page 47
NOTE: If you are using the TouchPad to move the pointer, and then want to scroll, you must lift your finger off the TouchPad before starting to scroll. Using pointing devices 35 Selecting Use the left and right TouchPad buttons like the corresponding buttons on an external mouse.
NOTE: If you are using the TouchPad to move the pointer, and then want to scroll, you must lift your finger off the TouchPad before starting to scroll. Using pointing devices 35 Selecting Use the left and right TouchPad buttons like the corresponding buttons on an external mouse.

HP ProBook Notebook PC User Guide - Windows Vista
Page 48
...the same time as PDFs, images, and photos. 36 Chapter 3 Pointing devices and keyboard Click Apply, and then click OK. Using TouchPad gestures The TouchPad supports a variety of the taskbar, and then click the Device Settings tab. 2. To view and enable these gestures: 1. NOTE: ... can scroll and pinch anywhere on the Synaptics icon in the notification area, at the far right of TouchPad gestures. Double-click on the TouchPad. NOTE: Your computer also supports additional TouchPad features that you to disable or reenable. 4. NOTE: Scrolling speed is useful for moving up , down...
...the same time as PDFs, images, and photos. 36 Chapter 3 Pointing devices and keyboard Click Apply, and then click OK. Using TouchPad gestures The TouchPad supports a variety of the taskbar, and then click the Device Settings tab. 2. To view and enable these gestures: 1. NOTE: ... can scroll and pinch anywhere on the Synaptics icon in the notification area, at the far right of TouchPad gestures. Double-click on the TouchPad. NOTE: Your computer also supports additional TouchPad features that you to disable or reenable. 4. NOTE: Scrolling speed is useful for moving up , down...

HP ProBook Notebook PC User Guide - Windows Vista
Page 49
...in a sweeping motion, moving them together to three o'clock. NOTE: Rotating must be done within the TouchPad zone. To reverse the rotation, move your left forefinger in by placing two fingers together on the TouchPad, and then moving them apart to gradually increase the object's size. ● Zoom out by placing ...two fingers apart on the TouchPad, and then moving from three o'clock to twelve o'clock. Rotating Rotating allows you to rotate items such as photos and pages. Three-finger flick ...
...in a sweeping motion, moving them together to three o'clock. NOTE: Rotating must be done within the TouchPad zone. To reverse the rotation, move your left forefinger in by placing two fingers together on the TouchPad, and then moving them apart to gradually increase the object's size. ● Zoom out by placing ...two fingers apart on the TouchPad, and then moving from three o'clock to twelve o'clock. Rotating Rotating allows you to rotate items such as photos and pages. Three-finger flick ...


