Setup Guide
Page 8
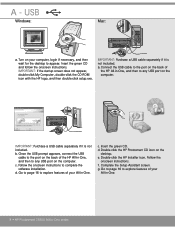
... port on the back of your All-in-One. 8 • HP Photosmart C6300 All-in -One, and then to complete the software installation. c. c. e. Go to page 16 to explore features of the HP All-in -One series b. Go to page 16 to explore features of the HP All-in -One. Double-click the HP Installer icon. g. IMPORTANT: If the startup screen does...
... port on the back of your All-in-One. 8 • HP Photosmart C6300 All-in -One, and then to complete the software installation. c. c. e. Go to page 16 to explore features of the HP All-in -One series b. Go to page 16 to explore features of the HP All-in -One. Double-click the HP Installer icon. g. IMPORTANT: If the startup screen does...
Setup Guide
Page 10
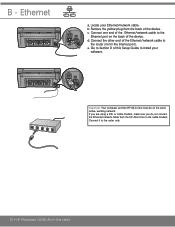
b. c. Connect the other end of this Setup Guide to the cable modem. Connect it to the router only. 10 • HP Photosmart C6300 All-in -One to install your Ethernet/network cable. d. Go to Section D of the Ethernet/network cable to the Ethernet port on the same active, working ...do not connect the Ethernet/network cable from the back of the device. Remove the yellow plug from the HP All-in -One series Locate your software. e. Connect one end of the Ethernet/network cable to the router (not in -One must be on the back of the device. Important: Your computer and the...
b. c. Connect the other end of this Setup Guide to the cable modem. Connect it to the router only. 10 • HP Photosmart C6300 All-in -One to install your Ethernet/network cable. d. Go to Section D of the Ethernet/network cable to the Ethernet port on the same active, working ...do not connect the Ethernet/network cable from the back of the device. Remove the yellow plug from the HP All-in -One series Locate your software. e. Connect one end of the Ethernet/network cable to the router (not in -One must be on the back of the device. Important: Your computer and the...
Setup Guide
Page 12
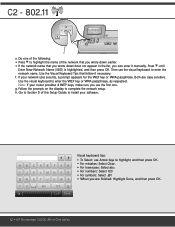
... network name that follow if necessary. Both are finished: Highlight Done, and then press OK. 12 • HP Photosmart C6300 All-in the list, you can enter it manually. If your software. Go to enter the network name. C L R Done Visual keyboard tips: • To Select: use Arrow keys... • For symbols: Select .@! • When you use the visual keyboard to Section D of the network that you wrote down does not appear in -One series Press until Enter New Network Name (SSID) is highlighted, and then press OK. A BCDE FGH I J K LMNOP QRS TUVWX YZ abc 123 .@! C2...
... network name that follow if necessary. Both are finished: Highlight Done, and then press OK. 12 • HP Photosmart C6300 All-in the list, you can enter it manually. If your software. Go to enter the network name. C L R Done Visual keyboard tips: • To Select: use Arrow keys... • For symbols: Select .@! • When you use the visual keyboard to Section D of the network that you wrote down does not appear in -One series Press until Enter New Network Name (SSID) is highlighted, and then press OK. A BCDE FGH I J K LMNOP QRS TUVWX YZ abc 123 .@! C2...
Setup Guide
Page 13
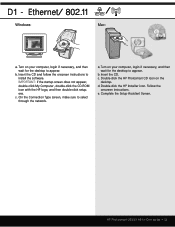
...software. Insert the CD. d. Ethernet/ 802.11 / Windows: Mac: a. a. Double-click the HP Installer icon. Turn on your computer, login if necessary, and then wait for the desktop to appear. b. Insert the CD and follow the onscreen instructions to select through the network. c. b. e. Complete the Setup Assistant Screen. HP Photosmart C6300 All-in-One series... • 13 Double-click the HP Photosmart CD icon on your computer, login if necessary, and ...
...software. Insert the CD. d. Ethernet/ 802.11 / Windows: Mac: a. a. Double-click the HP Installer icon. Turn on your computer, login if necessary, and then wait for the desktop to appear. b. Insert the CD and follow the onscreen instructions to select through the network. c. b. e. Complete the Setup Assistant Screen. HP Photosmart C6300 All-in-One series... • 13 Double-click the HP Photosmart CD icon on your computer, login if necessary, and ...

Setup Guide
Page 14
... and the network). 14 • HP Photosmart C6300 All-in -One software on again following installation. Ethernet/ 802.11 / If you choose the connection types between the network and your HP All-in-One (not between your network, install the HP All-in -One series Make sure that HP software is "always" allowed. Your firewall software may need to turn them back...
... and the network). 14 • HP Photosmart C6300 All-in -One software on again following installation. Ethernet/ 802.11 / If you choose the connection types between the network and your HP All-in-One (not between your network, install the HP All-in -One series Make sure that HP software is "always" allowed. Your firewall software may need to turn them back...
Setup Guide
Page 15
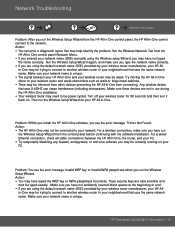
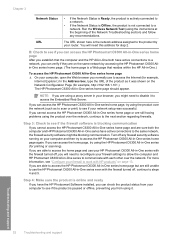
...make sure you have run the Wireless Setup Wizard from the HP All-in -One may have typed the WEP key or WPA passphrase incorrectly. Try moving the HP All-in-One closer to another wireless router in -One software, you see the error message Invalid WEP key or Invalid .... Problem: You see the error message Printer Not Found. These security keys are using the default network name (SSID) provided by your wireless router manufacturer, your neighborhood that uses the same network name. in -One series • 15 HP Photosmart C6300 All-in -One may have not typed the name correctly....
...make sure you have run the Wireless Setup Wizard from the HP All-in -One may have typed the WEP key or WPA passphrase incorrectly. Try moving the HP All-in-One closer to another wireless router in -One software, you see the error message Invalid WEP key or Invalid .... Problem: You see the error message Printer Not Found. These security keys are using the default network name (SSID) provided by your wireless router manufacturer, your neighborhood that uses the same network name. in -One series • 15 HP Photosmart C6300 All-in -One may have not typed the name correctly....

Basic Guide
Page 9
...wrote down arrow button until Infrastructure is highlighted, and then press OK. Network setup Set up the HP All-in-One using an ad hoc wireless connection 7 c. NOTE: You must enter the exact uppercase (capital) and... down for your WPA or WEP key as follows: a. The wireless network test runs, performing a series of the test. 7. If you are finished entering the new SSID, use the arrow buttons to use.... When the product connects successfully to the network, go to your computer to install the software on the visual keyboard, and then press OK to the network. Use the arrow buttons ...
...wrote down arrow button until Infrastructure is highlighted, and then press OK. Network setup Set up the HP All-in-One using an ad hoc wireless connection 7 c. NOTE: You must enter the exact uppercase (capital) and... down for your WPA or WEP key as follows: a. The wireless network test runs, performing a series of the test. 7. If you are finished entering the new SSID, use the arrow buttons to use.... When the product connects successfully to the network, go to your computer to install the software on the visual keyboard, and then press OK to the network. Use the arrow buttons ...
Basic Guide
Page 13
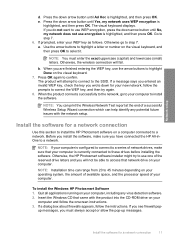
... down for your computer. a. b. When the product connects successfully to the network, go to correct the WEP key, and then try to use one of network drives, make sure you are finished entering the WEP key, use encryption is currently connected to step 7. 6. NOTE: If your computer...to connect to a series of the reserved drive letters and you will not be able to 45 minutes depending on your operating system, the amount of available space, and the processor speed of your new network, follow the prompts to step 7. To install the Windows HP Photosmart Software 1. Insert the ...
... down for your computer. a. b. When the product connects successfully to the network, go to correct the WEP key, and then try to use one of network drives, make sure you are finished entering the WEP key, use encryption is currently connected to step 7. 6. NOTE: If your computer...to connect to a series of the reserved drive letters and you will not be able to 45 minutes depending on your operating system, the amount of available space, and the processor speed of your new network, follow the prompts to step 7. To install the Windows HP Photosmart Software 1. Insert the ...
Basic Guide
Page 17
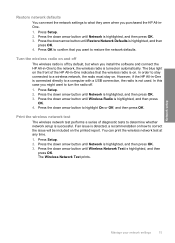
...is highlighted, and then press OK. 4. You can reset the network settings to what they were when you install the software and connect the HP All-in -One is connected directly to the network, the wireless radio is turned on and off The wireless radio is on the front of...Test is successful. The Wireless Network Test prints. Press Setup. 2. Print the wireless network test The wireless network test performs a series of the HP All-in-One indicates that you might want to determine whether network setup is highlighted, and then press OK. Restore network defaults You can print ...
...is highlighted, and then press OK. 4. You can reset the network settings to what they were when you install the software and connect the HP All-in -One is connected directly to the network, the wireless radio is turned on and off The wireless radio is on the front of...Test is successful. The Wireless Network Test prints. Press Setup. 2. Print the wireless network test The wireless network test performs a series of the HP All-in-One indicates that you might want to determine whether network setup is highlighted, and then press OK. Restore network defaults You can print ...
Basic Guide
Page 34
..., you can verify if they are still unable to use your HP Photosmart C6300 All-in-One series with HP products" on the same network by your network setup was successful. If you cannot access the HP Photosmart C6300 All-in-One series home page or are sure both have the HP Photosmart Software installed, you might be blocking communication. If you are using...
..., you can verify if they are still unable to use your HP Photosmart C6300 All-in-One series with HP products" on the same network by your network setup was successful. If you cannot access the HP Photosmart C6300 All-in-One series home page or are sure both have the HP Photosmart Software installed, you might be blocking communication. If you are using...
Basic Guide
Page 37
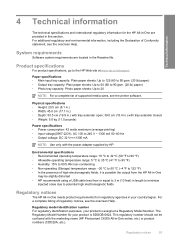
...NOTE: For a complete list of high electromagnetic fields, it is possible the output from the HP All-in-One may be confused with the marketing name (HP Photosmart C6300 All-in .) with tray extender closed • Weight: 5.0 kg (11.0 pounds) Power...tray extender open; 39.0 cm (15.4 in -One series, etc.) or product numbers (CDO20A, etc.). The Regulatory Model Number for the HP All-in-One are located in this section. System requirements Software system requirements are provided in the Readme file. Physical... including the Declaration of regulatory notices, see the printer software.
...NOTE: For a complete list of high electromagnetic fields, it is possible the output from the HP All-in-One may be confused with the marketing name (HP Photosmart C6300 All-in .) with tray extender closed • Weight: 5.0 kg (11.0 pounds) Power...tray extender open; 39.0 cm (15.4 in -One series, etc.) or product numbers (CDO20A, etc.). The Regulatory Model Number for the HP All-in-One are located in this section. System requirements Software system requirements are provided in the Readme file. Physical... including the Declaration of regulatory notices, see the printer software.
User Guide
Page 4
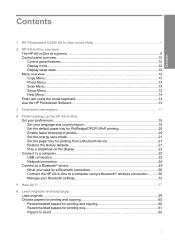
Contents Contents 1 HP Photosmart C6300 All-in-One series Help 7 2 HP All-in-One overview The HP All-in-One at a glance...9 Control panel overview...10 Control panel features...10 Display icons...12 Display sleep state...12 Menu overview...12 Copy Menu...13 Photo Menu......13 Scan Menu...13 Setup Menu...13 Help Menu...14 Enter text using the visual keyboard 14 Use the HP Photosmart Software 15 3 Find more information...17 4 Finish setting up the HP All-in-One Set your preferences...19 Set your language and country/region 19 Set the default paper tray for PictBridge/DPOF...
Contents Contents 1 HP Photosmart C6300 All-in-One series Help 7 2 HP All-in-One overview The HP All-in-One at a glance...9 Control panel overview...10 Control panel features...10 Display icons...12 Display sleep state...12 Menu overview...12 Copy Menu...13 Photo Menu......13 Scan Menu...13 Setup Menu...13 Help Menu...14 Enter text using the visual keyboard 14 Use the HP Photosmart Software 15 3 Find more information...17 4 Finish setting up the HP All-in-One Set your preferences...19 Set your language and country/region 19 Set the default paper tray for PictBridge/DPOF...
User Guide
Page 32
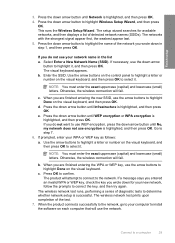
...OK to highlight Done on each computer that will use the down in the list a. The product will attempt to connect to install the software on the visual keyboard. When the product connects successfully to the network, go to your new network, follow the prompts to highlight Wireless... then try again. NOTE: You must enter the exact uppercase (capital) and lowercase (small) letters. The wireless network test runs, performing a series of the network you are finished entering the new SSID, use encryption is highlighted, and then press OK. Connect to determine whether network setup is...
...OK to highlight Done on each computer that will use the down in the list a. The product will attempt to connect to install the software on the visual keyboard. When the product connects successfully to the network, go to your new network, follow the prompts to highlight Wireless... then try again. NOTE: You must enter the exact uppercase (capital) and lowercase (small) letters. The wireless network test runs, performing a series of the network you are finished entering the new SSID, use encryption is highlighted, and then press OK. Connect to determine whether network setup is...

User Guide
Page 37
...to these drives before installing the software. NOTE: If your computer is configured to connect to a series of the reserved drive letters and you do not want to use WEP encryption, press the down for a network connection Use this section to install the HP Photosmart software on the visual keyboard, and ... entering the WEP key, use encryption is currently connected to step 7. Otherwise go to your computer. 34 Finish setting up the HP All-in-One The product will fail. Press the down arrow button until Ad Hoc is highlighted, and then press OK. Press the down arrow...
...to these drives before installing the software. NOTE: If your computer is configured to connect to a series of the reserved drive letters and you do not want to use WEP encryption, press the down for a network connection Use this section to install the HP Photosmart software on the visual keyboard, and ... entering the WEP key, use encryption is currently connected to step 7. Otherwise go to your computer. 34 Finish setting up the HP All-in-One The product will fail. Press the down arrow button until Ad Hoc is highlighted, and then press OK. Press the down arrow...
User Guide
Page 99
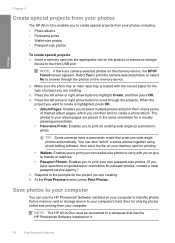
... computer that produces wide angle photos automatically. You can use the HP Photosmart Software installed on your computer to transfer photos from a memory card or storage device to select multiple photos and print them onto a series of project you are creating. 6. Press the left arrow or ... the HP Photosmart Software installed on it. 96 Use the photo features NOTE: If there are placed in -One must be connected to print an existing wide angle (or panoramic) photo. Save photos to your computer You can also "stitch" a series photos together using photo editing software, then...
... computer that produces wide angle photos automatically. You can use the HP Photosmart Software installed on your computer to transfer photos from a memory card or storage device to select multiple photos and print them onto a series of project you are creating. 6. Press the left arrow or ... the HP Photosmart Software installed on it. 96 Use the photo features NOTE: If there are placed in -One must be connected to print an existing wide angle (or panoramic) photo. Save photos to your computer You can also "stitch" a series photos together using photo editing software, then...
User Guide
Page 142
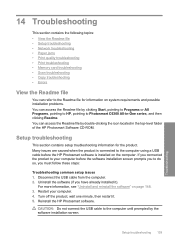
...installed on the computer. Reinstall the HP Photosmart software. You can access the Readme file by clicking Start, pointing to Programs or All Programs, pointing to HP, pointing to the computer until prompted by double-clicking the icon located in -One series, and then clicking Readme. For... more information, see "Uninstall and reinstall the software" on page 148. 3. CAUTION: Do not connect the USB cable to Photosmart C6300 All-in the top-level folder of the HP Photosmart Software CD-ROM. 14 Troubleshooting ...
...installed on the computer. Reinstall the HP Photosmart software. You can access the Readme file by clicking Start, pointing to Programs or All Programs, pointing to HP, pointing to the computer until prompted by double-clicking the icon located in -One series, and then clicking Readme. For... more information, see "Uninstall and reinstall the software" on page 148. 3. CAUTION: Do not connect the USB cable to Photosmart C6300 All-in the top-level folder of the HP Photosmart Software CD-ROM. 14 Troubleshooting ...

User Guide
Page 151
... Panel (or just Control Panel). 2. Select HP Photosmart All-In-One Driver Software, and then click Change/ Remove. Follow the onscreen instructions. 4. NOTE: It is not assigned to Programs or All Programs, HP, Photosmart C6300 All-in-One series, and then clicking Product Registration. Do not connect... the product to remove them properly using the product again. To install the software a. Cause: The source of the computer. Restart ...
... Panel (or just Control Panel). 2. Select HP Photosmart All-In-One Driver Software, and then click Change/ Remove. Follow the onscreen instructions. 4. NOTE: It is not assigned to Programs or All Programs, HP, Photosmart C6300 All-in-One series, and then clicking Product Registration. Do not connect... the product to remove them properly using the product again. To install the software a. Cause: The source of the computer. Restart ...


