Basics Guide
Page 3
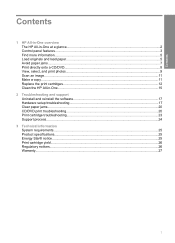
......5 Load originals and load paper...5 Avoid paper jams...7 Print directly onto a CD/DVD...8 View, select, and print photos...9 Scan an image...11 Make a copy...11 Replace the print cartridges...12 Clean the HP All-in-One...15 2 Troubleshooting and support Uninstall and reinstall the software... 17 Hardware setup troubleshooting 17 Clear paper jams...20 CD/DVD print troubleshooting 20 Print cartridge troubleshooting 23 Support process...24 3 ...
......5 Load originals and load paper...5 Avoid paper jams...7 Print directly onto a CD/DVD...8 View, select, and print photos...9 Scan an image...11 Make a copy...11 Replace the print cartridges...12 Clean the HP All-in-One...15 2 Troubleshooting and support Uninstall and reinstall the software... 17 Hardware setup troubleshooting 17 Clear paper jams...20 CD/DVD print troubleshooting 20 Print cartridge troubleshooting 23 Support process...24 3 ...
Basics Guide
Page 4
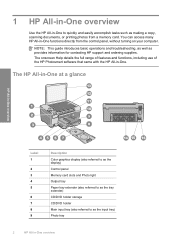
... range of features and functions, including use of the HP Photosmart software that came with the HP All-in-One. You can access many HP All-in-One functions directly from a memory card. 1 HP All-in-One overview Use the HP All-in-One to as making a copy, scanning documents, or printing photos from the control panel, without turning on your...
... range of features and functions, including use of the HP Photosmart software that came with the HP All-in-One. You can access many HP All-in-One functions directly from a memory card. 1 HP All-in-One overview Use the HP All-in-One to as making a copy, scanning documents, or printing photos from the control panel, without turning on your...
Basics Guide
Page 5
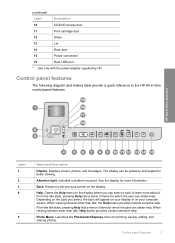
... a topic to learn more information. When viewing screens other than Idle, the Help button provides context sensitive help . Photo Menu: Launches the Photosmart Express menu for which the user can be pulled up and angled for more about it. Depending on the topic you can obtain help . ...Displays menus, photos, and messages. HP All-in -One control panel features. Help: Opens the Help menu on the display where you select, the topic will appear on your display or on the display. (continued) Label Description 10 CD/DVD access door 11 Print cartridge door 12 Glass 13 Lid 14...
... a topic to learn more information. When viewing screens other than Idle, the Help button provides context sensitive help . Photo Menu: Launches the Photosmart Express menu for which the user can be pulled up and angled for more about it. Depending on the topic you can obtain help . ...Displays menus, photos, and messages. HP All-in -One control panel features. Help: Opens the Help menu on the display where you select, the topic will appear on your display or on the display. (continued) Label Description 10 CD/DVD access door 11 Print cartridge door 12 Glass 13 Lid 14...
Basics Guide
Page 6
...-white copy. Setup: The Setup menu provides a variety of copies, paper size, and paper type. On: Turns the HP All-in -One off . Zoom out - (magnifying glass icon): Zooms out to print. If you are selected, a prompt appears asking if you want to the photo automatically. Red Eye Removal: Turns the ...feature On or Off. Copy Menu: Opens the Copy Menu where you can select a destination for 3 seconds. This will print any selected photo(s). To completely remove power, turn the HP All-in -One on or off , and then unplug the power cord. OK: Selects a menu setting, value, or photo on the ...
...-white copy. Setup: The Setup menu provides a variety of copies, paper size, and paper type. On: Turns the HP All-in -One off . Zoom out - (magnifying glass icon): Zooms out to print. If you are selected, a prompt appears asking if you want to the photo automatically. Red Eye Removal: Turns the ...feature On or Off. Copy Menu: Opens the Copy Menu where you can select a destination for 3 seconds. This will print any selected photo(s). To completely remove power, turn the HP All-in -One on or off , and then unplug the power cord. OK: Selects a menu setting, value, or photo on the ...
Basics Guide
Page 7
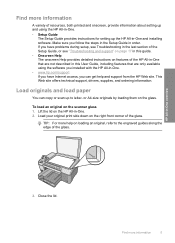
Find more information A variety of resources, both printed and onscreen, provide information about setting up and using the software you follow the steps in the Setup Guide in -One. 2. If you can copy or scan up the HP All-in-One and installing software. Load originals and load paper You can get help... on the scanner glass 1. Load your original print side down on the glass. Find more help and ...
Find more information A variety of resources, both printed and onscreen, provide information about setting up and using the software you follow the steps in the Setup Guide in -One. 2. If you can copy or scan up the HP All-in-One and installing software. Load originals and load paper You can get help... on the scanner glass 1. Load your original print side down on the glass. Find more help and ...
Basics Guide
Page 8
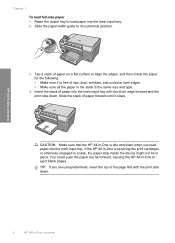
CAUTION: Make sure that the HP All-in-One is servicing the print cartridges or otherwise engaged in a task, the paper stop inside the device might not be in the stack is the same size and type. 4. TIP: ... push the paper too far forward, causing the HP All-in -One overview Chapter 1 To load full-size paper 1. HP All-in -One to eject blank pages. Insert the stack of the page first with the short edge forward and the print side down . 6 HP All-in -One is idle and silent when you are using letterhead...
CAUTION: Make sure that the HP All-in-One is servicing the print cartridges or otherwise engaged in a task, the paper stop inside the device might not be in the stack is the same size and type. 4. TIP: ... push the paper too far forward, causing the HP All-in -One overview Chapter 1 To load full-size paper 1. HP All-in -One to eject blank pages. Insert the stack of the page first with the short edge forward and the print side down . 6 HP All-in -One is idle and silent when you are using letterhead...
Basics Guide
Page 9
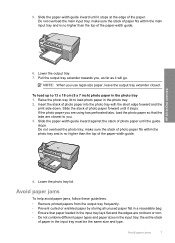
HP All-in the input tray must be the same size and type. Do not overload the photo tray; Avoid paper jams To help avoid paper jams, follow these guidelines. • Remove printed papers from the output tray frequently. • Prevent curled or wrinkled ... leave the output tray extender closed. Slide the stack of photo paper into the photo tray with the short edge forward and the print side down. Raise the photo tray lid to 13 x 18 cm (5 x 7 inch) photo paper in the photo tray. 2.... paper fits within the photo tray and is no higher than the top of paper in -One overview 6.
HP All-in the input tray must be the same size and type. Do not overload the photo tray; Avoid paper jams To help avoid paper jams, follow these guidelines. • Remove printed papers from the output tray frequently. • Prevent curled or wrinkled ... leave the output tray extender closed. Slide the stack of photo paper into the photo tray with the short edge forward and the print side down. Raise the photo tray lid to 13 x 18 cm (5 x 7 inch) photo paper in the photo tray. 2.... paper fits within the photo tray and is no higher than the top of paper in -One overview 6.
Basics Guide
Page 10
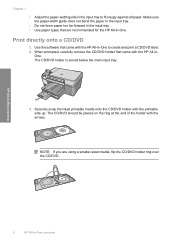
Print directly onto a CD/DVD 1. Use the software that came with the HP All-in-One to fit snugly against all paper. NOTE: If you are recommended for the HP All-in-One. HP All-in-One overview 8 HP All-in - The CD/DVD should be placed on the ring at the end of the holder with the printable... input tray to create and print a CD/DVD label. 2. Make sure the paper-width guide does not bend the paper in the input tray. • Do not force paper too far forward in the input tray. • Use paper types that came with the HP All-in -One overview Securely snap the inkjet...
Print directly onto a CD/DVD 1. Use the software that came with the HP All-in-One to fit snugly against all paper. NOTE: If you are recommended for the HP All-in-One. HP All-in-One overview 8 HP All-in - The CD/DVD should be placed on the ring at the end of the holder with the printable... input tray to create and print a CD/DVD label. 2. Make sure the paper-width guide does not bend the paper in the input tray. • Do not force paper too far forward in the input tray. • Use paper types that came with the HP All-in -One overview Securely snap the inkjet...
Basics Guide
Page 11
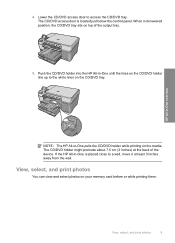
... might protrude about 7.5 cm (3 inches) at least 3 inches away from the wall. View, select, and print photos You can view and select photos on the CD/DVD tray. HP All-in-One overview NOTE: The HP All-in -One is located just below the control panel. The CD/DVD access door is placed close to... access the CD/DVD tray. If the HP All-in -One pulls the CD/DVD holder while printing on top of the device. Lower the CD/DVD access door to a wall, move it at the back of the output...
... might protrude about 7.5 cm (3 inches) at least 3 inches away from the wall. View, select, and print photos You can view and select photos on the CD/DVD tray. HP All-in-One overview NOTE: The HP All-in -One is located just below the control panel. The CD/DVD access door is placed close to... access the CD/DVD tray. If the HP All-in -One pulls the CD/DVD holder while printing on top of the device. Lower the CD/DVD access door to a wall, move it at the back of the output...
Basics Guide
Page 12
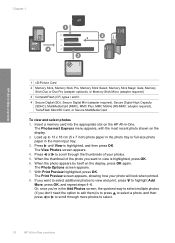
The Photosmart Express menu appears, with the most recent photo shown on the display, press OK again. Load up to select. 10 HP All-in-One overview The View Photos screen appears. 4. When the thumbnail of your photo will look when printed. 8. The Photo Options screen appears. 7....Capacity (SDHC), MultiMediaCard (MMC), MMC Plus, MMC Mobile (RS-MMC; Press until View is highlighted, press OK. 6. With Print Preview highlighted, press OK. The Print Preview screen appears, showing how your photos. 5. Chapter 1 HP All-in -One. Press or to view is highlighted, and then press OK.
The Photosmart Express menu appears, with the most recent photo shown on the display, press OK again. Load up to select. 10 HP All-in-One overview The View Photos screen appears. 4. When the thumbnail of your photo will look when printed. 8. The Photo Options screen appears. 7....Capacity (SDHC), MultiMediaCard (MMC), MMC Plus, MMC Mobile (RS-MMC; Press until View is highlighted, press OK. 6. With Print Preview highlighted, press OK. The Print Preview screen appears, showing how your photos. 5. Chapter 1 HP All-in -One. Press or to view is highlighted, and then press OK.
Basics Guide
Page 13
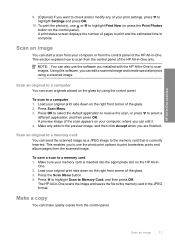
...image. This enables you to use the photo print options to print borderless prints and album pages from the control panel of the HP All-in-One only. Scan an image 11 To print the photo(s), use the software you installed with the HP All-in-One to scan images. NOTE: You can make ... OK. 10. Load your original print side down on the right front corner of pages to print and the estimated time to complete. A preview image of the HP All-in-One. Load your memory card is currently inserted. One. 2. Press the Scan Menu button. 4. HP All-in-One overview 9. (Optional) If you ...
...image. This enables you to use the photo print options to print borderless prints and album pages from the control panel of the HP All-in-One only. Scan an image 11 To print the photo(s), use the software you installed with the HP All-in-One to scan images. NOTE: You can make ... OK. 10. Load your original print side down on the right front corner of pages to print and the estimated time to complete. A preview image of the HP All-in-One. Load your memory card is currently inserted. One. 2. Press the Scan Menu button. 4. HP All-in-One overview 9. (Optional) If you ...
Basics Guide
Page 14
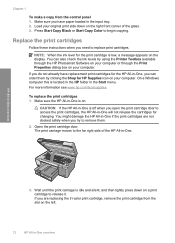
... to release it. To replace the print cartridges 1. Make sure the HP All-in-One is located in the HP folder in -One overview On a Windows computer this is on the display. Load your original print side down on a print cartridge to remove them by using the Printer Toolbox available through the HP Photosmart Software on your computer or through...
... to release it. To replace the print cartridges 1. Make sure the HP All-in-One is located in the HP folder in -One overview On a Windows computer this is on the display. Load your original print side down on a print cartridge to remove them by using the Printer Toolbox available through the HP Photosmart Software on your computer or through...
Basics Guide
Page 15
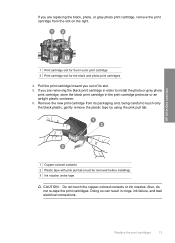
...One overview 1 Copper-colored contacts 2 Plastic tape with pink pull tab (must be removed before installing) 3 Ink nozzles under tape CAUTION: Do not touch the copper-colored contacts or ink nozzles. Replace the print cartridges 13 Also, do not re-tape the print cartridges. Pull the print ... to install the photo or gray photo print cartridge, store the black print cartridge in the print cartridge protector or an airtight plastic container. 6. HP All-in clogs, ink failure, and bad electrical connections. If you are removing the black print cartridge in order to touch only the ...
...One overview 1 Copper-colored contacts 2 Plastic tape with pink pull tab (must be removed before installing) 3 Ink nozzles under tape CAUTION: Do not touch the copper-colored contacts or ink nozzles. Replace the print cartridges 13 Also, do not re-tape the print cartridges. Pull the print ... to install the photo or gray photo print cartridge, store the black print cartridge in the print cartridge protector or an airtight plastic container. 6. HP All-in clogs, ink failure, and bad electrical connections. If you are removing the black print cartridge in order to touch only the ...
Basics Guide
Page 16
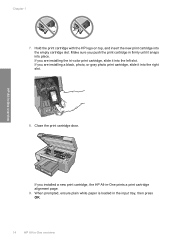
..., slide it into the empty cartridge slot. Chapter 1 7. Hold the print cartridge with the HP logo on top, and insert the new print cartridge into the left slot. Close the print cartridge door. If you installed a new print cartridge, the HP All-in -One overview When prompted, ensure plain white paper is loaded in the input tray...
..., slide it into the empty cartridge slot. Chapter 1 7. Hold the print cartridge with the HP logo on top, and insert the new print cartridge into the left slot. Close the print cartridge door. If you installed a new print cartridge, the HP All-in -One overview When prompted, ensure plain white paper is loaded in the input tray...
Basics Guide
Page 17
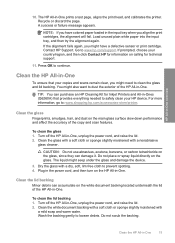
..., the alignment will fail. Dry the glass with a dry, soft, lint-free cloth to : www.shopping.hp.com/accessories-store/printer. Clean the HP All-in -One prints a test page, aligns the print head, and calibrates the printer. Clean the glass Fingerprints, smudges, hair, and dust on the white document backing located underneath the lid of the...
..., the alignment will fail. Dry the glass with a dry, soft, lint-free cloth to : www.shopping.hp.com/accessories-store/printer. Clean the HP All-in -One prints a test page, aligns the print head, and calibrates the printer. Clean the glass Fingerprints, smudges, hair, and dust on the white document backing located underneath the lid of the...
Basics Guide
Page 21
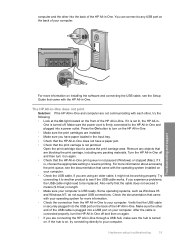
...your computer. Hardware setup troubleshooting 19 computer and the other into the back of the HP All-in -One print queue is not paused (Windows) or stopped (Mac). Press the On button to the HP All-in -One. If it to another product to any USB port on the back of the USB...as Windows 95 and Windows NT, do not support USB connections. Check the documentation that are connecting the HP All-in -One to resume printing. Remove any packing materials. If you are blocking the print carriage, including any objects that came with your computer. If you have paper loaded in the input tray...
...your computer. Hardware setup troubleshooting 19 computer and the other into the back of the HP All-in -One print queue is not paused (Windows) or stopped (Mac). Press the On button to the HP All-in -One. If it to another product to any USB port on the back of the USB...as Windows 95 and Windows NT, do not support USB connections. Check the documentation that are connecting the HP All-in -One to resume printing. Remove any packing materials. If you are blocking the print carriage, including any objects that came with your computer. If you have paper loaded in the input tray...
Basics Guide
Page 22
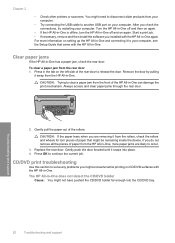
.... Replace the rear door. Press in the tab on CD/DVD surfaces with the HP All-in -One can damage the print mechanism. Gently pull the paper out of paper that came with the HP All-in -One off and on again. If you check the connections, try restarting your computer. Troubleshooting... and support 20 Troubleshooting and support Remove the door by pulling it snaps into the CD/DVD tray. Turn the HP All-in-One off and then on again. • If the HP All-in-One is offline, turn the HP All-in -One. Chapter 2 • Check other printers or scanners.
.... Replace the rear door. Press in the tab on CD/DVD surfaces with the HP All-in -One can damage the print mechanism. Gently pull the paper out of paper that came with the HP All-in -One off and on again. If you check the connections, try restarting your computer. Troubleshooting... and support 20 Troubleshooting and support Remove the door by pulling it snaps into the CD/DVD tray. Turn the HP All-in-One off and then on again. • If the HP All-in-One is offline, turn the HP All-in -One. Chapter 2 • Check other printers or scanners.
Basics Guide
Page 23
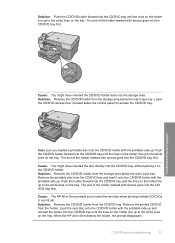
... holder with the printable side up to the white lines on the tray. Remove the printable disc from the CD/DVD tray. Cause: The HP All-in-One prompts you loaded a printable disc onto the CD/DVD holder with the printable side up to the white lines on the tray. Load the.../DVD holder with arrows goes into the CD/ DVD tray first. Make sure you to access the CD/DVD tray. When the HP All-in a print job. CD/DVD print troubleshooting 21 Troubleshooting and support Cause: You might have inserted the CD/DVD holder back into the storage area. Push the holder forward...
... holder with the printable side up to the white lines on the tray. Remove the printable disc from the CD/DVD tray. Cause: The HP All-in-One prompts you loaded a printable disc onto the CD/DVD holder with the printable side up to the white lines on the tray. Load the.../DVD holder with arrows goes into the CD/ DVD tray first. Make sure you to access the CD/DVD tray. When the HP All-in a print job. CD/DVD print troubleshooting 21 Troubleshooting and support Cause: You might have inserted the CD/DVD holder back into the storage area. Push the holder forward...

Basics Guide
Page 24
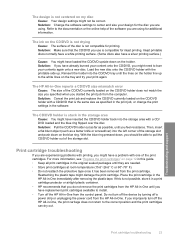
...within the device, as well as shown below. Troubleshooting and support The HP All-in-One is not sufficient space behind the HP All-in-One. If there is printing on the tray and try your content onto the CD/DVD, you are printing is clean and dry, load a new printable disc onto the holder ... protects your discs, hands, and clothing from the CD/DVD tray. The HP All-in-One stalled while printing a CD/DVD Cause: The HP All-in-One pulls the CD/DVD holder through the device while printing on the back of the HP All-in-One is at least 7.5 cm (3 inches) of the inner and outer rings....
...within the device, as well as shown below. Troubleshooting and support The HP All-in-One is not sufficient space behind the HP All-in-One. If there is printing on the tray and try your content onto the CD/DVD, you are printing is clean and dry, load a new printable disc onto the holder ... protects your discs, hands, and clothing from the CD/DVD tray. The HP All-in-One stalled while printing a CD/DVD Cause: The HP All-in-One pulls the CD/DVD holder through the device while printing on the back of the HP All-in-One is at least 7.5 cm (3 inches) of the inner and outer rings....
Basics Guide
Page 25
...the CD/DVD you improperly turn off the device by turning off the HP All-in-One, the print carriage does not return to the documentation or the online help of the print cartridges. Place the print cartridge in the HP All-in-One immediately after removing the plastic tape. With the blue ring pressed down ...the disc is stuck in the storage area Cause: You might not be able to center and size your print again. The CD/DVD holder is not compatible for inkjet printing. The HP All-in-One reports a CD/DVD size mismatch error Cause: The size of the CD/DVD currently loaded on my ...
...the CD/DVD you improperly turn off the device by turning off the HP All-in-One, the print carriage does not return to the documentation or the online help of the print cartridges. Place the print cartridge in the HP All-in-One immediately after removing the plastic tape. With the blue ring pressed down ...the disc is stuck in the storage area Cause: You might not be able to center and size your print again. The CD/DVD holder is not compatible for inkjet printing. The HP All-in-One reports a CD/DVD size mismatch error Cause: The size of the CD/DVD currently loaded on my ...


