Reference Guide
Page 1
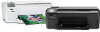
...Printed in [country] Printed in [country] Printed in [country] © 2009 Hewlett-Packard Development Company, L.P. *XXXXX-XXXXX* *XXXXX-XXXXX* XXXXX-XXXXX Black Cartridge XXX Tri-color Cartridge XXX For computers without a CD/DVD drive, please go to www.hp.com/support to use the Easy One... installation. Animations will guide you through the printer setup during the software installation. Do NOT connect the USB cable until prompted by the software! 2 Set up the printer, including how to download and install the software. English HP Photosmart C4700 series 1 Unpack Important!
...Printed in [country] Printed in [country] Printed in [country] © 2009 Hewlett-Packard Development Company, L.P. *XXXXX-XXXXX* *XXXXX-XXXXX* XXXXX-XXXXX Black Cartridge XXX Tri-color Cartridge XXX For computers without a CD/DVD drive, please go to www.hp.com/support to use the Easy One... installation. Animations will guide you through the printer setup during the software installation. Do NOT connect the USB cable until prompted by the software! 2 Set up the printer, including how to download and install the software. English HP Photosmart C4700 series 1 Unpack Important!
Reference Guide
Page 2
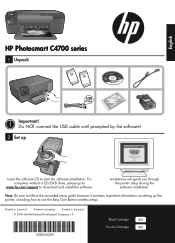
... insert your photos without connecting to a memory card or a connected computer. Connect the HP Photosmart to the current display. 5 Photo: Opens the Photo Menu. When viewing screens other than...that the wireless radio is on a variety of your HP Photosmart Print your memory card into a slot on the HP Photosmart and start printing. When viewing screens other than the Home screen, selects ...options related to the current display. 6 Copy: Opens the Copy Menu. Print on . English Get to know the HP Photosmart 1 Back: Returns to the previous screen. 2 Cancel: Stops the current ...
... insert your photos without connecting to a memory card or a connected computer. Connect the HP Photosmart to the current display. 5 Photo: Opens the Photo Menu. When viewing screens other than...that the wireless radio is on a variety of your HP Photosmart Print your memory card into a slot on the HP Photosmart and start printing. When viewing screens other than the Home screen, selects ...options related to the current display. 6 Copy: Opens the Copy Menu. Print on . English Get to know the HP Photosmart 1 Back: Returns to the previous screen. 2 Cancel: Stops the current ...
User Guide
Page 19
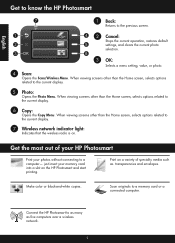
...the prompts to select your product, and then click one of everyday documents. Paper basics Recommended papers for papers with the ColorLok logo are available in a variety of weights and sizes from major paper manufacturers. To order HP papers and other supplies, go to meet high standards...tested to www.hp.com/buy/supplies. ColorLok HP recommends plain papers with the ColorLok logo for printing and copying of the shopping links on the page. NOTE: At this time, some portions of reliability and print quality, and produce documents with crisp, vivid color, bolder blacks, and dry ...
...the prompts to select your product, and then click one of everyday documents. Paper basics Recommended papers for papers with the ColorLok logo are available in a variety of weights and sizes from major paper manufacturers. To order HP papers and other supplies, go to meet high standards...tested to www.hp.com/buy/supplies. ColorLok HP recommends plain papers with the ColorLok logo for printing and copying of the shopping links on the page. NOTE: At this time, some portions of reliability and print quality, and produce documents with crisp, vivid color, bolder blacks, and dry ...
User Guide
Page 40
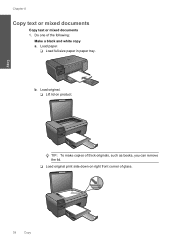
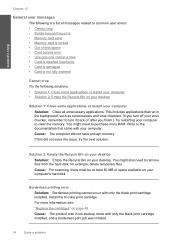
TIP: To make copies of thick originals, such as books, you can remove the lid. ❑ Load original print side down on product. b. Copy Chapter 8 Copy text or mixed documents Copy text or mixed documents 1. Load paper. ❑ Load full-size paper in paper tray. Load original. ❑ Lift lid on right front corner of the following: Make a black and white copy a. Do one of glass. 38 Copy
TIP: To make copies of thick originals, such as books, you can remove the lid. ❑ Load original print side down on product. b. Copy Chapter 8 Copy text or mixed documents Copy text or mixed documents 1. Load paper. ❑ Load full-size paper in paper tray. Load original. ❑ Lift lid on right front corner of the following: Make a black and white copy a. Do one of glass. 38 Copy

User Guide
Page 50
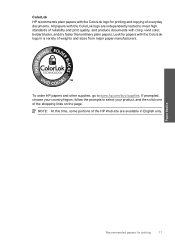
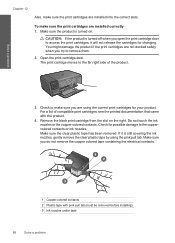
Wait for black cartridge 48 Work with cartridges Work with cartridges 1 Cartridge slot for tri-color cartridge 2 Cartridge slot for print carriage to move to release it, then remove it from slot. b. Lightly press down on . 2. Chapter 11 Replace the cartridges To replace the cartridges 1. Open cartridge access door. Check that power is on the cartridge to center of the product. a. Remove cartridge.
Wait for black cartridge 48 Work with cartridges Work with cartridges 1 Cartridge slot for tri-color cartridge 2 Cartridge slot for print carriage to move to release it, then remove it from slot. b. Lightly press down on . 2. Chapter 11 Replace the cartridges To replace the cartridges 1. Open cartridge access door. Check that power is on the cartridge to center of the product. a. Remove cartridge.

User Guide
Page 52
... online is displayed on screen. Installed print cartridge Black print cartridge Tri-color print cartridge Result Colors print as grayscale. Related topics "Replace the cartridges" on page 48 Work with cartridges 50 Work with only one print cartridge. NOTE: When the HP Photosmart operates in ink-backup mode, a message..."Exit ink-backup mode" on page 50 Ink-backup mode output Printing in ink-backup mode slows the printer and affects the quality of plastic tape has been removed from each print cartridge. During ink-backup mode, the product can find cartridge information ...
... online is displayed on screen. Installed print cartridge Black print cartridge Tri-color print cartridge Result Colors print as grayscale. Related topics "Replace the cartridges" on page 48 Work with cartridges 50 Work with only one print cartridge. NOTE: When the HP Photosmart operates in ink-backup mode, a message..."Exit ink-backup mode" on page 50 Ink-backup mode output Printing in ink-backup mode slows the printer and affects the quality of plastic tape has been removed from each print cartridge. During ink-backup mode, the product can find cartridge information ...
User Guide
Page 76
...print job was in the background, such as screensavers and virus checkers. (If you turn off your virus checker, remember to turn it back on your computer's hard disk. Cause: For scanning, there must be at least 50 MB of disk space • Card access error • Use only one... all unnecessary applications. Refer to the documentation that run in ink-backup mode with your computer. Borderless printing error Solution: Borderless printing cannot occur with only the black print cartridge installed. Solve a problem Chapter 12 General user messages The following is a list of messages related...
...print job was in the background, such as screensavers and virus checkers. (If you turn off your virus checker, remember to turn it back on your computer's hard disk. Cause: For scanning, there must be at least 50 MB of disk space • Card access error • Use only one... all unnecessary applications. Refer to the documentation that run in ink-backup mode with your computer. Borderless printing error Solution: Borderless printing cannot occur with only the black print cartridge installed. Solve a problem Chapter 12 General user messages The following is a list of messages related...
User Guide
Page 83
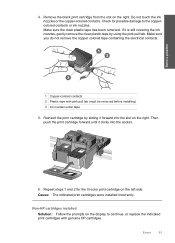
... colored tape containing the electrical contacts. 1 Copper-colored contacts 2 Plastic tape with genuine HP cartridges. Make sure the clear plastic tape has been removed. Cause: The indicated print cartridges were installed incorrectly. Solve a problem 4. Repeat steps 1 and 2 for possible ...damage to continue, or replace the indicated print cartridges with pink pull tab (must be removed before installing) 3 Ink nozzles under tape 5. Errors 81 Remove the black print cartridge from the slot on the left side. Then push the print cartridge forward until it forward into the ...
... colored tape containing the electrical contacts. 1 Copper-colored contacts 2 Plastic tape with genuine HP cartridges. Make sure the clear plastic tape has been removed. Cause: The indicated print cartridges were installed incorrectly. Solve a problem 4. Repeat steps 1 and 2 for possible ...damage to continue, or replace the indicated print cartridges with pink pull tab (must be removed before installing) 3 Ink nozzles under tape 5. Errors 81 Remove the black print cartridge from the slot on the left side. Then push the print cartridge forward until it forward into the ...
User Guide
Page 90
...on the right. Do not touch the ink nozzles or the copper-colored contacts. Check for changing. Open the print cartridge door. Make sure you open the print cartridge door to remove them. 2. Make sure the product is still covering the ink nozzles, gently remove the ... far right side of compatible print cartridges, see the printed documentation that came with pink pull tab (must be removed before installing) 3 Ink nozzles under tape 88 Solve a problem To make sure the print cartridges are installed into the correct slots. Remove the black print cartridge from the slot on ...
...on the right. Do not touch the ink nozzles or the copper-colored contacts. Check for changing. Open the print cartridge door. Make sure you open the print cartridge door to remove them. 2. Make sure the product is still covering the ink nozzles, gently remove the ... far right side of compatible print cartridges, see the printed documentation that came with pink pull tab (must be removed before installing) 3 Ink nozzles under tape 88 Solve a problem To make sure the print cartridges are installed into the correct slots. Remove the black print cartridge from the slot on ...

User Guide
Page 95
...when you are using the pink pull tab. Check to make sure you open the print cartridge door to remove them. 2. Make sure the clear plastic tape has been removed. Remove the black print cartridge from the slot on . If it will not release the cartridges for possible ...damage to the far right side of compatible print cartridges, see the printed documentation that came with pink pull tab (must be removed before installing...
...when you are using the pink pull tab. Check to make sure you open the print cartridge door to remove them. 2. Make sure the clear plastic tape has been removed. Remove the black print cartridge from the slot on . If it will not release the cartridges for possible ...damage to the far right side of compatible print cartridges, see the printed documentation that came with pink pull tab (must be removed before installing...
User Guide
Page 97
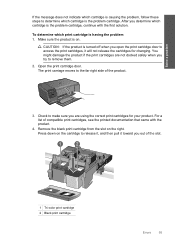
...: If the product is turned off when you open the print cartridge door to access the print cartridges, it toward you determine which cartridge is the problem cartridge, continue with the product. 4. Remove the black print cartridge from the slot on . To determine which cartridge is... the problem cartridge. Open the print cartridge door. For a list of compatible print cartridges, see the printed documentation that came with the first solution. Check to make...
...: If the product is turned off when you open the print cartridge door to access the print cartridges, it toward you determine which cartridge is the problem cartridge, continue with the product. 4. Remove the black print cartridge from the slot on . To determine which cartridge is... the problem cartridge. Open the print cartridge door. For a list of compatible print cartridges, see the printed documentation that came with the first solution. Check to make...
User Guide
Page 98
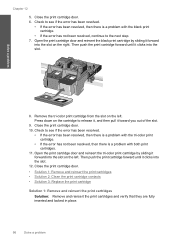
... to release it, and then pull it forward into the slot on the left . Open the print cartridge door and reinsert the black print cartridge by sliding it clicks into the slot. 12. Remove the tri-color print cartridge from the slot on the right. Check to see if the error has been resolved.... • If the error has been resolved, then there is a problem with the black print cartridge. • If the error has not been resolved, continue to see if the error has been resolved. • If the error has been resolved...
... to release it, and then pull it forward into the slot on the left . Open the print cartridge door and reinsert the black print cartridge by sliding it clicks into the slot. 12. Remove the tri-color print cartridge from the slot on the right. Check to see if the error has been resolved.... • If the error has been resolved, then there is a problem with the black print cartridge. • If the error has not been resolved, continue to see if the error has been resolved. • If the error has been resolved...
User Guide
Page 99
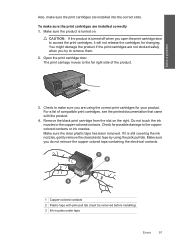
...You might damage the product if the print cartridges are not docked safely when you are using the pink pull tab. For a list of the product. 3. Remove the black print cartridge from the slot on . Solve a problem Also, make sure the print cartridges are installed correctly 1. Check ...for changing. Check to make sure you try to access the print cartridges, it will not release the cartridges for possible ...
...You might damage the product if the print cartridges are not docked safely when you are using the pink pull tab. For a list of the product. 3. Remove the black print cartridge from the slot on . Solve a problem Also, make sure the print cartridges are installed correctly 1. Check ...for changing. Check to make sure you try to access the print cartridges, it will not release the cartridges for possible ...


