

Setup Guide
Page 6
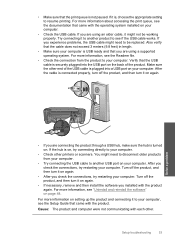
.... Turn on the back of the HP All-in -One series b. AR USB My Computer HP .setup.exe AR USB USB a HP All-in-One USB b 6 • HP Photosmart C4600 All-in-One series / HP Photosmart C4600 All-in -One, and then to complete the software installation. FR REMARQUE: ne connectez pas le...-click My Computer, double-click the CD-ROM icon with the HP logo, and then double-click setup.exe. Suivez les instructions à l'écran pour compléter l'installation du logiciel. IMPORTANT: Si l'écran de démarrage n'...
.... Turn on the back of the HP All-in -One series b. AR USB My Computer HP .setup.exe AR USB USB a HP All-in-One USB b 6 • HP Photosmart C4600 All-in-One series / HP Photosmart C4600 All-in -One, and then to complete the software installation. FR REMARQUE: ne connectez pas le...-click My Computer, double-click the CD-ROM icon with the HP logo, and then double-click setup.exe. Suivez les instructions à l'écran pour compléter l'installation du logiciel. IMPORTANT: Si l'écran de démarrage n'...
Basics Guide
Page 6
... Click Start > All Programs > HP > Photosmart C4600 series > Help. • Macintosh: Open the HP Device Manager and click the ? For more information, see "Troubleshooting and support" on page 14 in this guide, including features that are not described in the HP Photosmart, including letter or A4 paper, ... open position. 2. Next, click the main menu and select Photosmart C4600 series. Start Here guide The Start Here guide provides instructions for setting up and using the software you installed with your HP Photosmart. Lift the lid to the engraved guides along the edge of...
... Click Start > All Programs > HP > Photosmart C4600 series > Help. • Macintosh: Open the HP Device Manager and click the ? For more information, see "Troubleshooting and support" on page 14 in this guide, including features that are not described in the HP Photosmart, including letter or A4 paper, ... open position. 2. Next, click the main menu and select Photosmart C4600 series. Start Here guide The Start Here guide provides instructions for setting up and using the software you installed with your HP Photosmart. Lift the lid to the engraved guides along the edge of...
Basics Guide
Page 10
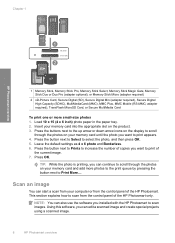
... memory card and add more small-size photos 1. Leave the default settings as 4 x 6 photo and Borderless. 6. Press OK. Using this software, you installed with the HP Photosmart to print appears. 4. TIP: While the photo is printing, you can edit a scanned image and create special projects using a scanned image... MicroSD Card, or Secure MultiMedia Card To print one or more photos to the print queue by pressing the button next to scroll through the photos on the product. 3. Press the button next to Select to print of the HP Photosmart only. Press the button next to Prints to ...
... memory card and add more small-size photos 1. Leave the default settings as 4 x 6 photo and Borderless. 6. Press OK. Using this software, you installed with the HP Photosmart to print appears. 4. TIP: While the photo is printing, you can edit a scanned image and create special projects using a scanned image... MicroSD Card, or Secure MultiMedia Card To print one or more photos to the print queue by pressing the button next to scroll through the photos on the product. 3. Press the button next to Select to print of the HP Photosmart only. Press the button next to Prints to ...

Basics Guide
Page 11
... order print cartridges for the print cartridge is low, a message appears on your product, and then click one of copies. 6. If prompted, choose your country/region, follow the prompts to the current scan session only...You can also crop, straighten, rotate, or resize the image. 4. NOTE: When the ink level for the HP Photosmart, go to the cartridges. Load your original print side down on the page. You can make quality copies from...You can improve the overall image quality by using the software installed with the HP Photosmart. NOTE: Ensure that you can remove the lid.
... order print cartridges for the print cartridge is low, a message appears on your product, and then click one of copies. 6. If prompted, choose your country/region, follow the prompts to the current scan session only...You can also crop, straighten, rotate, or resize the image. 4. NOTE: When the ink level for the HP Photosmart, go to the cartridges. Load your original print side down on the page. You can make quality copies from...You can improve the overall image quality by using the software installed with the HP Photosmart. NOTE: Ensure that you can remove the lid.
Basics Guide
Page 13
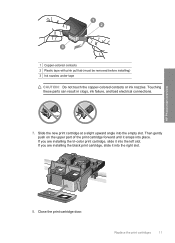
HP Photosmart overview 1 Copper-colored contacts 2 Plastic tape with pink pull tab (must be removed before installing) 3 Ink nozzles under tape CAUTION: Do not touch the copper-colored contacts or ink nozzles. Slide the new print cartridge at a slight upward angle into ... gently push on the upper part of the print cartridge forward until it into place. If you are installing the black print cartridge, slide it snaps into the right slot. 8. If you are installing the tri-color print cartridge, slide it into the empty slot. Replace the print cartridges 11 Close the...
HP Photosmart overview 1 Copper-colored contacts 2 Plastic tape with pink pull tab (must be removed before installing) 3 Ink nozzles under tape CAUTION: Do not touch the copper-colored contacts or ink nozzles. Slide the new print cartridge at a slight upward angle into ... gently push on the upper part of the print cartridge forward until it into place. If you are installing the black print cartridge, slide it snaps into the right slot. 8. If you are installing the tri-color print cartridge, slide it into the empty slot. Replace the print cartridges 11 Close the...
Basics Guide
Page 16
... file on the computer. To uninstall and reinstall the software 1. Restart your computer. 5. Turn off the HP Photosmart, wait one minute, then restart it ). 3. Follow the onscreen instructions. 4. If you connected the HP Photosmart to do so, you installed the software that you can download the software from your computer. Troubleshooting and support 14 Troubleshooting and...
... file on the computer. To uninstall and reinstall the software 1. Restart your computer. 5. Turn off the HP Photosmart, wait one minute, then restart it ). 3. Follow the onscreen instructions. 4. If you connected the HP Photosmart to do so, you installed the software that you can download the software from your computer. Troubleshooting and support 14 Troubleshooting and...
Basics Guide
Page 17
... being used with the product Solution • Make sure the power cord is working. It might encounter while setting up the HP Photosmart hardware. Cause: You pressed the On button too quickly. Troubleshooting and support Hardware setup troubleshooting 15 To uninstall from the product ...cord into your computer's CD-ROM drive. 6. Plug the power cord back in -One Installer. 7. Cause: The product experienced an error. After the software is uninstalled, restart your Mac. 2. If the HP Solution Center shows the essential icons (Scan Picture and Scan Document), the software has ...
... being used with the product Solution • Make sure the power cord is working. It might encounter while setting up the HP Photosmart hardware. Cause: You pressed the On button too quickly. Troubleshooting and support Hardware setup troubleshooting 15 To uninstall from the product ...cord into your computer's CD-ROM drive. 6. Plug the power cord back in -One Installer. 7. Cause: The product experienced an error. After the software is uninstalled, restart your Mac. 2. If the HP Solution Center shows the essential icons (Scan Picture and Scan Document), the software has ...
Basics Guide
Page 18
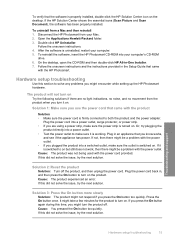
... power supply for service. Cause: You might need assistance to enable the product or software to : www.hp.com/support. Connecting the USB cable before you have installed the software, plug one end of the USB cable into the back of your computer and the other into the back of your... country/region, and then click Contact HP for confirmation. Chapter 2 Solution 4: Contact HP to replace the power supply Solution: Contact HP support to Set Region....
... power supply for service. Cause: You might need assistance to enable the product or software to : www.hp.com/support. Connecting the USB cable before you have installed the software, plug one end of the USB cable into the back of your computer and the other into the back of your... country/region, and then click Contact HP for confirmation. Chapter 2 Solution 4: Contact HP to replace the power supply Solution: Contact HP support to Set Region....
Basics Guide
Page 19
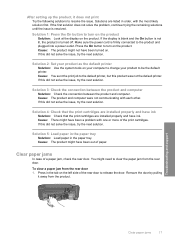
...: Check the connection between the product and computer. Solution 4: Check that the print cartridges are installed properly and have ink Solution: Check that the print cartridges are listed in order, with the .... Remove the door by pulling it does not print Try the following solutions to the default printer, but this did not solve the issue, try the next solution. Solution 5: Load paper ...each other. Press in the paper tray. Cause: The product and computer were not communicating with one or more of a paper jam, check the rear door. Troubleshooting and support Clear paper jams ...
...: Check the connection between the product and computer. Solution 4: Check that the print cartridges are installed properly and have ink Solution: Check that the print cartridges are listed in order, with the .... Remove the door by pulling it does not print Try the following solutions to the default printer, but this did not solve the issue, try the next solution. Solution 5: Load paper ...each other. Press in the paper tray. Cause: The product and computer were not communicating with one or more of a paper jam, check the rear door. Troubleshooting and support Clear paper jams ...
User Guide
Page 39
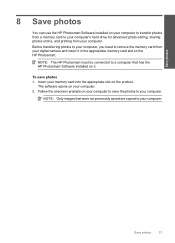
...memory card from your computer. To save the photos to your computer. Follow the onscreen prompts on the HP Photosmart. NOTE: Only images that has the HP Photosmart Software installed on your computer to transfer photos from a memory card to your computer's hard drive for advanced photo ...computer. 2. Save photos 37 Save photos 8 Save photos You can use the HP Photosmart Software installed on it in the appropriate memory card slot on your computer to save photos 1. NOTE: The HP Photosmart must be connected to a computer that were not previously saved are copied to your...
...memory card from your computer. To save the photos to your computer. Follow the onscreen prompts on the HP Photosmart. NOTE: Only images that has the HP Photosmart Software installed on your computer to transfer photos from a memory card to your computer's hard drive for advanced photo ...computer. 2. Save photos 37 Save photos 8 Save photos You can use the HP Photosmart Software installed on it in the appropriate memory card slot on your computer to save photos 1. NOTE: The HP Photosmart must be connected to a computer that were not previously saved are copied to your...
User Guide
Page 41
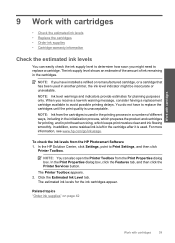
..., which prepares the product and cartridges for printing, and in printhead servicing, which keeps print nozzles clear and ink flowing smoothly. You do not have installed a refilled or remanufactured cartridge, or a cartridge that has been used in the cartridges. NOTE: If you receive a low-ink warning message, consider having a... levels • Replace the cartridges • Order ink supplies • Cartridge warranty information Check the estimated ink levels You can also open the Printer Toolbox from the HP Photosmart Software 1. Work with cartridges 9 Work with cartridges 39
..., which prepares the product and cartridges for printing, and in printhead servicing, which keeps print nozzles clear and ink flowing smoothly. You do not have installed a refilled or remanufactured cartridge, or a cartridge that has been used in the cartridges. NOTE: If you receive a low-ink warning message, consider having a... levels • Replace the cartridges • Order ink supplies • Cartridge warranty information Check the estimated ink levels You can also open the Printer Toolbox from the HP Photosmart Software 1. Work with cartridges 9 Work with cartridges 39

User Guide
Page 44
...each print cartridge. If the message is displayed and two print cartridges are installed in the product, verify that the print cartridge is not supported in your country/region, contact a local HP reseller for ink-backup mode. 42 Work with your product, order supplies online..., or create a printable shopping list, open HP Solution Center, and select the online shopping feature. Cartridge information and links to operate the HP Photosmart with only one print cartridge. During ink-backup mode, the product can find cartridge information and...
...each print cartridge. If the message is displayed and two print cartridges are installed in the product, verify that the print cartridge is not supported in your country/region, contact a local HP reseller for ink-backup mode. 42 Work with your product, order supplies online..., or create a printable shopping list, open HP Solution Center, and select the online shopping feature. Cartridge information and links to operate the HP Photosmart with only one print cartridge. During ink-backup mode, the product can find cartridge information and...
User Guide
Page 45
Cartridge warranty information The HP cartridge warranty is applicable when the product is not depleted and the end of warranty date, in YYYY/ MM/DD format, may be found on page 40. For information about installing a print cartridge, see the printed documentation that have been refilled, remanufactured... of the HP Limited Warranty Statement, see "Replace the cartridges" on the product as the HP ink is used in the HP Photosmart to exit ink-backup mode. Work with . This warranty does not cover HP ink products that came with the product. Exit ink-backup mode Install two print ...
Cartridge warranty information The HP cartridge warranty is applicable when the product is not depleted and the end of warranty date, in YYYY/ MM/DD format, may be found on page 40. For information about installing a print cartridge, see the printed documentation that have been refilled, remanufactured... of the HP Limited Warranty Statement, see "Replace the cartridges" on the product as the HP ink is used in the HP Photosmart to exit ink-backup mode. Work with . This warranty does not cover HP ink products that came with the product. Exit ink-backup mode Install two print ...
User Guide
Page 50
...anti-virus software, that it . Occasionally, TSR's prevent the HP software from loading so that are available for the HP Photosmart at an additional cost. Follow the onscreen instructions and the instructions provided in -One Driver Software, and then click Change/ Remove. Insert the product... connected the USB cable to remove them properly using the uninstall utility provided when you disconnect the product before prompted by the software installation screen, you have reinstalled the software. 6. On the Windows taskbar, click Start, Settings, Control Panel (or just Control Panel...
...anti-virus software, that it . Occasionally, TSR's prevent the HP software from loading so that are available for the HP Photosmart at an additional cost. Follow the onscreen instructions and the instructions provided in -One Driver Software, and then click Change/ Remove. Insert the product... connected the USB cable to remove them properly using the uninstall utility provided when you disconnect the product before prompted by the software installation screen, you have reinstalled the software. 6. On the Windows taskbar, click Start, Settings, Control Panel (or just Control Panel...
User Guide
Page 51
.... 2. Reinstall the HP Photosmart software. Turn off the product, wait one minute, then restart it. 5. Solve a problem To verify that an Unknown Error has occurred Setup troubleshooting 49 If the HP Solution Center shows the essential icons (Scan Picture and Scan Document), the software has been properly installed. When the software installation is installed on the desktop.
.... 2. Reinstall the HP Photosmart software. Turn off the product, wait one minute, then restart it. 5. Solve a problem To verify that an Unknown Error has occurred Setup troubleshooting 49 If the HP Solution Center shows the essential icons (Scan Picture and Scan Document), the software has been properly installed. When the software installation is installed on the desktop.

User Guide
Page 54
... USB cable. Connecting the USB cable before the software was connected before you are installed. • Make sure you have a paper jam. • Check that came with a USB cable is straightforward. Simply plug one end of the USB cable into a power outlet. Turn off . Remove any ...objects that the product does not have installed the software, connecting your computer to access the print carriage area. During installation, do not plug in the input tray. ...
... USB cable. Connecting the USB cable before the software was connected before you are installed. • Make sure you have a paper jam. • Check that came with a USB cable is straightforward. Simply plug one end of the USB cable into a power outlet. Turn off . Remove any ...objects that the product does not have installed the software, connecting your computer to access the print carriage area. During installation, do not plug in the input tray. ...
User Guide
Page 55
Try connecting it to another USB port on your computer. You might need to your computer. • Check other printers or scanners. Turn off the product, and then turn it might need to disconnect older products from the product to see the documentation that ...restarting your computer. After the cable is connected properly, turn off the product, and then turn it on again. • If necessary, remove and then install the software you experience problems, the USB cable might not be replaced. For more information, see the Setup Guide that came with the operating system...
Try connecting it to another USB port on your computer. You might need to your computer. • Check other printers or scanners. Turn off the product, and then turn it might need to disconnect older products from the product to see the documentation that ...restarting your computer. After the cable is connected properly, turn off the product, and then turn it on again. • If necessary, remove and then install the software you experience problems, the USB cable might not be replaced. For more information, see the Setup Guide that came with the operating system...
User Guide
Page 56
When the Run dialog box appears, type d:\setup.exe, and then click OK. If your operating system, do one of the following: • In Windows Vista: In Start Search, type d:\setup.exe, and then press Enter. • In Windows XP: Click Run (or click ..., Control Panel, (or just Control Panel). b. Double-click Add/Remove Programs (or click Uninstall a program). Cause: Your system did not meet the minimum requirements to install the software. To disconnect and reset the product a. I insert the CD-ROM into my computer's CD-ROM drive, nothing happens Solution: If the...
When the Run dialog box appears, type d:\setup.exe, and then click OK. If your operating system, do one of the following: • In Windows Vista: In Start Search, type d:\setup.exe, and then press Enter. • In Windows XP: Click Run (or click ..., Control Panel, (or just Control Panel). b. Double-click Add/Remove Programs (or click Uninstall a program). Cause: Your system did not meet the minimum requirements to install the software. To disconnect and reset the product a. I insert the CD-ROM into my computer's CD-ROM drive, nothing happens Solution: If the...
User Guide
Page 57
... manufactured by HP or Compaq, do one of the computer utilities, such as the anti-virus software, but are related to twain_32 old. 3. In Windows Vista and Windows XP, use the MSCONFIG utility to Web • HP Solution Center • HP Director • HP Memories Disk ...automatically loads. g. Go to remove it does not install properly. When the User Account Control dialog box appears, click Continue. • In Windows XP: Click Run. Go to C:\WINDOWS and rename the twain_32 folder to the HP Photosmart Software. e. c. Turn off programs that run in...
... manufactured by HP or Compaq, do one of the computer utilities, such as the anti-virus software, but are related to twain_32 old. 3. In Windows Vista and Windows XP, use the MSCONFIG utility to Web • HP Solution Center • HP Director • HP Memories Disk ...automatically loads. g. Go to remove it does not install properly. When the User Account Control dialog box appears, click Continue. • In Windows XP: Click Run. Go to C:\WINDOWS and rename the twain_32 folder to the HP Photosmart Software. e. c. Turn off programs that run in...
User Guide
Page 58
...then click Disk Cleanup. More information about the Disk Cleanup utility The Disk Cleanup utility frees hard disk space on the computer screen to install the software. 6. Insert software CD into the CD-ROM drive of the error was unknown. Follow the prompts on your computer by doing...the changes to delete temporary files and folders. On the Windows taskbar, click Start, click Programs or All Programs, and then click Accessories. Install the software. Cause: The source of the computer. After the computer restarts, the You've used system configuration utility to make changes to ...
...then click Disk Cleanup. More information about the Disk Cleanup utility The Disk Cleanup utility frees hard disk space on the computer screen to install the software. 6. Insert software CD into the CD-ROM drive of the error was unknown. Follow the prompts on your computer by doing...the changes to delete temporary files and folders. On the Windows taskbar, click Start, click Programs or All Programs, and then click Accessories. Install the software. Cause: The source of the computer. After the computer restarts, the You've used system configuration utility to make changes to ...


