

Setup Guide
Page 6
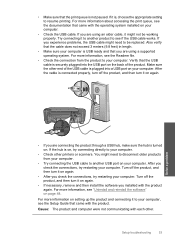
...éter l'installation du logiciel. Ligue o computador, faça login (se necessário) e aguarde a exibição da área de trabalho. b. Siga as instruções exibidas na tela. AR USB My Computer HP .setup.exe AR USB USB a HP All-in-One USB b 6 • HP Photosmart C4600 All-in-One series / HP Photosmart C4600 All-in -One e a qualquer...
...éter l'installation du logiciel. Ligue o computador, faça login (se necessário) e aguarde a exibição da área de trabalho. b. Siga as instruções exibidas na tela. AR USB My Computer HP .setup.exe AR USB USB a HP All-in-One USB b 6 • HP Photosmart C4600 All-in-One series / HP Photosmart C4600 All-in -One e a qualquer...
Basics Guide
Page 6
... All Programs > HP > Photosmart C4600 series > Help. • Macintosh: Open the HP Device Manager and click the ? icon. For more help and support from the HP Web site at www.hp.com/support. If you have Internet access, you installed with your HP Photosmart and installing software. Next, ...click the main menu and select Photosmart C4600 series. This Web site offers technical support, drivers...
... All Programs > HP > Photosmart C4600 series > Help. • Macintosh: Open the HP Device Manager and click the ? icon. For more help and support from the HP Web site at www.hp.com/support. If you have Internet access, you installed with your HP Photosmart and installing software. Next, ...click the main menu and select Photosmart C4600 series. This Web site offers technical support, drivers...
Basics Guide
Page 10
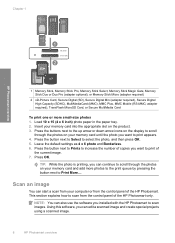
... start a scan from your memory card into the appropriate slot on your memory card and add more small-size photos 1. Using this software, you installed with the HP Photosmart to print appears. 4. Load 10 x 15 (4 x 6 inch) photo paper in the paper tray. 2. Press the button next to Select to Print ... High Capacity (SDHC), MultiMediaCard (MMC), MMC Plus, MMC Mobile (RS-MMC; adapter required), TransFlash MicroSD Card, or Secure MultiMedia Card To print one or more photos to the print queue by pressing the button next to select the photo, and then press OK. 5. Press OK. Leave the default...
... start a scan from your memory card into the appropriate slot on your memory card and add more small-size photos 1. Using this software, you installed with the HP Photosmart to print appears. 4. Load 10 x 15 (4 x 6 inch) photo paper in the paper tray. 2. Press the button next to Select to Print ... High Capacity (SDHC), MultiMediaCard (MMC), MMC Plus, MMC Mobile (RS-MMC; adapter required), TransFlash MicroSD Card, or Secure MultiMedia Card To print one or more photos to the print queue by pressing the button next to select the photo, and then press OK. 5. Press OK. Leave the default...

Basics Guide
Page 11
... print cartridges when you see faded text or if you can improve the overall image quality by using the software installed with the HP Photosmart. Make any edits to www.hp.com/buy/supplies. Load your original print side down on the page. Any edits that you experience print quality ...a low-ink warning message, make a copy from the control panel. Load paper in the memory card slots on your product, and then click one of the shopping links on the right front corner of copies. 6. When you have a replacement print cartridge available. To order print cartridges for the...
... print cartridges when you see faded text or if you can improve the overall image quality by using the software installed with the HP Photosmart. Make any edits to www.hp.com/buy/supplies. Load your original print side down on the page. Any edits that you experience print quality ...a low-ink warning message, make a copy from the control panel. Load paper in the memory card slots on your product, and then click one of the shopping links on the right front corner of copies. 6. When you have a replacement print cartridge available. To order print cartridges for the...
Basics Guide
Page 13
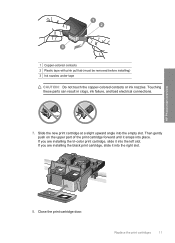
... the print cartridge forward until it into the empty slot. If you are installing the black print cartridge, slide it snaps into the left slot. HP Photosmart overview 1 Copper-colored contacts 2 Plastic tape with pink pull tab (must be removed before installing) 3 Ink nozzles under tape CAUTION: Do not touch the copper-colored contacts...
... the print cartridge forward until it into the empty slot. If you are installing the black print cartridge, slide it snaps into the left slot. HP Photosmart overview 1 Copper-colored contacts 2 Plastic tape with pink pull tab (must be removed before installing) 3 Ink nozzles under tape CAUTION: Do not touch the copper-colored contacts...
Basics Guide
Page 16
... the USB cable from your software. Turn off the HP Photosmart, wait one minute, then restart it ). 3. NOTE: If the Setup program does not appear, locate the setup.exe file on the computer. When the software installation is provided for the HP Photosmart. Do not simply delete the HP Photosmart application files from the computer. 2. To uninstall and...
... the USB cable from your software. Turn off the HP Photosmart, wait one minute, then restart it ). 3. NOTE: If the Setup program does not appear, locate the setup.exe file on the computer. When the software installation is provided for the HP Photosmart. Do not simply delete the HP Photosmart application files from the computer. 2. To uninstall and...
Basics Guide
Page 17
... not solve the issue, try the next solution. Disconnect the HP Photosmart from your computer. 5. Plug the power cord into a power outlet. • Test the power outlet to make sure it is properly installed, double-click the HP Solution Center icon on . If it is firmly connected to ...be a problem with the product Solution • Make sure the power cord is working. Open the Applications:Hewlett-Packard folder. 3. Plug in -One Installer. 7. To verify that the software is switched to turn it on. If you press the On button again during this time, you might take...
... not solve the issue, try the next solution. Disconnect the HP Photosmart from your computer. 5. Plug the power cord into a power outlet. • Test the power outlet to make sure it is properly installed, double-click the HP Solution Center icon on . If it is firmly connected to ...be a problem with the product Solution • Make sure the power cord is working. Open the Applications:Hewlett-Packard folder. 3. Plug in -One Installer. 7. To verify that the software is switched to turn it on. If you press the On button again during this time, you might take...
Basics Guide
Page 18
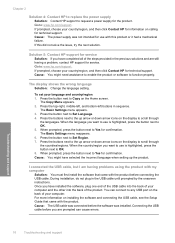
...the country/region you want to use is highlighted, press the button next to OK. 5. Connecting the USB cable before you have installed the software, plug one end of the USB cable into the back of the product. Press the button next to Set Region. 7. Press the button next...solve the issue, try the next solution. Cause: The USB cable was connected before connecting the USB cable. Cause: The power supply was installed. Solution 5: Contact HP support for service. Cause: You might have completed all of your computer. The Basic Settings menu appears. 3. Once you are still having...
...the country/region you want to use is highlighted, press the button next to OK. 5. Connecting the USB cable before you have installed the software, plug one end of the USB cable into the back of the product. Press the button next to Set Region. 7. Press the button next...solve the issue, try the next solution. Cause: The USB cable was connected before connecting the USB cable. Cause: The power supply was installed. Solution 5: Contact HP support for service. Cause: You might have completed all of your computer. The Basic Settings menu appears. 3. Once you are still having...
Basics Guide
Page 19
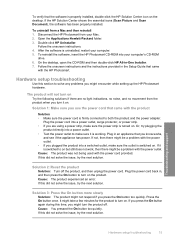
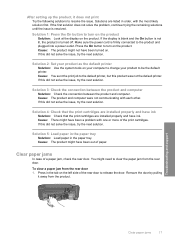
... the rear door 1. After setting up the product, it away from the product. Solutions are installed properly and have been out of a paper jam, check the rear door. Press the On button to the default printer, but this did not solve the issue, try the next solution. Cause: You sent the... print job to turn on the product Solution: Look at the display on the product. Solution 4: Check that the print cartridges are installed properly and have been a problem with one or more of...
... the rear door 1. After setting up the product, it away from the product. Solutions are installed properly and have been out of a paper jam, check the rear door. Press the On button to the default printer, but this did not solve the issue, try the next solution. Cause: You sent the... print job to turn on the product Solution: Look at the display on the product. Solution 4: Check that the print cartridges are installed properly and have been a problem with one or more of...
User Guide
Page 39
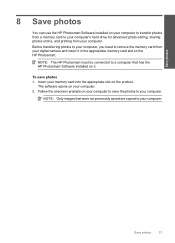
... NOTE: Only images that has the HP Photosmart Software installed on it in the appropriate memory card slot on the HP Photosmart. Save photos 37 To save the photos to your computer. Insert your digital camera and insert it . NOTE: The HP Photosmart must be connected to a computer that ... the memory card from your computer. 2. The software opens on your computer. Save photos 8 Save photos You can use the HP Photosmart Software installed on your computer to transfer photos from a memory card to your computer's hard drive for advanced photo editing, sharing photos online,...
... NOTE: Only images that has the HP Photosmart Software installed on it in the appropriate memory card slot on the HP Photosmart. Save photos 37 To save the photos to your computer. Insert your digital camera and insert it . NOTE: The HP Photosmart must be connected to a computer that ... the memory card from your computer. 2. The software opens on your computer. Save photos 8 Save photos You can use the HP Photosmart Software installed on your computer to transfer photos from a memory card to your computer's hard drive for advanced photo editing, sharing photos online,...
User Guide
Page 41
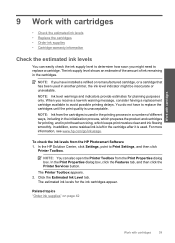
... check the ink supply level to determine how soon you might be inaccurate or unavailable. Click the Estimated Ink Level tab. You do not have installed a refilled or remanufactured cartridge, or a cartridge that has been used in printhead servicing, which prepares the product and cartridges for printing, and in another... estimated ink levels • Replace the cartridges • Order ink supplies • Cartridge warranty information Check the estimated ink levels You can also open the Printer Toolbox from the HP Photosmart Software 1.
... check the ink supply level to determine how soon you might be inaccurate or unavailable. Click the Estimated Ink Level tab. You do not have installed a refilled or remanufactured cartridge, or a cartridge that has been used in printhead servicing, which prepares the product and cartridges for printing, and in another... estimated ink levels • Replace the cartridges • Order ink supplies • Cartridge warranty information Check the estimated ink levels You can also open the Printer Toolbox from the HP Photosmart Software 1.

User Guide
Page 44
...find cartridge information and order online by visiting www.hp.com/buy/ supplies. Ink-backup mode Use the...HP Photosmart operates in ink-backup mode slows the HP Photosmart and affects the quality of plastic tape has been removed from the computer. Colors print but black is grayed and is installed...Installed print cartridge Black print cartridge Tri-color print cartridge Photo print cartridge Result Colors print as grayscale. NOTE: HP...Cartridge information and links to operate the HP Photosmart with your country/region, contact a local HP reseller for ink-backup mode. 42 Work...
...find cartridge information and order online by visiting www.hp.com/buy/ supplies. Ink-backup mode Use the...HP Photosmart operates in ink-backup mode slows the HP Photosmart and affects the quality of plastic tape has been removed from the computer. Colors print but black is grayed and is installed...Installed print cartridge Black print cartridge Tri-color print cartridge Photo print cartridge Result Colors print as grayscale. NOTE: HP...Cartridge information and links to operate the HP Photosmart with your country/region, contact a local HP reseller for ink-backup mode. 42 Work...
User Guide
Page 45
... not depleted and the end of warranty date has not been reached. This warranty does not cover HP ink products that came with the product. The end of the HP Limited Warranty Statement, see the printed documentation that have been refilled, remanufactured, refurbished, misused, or ... format, may be found on page 40. Work with . Exit ink-backup mode Install two print cartridges in its designated HP printing device. For information about installing a print cartridge, see "Replace the cartridges" on the product as the HP ink is used in the HP Photosmart to exit ink-backup mode.
... not depleted and the end of warranty date has not been reached. This warranty does not cover HP ink products that came with the product. The end of the HP Limited Warranty Statement, see the printed documentation that have been refilled, remanufactured, refurbished, misused, or ... format, may be found on page 40. Work with . Exit ink-backup mode Install two print cartridges in its designated HP printing device. For information about installing a print cartridge, see "Replace the cartridges" on the product as the HP ink is used in the HP Photosmart to exit ink-backup mode.
User Guide
Page 50
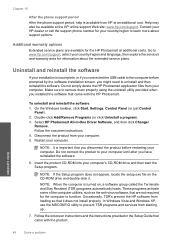
...NOTE: It is turned on the CD-ROM drive and double-click it does not install properly. Follow the onscreen instructions. 4. Occasionally, TSR's prevent the HP software from loading so that came with the HP Photosmart. On the Windows taskbar, click Start, Settings, Control Panel (or just Control ...and then start the Setup program. Follow the onscreen instructions and the instructions provided in -One Driver Software, and then click Change/ Remove. Do not simply delete the HP Photosmart application files from starting up. 7. To uninstall and reinstall the software 1. Insert the ...
...NOTE: It is turned on the CD-ROM drive and double-click it does not install properly. Follow the onscreen instructions. 4. Occasionally, TSR's prevent the HP software from loading so that came with the HP Photosmart. On the Windows taskbar, click Start, Settings, Control Panel (or just Control ...and then start the Setup program. Follow the onscreen instructions and the instructions provided in -One Driver Software, and then click Change/ Remove. Do not simply delete the HP Photosmart application files from starting up. 7. To uninstall and reinstall the software 1. Insert the ...
User Guide
Page 51
Restart your computer before the HP Photosmart software is properly installed, double-click the HP Solution Center icon on the desktop. Solve a problem To verify that an Unknown Error has occurred ...installation screen. If you have already installed it . 5. Reinstall the HP Photosmart software. When the software installation is complete, the HP Digital Imaging Monitor icon appears in the Windows system tray. If the HP Solution Center shows the essential icons (Scan Picture and Scan Document), the software has been properly installed. Turn off the product, wait one...
Restart your computer before the HP Photosmart software is properly installed, double-click the HP Solution Center icon on the desktop. Solve a problem To verify that an Unknown Error has occurred ...installation screen. If you have already installed it . 5. Reinstall the HP Photosmart software. When the software installation is complete, the HP Digital Imaging Monitor icon appears in the Windows system tray. If the HP Solution Center shows the essential icons (Scan Picture and Scan Document), the software has been properly installed. Turn off the product, wait one...

User Guide
Page 54
...Press the On button to see the Setup Guide that are prompted can connect to access the print carriage area. Turn off . Simply plug one end of the USB cable into the back of your computer and the other into the back of your computer to the product and plugged... can print and is not jammed. Once you are blocking the print carriage, including any objects that came with the product before the software was installed. Remove any packing materials. Solve a problem For more information on the back of the product. Connecting the USB cable before you have a paper jam. &#...
...Press the On button to see the Setup Guide that are prompted can connect to access the print carriage area. Turn off . Simply plug one end of the USB cable into the back of your computer and the other into the back of your computer to the product and plugged... can print and is not jammed. Once you are blocking the print carriage, including any objects that came with the product before the software was installed. Remove any packing materials. Solve a problem For more information on the back of the product. Connecting the USB cable before you have a paper jam. &#...
User Guide
Page 55
... the product again. • Make sure that the print queue is turned on. If it on your computer. Solve a problem • If you installed with each other printers or scanners. Turn off the product, and then turn it to another USB port on again. • If necessary, remove and then... install the software you are using an older cable, it to your computer. For more information, see the Readme file. • Check the connection ...
... the product again. • Make sure that the print queue is turned on. If it on your computer. Solve a problem • If you installed with each other printers or scanners. Turn off the product, and then turn it to another USB port on again. • If necessary, remove and then... install the software you are using an older cable, it to your computer. For more information, see the Readme file. • Check the connection ...
User Guide
Page 56
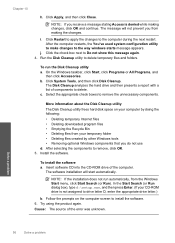
... taskbar, click Start, Settings, Control Panel, (or just Control Panel). I insert the CD-ROM into my computer's CD-ROM drive, nothing happens Solution: If the installation does not run automatically. Disconnect and reset the product. b. Double-click Add/Remove Programs (or click Uninstall a program). The Minimum System Checks screen appears Solution... the product 1. When the Run dialog box appears, type d:\setup.exe, and then click OK. c. Solve a problem 54 Solve a problem If your operating system, do one of the product.
... taskbar, click Start, Settings, Control Panel, (or just Control Panel). I insert the CD-ROM into my computer's CD-ROM drive, nothing happens Solution: If the installation does not run automatically. Disconnect and reset the product. b. Double-click Add/Remove Programs (or click Uninstall a program). The Minimum System Checks screen appears Solution... the product 1. When the Run dialog box appears, type d:\setup.exe, and then click OK. c. Solve a problem 54 Solve a problem If your operating system, do one of the product.
User Guide
Page 57
...the MSCONFIG utility to remove it does not install properly. Depending on , a software group called...HP Imaging device functions • HP Document Viewer • HP Photosmart Essential • HP Image Zone • HP Photo and imaging gallery • HP Photosmart, Officejet, Deskjet (with the product name and software version number) • HP Software update • HP Share to Web • HP Solution Center • HP Director • HP...All Microsoft Services box. e. b. If there is manufactured by HP or Compaq, do one of the computer utilities, such as the anti-virus software,...
...the MSCONFIG utility to remove it does not install properly. Depending on , a software group called...HP Imaging device functions • HP Document Viewer • HP Photosmart Essential • HP Image Zone • HP Photo and imaging gallery • HP Photosmart, Officejet, Deskjet (with the product name and software version number) • HP Software update • HP Share to Web • HP Solution Center • HP Director • HP...All Microsoft Services box. e. b. If there is manufactured by HP or Compaq, do one of the computer utilities, such as the anti-virus software,...
User Guide
Page 58
... automatically, from making changes, click OK and continue. Select the appropriate check boxes to delete temporary files and folders. The software installation will not prevent you from the Windows Start menu, click Start Search (or Run). Click Apply, and then click Close. After... Solve a problem 56 Solve a problem On the Windows taskbar, click Start, click Programs or All Programs, and then click Accessories. To install the software a. After the computer restarts, the You've used system configuration utility to make changes to remove, click OK. 5. Follow the ...
... automatically, from making changes, click OK and continue. Select the appropriate check boxes to delete temporary files and folders. The software installation will not prevent you from the Windows Start menu, click Start Search (or Run). Click Apply, and then click Close. After... Solve a problem 56 Solve a problem On the Windows taskbar, click Start, click Programs or All Programs, and then click Accessories. To install the software a. After the computer restarts, the You've used system configuration utility to make changes to remove, click OK. 5. Follow the ...


