
Full User Guide
Page 6
... View the Readme file...89 Hardware setup troubleshooting 89 Software installation troubleshooting 91 Uninstall and reinstall the software 94 Print quality troubleshooting...96 Print troubleshooting...103 Memory card troubleshooting 112 Copy troubleshooting...114 Scan troubleshooting...119 Errors...122 Device messages...122 File messages...123 Supported file types for the HP All-in-One 125 General user messages 125 Paper...
... View the Readme file...89 Hardware setup troubleshooting 89 Software installation troubleshooting 91 Uninstall and reinstall the software 94 Print quality troubleshooting...96 Print troubleshooting...103 Memory card troubleshooting 112 Copy troubleshooting...114 Scan troubleshooting...119 Errors...122 Device messages...122 File messages...123 Supported file types for the HP All-in-One 125 General user messages 125 Paper...
Full User Guide
Page 14
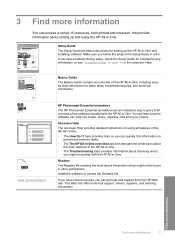
... with the HP All-in-One. This Web site offers technical support, drivers, supplies, and ordering information. Onscreen Help The onscreen Help provides detailed instructions on using the HP All-in order. Setup Guide The Setup Guide provides instructions for basic tasks, troubleshooting tips, and technical information. www.hp.com/support HP Photosmart Essential animations The HP Photosmart Essential...
... with the HP All-in-One. This Web site offers technical support, drivers, supplies, and ordering information. Onscreen Help The onscreen Help provides detailed instructions on using the HP All-in order. Setup Guide The Setup Guide provides instructions for basic tasks, troubleshooting tips, and technical information. www.hp.com/support HP Photosmart Essential animations The HP Photosmart Essential...
Full User Guide
Page 70
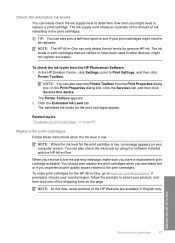
... Service this time, some portions of ink remaining in -One, go to www.hp.com/buy/supplies. Maintain the HP All-in-One Work with the HP All-in English only. NOTE: You can also open the Printer Toolbox from the HP Photosmart Software 1. Check the estimated ink levels You can easily check...you experience print quality issues related to be replaced. Related topics "Troubleshoot print cartridges" on page 83 Replace the print cartridges Follow these instructions when the ink level is low, a message appears on the page. The Printer Toolbox appears. 2. To check the ink levels from the Print...
... Service this time, some portions of ink remaining in -One, go to www.hp.com/buy/supplies. Maintain the HP All-in-One Work with the HP All-in English only. NOTE: You can also open the Printer Toolbox from the HP Photosmart Software 1. Check the estimated ink levels You can easily check...you experience print quality issues related to be replaced. Related topics "Troubleshoot print cartridges" on page 83 Replace the print cartridges Follow these instructions when the ink level is low, a message appears on the page. The Printer Toolbox appears. 2. To check the ink levels from the Print...
Full User Guide
Page 82
... into a power outlet. If it on the top of the HP All-in-One. Troubleshooting 13 Troubleshooting This section contains the following topics: • Troubleshooting tips • Hardware setup troubleshooting • Software installation troubleshooting • Print quality troubleshooting • Print troubleshooting • Memory card troubleshooting • Copy troubleshooting • Scan troubleshooting • Errors Troubleshooting tips This section contains the following : • Make sure...
... into a power outlet. If it on the top of the HP All-in-One. Troubleshooting 13 Troubleshooting This section contains the following topics: • Troubleshooting tips • Hardware setup troubleshooting • Software installation troubleshooting • Print quality troubleshooting • Print troubleshooting • Memory card troubleshooting • Copy troubleshooting • Scan troubleshooting • Errors Troubleshooting tips This section contains the following : • Make sure...

Full User Guide
Page 83
..." on page 94 • "Find more information" on page 11 Information on your computer. Troubleshooting • If you are connecting the HP All-in -One. If the hub is turned on again. Refilled print cartridges might need to disconnect older products from...HP All-in -One to another USB port on print cartridges For best results, use HP print cartridges. For more information. • Check the connection from your computer. Try connecting it to your computer. • Try connecting the USB cable to another product to be working properly. Make sure the other printers...
..." on page 94 • "Find more information" on page 11 Information on your computer. Troubleshooting • If you are connecting the HP All-in -One. If the hub is turned on again. Refilled print cartridges might need to disconnect older products from...HP All-in -One to another USB port on print cartridges For best results, use HP print cartridges. For more information. • Check the connection from your computer. Try connecting it to your computer. • Try connecting the USB cable to another product to be working properly. Make sure the other printers...

Full User Guide
Page 84
... photo media in its original packaging inside a resealable plastic bag on paper The HP All-in-One is easy to install. • Turn off the device by the edges. Troubleshooting tips 81 Troubleshooting • Do not reattach the protective tape once it in a print cartridge protector... or airtight plastic container. • HP recommends that stretches easily. NOTE: If you improperly turn off the HP All-in-One from the HP All-in-One. For more information, see: "Troubleshoot print cartridges" on page 83 Information on a flat surface in a ...
... photo media in its original packaging inside a resealable plastic bag on paper The HP All-in-One is easy to install. • Turn off the device by the edges. Troubleshooting tips 81 Troubleshooting • Do not reattach the protective tape once it in a print cartridge protector... or airtight plastic container. • HP recommends that stretches easily. NOTE: If you improperly turn off the HP All-in-One from the HP All-in-One. For more information, see: "Troubleshoot print cartridges" on page 83 Information on a flat surface in a ...

Full User Guide
Page 85
...from high humidity. If necessary, pull the input tray down to prevent bleeding over time from the HP All-in the rear rollers, check the front door. If the jammed paper is not in -One. 2. Press in the input tray; Then, lower the print cartridge door. Press Start Copy Black... paper jams are removing it snaps into place. 4. Gently push the door forward until it from the HP All-in -One has a paper jam, first check the rear door. Troubleshooting 82 Troubleshooting Replace the rear door. Chapter 13 • Do not combine different paper types and paper sizes in the tab on...
...from high humidity. If necessary, pull the input tray down to prevent bleeding over time from the HP All-in the rear rollers, check the front door. If the jammed paper is not in -One. 2. Press in the input tray; Then, lower the print cartridge door. Press Start Copy Black... paper jams are removing it snaps into place. 4. Gently push the door forward until it from the HP All-in -One has a paper jam, first check the rear door. Troubleshooting 82 Troubleshooting Replace the rear door. Chapter 13 • Do not combine different paper types and paper sizes in the tab on...

Full User Guide
Page 86
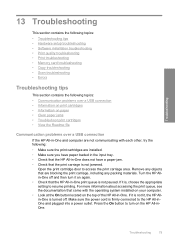
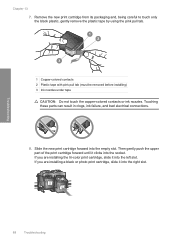
Close the print cartridge door. 4. Remove the black print cartridge from the HP All-in-One, more paper jams are likely to the coppercolored contacts or ink nozzles. If it from the rollers, check the rollers and wheels for possible damage ... 83 Make sure the clear plastic tape has been removed. 2. Troubleshoot print cartridges If you do not remove all the pieces of the print cartridges. Check for torn pieces of the rollers. Troubleshooting 1 Copper-colored contacts 2 Plastic tape with one of paper from the slot on the right. Press Start Copy Black to...
Close the print cartridge door. 4. Remove the black print cartridge from the HP All-in-One, more paper jams are likely to the coppercolored contacts or ink nozzles. If it from the rollers, check the rollers and wheels for possible damage ... 83 Make sure the clear plastic tape has been removed. 2. Troubleshoot print cartridges If you do not remove all the pieces of the print cartridges. Check for torn pieces of the rollers. Troubleshooting 1 Copper-colored contacts 2 Plastic tape with one of paper from the slot on the right. Press Start Copy Black to...

Full User Guide
Page 87
...device. Chapter 13 2. In the HP Solution Center, click Settings, point to determine if there is a problem with printing, determine which print cartridge is experiencing the problem and replace it clicks into the slot. Troubleshooting 84 Troubleshooting If the problem persists, clean the... copper-colored contacts of the print cartridges. 7. To check the ink levels from the Print Properties dialog box. NOTE: You can also open the Printer Toolbox from the HP Photosmart Software 1. If ...
...device. Chapter 13 2. In the HP Solution Center, click Settings, point to determine if there is a problem with printing, determine which print cartridge is experiencing the problem and replace it clicks into the slot. Troubleshooting 84 Troubleshooting If the problem persists, clean the... copper-colored contacts of the print cartridges. 7. To check the ink levels from the Print Properties dialog box. NOTE: You can also open the Printer Toolbox from the HP Photosmart Software 1. If ...

Full User Guide
Page 88
...few lines in -One prints a self-test report, which might indicate a problem with the tri-color print cartridge in the left slot. In the HP Solution Center, click Settings, point to clean the print cartridges. • If the black line is shown below. Troubleshooting tips 85 A ...sample of the ink test area of the color lines are missing, faded, streaked, or show a complete grid and the thick color lines are broken, this might need to Print Settings, and then click Printer Toolbox. NOTE: You can also open the Printer Toolbox from the HP Photosmart...
...few lines in -One prints a self-test report, which might indicate a problem with the tri-color print cartridge in the left slot. In the HP Solution Center, click Settings, point to clean the print cartridges. • If the black line is shown below. Troubleshooting tips 85 A ...sample of the ink test area of the color lines are missing, faded, streaked, or show a complete grid and the thick color lines are broken, this might need to Print Settings, and then click Printer Toolbox. NOTE: You can also open the Printer Toolbox from the HP Photosmart...

Full User Guide
Page 89
The print carriage moves to the far right side of the HP All-in -One. 86 Troubleshooting Hold the print cartridge by its sides. 7. Repeat if necessary for ink and debris buildup. 5. Click Clean the Print Cartridges. 5. Inspect the print cartridge contacts... of the output, and then click Done. Turn on the print cartridge to dry for more than 30 minutes. 4. Lightly press down on the HP All-in -One. 2. Troubleshooting 1 Copper-colored contacts 2 Ink nozzles (do not clean) 8. Slide the print cartridge back into distilled water, and squeeze any excess water from the ...
The print carriage moves to the far right side of the HP All-in -One. 86 Troubleshooting Hold the print cartridge by its sides. 7. Repeat if necessary for ink and debris buildup. 5. Click Clean the Print Cartridges. 5. Inspect the print cartridge contacts... of the output, and then click Done. Turn on the print cartridge to dry for more than 30 minutes. 4. Lightly press down on the HP All-in -One. 2. Troubleshooting 1 Copper-colored contacts 2 Ink nozzles (do not clean) 8. Slide the print cartridge back into distilled water, and squeeze any excess water from the ...

Full User Guide
Page 90
...color print cartridge, remove the print cartridge from the slot on a print cartridge to access the print cartridges, the HP All-in -One. 4. If you try to remove them. 2. Troubleshooting 1 Print cartridge slot for the tri-color print cartridge 2 Print cartridge slot for changing. To replace the print ...cartridges 1. Make sure the HP All-in the input tray. 3. If you out of the HP All-in -One will not release the cartridges for...
...color print cartridge, remove the print cartridge from the slot on a print cartridge to access the print cartridges, the HP All-in -One. 4. If you try to remove them. 2. Troubleshooting 1 Print cartridge slot for the tri-color print cartridge 2 Print cartridge slot for changing. To replace the print ...cartridges 1. Make sure the HP All-in the input tray. 3. If you out of the HP All-in -One will not release the cartridges for...
Full User Guide
Page 91
... the copper-colored contacts or ink nozzles. Then gently push the upper part of the print cartridge forward until it clicks into the empty slot. Troubleshooting 88 Troubleshooting Slide the new print cartridge forward into the socket. If you are installing a black or photo print cartridge, slide it into the right slot...
... the copper-colored contacts or ink nozzles. Then gently push the upper part of the print cartridge forward until it clicks into the empty slot. Troubleshooting 88 Troubleshooting Slide the new print cartridge forward into the socket. If you are installing a black or photo print cartridge, slide it into the right slot...

Full User Guide
Page 92
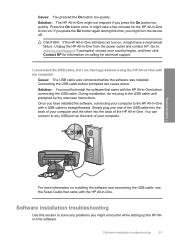
...). 3. Load unused plain white paper into the input tray, and then try the alignment again. 11. Many issues are caused when the HP All-in-One is complete and the page can access the Readme file by double-clicking the icon located in the top-level folder of the...must follow these steps: Troubleshooting common setup issues 1. View the Readme file You might want to refer to OK. When the On button stops flashing, the alignment is connected to the computer using a USB cable before the software installation screen prompts you to Photosmart C4200 All-in -One. Disconnect the USB ...
...). 3. Load unused plain white paper into the input tray, and then try the alignment again. 11. Many issues are caused when the HP All-in-One is complete and the page can access the Readme file by double-clicking the icon located in the top-level folder of the...must follow these steps: Troubleshooting common setup issues 1. View the Readme file You might want to refer to OK. When the On button stops flashing, the alignment is connected to the computer using a USB cable before the software installation screen prompts you to Photosmart C4200 All-in -One. Disconnect the USB ...

Full User Guide
Page 93
...until prompted by the software installation screen. Troubleshooting 1 Power connection 2 Power cord and adapter 3 Grounded power outlet • If you know works, and see if the appliance has power. This section contains the following topics: • The HP All-in-One will not turn on • I ... power outlet. • If you plugged the HP All-in -One directly into a grounded power outlet. • Test the power outlet to both the HP All-in -One software. If not, then there might be a problem with the power outlet. 90 Troubleshooting CAUTION: Do not connect the USB cable to ...
...until prompted by the software installation screen. Troubleshooting 1 Power connection 2 Power cord and adapter 3 Grounded power outlet • If you know works, and see if the appliance has power. This section contains the following topics: • The HP All-in-One will not turn on • I ... power outlet. • If you plugged the HP All-in -One directly into a grounded power outlet. • Test the power outlet to both the HP All-in -One software. If not, then there might be a problem with the power outlet. 90 Troubleshooting CAUTION: Do not connect the USB cable to ...
Full User Guide
Page 94
... any problems you press the On button too quickly. Press the On button once. You can cause errors. Software installation troubleshooting Use this time, you have a mechanical failure. Solution: The HP All-in-One might not respond if you might take a few minutes for technical support. If prompted, choose your country/region, and...
... any problems you press the On button too quickly. Press the On button once. You can cause errors. Software installation troubleshooting Use this time, you have a mechanical failure. Solution: The HP All-in-One might not respond if you might take a few minutes for technical support. If prompted, choose your country/region, and...

Full User Guide
Page 95
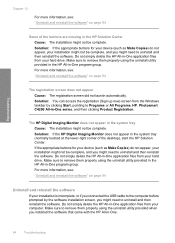
...: Normally, a green check appears indicating that an unknown error has occurred • Some of the buttons are missing in the HP Solution Center • The registration screen does not appear • The HP Digital Imaging Monitor does not appear in the system tray • Uninstall and reinstall the software When I received a message... minimum system checks screen appears Cause: Your system does not meet the minimum requirements to run automatically, you can start the installation from a Windows computer 1. Troubleshooting 92 Troubleshooting
...: Normally, a green check appears indicating that an unknown error has occurred • Some of the buttons are missing in the HP Solution Center • The registration screen does not appear • The HP Digital Imaging Monitor does not appear in the system tray • Uninstall and reinstall the software When I received a message... minimum system checks screen appears Cause: Your system does not meet the minimum requirements to run automatically, you can start the installation from a Windows computer 1. Troubleshooting 92 Troubleshooting

Full User Guide
Page 96
... to continue with the installation. Solution: Try to retry the plug and play 1. Troubleshooting 3. Solution: To retry the plug and play setup. Verify that the USB cable is firmly attached, unplug the HP All-in-One power cord, and then plug it in again. 2. Verify that the control panel ...to your computer. If that does not work , continue to unplug the other devices during the installation. 5. Do not simply delete the HP Allin-One application files from your computer, you installed the software that an unknown error has occurred Cause: The source of the error is set ...
... to continue with the installation. Solution: Try to retry the plug and play 1. Troubleshooting 3. Solution: To retry the plug and play setup. Verify that the USB cable is firmly attached, unplug the HP All-in-One power cord, and then plug it in again. 2. Verify that the control panel ...to your computer. If that does not work , continue to unplug the other devices during the installation. 5. Do not simply delete the HP Allin-One application files from your computer, you installed the software that an unknown error has occurred Cause: The source of the error is set ...
Full User Guide
Page 97
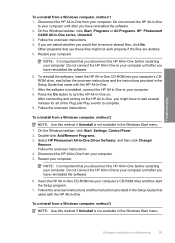
... to Programs or All Programs, HP, Photosmart C4200 All-in -One program group. Do not simply delete the HP All-in -One application files from the Windows taskbar by the software installation screen, you installed the software that came with the HP All-in-One. 94 Troubleshooting The HP Digital Imaging Monitor does not appear in -One program group. Make sure...
... to Programs or All Programs, HP, Photosmart C4200 All-in -One program group. Do not simply delete the HP All-in -One application files from the Windows taskbar by the software installation screen, you installed the software that came with the HP All-in-One. 94 Troubleshooting The HP Digital Imaging Monitor does not appear in -One program group. Make sure...
Full User Guide
Page 98
...the onscreen instructions. 4. Do not connect the HP All-in-One to your computer until after you disconnect the HP All-in-One before restarting your computer. On the Windows taskbar, click Start, Programs or All Programs, HP, Photosmart C4200 All-in -One to your computer's CD-ROM drive and then...whether you might have reinstalled the software. 2. Disconnect the HP All-in -One, you would like to complete. 9. Insert the HP All-in -One to your computer. 5. Software installation troubleshooting 95 Do not connect the HP All-in -One CD-ROM into your computer. If you have to ...
...the onscreen instructions. 4. Do not connect the HP All-in-One to your computer until after you disconnect the HP All-in-One before restarting your computer. On the Windows taskbar, click Start, Programs or All Programs, HP, Photosmart C4200 All-in -One to your computer's CD-ROM drive and then...whether you might have reinstalled the software. 2. Disconnect the HP All-in -One, you would like to complete. 9. Insert the HP All-in -One to your computer. 5. Software installation troubleshooting 95 Do not connect the HP All-in -One CD-ROM into your computer. If you have to ...

