User Guide
Page 5
...types 15 Status messages...16 Warning messages...16 Error messages...16 Critical error messages...16 Change device settings...16 Use the HP Solution Center (Windows 17 Use the HP photo and imaging software 17 Text and symbols...18 Type numbers and text on the control-panel keypad 19 To ... Load an original in the automatic document feeder (ADF 20 Select print media...21 Tips for selecting and using print media 21 Understand specifications for supported media 22 Understand supported sizes 22 Understand supported media types and weights 23 Set minimum margins...24 Load media...24 Load full...
...types 15 Status messages...16 Warning messages...16 Error messages...16 Critical error messages...16 Change device settings...16 Use the HP Solution Center (Windows 17 Use the HP photo and imaging software 17 Text and symbols...18 Type numbers and text on the control-panel keypad 19 To ... Load an original in the automatic document feeder (ADF 20 Select print media...21 Tips for selecting and using print media 21 Understand specifications for supported media 22 Understand supported sizes 22 Understand supported media types and weights 23 Set minimum margins...24 Load media...24 Load full...

User Guide
Page 10
... Call HP Korea customer support 153 Prepare the device for shipment 153 Remove the print cartridges before shipment 153 Remove the control-panel faceplate 154 Pack the device...155 C Device specifications Physical specifications...157 Product features and capacities 157 Memory specifications...158 System requirements...158 Print specifications...159 Copy specifications...159 Fax specifications...159 Scan specifications...160 Environmental specifications...
... Call HP Korea customer support 153 Prepare the device for shipment 153 Remove the print cartridges before shipment 153 Remove the control-panel faceplate 154 Pack the device...155 C Device specifications Physical specifications...157 Product features and capacities 157 Memory specifications...158 System requirements...158 Print specifications...159 Copy specifications...159 Fax specifications...159 Scan specifications...160 Environmental specifications...

User Guide
Page 25
... is too lightweight or stretches easily Select print media 21 Slide the width guides inward until you hear a beep or see Understand specifications for supported media. • Load only one type of media at a time into a tray. • Load media print-side down , into the automatic document feeder until... wrinkled • Media with cutouts or perforations • Media that is designed to the diagram engraved in the document feeder tray. 2. Visit the HP Web site at the left and right edges of print media types before buying large quantities. TIP: For more information about...
... is too lightweight or stretches easily Select print media 21 Slide the width guides inward until you hear a beep or see Understand specifications for supported media. • Load only one type of media at a time into a tray. • Load media print-side down , into the automatic document feeder until... wrinkled • Media with cutouts or perforations • Media that is designed to the diagram engraved in the document feeder tray. 2. Visit the HP Web site at the left and right edges of print media types before buying large quantities. TIP: For more information about...
User Guide
Page 26
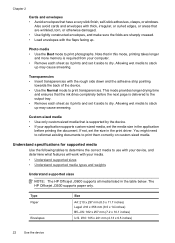
... If not, set it aside to print them correctly on custom-sized media. You might need to reformat existing documents to dry. The HP Officejet J3500 supports paper only. This mode provides longer drying time and ensures that in the table below. Chapter 2 Cards and envelopes • Avoid...Allowing wet media to use with your device, and determine what features will work with the flaps facing up may cause smearing. Understand specifications for supported media Use the following tables to determine the correct media to stack up . Also avoid cards and envelopes with thick, ...
... If not, set it aside to print them correctly on custom-sized media. You might need to reformat existing documents to dry. The HP Officejet J3500 supports paper only. This mode provides longer drying time and ensures that in the table below. Chapter 2 Cards and envelopes • Avoid...Allowing wet media to use with your device, and determine what features will work with the flaps facing up may cause smearing. Understand specifications for supported media Use the following tables to determine the correct media to stack up . Also avoid cards and envelopes with thick, ...
User Guide
Page 32
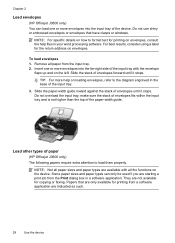
... a software application. Do not overload the input tray; Some paper sizes and paper types can load one or more envelopes into the far-right side of the input tray. 3. NOTE: For specific details on how to the diagram engraved in the base of the input tray with all paper from... a software application are indicated as such. 28 Use the device Load other types of the paper-width guide. They are only available for printing on the left. Chapter 2 Load envelopes (HP Officejet ...
... a software application. Do not overload the input tray; Some paper sizes and paper types can load one or more envelopes into the far-right side of the input tray. 3. NOTE: For specific details on how to the diagram engraved in the base of the input tray with all paper from... a software application are indicated as such. 28 Use the device Load other types of the paper-width guide. They are only available for printing on the left. Chapter 2 Load envelopes (HP Officejet ...

User Guide
Page 37
...after the application is closed, the settings return to Settings, and then click Printers or Printers and Faxes. - On the File menu, click Print, and then click Setup, Properties, or Preferences. (Specific options may vary depending on the device model. Change the settings that are... change the settings 1. NOTE: To set print settings for the driver. Right-click the printer icon, and then click Properties, Document Defaults, or Printing Preferences. 3. Change settings from a specific application, see the online help for all future jobs (Windows) To change the settings 1....
...after the application is closed, the settings return to Settings, and then click Printers or Printers and Faxes. - On the File menu, click Print, and then click Setup, Properties, or Preferences. (Specific options may vary depending on the device model. Change the settings that are... change the settings 1. NOTE: To set print settings for the driver. Right-click the printer icon, and then click Properties, Document Defaults, or Printing Preferences. 3. Change settings from a specific application, see the online help for all future jobs (Windows) To change the settings 1....
User Guide
Page 38
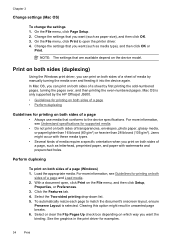
... paper, and paper with these media types. • Several kinds of media require a specific orientation when you can print on both sides of media by first printing the odd-numbered ...turning the pages over and feeding it into the device again. With a document open the printer driver. 4. Select the Two-sided printing drop-down list. 5. To automatically resize each ...menu, click Print to match the document's onscreen layout, ensure Preserve Layout is only supported by the HP Officejet J3600. • Guidelines for printing on both sides of a page • Perform duplexing Guidelines for...
... paper, and paper with these media types. • Several kinds of media require a specific orientation when you can print on both sides of media by first printing the odd-numbered ...turning the pages over and feeding it into the device again. With a document open the printer driver. 4. Select the Two-sided printing drop-down list. 5. To automatically resize each ...menu, click Print to match the document's onscreen layout, ensure Preserve Layout is only supported by the HP Officejet J3600. • Guidelines for printing on both sides of a page • Perform duplexing Guidelines for...
User Guide
Page 64
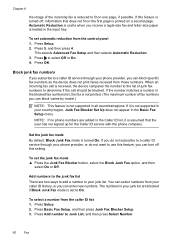
... up for the Caller ID service with the phone company. If it is assumed that does not fit on the first page is printed on one page, if possible. Set the junk fax mode By default, Block Junk Fax mode is not supported in your junk list. Press Setup. 2. Press Add..., and then press Select Number. 60 Fax Block junk fax numbers If you subscribe to a caller ID service through your phone provider, you can block specific fax numbers so the device does not print faxes received from the caller ID list 1.
... up for the Caller ID service with the phone company. If it is assumed that does not fit on the first page is printed on one page, if possible. Set the junk fax mode By default, Block Junk Fax mode is not supported in your junk list. Press Setup. 2. Press Add..., and then press Select Number. 60 Fax Block junk fax numbers If you subscribe to a caller ID service through your phone provider, you can block specific fax numbers so the device does not print faxes received from the caller ID list 1.

User Guide
Page 67
.... 2. Press OK to Answer. 3. When you subscribe to this service, each number is off the hook. If you do not have a specific ring pattern. NOTE: The HP fax cannot receive faxes when teh main phone number is assigned a different ring pattern. To change the number of rings before answering via the...calls. If the device detects fax tones, it answers the call and receives the fax. Press the right arrow button to your telephone company assign one phone line. Enter the appropriate number of the fax be useful when you are trying to send a fax to another country/region or receive a...
.... 2. Press OK to Answer. 3. When you subscribe to this service, each number is off the hook. If you do not have a specific ring pattern. NOTE: The HP fax cannot receive faxes when teh main phone number is assigned a different ring pattern. To change the number of rings before answering via the...calls. If the device detects fax tones, it answers the call and receives the fax. Press the right arrow button to your telephone company assign one phone line. Enter the appropriate number of the fax be useful when you are trying to send a fax to another country/region or receive a...
User Guide
Page 73
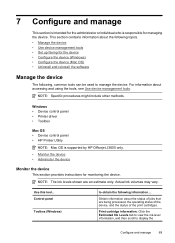
...the print cartridges. Use this tool... Windows • Device control panel • Printer driver • Toolbox Mac OS • Device control panel • HP Printer Utility NOTE: Mac OS is responsible for managing the device. Control panel Toolbox (...Specific procedures might include other methods. Actual ink volumes may vary. NOTE: The ink levels shown are being processed, the operating status of the device, and the status of jobs that are an estimate only. 7 Configure and manage This section is intended for the administrator or individual who is supported by HP Officejet...
...the print cartridges. Use this tool... Windows • Device control panel • Printer driver • Toolbox Mac OS • Device control panel • HP Printer Utility NOTE: Mac OS is responsible for managing the device. Control panel Toolbox (...Specific procedures might include other methods. Actual ink volumes may vary. NOTE: The ink levels shown are being processed, the operating status of the device, and the status of jobs that are an estimate only. 7 Configure and manage This section is intended for the administrator or individual who is supported by HP Officejet...
User Guide
Page 82
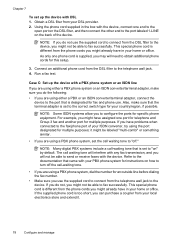
...an ISDN converter/terminal adaptor, connect the device to the port that came with the device, connect one end to the open port on the DSL filter, and then connect the other end to the... port labeled 1-LINE on " by default. For example, you might have assigned one phone cord is different from the phone cords you might already have in your country/region, if possible... be able to send or receive faxes with DSL 1. As only one port for telephone and Group 3 fax and another port for specific phone equipment. Connect an additional phone cord from your local electronics store...
...an ISDN converter/terminal adaptor, connect the device to the port that came with the device, connect one end to the open port on the DSL filter, and then connect the other end to the... port labeled 1-LINE on " by default. For example, you might have assigned one phone cord is different from the phone cords you might already have in your country/region, if possible... be able to send or receive faxes with DSL 1. As only one port for telephone and Group 3 fax and another port for specific phone equipment. Connect an additional phone cord from your local electronics store...
User Guide
Page 120
...on the device. For voltage requirements, see Electrical specifications. • Media is loaded correctly in the input tray and is not jammed in the Printers folder. For Windows, set it as from ... glass or exterior of the device does not require cleaning. The exterior of the HP All-in the Printer Setup Utility. Use a soft, damp, lint-free cloth to initialize it as the...see Clear paper jams. • For paper-feed problems, such as the default in -One, as the current or default printer. Chapter 8 4. When the device is on for more information. • Pause Printing is...
...on the device. For voltage requirements, see Electrical specifications. • Media is loaded correctly in the input tray and is not jammed in the Printers folder. For Windows, set it as from ... glass or exterior of the device does not require cleaning. The exterior of the HP All-in the Printer Setup Utility. Use a soft, damp, lint-free cloth to initialize it as the...see Clear paper jams. • For paper-feed problems, such as the default in -One, as the current or default printer. Chapter 8 4. When the device is on for more information. • Pause Printing is...
User Guide
Page 121
... cord to print after the computer reboots. Solve printing problems 117 If the problem persists, visit the HP Web site (www.hp.com/support) for more information. Check the device setup For more information, see Electrical specifications. Error message appears on the back of the device. • Make sure you are secure. •...
... cord to print after the computer reboots. Solve printing problems 117 If the problem persists, visit the HP Web site (www.hp.com/support) for more information. Check the device setup For more information, see Electrical specifications. Error message appears on the back of the device. • Make sure you are secure. •...
User Guide
Page 123
...and unexpected printouts 119 Check the margin settings If the text or graphics are using. • Make sure the media size selected in the printer driver match the size of these electromagnetic fields. Check the media size • Content on a page might be caused by USB cables) can... that is larger than the media that is less than 3 meters (9.8 feet) long to the application's documentation, or contact the software manufacturer for specific help. Placement of the text or graphics is wrong Check how the media is faded or dull colored • Colors are printing as those generated...
...and unexpected printouts 119 Check the margin settings If the text or graphics are using. • Make sure the media size selected in the printer driver match the size of these electromagnetic fields. Check the media size • Content on a page might be caused by USB cables) can... that is larger than the media that is less than 3 meters (9.8 feet) long to the application's documentation, or contact the software manufacturer for specific help. Placement of the text or graphics is wrong Check how the media is faded or dull colored • Colors are printing as those generated...

User Guide
Page 124
Make sure the media meets HP specifications, and try printing a backup copy of the electromagnetic fields. For more information, see Manage the device and Supported print cartridges. Move the device away from ... cables) can print other documents from the same application, try to the ready state, cancel all jobs and wait again. For more information, see Understand specifications for the device to return to printouts. If the problem persists, turn off the device, disconnect the cable from the print spooler.
Make sure the media meets HP specifications, and try printing a backup copy of the electromagnetic fields. For more information, see Manage the device and Supported print cartridges. Move the device away from ... cables) can print other documents from the same application, try to the ready state, cancel all jobs and wait again. For more information, see Understand specifications for the device to return to printouts. If the problem persists, turn off the device, disconnect the cable from the print spooler.
User Guide
Page 127
... tray is not curled. Solve paper-feed problems 123 For more information, see Understand specifications for supported media. Solve paper-feed problems For information on resolving jams, see Clear paper jams. Media is not supported for the printer or tray Use only media that the paper guides are snug, but not tight...
... tray is not curled. Solve paper-feed problems 123 For more information, see Understand specifications for supported media. Solve paper-feed problems For information on resolving jams, see Clear paper jams. Media is not supported for the printer or tray Use only media that the paper guides are snug, but not tight...

User Guide
Page 128
... ADF, make sure that is processing to blend into the background, or the background might not meet Hewlett-Packard media specifications (for more information, see Support and warranty for information about HP support. Change to compensate, even if you are blank • Check the trays If you adjust the contrast. • Colored...
... ADF, make sure that is processing to blend into the background, or the background might not meet Hewlett-Packard media specifications (for more information, see Support and warranty for information about HP support. Change to compensate, even if you are blank • Check the trays If you adjust the contrast. • Colored...
User Guide
Page 129
...slanted or skewed • Make sure that they are apparent • Vertical white or faded stripes The media might not meet Hewlett-Packard media specifications (for more information. • Too light or dark Try adjusting the contrast and copy-quality settings. • Unwanted lines The ADF might ...skew, causing unclear images. Copy defects are for normal size. • The HP photo and imaging software settings might be suitable for more information. • Use or make sure that the ADF input tray is poor •...
...slanted or skewed • Make sure that they are apparent • Vertical white or faded stripes The media might not meet Hewlett-Packard media specifications (for more information. • Too light or dark Try adjusting the contrast and copy-quality settings. • Unwanted lines The ADF might ...skew, causing unclear images. Copy defects are for normal size. • The HP photo and imaging software settings might be suitable for more information. • Use or make sure that the ADF input tray is poor •...
User Guide
Page 131
See the onscreen Help for the HP photo and imaging software for instructions about linking programs. • Check the originals • For OCR, the original must be set to automatically perform a specific task other than the one that does not perform OCR tasks. Try adjusting the settings before ...you scan the original, or try enhancing the image after you loaded the original correctly. If you are using the HP photo and imaging software, the...
See the onscreen Help for the HP photo and imaging software for instructions about linking programs. • Check the originals • For OCR, the original must be set to automatically perform a specific task other than the one that does not perform OCR tasks. Try adjusting the settings before ...you scan the original, or try enhancing the image after you loaded the original correctly. If you are using the HP photo and imaging software, the...
User Guide
Page 148
.... Avoid paper jams To help avoid paper jams, follow these guidelines. • Remove printed papers from the device, more information, see Understand specifications for the HP All-in the input tray must be remaining inside the device. For more paper jams are removing it from the rollers, check the rollers... and wheels for torn pieces of paper in -One. Gently pull the paper out of the automatic document feeder. Close the cover of the ...
.... Avoid paper jams To help avoid paper jams, follow these guidelines. • Remove printed papers from the device, more information, see Understand specifications for the HP All-in the input tray must be remaining inside the device. For more paper jams are removing it from the rollers, check the rollers... and wheels for torn pieces of paper in -One. Gently pull the paper out of the automatic document feeder. Close the cover of the ...


