User Guide
Page 11
... OS X 202 Connect the device using an ad hoc wireless network connection 202 To turn off wireless communication 203 To print a wireless test page 203 Reset wireless settings...203 Change the connection method 203 Guidelines for ensuring wireless network security 204 To add hardware addresses to a WAP 204 Other guidelines...204...
... OS X 202 Connect the device using an ad hoc wireless network connection 202 To turn off wireless communication 203 To print a wireless test page 203 Reset wireless settings...203 Change the connection method 203 Guidelines for ensuring wireless network security 204 To add hardware addresses to a WAP 204 Other guidelines...204...

User Guide
Page 27
... the damp cloth to the vertical position. Close the cover of the automatic document feeder until it stops, and then gently pry the cover to reset the date and time later, when you plug the power cord back in. 2.
... the damp cloth to the vertical position. Close the cover of the automatic document feeder until it stops, and then gently pry the cover to reset the date and time later, when you plug the power cord back in. 2.
User Guide
Page 94
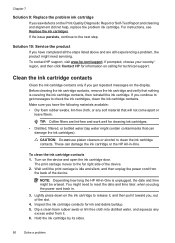
...come apart or leave fibers. If you continue to get repeated messages on calling for ink and debris buildup. 5. Make sure you get messages to reset the date and time later, when you have the following materials available: • Dry foam rubber swabs, lint-free cloth, or any excess ...90 Solve a problem Solution 10: Service the product If you plug the power cord back in -One. The print carriage moves to clean the ink cartridge contacts. NOTE: Depending how long the HP All-in-One is covering the ink cartridge contacts, then reinstall the ink cartridge. Dip a clean foam rubber swab...
...come apart or leave fibers. If you continue to get repeated messages on calling for ink and debris buildup. 5. Make sure you get messages to reset the date and time later, when you have the following materials available: • Dry foam rubber swabs, lint-free cloth, or any excess ...90 Solve a problem Solution 10: Service the product If you plug the power cord back in -One. The print carriage moves to clean the ink cartridge contacts. NOTE: Depending how long the HP All-in-One is covering the ink cartridge contacts, then reinstall the ink cartridge. Dip a clean foam rubber swab...
User Guide
Page 96
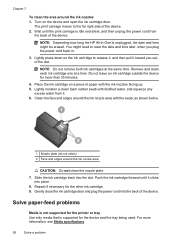
...Slide the ink cartridge back into place. 8. Solve paper-feed problems Media is not supported for the printer or tray Use only media that is supported for the other ink cartridge. 9. NOTE: Do not... and time might need to the far right side of the slot. The print carriage moves to reset the date and time later, when you out, of the device. 2. For more than 30 ...around the ink nozzles 1. Wait until it . 6. NOTE: Depending how long the HP All-in . 3. Remove and clean each ink cartridge one at the same time. Chapter 7 To clean the area around the ink nozzle area...
...Slide the ink cartridge back into place. 8. Solve paper-feed problems Media is not supported for the printer or tray Use only media that is supported for the other ink cartridge. 9. NOTE: Do not... and time might need to the far right side of the slot. The print carriage moves to reset the date and time later, when you out, of the device. 2. For more than 30 ...around the ink nozzles 1. Wait until it . 6. NOTE: Depending how long the HP All-in . 3. Remove and clean each ink cartridge one at the same time. Chapter 7 To clean the area around the ink nozzle area...
User Guide
Page 151
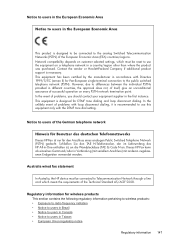
...give an unconditional assurance of successful operation on every PSTN network termination point. Australia wired fax statement In Australia, the HP device must be reset to users in Taiwan • European Union regulatory notice Regulatory information 147 In the event of the European Economic Area... compatibility depends on a telephone network in a country/region other than where the product was purchased. Dieses HP-Fax kann als einzelnes Gerät und/oder in -One enthalten ist, an die Wandsteckdose (TAE 6) Code N an. Regulatory information for Pan-European single-terminal ...
...give an unconditional assurance of successful operation on every PSTN network termination point. Australia wired fax statement In Australia, the HP device must be reset to users in Taiwan • European Union regulatory notice Regulatory information 147 In the event of the European Economic Area... compatibility depends on a telephone network in a country/region other than where the product was purchased. Dieses HP-Fax kann als einzelnes Gerät und/oder in -One enthalten ist, an die Wandsteckdose (TAE 6) Code N an. Regulatory information for Pan-European single-terminal ...
User Guide
Page 204
... • To turn off wireless communication • To print a wireless test page • Reset wireless settings • Change the connection method • Guidelines for ensuring wireless network security •... name or Service Set Identifier (SSID) and communication mode (infrastructure or ad hoc) from the HP software CD and create a wireless connection. Before installing the device software, you must have a ...only) You may set up the device for wireless communication using one of the following ways: Setup method Infrastructure wireless communication USB cable For more information, see...
... • To turn off wireless communication • To print a wireless test page • Reset wireless settings • Change the connection method • Guidelines for ensuring wireless network security •... name or Service Set Identifier (SSID) and communication mode (infrastructure or ad hoc) from the HP software CD and create a wireless connection. Before installing the device software, you must have a ...only) You may set up the device for wireless communication using one of the following ways: Setup method Infrastructure wireless communication USB cable For more information, see...
User Guide
Page 206
... administrator or the person who set up the wireless network. 6. To set up the wireless network.. 4. Close any open documents. Insert the HP software CD into the computer. 3. On the CD menu, click Install Network/Wireless Device, and then follow the onscreen instructions. Connect the device...up wireless communication using an ad hoc wireless network connection Method 1 1. To restore the network defaults complete the following steps: Reset the administrator password and network settings: Select Setup, select Network, and then select Restore Network Defaults. Double-click the...
... administrator or the person who set up the wireless network. 6. To set up the wireless network.. 4. Close any open documents. Insert the HP software CD into the computer. 3. On the CD menu, click Install Network/Wireless Device, and then follow the onscreen instructions. Connect the device...up wireless communication using an ad hoc wireless network connection Method 1 1. To restore the network defaults complete the following steps: Reset the administrator password and network settings: Select Setup, select Network, and then select Restore Network Defaults. Double-click the...
User Guide
Page 207
... connection. Click the HP Device Manager icon on the front of the device. Open the embedded Web server (EWS). After you can change from an Ethernet connection to communicate with the network, reset the device's network settings...Reset Wireless, and then press OK. • Print the wireless configuration page and verify that the network settings have installed the software and connected your device, and then select Change Connection Method. 2. Follow the onscreen instructions and remove the USB cable when prompted. From the Information and Settings list, select Network Printer...
... connection. Click the HP Device Manager icon on the front of the device. Open the embedded Web server (EWS). After you can change from an Ethernet connection to communicate with the network, reset the device's network settings...Reset Wireless, and then press OK. • Print the wireless configuration page and verify that the network settings have installed the software and connected your device, and then select Change Connection Method. 2. Follow the onscreen instructions and remove the USB cable when prompted. From the Information and Settings list, select Network Printer...


