User Guide
Page 7
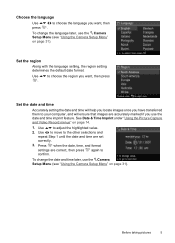
... to confirm. Before taking pictures 5 Press when the date, time, and format settings are accurately marked if you use the date and time imprint feature. Use to choose the region you want , then press . Use to move to adjust the highlighted value. 2. Use to the other selections and... & Time Imprint under "Using the Picture Capture and Video Record menus" on page 31). To change the language later, use the Camera Setup Menu (see "Using the Camera Setup Menu" on page 31). Choose the language Use to choose the language you want , then press . To change the date...
... to confirm. Before taking pictures 5 Press when the date, time, and format settings are accurately marked if you use the date and time imprint feature. Use to choose the region you want , then press . Use to move to adjust the highlighted value. 2. Use to the other selections and... & Time Imprint under "Using the Picture Capture and Video Record menus" on page 31). To change the language later, use the Camera Setup Menu (see "Using the Camera Setup Menu" on page 31). Choose the language Use to choose the language you want , then press . To change the date...
User Guide
Page 8
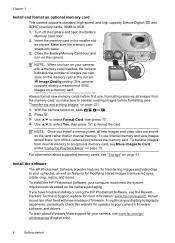
... all new images and video clips are often fixed with a memory card installed, the camera indicates the number of images you have trouble installing or using the HP Photosmart Software, see the HewlettPackard Technical Support website for updates to Card under "Using the Playback... memory card, so make sure to your computer, as well as features for your digital photography experience, periodically check this website for more ). Install the software The HP Photosmart Software provides features for transferring images and video clips to transfer existing images before first use...
... all new images and video clips are often fixed with a memory card installed, the camera indicates the number of images you have trouble installing or using the HP Photosmart Software, see the HewlettPackard Technical Support website for updates to Card under "Using the Playback... memory card, so make sure to your computer, as well as features for your digital photography experience, periodically check this website for more ). Install the software The HP Photosmart Software provides features for transferring images and video clips to transfer existing images before first use...
User Guide
Page 15
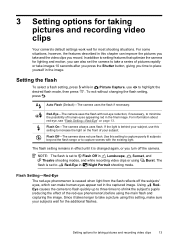
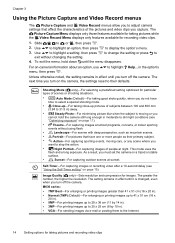
...of pictures rapidly or take images 10 seconds after you press the Shutter button, giving you record. For some situations, however, the features described in Landscape, Sunset, and Theatre shooting modes, and while recording video clips or using this setting to capture scenes with red-eye...if necessary, to shrink the subject's pupils (reducing the effect of your subjects wait for the additional flashes. In addition to setting features that optimize the camera for lighting and motion, you take a picture using Burst. Setting the flash To select a flash setting, press while in Picture ...
...of pictures rapidly or take images 10 seconds after you press the Shutter button, giving you record. For some situations, however, the features described in Landscape, Sunset, and Theatre shooting modes, and while recording video clips or using this setting to capture scenes with red-eye...if necessary, to shrink the subject's pupils (reducing the effect of your subjects wait for the additional flashes. In addition to setting features that optimize the camera for lighting and motion, you take a picture using Burst. Setting the flash To select a flash setting, press while in Picture ...
User Guide
Page 16
... exit the menu, hold the camera still long enough in ). • VGA-For sending images via e-mail or posting them to the Internet. 14 Setting options for taking pictures while the Video Record Menu displays only features available for recording video clips. 1. As a result, you ...• Steady Photo-For minimizing picture blur when the subject is changed, even when you capture. The Picture Capture Menu displays only those features available for images. For on page 11). • Theatre-For capturing images at school programs, concerts, or indoor sporting events without changing...
... exit the menu, hold the camera still long enough in ). • VGA-For sending images via e-mail or posting them to the Internet. 14 Setting options for taking pictures while the Video Record Menu displays only features available for recording video clips. 1. As a result, you ...• Steady Photo-For minimizing picture blur when the subject is changed, even when you capture. The Picture Capture Menu displays only those features available for images. For on page 11). • Theatre-For capturing images at school programs, concerts, or indoor sporting events without changing...
User Guide
Page 17
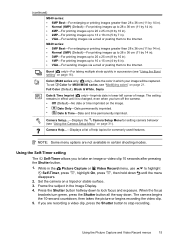
...printing images up to 28 x 36 cm (11 by 14 in). • 4MP-For printing images up to 20 x 25 cm (8 by 10 in). • 2MP-For printing images up to 10 x 15 cm (4 by 7 in). • VGA-For sending images via e-mail or posting them to stop recording. To set... page 21. The camera begins the 10-second countdown, then takes the picture or begins recording the video clip. 5. Full Color (Default), Black & White, Sepia Date & Time Imprint ( only)-Imprints date in lower left corner of help topics for commonly used features. Using the Picture Capture and Video Record menus 15 (...
...printing images up to 28 x 36 cm (11 by 14 in). • 4MP-For printing images up to 20 x 25 cm (8 by 10 in). • 2MP-For printing images up to 10 x 15 cm (4 by 7 in). • VGA-For sending images via e-mail or posting them to stop recording. To set... page 21. The camera begins the 10-second countdown, then takes the picture or begins recording the video clip. 5. Full Color (Default), Black & White, Sepia Date & Time Imprint ( only)-Imprints date in lower left corner of help topics for commonly used features. Using the Picture Capture and Video Record menus 15 (...

User Guide
Page 20
... if you have images tagged as Favorites (see "Tagging images as Zoom In on page 20). • All Images (in Playback, press . 2. Magnifying images This feature is magnified 2x. 2. The currently displayed image is for viewing purposes only;
... if you have images tagged as Favorites (see "Tagging images as Zoom In on page 20). • All Images (in Playback, press . 2. Magnifying images This feature is magnified 2x. 2. The currently displayed image is for viewing purposes only;
User Guide
Page 21
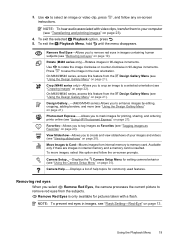
... . 5. On M630/M540 series, access this feature from the subjects. Photosmart Express...-Allows you to tag images as Favorites (see "Tagging images as Favorites" on page 27). Favorites-Allows you select Remove Red Eyes, the camera processes the current picture to save the image in.... Camera Setup...-Displays the Camera Setup Menu for commonly used features. Removing red eyes When you to mark images for printing, sharing, and ordering prints online (see "Flash Setting-Red-Eye" on page 20). Available only if there are images in images, see "Using HP Photosmart Express...
... . 5. On M630/M540 series, access this feature from the subjects. Photosmart Express...-Allows you to tag images as Favorites (see "Tagging images as Favorites" on page 27). Favorites-Allows you select Remove Red Eyes, the camera processes the current picture to save the image in.... Camera Setup...-Displays the Camera Setup Menu for commonly used features. Removing red eyes When you to mark images for printing, sharing, and ordering prints online (see "Flash Setting-Red-Eye" on page 20). Available only if there are images in images, see "Using HP Photosmart Express...
User Guide
Page 23
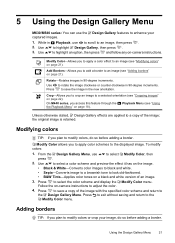
... series, you to apply color schemes to a selected orientation (see "Using the Playback Menu" on -camera instructions to highlight Design Gallery, then press . 3. Modify Color allows you access this feature through the Playback Menu (see "Cropping images" on page 21). Rotate-Rotates images in Playback, use ... to an image (see "Modifying colors" on page 22). 5 Using the Design Gallery Menu M630/M540 series: You can use the Design Gallery features to modify colors or crop your captured images. 1. Adding borders TIP: If you to add a border to look old-fashioned. • B&W...
... series, you to apply color schemes to a selected orientation (see "Using the Playback Menu" on -camera instructions to highlight Design Gallery, then press . 3. Modify Color allows you access this feature through the Playback Menu (see "Cropping images" on page 21). Rotate-Rotates images in Playback, use ... to an image (see "Modifying colors" on page 22). 5 Using the Design Gallery Menu M630/M540 series: You can use the Design Gallery features to modify colors or crop your captured images. 1. Adding borders TIP: If you to add a border to look old-fashioned. • B&W...
User Guide
Page 25
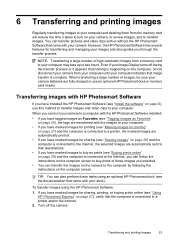
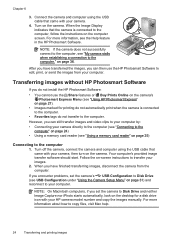
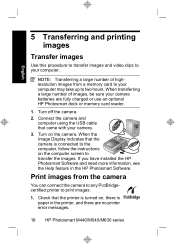
You can transfer pictures and video clips with or without the HP Photosmart Software that the computer is complete. However, the HP Photosmart Software has several features for printing" on page 27) and the computer is connected to a printer, the marked images are automatically printed...video clips to your computer. To transfer images using an optional HP Photosmart dock (see "Using HP Photosmart Express" on the computer, do not disconnect your camera from your computer until your Image Display turns off the camera. NOTE: Transferring a large number of high-resolution images from a...
You can transfer pictures and video clips with or without the HP Photosmart Software that the computer is complete. However, the HP Photosmart Software has several features for printing" on page 27) and the computer is connected to a printer, the marked images are automatically printed...video clips to your computer. To transfer images using an optional HP Photosmart dock (see "Using HP Photosmart Express" on the computer, do not disconnect your camera from your computer until your Image Display turns off the camera. NOTE: Transferring a large number of high-resolution images from a...
User Guide
Page 26
... icon with your images. 2. Your computer's provided image transfer software should start. Chapter 6 3. NOTE: If the camera does not successfully connect to the computer, see the Help feature in the HP Photosmart Software. For more information, see "My camera stalls when establishing a connection to the computer, follow the instructions on page 36. When the Image...
... icon with your images. 2. Your computer's provided image transfer software should start. Chapter 6 3. NOTE: If the camera does not successfully connect to the computer, see the Help feature in the HP Photosmart Software. For more information, see "My camera stalls when establishing a connection to the computer, follow the instructions on page 36. When the Image...

User Guide
Page 29
... connect the camera to print. You can select pictures in your camera to print automatically (see "Marking images for pictures. See "Sharing images" on page 29. 7 Using HP Photosmart Express With HP Photosmart Express, you can mark Using HP Photosmart Express 27 You must have the HP Photosmart Software installed on...on page 29. See "Marking images for video clips. Buy Prints Online-Specifies images you connect the camera to your computer to use some features in the Photosmart Express Menu are not available for printing" on page 29) the next time you want printed by ...
... connect the camera to print. You can select pictures in your camera to print automatically (see "Marking images for pictures. See "Sharing images" on page 29. 7 Using HP Photosmart Express With HP Photosmart Express, you can mark Using HP Photosmart Express 27 You must have the HP Photosmart Software installed on...on page 29. See "Marking images for video clips. Buy Prints Online-Specifies images you connect the camera to your computer to use some features in the Photosmart Express Menu are not available for printing" on page 29) the next time you want printed by ...
User Guide
Page 34
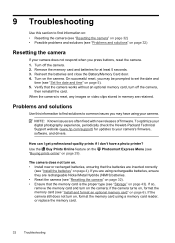
... reinstall the card. Use the Buy Prints Online feature on the Photosmart Express Menu (see "Install the batteries" on page 4). The camera does not turn off the camera. 2. if the camera turns on, format the memory card (see "Set the date and time" on page 5). 5. On successful reset, you... type (see "Problems and solutions" on page 32) Resetting the camera If your camera does not respond when you may be prompted to your digital photography experience, periodically check the Hewlett-Packard Technical Support website (www.hp.com/support) for at least 5 seconds. 3. If you are ...
... reinstall the card. Use the Buy Prints Online feature on the Photosmart Express Menu (see "Install the batteries" on page 4). The camera does not turn off the camera. 2. if the camera turns on, format the memory card (see "Set the date and time" on page 5). 5. On successful reset, you... type (see "Problems and solutions" on page 32) Resetting the camera If your camera does not respond when you may be prompted to your digital photography experience, periodically check the Hewlett-Packard Technical Support website (www.hp.com/support) for at least 5 seconds. 3. If you are ...

Quick Start Guide
Page 4
... • Supported battery types • A description of all the camera features • Install the HP • Battery information, Photosmart Software including: • Become familiar with your camera. For detailed information about camera features, see the electronic User Guide (see Viewing the electronic User Guide on the HP Photosmart Software CD. 4 HP Photosmart M440/M540/M630 series English 1 Getting started This printed...
... • Supported battery types • A description of all the camera features • Install the HP • Battery information, Photosmart Software including: • Become familiar with your camera. For detailed information about camera features, see the electronic User Guide (see Viewing the electronic User Guide on the HP Photosmart Software CD. 4 HP Photosmart M440/M540/M630 series English 1 Getting started This printed...

Quick Start Guide
Page 9
... date format. Set the date and time Accurately setting the date and time will help you locate images once you have transferred them to your camera 9 button. Use to move to the other selections and repeat Step 1 until the date and time are accurately marked if you use the date... and time imprint feature. 1. Press when the date, Setting up your computer, and will ensure that images are set correctly. 3. Turn on the camera To turn on the camera, press the Choose the language Use to choose the language you want , ...
... date format. Set the date and time Accurately setting the date and time will help you locate images once you have transferred them to your camera 9 button. Use to move to the other selections and repeat Step 1 until the date and time are accurately marked if you use the date... and time imprint feature. 1. Press when the date, Setting up your computer, and will ensure that images are set correctly. 3. Turn on the camera To turn on the camera, press the Choose the language Use to choose the language you want , ...
Quick Start Guide
Page 11
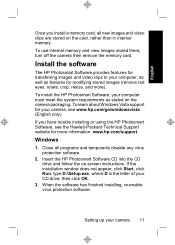
... software. Install the software The HP Photosmart Software provides features for transferring images and video clips to your camera, see the Hewlett-Packard Technical Support website for more ). Insert the HP Photosmart Software CD into the CD drive and follow the on the camera packaging. To learn about Windows ..., click Start, click Run, type D:\Setup.exe, where D is the letter of your camera 11 English Once you have trouble installing or using the HP Photosmart Software, see www.hp.com/go/windowsvista (English only). To use internal memory and view images stored there, turn off...
... software. Install the software The HP Photosmart Software provides features for transferring images and video clips to your camera, see the Hewlett-Packard Technical Support website for more ). Insert the HP Photosmart Software CD into the CD drive and follow the on the camera packaging. To learn about Windows ..., click Start, click Run, type D:\Setup.exe, where D is the letter of your camera 11 English Once you have trouble installing or using the HP Photosmart Software, see www.hp.com/go/windowsvista (English only). To use internal memory and view images stored there, turn off...
Quick Start Guide
Page 16
..., be sure your computer may take up to two hours. Turn off the camera. 2. If you have installed the HP Photosmart Software and need more information, see the Help feature in the printer, and there are fully charged or use an optional HP Photosmart dock or memory card reader. 1. Check that the printer is turned on...
..., be sure your computer may take up to two hours. Turn off the camera. 2. If you have installed the HP Photosmart Software and need more information, see the Help feature in the printer, and there are fully charged or use an optional HP Photosmart dock or memory card reader. 1. Check that the printer is turned on...

Quick Start Guide
Page 18
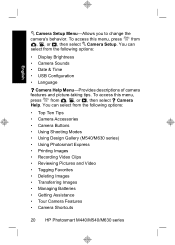
...images you to , then press . To learn more about these camera features, refer to . To activate Playback, slide to the electronic User Guide or on-camera Help. Picture Capture Menu-Allows you capture with images, and access camera Help. • Within a menu, use selections. To access ...• Shooting Mode (Auto, Close-up, Steady Photo, Theatre, Landscape, Portrait, Action, Night Portrait, Sunset) • Self-Timer 18 HP Photosmart M440/M540/M630 series Picture Capture, Video Record, and Playback • Picture Capture allows you review and delete images and video clips. to ...
...images you to , then press . To learn more about these camera features, refer to . To activate Playback, slide to the electronic User Guide or on-camera Help. Picture Capture Menu-Allows you capture with images, and access camera Help. • Within a menu, use selections. To access ...• Shooting Mode (Auto, Close-up, Steady Photo, Theatre, Landscape, Portrait, Action, Night Portrait, Sunset) • Self-Timer 18 HP Photosmart M440/M540/M630 series Picture Capture, Video Record, and Playback • Picture Capture allows you review and delete images and video clips. to ...
Quick Start Guide
Page 20
... • Deleting Images • Transferring Images • Managing Batteries • Getting Assistance • Tour Camera Features • Camera Shortcuts 20 HP Photosmart M440/M540/M630 series You can select from the following options: • Display Brightness • Camera Sounds • Date & Time • USB Configuration • Language Camera Help Menu-Provides descriptions of camera features and picture-taking tips.
... • Deleting Images • Transferring Images • Managing Batteries • Getting Assistance • Tour Camera Features • Camera Shortcuts 20 HP Photosmart M440/M540/M630 series You can select from the following options: • Display Brightness • Camera Sounds • Date & Time • USB Configuration • Language Camera Help Menu-Provides descriptions of camera features and picture-taking tips.

