User Guide
Page 3
... 1 Getting started...5 Camera top and back 5 Camera front, side, and bottom 6 Camera dock insert 6 Before taking pictures 6 Using your camera 9 2 Taking pictures and recording video clips 11 Taking still pictures 11 Recording video clips 12 Instant Review...12 Auto focus and... 8 Troubleshooting 32 Resetting the camera 32 Problems and solutions 32 9 Product support 36 Helpful websites...36 Getting assistance 36 A Managing batteries 38 Top points about batteries 38 Extending battery life 38 Safety precautions for using batteries 38 HP Photosmart M425/M525 Digital Camera 3
... 1 Getting started...5 Camera top and back 5 Camera front, side, and bottom 6 Camera dock insert 6 Before taking pictures 6 Using your camera 9 2 Taking pictures and recording video clips 11 Taking still pictures 11 Recording video clips 12 Instant Review...12 Auto focus and... 8 Troubleshooting 32 Resetting the camera 32 Problems and solutions 32 9 Product support 36 Helpful websites...36 Getting assistance 36 A Managing batteries 38 Top points about batteries 38 Extending battery life 38 Safety precautions for using batteries 38 HP Photosmart M425/M525 Digital Camera 3
User Guide
Page 5
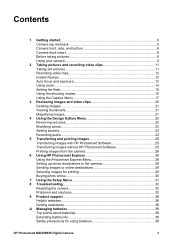
HP Photosmart M425/M525 Digital Camera 5 1 Getting started Use this section to access the Shooting Mode menu while in Live View (see Using the shooting modes on page 15). 11 and buttons-Scrolls through menus and images. 12 button-Displays camera menus, selects options, and confirms actions. 13 Delete ...video clips on page 11 and Reviewing images and video clips on page 20). 6 Power light. 7 button. 8 Zoom lever-See Using zoom on page 14. 9 Wrist strap mount. 10 Mode button-Press to get familiar with camera controls, set up your digital camera for use, and begin taking ...
HP Photosmart M425/M525 Digital Camera 5 1 Getting started Use this section to access the Shooting Mode menu while in Live View (see Using the shooting modes on page 15). 11 and buttons-Scrolls through menus and images. 12 button-Displays camera menus, selects options, and confirms actions. 13 Delete ...video clips on page 11 and Reviewing images and video clips on page 20). 6 Power light. 7 button. 8 Zoom lever-See Using zoom on page 14. 9 Wrist strap mount. 10 Mode button-Press to get familiar with camera controls, set up your digital camera for use, and begin taking ...
User Guide
Page 9
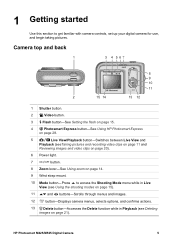
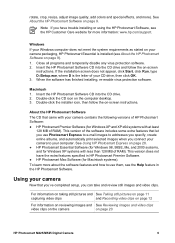
... page 11 capturing video clips and Recording video clips on page 12 For information on reviewing images and See Reviewing images and video clips video clips on the camera on page 9. See About the HP Photosmart Software on page 20 HP Photosmart M425/M525 Digital Camera 9 When the software has finished installing, re-enable virus protection software. Double-click the...
... page 11 capturing video clips and Recording video clips on page 12 For information on reviewing images and See Reviewing images and video clips video clips on the camera on page 9. See About the HP Photosmart Software on page 20 HP Photosmart M425/M525 Digital Camera 9 When the software has finished installing, re-enable virus protection software. Double-click the...
User Guide
Page 12
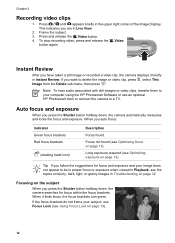
... to delete the image or video clip, press , select This Image from the Delete sub-menu, then press . Frame the subject. 3. Instant Review After you auto focus: Indicator Green focus brackets Red focus brackets (shaking hand icon) Description Focus found (see Using Focus Lock on page 32. ...Live View. 2. Auto focus and exposure When you press the Shutter button halfway down, the camera searches for focus and exposure and your subject, use an optional HP Photosmart dock to connect the camera to be in proper focus or exposure when viewed in the upper right corner of the Image...
... to delete the image or video clip, press , select This Image from the Delete sub-menu, then press . Frame the subject. 3. Instant Review After you auto focus: Indicator Green focus brackets Red focus brackets (shaking hand icon) Description Focus found (see Using Focus Lock on page 32. ...Live View. 2. Auto focus and exposure When you press the Shutter button halfway down, the camera searches for focus and exposure and your subject, use an optional HP Photosmart dock to connect the camera to be in proper focus or exposure when viewed in the upper right corner of the Image...
User Guide
Page 17
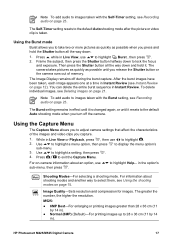
...images taken with the Self-Timer setting, see Recording audio on page 23. For on-camera information about shooting modes and another way to select them, see Deleting images on page 21. M525: ● 6MP Best-For enlarging or printing images greater than 28 x 36 cm.... 1. While in Instant Review. The greater the number, the higher the resolution. Note To add audio to images taken with the Burst setting, see Recording audio on page 23. The Image Display remains off the camera. Image Quality-Sets resolution and compression for images. HP Photosmart M425/M525 Digital Camera 17
...images taken with the Self-Timer setting, see Recording audio on page 23. For on-camera information about shooting modes and another way to select them, see Deleting images on page 21. M525: ● 6MP Best-For enlarging or printing images greater than 28 x 36 cm.... 1. While in Instant Review. The greater the number, the higher the resolution. Note To add audio to images taken with the Burst setting, see Recording audio on page 23. The Image Display remains off the camera. Image Quality-Sets resolution and compression for images. HP Photosmart M425/M525 Digital Camera 17
User Guide
Page 20
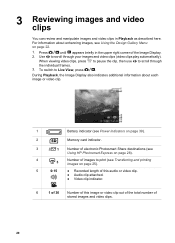
... (video clips play automatically). When viewing video clips, press the individual frames. 3. 3 Reviewing images and video clips You can review and manipulate images and video clips in the upper right corner of images to print (see... Using the Design Gallery Menu on page 22. 1. For information about each image or video clip. 1 Battery indicator (see Power indicators on page 39). 2 Memory card indicator. 3 1 Number of electronic Photosmart Share destinations (see Using HP Photosmart...
... (video clips play automatically). When viewing video clips, press the individual frames. 3. 3 Reviewing images and video clips You can review and manipulate images and video clips in the upper right corner of images to print (see... Using the Design Gallery Menu on page 22. 1. For information about each image or video clip. 1 Battery indicator (see Power indicators on page 39). 2 Memory card indicator. 3 1 Number of electronic Photosmart Share destinations (see Using HP Photosmart...

User Guide
Page 34
...under Using the Capture Menu on page 32). ● Press Live View/Playback to review images. Then examine the camera and the batteries for cards marked High Performance, Pro, Ultra, or High Speed. Always store the camera in very hot locations. Images are stored in internal memory. My image is too dark... too bright. ● Turn the flash off (see Setting the flash on page 15). ● Move back from AC power, and allow the camera to the touch. Video recording terminates abruptly. Replace your memory card with a faster card. Look for signs of the ordinary, turn off the...
...under Using the Capture Menu on page 32). ● Press Live View/Playback to review images. Then examine the camera and the batteries for cards marked High Performance, Pro, Ultra, or High Speed. Always store the camera in very hot locations. Images are stored in internal memory. My image is too dark... too bright. ● Turn the flash off (see Setting the flash on page 15). ● Move back from AC power, and allow the camera to the touch. Video recording terminates abruptly. Replace your memory card with a faster card. Look for signs of the ordinary, turn off the...
User Guide
Page 36
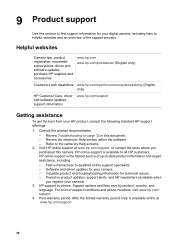
...camera's Help screens. 2. Helpful websites Camera tips, product registration, newsletter subscriptions, driver and software updates, purchase HP supplies and accessories www.hp.com www.hp.com/photosmart (English only) Customers with disabilities www.hp.com/hpinfo/community/accessibility (English only) HP Customer Care, driver www.hp... your digital camera, including links to helpful websites and an overview of the support process. Proactive product updates, support alerts, and HP newsletters (available when you purchased this camera. For a list of up-to all HP customers. Review the...
...camera's Help screens. 2. Helpful websites Camera tips, product registration, newsletter subscriptions, driver and software updates, purchase HP supplies and accessories www.hp.com www.hp.com/photosmart (English only) Customers with disabilities www.hp.com/hpinfo/community/accessibility (English only) HP Customer Care, driver www.hp... your digital camera, including links to helpful websites and an overview of the support process. Proactive product updates, support alerts, and HP newsletters (available when you purchased this camera. For a list of up-to all HP customers. Review the...
User Guide
Page 45
... modes 15 transfer to computer 25 White Balance 18 install memory card 8 install software 8 Instant Review 12, 17 interfaces 43 internal memory 11, 43 ISO Speed 18, 19 L Landscape mode 16 Language 7, 31 LEDs 5, 6 lights on camera 5, 6 Live View/Playback button 5 M Macro shooting mode 16 Magnify control 5 magnifying images 21 memory ... 41 number of pictures remaining 11 still images 44 O on/off 7 ON/OFF button 5 online destinations 28 print buying 30 optical zoom 14 P parts of camera 5, 6 Photosmart Express button 5 Photosmart Express Menu 28, 28, 29 HP Photosmart M425/M525 Digital Camera 45
... modes 15 transfer to computer 25 White Balance 18 install memory card 8 install software 8 Instant Review 12, 17 interfaces 43 internal memory 11, 43 ISO Speed 18, 19 L Landscape mode 16 Language 7, 31 LEDs 5, 6 lights on camera 5, 6 Live View/Playback button 5 M Macro shooting mode 16 Magnify control 5 magnifying images 21 memory ... 41 number of pictures remaining 11 still images 44 O on/off 7 ON/OFF button 5 online destinations 28 print buying 30 optical zoom 14 P parts of camera 5, 6 Photosmart Express button 5 Photosmart Express Menu 28, 28, 29 HP Photosmart M425/M525 Digital Camera 45

User Guide
Page 46
... and solutions 32 R record audio clips 23 video clips 12 redeye removal 22 Region 8 remaining pictures count 11 removing red eyes 22 resolution 42 reviewing images 20 transfer images 25 troubleshooting 32 turn on/off power 7 TV Configuration 31 U USB configuration 26, 31 USB connector 6 V Video button... Setup Menu 31 share pictures 28 shooting mode 15 Shutter button 5, 12 shutter speed 42 software install 8 solving problems 32 sounds of camera 31 space remaining in memory 11 specifications 42 storage 43 Sunset mode 16 support process 36 T Thumbnails 21 Thumbnails control 5 Time & Date 8,...
... and solutions 32 R record audio clips 23 video clips 12 redeye removal 22 Region 8 remaining pictures count 11 removing red eyes 22 resolution 42 reviewing images 20 transfer images 25 troubleshooting 32 turn on/off power 7 TV Configuration 31 U USB configuration 26, 31 USB connector 6 V Video button... Setup Menu 31 share pictures 28 shooting mode 15 Shutter button 5, 12 shutter speed 42 software install 8 solving problems 32 sounds of camera 31 space remaining in memory 11 specifications 42 storage 43 Sunset mode 16 support process 36 T Thumbnails 21 Thumbnails control 5 Time & Date 8,...

Quick Start Guide
Page 3
... on the camera 10 Choose the language 10 Set the region 10 Set the date and time 10 Install and format an optional memory card.........11 Install the software 12 3 Taking pictures and recording video clips......14 Take a still picture 14 Record a video clip 14 4 Reviewing and deleting ...images and video clips 16 Review images and video clips 16 Delete an image 16 5 Transferring and printing images 17 Transfer images 17 Print images from the...
... on the camera 10 Choose the language 10 Set the region 10 Set the date and time 10 Install and format an optional memory card.........11 Install the software 12 3 Taking pictures and recording video clips......14 Take a still picture 14 Record a video clip 14 4 Reviewing and deleting ...images and video clips 16 Review images and video clips 16 Delete an image 16 5 Transferring and printing images 17 Transfer images 17 Print images from the...
Quick Start Guide
Page 16
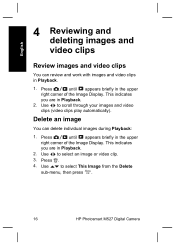
... Delete an image You can review and work with images and video clips in the upper right corner of the Image Display. Press . 4. Use to select This Image from the Delete sub-menu, then press . 16 HP Photosmart M527 Digital Camera Press until appears briefly in Playback.... 1. This indicates you are in the upper right corner of the Image Display. English 4 Reviewing and deleting images and video clips Review images and video clips You can delete individual...
... Delete an image You can review and work with images and video clips in the upper right corner of the Image Display. Press . 4. Use to select This Image from the Delete sub-menu, then press . 16 HP Photosmart M527 Digital Camera Press until appears briefly in Playback.... 1. This indicates you are in the upper right corner of the Image Display. English 4 Reviewing and deleting images and video clips Review images and video clips You can delete individual...

Quick Start Guide
Page 19
...the electronic User Guide. Use to move to frame pictures and video clips in the example screen. Within a menu, use specific selections. Camera quick reference 19 To activate Live View, press until appears briefly in the upper right corner of the Image Display. Menus When you press... from either Playback or Live View, you review and work with images and video clips. To learn more about these camera features, refer to the desired menu. English 6 Camera quick reference Use this chapter as shown in the Image Display.
...the electronic User Guide. Use to move to frame pictures and video clips in the example screen. Within a menu, use specific selections. Camera quick reference 19 To activate Live View, press until appears briefly in the upper right corner of the Image Display. Menus When you press... from either Playback or Live View, you review and work with images and video clips. To learn more about these camera features, refer to the desired menu. English 6 Camera quick reference Use this chapter as shown in the Image Display.

Quick Start Guide
Page 21
Options ● Print ● Buy Prints Online ● Share Menu Setup Camera quick reference 21 English Menu Options ● Sharing Images ● Printing Images ● Recording Audio Clips ● Recording Video Clips ● Reviewing Images and Videos ● Deleting Images ● Transferring Images ● Managing Batteries ● Getting Assistance ● Camera Shortcuts ● About... Menu Photosmart Express allows you see the Photosmart Express menu. When you press from either Live View or Playback, you to share your photos with friends and relatives.
Options ● Print ● Buy Prints Online ● Share Menu Setup Camera quick reference 21 English Menu Options ● Sharing Images ● Printing Images ● Recording Audio Clips ● Recording Video Clips ● Reviewing Images and Videos ● Deleting Images ● Transferring Images ● Managing Batteries ● Getting Assistance ● Camera Shortcuts ● About... Menu Photosmart Express allows you see the Photosmart Express menu. When you press from either Live View or Playback, you to share your photos with friends and relatives.

