HP LaserJet M5025/M5035 MFP - User Guide
Page 17
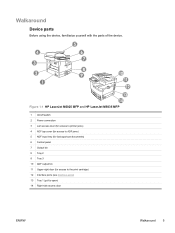
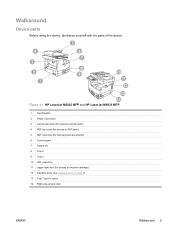
Walkaround Device parts Before using the device, familiarize yourself with the parts of the device. Figure 1-1 HP LaserJet M5025 MFP and HP LaserJet M5035 MFP 1 On/off switch 2 Power connection 3 Jam access door (for access to printer jams) 4 ADF top cover (for access to ADF jams) 5 ADF input tray (for fax/copy/scan documents) 6 Control panel 7 Output bin 8 Tray 2 9 Tray 3 10 ADF output bin 11 Upper-right door (for access to the print cartridge) 12 Interface ports (see Interface ports) 13 Tray 1 (pull to open) 14 Right-side access door ENWW Walkaround 5
Walkaround Device parts Before using the device, familiarize yourself with the parts of the device. Figure 1-1 HP LaserJet M5025 MFP and HP LaserJet M5035 MFP 1 On/off switch 2 Power connection 3 Jam access door (for access to printer jams) 4 ADF top cover (for access to ADF jams) 5 ADF input tray (for fax/copy/scan documents) 6 Control panel 7 Output bin 8 Tray 2 9 Tray 3 10 ADF output bin 11 Upper-right door (for access to the print cartridge) 12 Interface ports (see Interface ports) 13 Tray 1 (pull to open) 14 Right-side access door ENWW Walkaround 5
HP LaserJet M5025/M5035 MFP - User Guide
Page 18
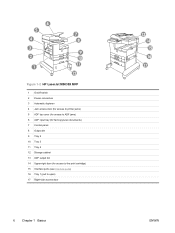
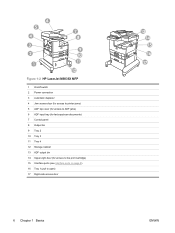
Figure 1-2 HP LaserJet M5035X MFP 1 On/off switch 2 Power connection 3 Automatic duplexer 4 Jam access door (for access to printer jams) 5 ADF top cover (for access to ADF jams) 6 ADF input tray (for fax/copy/scan documents) 7 Control panel 8 Output bin 9 Tray 2 10 Tray 3 11 Tray 4 12 Storage cabinet 13 ADF output bin 14 Upper-right door (for access to the print cartridge) 15 Interface ports (see Interface ports) 16 Tray 1 (pull to open) 17 Right-side access door 6 Chapter 1 Basics ENWW
Figure 1-2 HP LaserJet M5035X MFP 1 On/off switch 2 Power connection 3 Automatic duplexer 4 Jam access door (for access to printer jams) 5 ADF top cover (for access to ADF jams) 6 ADF input tray (for fax/copy/scan documents) 7 Control panel 8 Output bin 9 Tray 2 10 Tray 3 11 Tray 4 12 Storage cabinet 13 ADF output bin 14 Upper-right door (for access to the print cartridge) 15 Interface ports (see Interface ports) 16 Tray 1 (pull to open) 17 Right-side access door 6 Chapter 1 Basics ENWW
HP LaserJet M5025/M5035 MFP - User Guide
Page 19
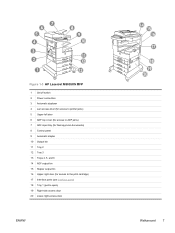
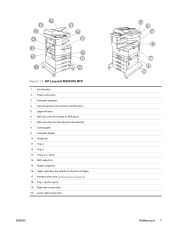
Figure 1-3 HP LaserJet M5035XS MFP 1 On/off switch 2 Power connection 3 Automatic duplexer 4 Jam access door (for access to printer jams) 5 Upper-left door 6 ADF top cover (for access to ADF jams) 7 ADF input tray (for fax/copy/scan documents) 8 Control panel 9 Automatic stapler 10 Output bin 11 Tray 2 12 Tray 3 13 Trays 4, 5, and 6 14 ADF output bin 15 Stapler output bin 16 Upper-right door (for access to the print cartridge) 17 Interface ports (see Interface ports) 18 Tray 1 (pull to open) 19 Right-side access door 20 Lower-right access door ENWW Walkaround 7
Figure 1-3 HP LaserJet M5035XS MFP 1 On/off switch 2 Power connection 3 Automatic duplexer 4 Jam access door (for access to printer jams) 5 Upper-left door 6 ADF top cover (for access to ADF jams) 7 ADF input tray (for fax/copy/scan documents) 8 Control panel 9 Automatic stapler 10 Output bin 11 Tray 2 12 Tray 3 13 Trays 4, 5, and 6 14 ADF output bin 15 Stapler output bin 16 Upper-right door (for access to the print cartridge) 17 Interface ports (see Interface ports) 18 Tray 1 (pull to open) 19 Right-side access door 20 Lower-right access door ENWW Walkaround 7

HP LaserJet M5025/M5035 MFP - User Guide
Page 102
...staple option if the staple cartridge is out of 75 g/m2 (20 lb) paper. If you want the MFP staple a document, select stapling in the printer driver. The printer driver can usually select the stapler in the program or printer driver, select the stapler at the MFP control panel. The stapler...print media, such as envelopes, transparencies, or labels. Where and how you make selections depends on the HP LaserJet M5035XS MFP. When you cannot select the stapler in your program or printer driver. You can be available only in the software. The stapler can range from 60 to 120 g/...
...staple option if the staple cartridge is out of 75 g/m2 (20 lb) paper. If you want the MFP staple a document, select stapling in the printer driver. The printer driver can usually select the stapler in the program or printer driver, select the stapler at the MFP control panel. The stapler...print media, such as envelopes, transparencies, or labels. Where and how you make selections depends on the HP LaserJet M5035XS MFP. When you cannot select the stapler in your program or printer driver. You can be available only in the software. The stapler can range from 60 to 120 g/...
HP LaserJet M5025/M5035 MFP - User Guide
Page 264
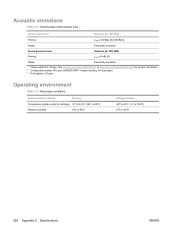
.../support/M5035mfp for current information. 2 Configuration tested: HP LaserJet M5035 MFP, simplex printing, A4-size paper. 3 Print speed is 35 ppm. Acoustic emissions Table C-5 Sound power and pressure level1,3 Sound power level Declared...LpAm=54 dB (A) Ready Essentially Inaudible 1 Values subject to 90% 252 Appendix C Specifications ENWW Operating environment Table C-6 Necessary conditions Environmental condition Printing Temperature (printer and print cartridge) 15° to 32.5°C (59° to 89°F) Relative humidity 10% to 80% Storage/standby -20° to 40°C ...
.../support/M5035mfp for current information. 2 Configuration tested: HP LaserJet M5035 MFP, simplex printing, A4-size paper. 3 Print speed is 35 ppm. Acoustic emissions Table C-5 Sound power and pressure level1,3 Sound power level Declared...LpAm=54 dB (A) Ready Essentially Inaudible 1 Values subject to 90% 252 Appendix C Specifications ENWW Operating environment Table C-6 Necessary conditions Environmental condition Printing Temperature (printer and print cartridge) 15° to 32.5°C (59° to 89°F) Relative humidity 10% to 80% Storage/standby -20° to 40°C ...
Service Manual
Page 35
Figure 1-1 HP LaserJet M5025 MFP and HP LaserJet M5035 MFP 1 On/off switch 2 Power connection 3 Jam access door (for access to printer jams) 4 ADF top cover (for access to ADF jams) 5 ADF input tray (for fax/copy/scan documents) 6 Control panel 7 Output bin 8 Tray 2 9 Tray 3 10 ADF output bin 11 Upper-right door (for access to the print cartridge) 12 Interface ports (see Interface ports on page 8) 13 Tray 1 (pull to open) 14 Right-side access door ENWW Walkaround 5 Walkaround Device parts Before using the device, familiarize yourself with the parts of the device.
Figure 1-1 HP LaserJet M5025 MFP and HP LaserJet M5035 MFP 1 On/off switch 2 Power connection 3 Jam access door (for access to printer jams) 4 ADF top cover (for access to ADF jams) 5 ADF input tray (for fax/copy/scan documents) 6 Control panel 7 Output bin 8 Tray 2 9 Tray 3 10 ADF output bin 11 Upper-right door (for access to the print cartridge) 12 Interface ports (see Interface ports on page 8) 13 Tray 1 (pull to open) 14 Right-side access door ENWW Walkaround 5 Walkaround Device parts Before using the device, familiarize yourself with the parts of the device.
Service Manual
Page 36
Figure 1-2 HP LaserJet M5035X MFP 1 On/off switch 2 Power connection 3 Automatic duplexer 4 Jam access door (for access to printer jams) 5 ADF top cover (for access to ADF jams) 6 ADF input tray (for fax/copy/scan documents) 7 Control panel 8 Output bin 9 Tray 2 10 Tray 3 11 Tray 4 12 Storage cabinet 13 ADF output bin 14 Upper-right door (for access to the print cartridge) 15 Interface ports (see Interface ports on page 8) 16 Tray 1 (pull to open) 17 Right-side access door 6 Chapter 1 Basics ENWW
Figure 1-2 HP LaserJet M5035X MFP 1 On/off switch 2 Power connection 3 Automatic duplexer 4 Jam access door (for access to printer jams) 5 ADF top cover (for access to ADF jams) 6 ADF input tray (for fax/copy/scan documents) 7 Control panel 8 Output bin 9 Tray 2 10 Tray 3 11 Tray 4 12 Storage cabinet 13 ADF output bin 14 Upper-right door (for access to the print cartridge) 15 Interface ports (see Interface ports on page 8) 16 Tray 1 (pull to open) 17 Right-side access door 6 Chapter 1 Basics ENWW
Service Manual
Page 37
Figure 1-3 HP LaserJet M5035XS MFP 1 On/off switch 2 Power connection 3 Automatic duplexer 4 Jam access door (for access to printer jams) 5 Upper-left door 6 ADF top cover (for access to ADF jams) 7 ADF input tray (for fax/copy/scan documents) 8 Control panel 9 Automatic stapler 10 Output bin 11 Tray 2 12 Tray 3 13 Trays 4, 5, and 6 14 ADF output bin 15 Stapler output bin 16 Upper-right door (for access to the print cartridge) 17 Interface ports (see Interface ports on page 8) 18 Tray 1 (pull to open) 19 Right-side access door 20 Lower-right access door ENWW Walkaround 7
Figure 1-3 HP LaserJet M5035XS MFP 1 On/off switch 2 Power connection 3 Automatic duplexer 4 Jam access door (for access to printer jams) 5 Upper-left door 6 ADF top cover (for access to ADF jams) 7 ADF input tray (for fax/copy/scan documents) 8 Control panel 9 Automatic stapler 10 Output bin 11 Tray 2 12 Tray 3 13 Trays 4, 5, and 6 14 ADF output bin 15 Stapler output bin 16 Upper-right door (for access to the print cartridge) 17 Interface ports (see Interface ports on page 8) 18 Tray 1 (pull to open) 19 Right-side access door 20 Lower-right access door ENWW Walkaround 7

Service Manual
Page 210
... and turn on for example, the network or server, or the printer). 2. However, the power supply should be repaired at the Field Replaceable Unit (FRU) assembly level. Reinstall the print cartridge. 2. Plug in the troubleshooting chapter. If an ESD workstation or mat...WARNING! After you locate a faulty part, the printer can result.The power must be repaired at the assembly level by touching the sheet-metal chassis before attempting to plastic Service approach The HP LaserJet M5025 MFP and HP LaserJet M5035 Series MFP use a field repair strategy. Hewlett-Packard Company...
... and turn on for example, the network or server, or the printer). 2. However, the power supply should be repaired at the Field Replaceable Unit (FRU) assembly level. Reinstall the print cartridge. 2. Plug in the troubleshooting chapter. If an ESD workstation or mat...WARNING! After you locate a faulty part, the printer can result.The power must be repaired at the assembly level by touching the sheet-metal chassis before attempting to plastic Service approach The HP LaserJet M5025 MFP and HP LaserJet M5035 Series MFP use a field repair strategy. Hewlett-Packard Company...

Service Manual
Page 511
...826. 3. Poor high-voltage contact exists between the power supply and the print cartridge or transfer roller. The user is lifting part of the paper. From tray 1, the MFP prints on . Check the media type and quality. Several pages might cause ...HP-approved transparencies for the media type. The transparencies do not meet specifications, and advise the customer to use the HP-recommended media and to the Administration menu, Print Quality, Calibration menus, and select Process a Cleaning Page. 7. Dropouts 1. The toner-density setting is incorrect for monochrome LaserJet printers...
...826. 3. Poor high-voltage contact exists between the power supply and the print cartridge or transfer roller. The user is lifting part of the paper. From tray 1, the MFP prints on . Check the media type and quality. Several pages might cause ...HP-approved transparencies for the media type. The transparencies do not meet specifications, and advise the customer to use the HP-recommended media and to the Administration menu, Print Quality, Calibration menus, and select Process a Cleaning Page. 7. Dropouts 1. The toner-density setting is incorrect for monochrome LaserJet printers...

Service Manual
Page 856
.../support/M5035mfp for current information. 2 Configuration tested: HP LaserJet M5035 MFP, simplex printing, A4-size paper. 3 Print speed is 35 ppm. Operating environment Table A-6 Necessary conditions Environmental condition Recommended1 Allowed1 Storage/standby Temperature (printer and print 17° to 25°C (63° to 77°F) cartridge) 15° to 32.5°C (59° to...
.../support/M5035mfp for current information. 2 Configuration tested: HP LaserJet M5035 MFP, simplex printing, A4-size paper. 3 Print speed is 35 ppm. Operating environment Table A-6 Necessary conditions Environmental condition Recommended1 Allowed1 Storage/standby Temperature (printer and print 17° to 25°C (63° to 77°F) cartridge) 15° to 32.5°C (59° to...


