User Guide
Page 198
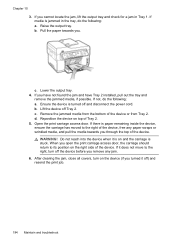
.... Reposition the device on the device (if you open the print carriage access door, the carriage should return to the right of the device. b. Lower the output tray. 4. b. Remove the jammed media from the bottom of Tray 2. 5. d. If you have not found the jam and have Tray 2 installed, pull out the tray and remove...
.... Reposition the device on the device (if you open the print carriage access door, the carriage should return to the right of the device. b. Lower the output tray. 4. b. Remove the jammed media from the bottom of Tray 2. 5. d. If you have not found the jam and have Tray 2 installed, pull out the tray and remove...
User Guide
Page 239
...203 print quality diagnostic page 145 troubleshoot 162 Print quality diagnostic page 145 print-carriage access door, locating 14 printer driver accessories settings 22 settings 47 version 201 ...replace 150 status 87, 97, 145 supported 208 troubleshoot 159 warranty 203 privacy, HP Instant Support 95 processor specifications 209 Proof Sheet button control panel button 17 proof...134 regulatory information 219 radio, turn off 100 readme 10 rear access panel clear jams 192 illustration 15 receive faxes auto answer mode 79 automatically 73 blocking numbers 77 ...slow 170 Start Color Photo button 17 235
...203 print quality diagnostic page 145 troubleshoot 162 Print quality diagnostic page 145 print-carriage access door, locating 14 printer driver accessories settings 22 settings 47 version 201 ...replace 150 status 87, 97, 145 supported 208 troubleshoot 159 warranty 203 privacy, HP Instant Support 95 processor specifications 209 Proof Sheet button control panel button 17 proof...134 regulatory information 219 radio, turn off 100 readme 10 rear access panel clear jams 192 illustration 15 receive faxes auto answer mode 79 automatically 73 blocking numbers 77 ...slow 170 Start Color Photo button 17 235


