
User Guide
Page 105
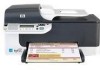
... tape by using the pink pull tab. 1 Copper-colored contacts 2 Plastic tape with ink cartridges 101 Doing so can result in the ink cartridge protector or an airtight plastic container. 6. Remove the new ink cartridge from the slot on the right. 4. Work with pink pull tab (must be removed before installing) 3 Ink nozzles under tape CAUTION: Do not touch the...
... tape by using the pink pull tab. 1 Copper-colored contacts 2 Plastic tape with ink cartridges 101 Doing so can result in the ink cartridge protector or an airtight plastic container. 6. Remove the new ink cartridge from the slot on the right. 4. Work with pink pull tab (must be removed before installing) 3 Ink nozzles under tape CAUTION: Do not touch the...
User Guide
Page 106
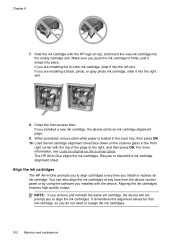
.... If you do not need to align the ink cartridges. You can also align the ink cartridges at any time from the device control panel or by using the software you installed a new ink cartridge, the device prints an ink cartridge alignment page. 9. It remembers the alignment values for that ink cartridge, so you are installing the tri-color ink cartridge, slide it into the empty...
.... If you do not need to align the ink cartridges. You can also align the ink cartridges at any time from the device control panel or by using the software you installed a new ink cartridge, the device prints an ink cartridge alignment page. 9. It remembers the alignment values for that ink cartridge, so you are installing the tri-color ink cartridge, slide it into the empty...
User Guide
Page 117
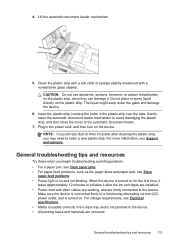
... the device. • All packing tapes and materials are firmly connected to the device. For voltage requirements, see dust or lines on scans after the ink cartridges are installed. • Power cord and other cables are working, and are removed. The liquid might seep under the glass and damage the device. 6. When the... then close the cover of the automatic document feeder. 7. For more information, see Solve paper-feed problems. • Power light is connected firmly to order a new plastic strip.
... the device. • All packing tapes and materials are firmly connected to the device. For voltage requirements, see dust or lines on scans after the ink cartridges are installed. • Power cord and other cables are working, and are removed. The liquid might seep under the glass and damage the device. 6. When the... then close the cover of the automatic document feeder. 7. For more information, see Solve paper-feed problems. • Power light is connected firmly to order a new plastic strip.
User Guide
Page 147
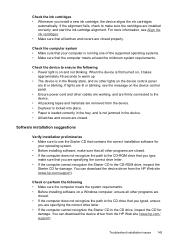
...is loaded correctly in the tray, and is on , it takes approximately 45 seconds to warm up. • The device is running one of the supported operating systems. • Make sure that you are closed . • If the computer does not recognize the path ... to the CD-ROM drive that you install a new ink cartridge, the device aligns the ink cartridges automatically. Software installation suggestions Verify installation preliminaries • Make sure to the device. • All packing tapes and materials are removed from the HP Web site (www.hp.com/support). When the device is first...
...is loaded correctly in the tray, and is on , it takes approximately 45 seconds to warm up. • The device is running one of the supported operating systems. • Make sure that you are closed . • If the computer does not recognize the path ... to the CD-ROM drive that you install a new ink cartridge, the device aligns the ink cartridges automatically. Software installation suggestions Verify installation preliminaries • Make sure to the device. • All packing tapes and materials are removed from the HP Web site (www.hp.com/support). When the device is first...


