User Guide
Page 6
... Start Copy Color: Starts a color copy job. 8 Number of Copies LCD: Displays the number of copies to either plain or photo paper. When the product is off . Also displays a warning when the device is still used. Also displays a warning for the black cartridge. To completely remove power, turn... Fit: Scales the original to the maximum size to fit within the margins of power is out of paper. 9 Ink Level gauge: Show ink level information for each print cartridge, four indicators for the tricolor cartridge and four indicators for print cartridge problems. 4 Get to know the HP All-in -One
... Start Copy Color: Starts a color copy job. 8 Number of Copies LCD: Displays the number of copies to either plain or photo paper. When the product is off . Also displays a warning when the device is still used. Also displays a warning for the black cartridge. To completely remove power, turn... Fit: Scales the original to the maximum size to fit within the margins of power is out of paper. 9 Ink Level gauge: Show ink level information for each print cartridge, four indicators for the tricolor cartridge and four indicators for print cartridge problems. 4 Get to know the HP All-in -One

User Guide
Page 7
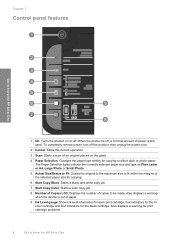
... remove power, turn off . Also displays a warning when the device is still used. Control panel features (HP Deskjet F4424 All-in-One only) Get to know the HP All-in -One only... is out of copies to be made. Also displays a warning for print cartridge problems. Control panel features (HP Deskjet F4424 All-in -One 1 On: Turns the product on or off the product, then unplug the... Copy Color: Starts a color copy job. 8 Number of Copies LCD: Displays the number of paper. 9 Ink Level gauge: Show ink level information for each print cartridge, four indicators for the tricolor cartridge and ...
... remove power, turn off . Also displays a warning when the device is still used. Control panel features (HP Deskjet F4424 All-in-One only) Get to know the HP All-in -One only... is out of copies to be made. Also displays a warning for print cartridge problems. Control panel features (HP Deskjet F4424 All-in -One 1 On: Turns the product on or off the product, then unplug the... Copy Color: Starts a color copy job. 8 Number of Copies LCD: Displays the number of paper. 9 Ink Level gauge: Show ink level information for each print cartridge, four indicators for the tricolor cartridge and ...

User Guide
Page 41
... Print Settings area, click Printer Toolbox. 2. Do not leave a print cartridge outside the HP Allin-One for ink and debris buildup. Automatically clean print cartridges If your documents are faded or if they contain ink streaks, the print cartridges might be cleaned. Turn on the print cartridge to release it, and then pull it towards you try to...
... Print Settings area, click Printer Toolbox. 2. Do not leave a print cartridge outside the HP Allin-One for ink and debris buildup. Automatically clean print cartridges If your documents are faded or if they contain ink streaks, the print cartridges might be cleaned. Turn on the print cartridge to release it, and then pull it towards you try to...
User Guide
Page 42
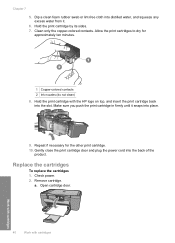
... cartridges To replace the cartridges 1. Remove cartridge. Clean only the copper-colored contacts. Open cartridge door. 40 Work with cartridges Work with the HP logo on top, and insert the print cartridge back into distilled water, and squeeze any excess water from it snaps into the back of the product. Repeat if necessary for approximately ten minutes. 1 Copper-colored contacts 2 Ink...
... cartridges To replace the cartridges 1. Remove cartridge. Clean only the copper-colored contacts. Open cartridge door. 40 Work with cartridges Work with the HP logo on top, and insert the print cartridge back into distilled water, and squeeze any excess water from it snaps into the back of the product. Repeat if necessary for approximately ten minutes. 1 Copper-colored contacts 2 Ink...
User Guide
Page 56
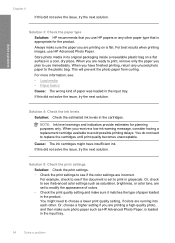
...-quality photo, and then make sure photo paper such as saturation, brightness, or color tone, are ready to print, remove only the paper you receive a low-ink warning message, consider having a replacement cartridge available to avoid possible printing delays. Or, choose a higher setting if you use... best results when printing images, use immediately. For example, check to see if advanced color settings such as HP Advanced Photo Paper, is set to choose a lower print quality setting, if colors are incorrect. Solve a problem Chapter 8 If this did not solve the issue, try...
...-quality photo, and then make sure photo paper such as saturation, brightness, or color tone, are ready to print, remove only the paper you receive a low-ink warning message, consider having a replacement cartridge available to avoid possible printing delays. Or, choose a higher setting if you use... best results when printing images, use immediately. For example, check to see if advanced color settings such as HP Advanced Photo Paper, is set to choose a lower print quality setting, if colors are incorrect. Solve a problem Chapter 8 If this did not solve the issue, try...
User Guide
Page 59
... of paper was a problem with your ink supplies. Store photo media in a cool, dry place. Cause: There was loaded in a cool, dry place. Therefore, replacing the ink cartridges or printhead is flat. For best results when printing images, use HP Advanced Photo Paper. When you are ready... to : www.hp.com/support. For best results when printing images, use HP Advanced Photo Paper. Go to print, remove only the paper you Print...
... of paper was a problem with your ink supplies. Store photo media in a cool, dry place. Cause: There was loaded in a cool, dry place. Therefore, replacing the ink cartridges or printhead is flat. For best results when printing images, use HP Advanced Photo Paper. When you are ready... to : www.hp.com/support. For best results when printing images, use HP Advanced Photo Paper. Go to print, remove only the paper you Print...
User Guide
Page 64
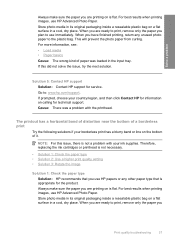
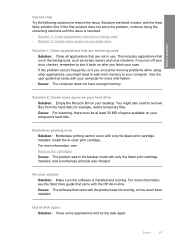
... quality or reliability of using a non-HP supply will not be covered under warranty. When you purchased genuine HP ink cartridges, go to: www.hp.com/go/anticounterfeit Cause: Non-HP ink cartridges were being used. Solution 4: Check the paper type Solution: HP recommends that is appropriate for planning purposes ... low. Solution 2: Check the ink levels Solution: Check the estimated ink levels in a cool, dry place. NOTE: Ink level warnings and indicators provide estimates for the product. You do not need to print, remove only the paper you use HP Advanced Photo Paper. Solution 3: ...
... quality or reliability of using a non-HP supply will not be covered under warranty. When you purchased genuine HP ink cartridges, go to: www.hp.com/go/anticounterfeit Cause: Non-HP ink cartridges were being used. Solution 4: Check the paper type Solution: HP recommends that is appropriate for planning purposes ... low. Solution 2: Check the ink levels Solution: Check the estimated ink levels in a cool, dry place. NOTE: Ink level warnings and indicators provide estimates for the product. You do not need to print, remove only the paper you use HP Advanced Photo Paper. Solution 3: ...

User Guide
Page 68
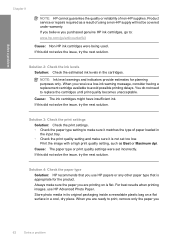
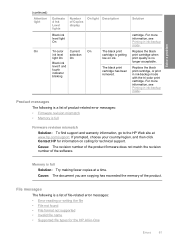
...the back of the paper, try the next solution. Therefore, replacing the ink cartridges or printhead is not necessary. • Solution 1: Use TrueType or OpenType fonts • Solution 2: Align the printer 66 Solve a problem Cause: More than one type of paper was loaded in the input tray. 2. Check the ...and the edges are jagged Try the following solutions if there is smeared ink on another page of plain paper. To remove excess ink using plain paper 1. Load several pages of plain paper to soak up any excess ink in the product needed to dry, then try the next solution. Cause...
...the back of the paper, try the next solution. Therefore, replacing the ink cartridges or printhead is not necessary. • Solution 1: Use TrueType or OpenType fonts • Solution 2: Align the printer 66 Solve a problem Cause: More than one type of paper was loaded in the input tray. 2. Check the ...and the edges are jagged Try the following solutions if there is smeared ink on another page of plain paper. To remove excess ink using plain paper 1. Load several pages of plain paper to soak up any excess ink in the product needed to dry, then try the next solution. Cause...
User Guide
Page 73
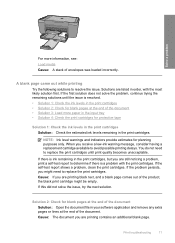
... blank pages at the end of the document Solution: Open the document file in order, with the print cartridges. If there is resolved. • Solution 1: Check the ink levels in the print cartridges • Solution 2: Check for blank pages at the end of the document • Solution 3: Load ...see: Load media Cause: A stack of the product, the black print cartridge might need to replace the print cartridges until the issue is ink remaining in the print cartridges, but you are listed in your software application and remove any extra pages or lines at the end of the document. A blank...
... blank pages at the end of the document Solution: Open the document file in order, with the print cartridges. If there is resolved. • Solution 1: Check the ink levels in the print cartridges • Solution 2: Check for blank pages at the end of the document • Solution 3: Load ...see: Load media Cause: A stack of the product, the black print cartridge might need to replace the print cartridges until the issue is ink remaining in the print cartridges, but you are listed in your software application and remove any extra pages or lines at the end of the document. A blank...
User Guide
Page 74
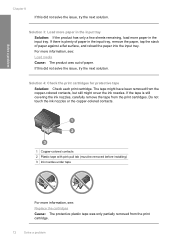
...media Cause: The product was only partially removed from the print cartridge. 72 Solve a problem Do not touch the ink nozzles or the copper-colored contacts. 1 Copper-colored contacts 2 Plastic tape with pink pull tab (must be removed before installing) 3 Ink nozzles under tape For more paper in... reload the paper into the input tray. If there is still covering the ink nozzles, carefully remove the tape from the copper-colored contacts, but still might have been removed from the print cartridges. Solution 4: Check the print cartridges for protective tape Solution: Check each print...
...media Cause: The product was only partially removed from the print cartridge. 72 Solve a problem Do not touch the ink nozzles or the copper-colored contacts. 1 Copper-colored contacts 2 Plastic tape with pink pull tab (must be removed before installing) 3 Ink nozzles under tape For more paper in... reload the paper into the input tray. If there is still covering the ink nozzles, carefully remove the tape from the copper-colored contacts, but still might have been removed from the print cartridges. Solution 4: Check the print cartridges for protective tape Solution: Check each print...
User Guide
Page 82
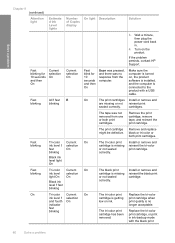
... . 4. Install or remove and reinsert the tri-color print cartridge. On Tri-color Current On The tri-color print Replace the tri-color ink level ! Wait a minute, then plug the power cord back in ink-backup mode with a USB cable. Turn on ink. The print cartridge might be defective. fast blinking The black print cartridge is no response from one or both...
... . 4. Install or remove and reinsert the tri-color print cartridge. On Tri-color Current On The tri-color print Replace the tri-color ink level ! Wait a minute, then plug the power cord back in ink-backup mode with a USB cable. Turn on ink. The print cartridge might be defective. fast blinking The black print cartridge is no response from one or both...
User Guide
Page 83
The black print cartridge has been removed. Replace the black print cartridge, or print in ink-backup mode. and fourth indicator blinking The black print cartridge is a list of file-related ...in -One Errors 81 Cause: The document you are copying has exceeded the memory of Copies display Tri-color Current On ink level selection light On On Black ink level ! Solution cartridge. File...and warranty information, go to the HP Web site at a time. For more information, see Printing in ink-backup mode with the tri-color print cartridge. Product messages The following is getting...
The black print cartridge has been removed. Replace the black print cartridge, or print in ink-backup mode. and fourth indicator blinking The black print cartridge is a list of file-related ...in -One Errors 81 Cause: The document you are copying has exceeded the memory of Copies display Tri-color Current On ink level selection light On On Black ink level ! Solution cartridge. File...and warranty information, go to the HP Web site at a time. For more information, see Printing in ink-backup mode with the tri-color print cartridge. Product messages The following is getting...
User Guide
Page 85
... the black print cartridge installed, and a borderless print job was in ink-backup mode with the HP All-in order, with the most likely solution first. Install the tri-color print cartridge. No scan options...you might also need to your desktop. See the user guide that are listed in -One. For more space on your computer. Cause: The software that came with your hard drive... with only the black print cartridge installed. You might need to resolve the issue. Solve a problem Cannot crop Try the following solutions to remove files from the hard disk;...
... the black print cartridge installed, and a borderless print job was in ink-backup mode with the HP All-in order, with the most likely solution first. Install the tri-color print cartridge. No scan options...you might also need to your desktop. See the user guide that are listed in -One. For more space on your computer. Cause: The software that came with your hard drive... with only the black print cartridge installed. You might need to resolve the issue. Solve a problem Cannot crop Try the following solutions to remove files from the hard disk;...
User Guide
Page 86
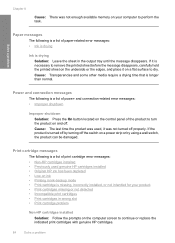
...switch, the product can be damaged. If the product is a list of paper-related error messages: • Ink is drying Ink is necessary to remove the printed sheet before the message disappears, carefully hold the printed sheet on the underside or the edges, and place... panel of print cartridge error messages: • Non-HP cartridges installed • Previously used , it is drying Solution: Leave the sheet in ink-backup mode • Print cartridge is longer than normal. Cause: The last time the product was used genuine HP cartridges installed • Original HP ink has been depleted...
...switch, the product can be damaged. If the product is a list of paper-related error messages: • Ink is drying Ink is necessary to remove the printed sheet before the message disappears, carefully hold the printed sheet on the underside or the edges, and place... panel of print cartridge error messages: • Non-HP cartridges installed • Previously used , it is drying Solution: Leave the sheet in ink-backup mode • Print cartridge is longer than normal. Cause: The last time the product was used genuine HP cartridges installed • Original HP ink has been depleted...

User Guide
Page 88
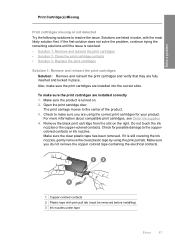
...If the print cartridges are installed in another product, the ink level indicator may appear on your computer screen: Print Cartridge Problem Incorrect Print Cartridge(s) Incorrectly Installed Cartridge(s) 86 Solve a problem You do not need to be removed before installing) 3 Ink nozzles under ... at: www.hp.com/recycle. Solve a problem Chapter 8 Low on ink Solution: Ink level warnings and indicators provide estimates for your product, one print cartridge is installed, inkbackup mode is installed. 1 Copper-colored contacts 2 Plastic tape with a single print cartridge, but it ...
...If the print cartridges are installed in another product, the ink level indicator may appear on your computer screen: Print Cartridge Problem Incorrect Print Cartridge(s) Incorrectly Installed Cartridge(s) 86 Solve a problem You do not need to be removed before installing) 3 Ink nozzles under ... at: www.hp.com/recycle. Solve a problem Chapter 8 Low on ink Solution: Ink level warnings and indicators provide estimates for your product, one print cartridge is installed, inkbackup mode is installed. 1 Copper-colored contacts 2 Plastic tape with a single print cartridge, but it ...
User Guide
Page 89
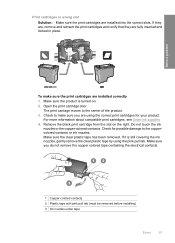
... resolve the issue. Do not touch the ink nozzles or the copper-colored contacts. If it is resolved. • Solution 1: Remove and reinsert the print cartridges • Solution 2: Clean the print cartridge contacts • Solution 3: Replace the print cartridges Solution 1: Remove and reinsert the print cartridges Solution: Remove and reinsert the print cartridges and verify that they are fully inserted...
... resolve the issue. Do not touch the ink nozzles or the copper-colored contacts. If it is resolved. • Solution 1: Remove and reinsert the print cartridges • Solution 2: Clean the print cartridge contacts • Solution 3: Replace the print cartridges Solution 1: Remove and reinsert the print cartridges Solution: Remove and reinsert the print cartridges and verify that they are fully inserted...

User Guide
Page 90
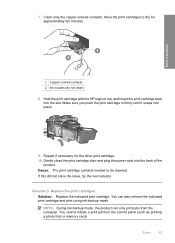
... are lint-free and work well for the tri-color print cartridge on the right. Turn on the print cartridge to clean the print cartridge contacts. NOTE: Do not remove both print cartridges at a time. Hold the print cartridge by sliding it clicks into the slot on the left... Remove and clean each print cartridge one at the same time. Do not leave a print cartridge outside the HP All-in-One for ink and debris buildup. 5. Lightly press down on the product and open the print cartridge door. These can damage the print cartridges). Cause: The indicated print cartridges ...
... are lint-free and work well for the tri-color print cartridge on the right. Turn on the print cartridge to clean the print cartridge contacts. NOTE: Do not remove both print cartridges at a time. Hold the print cartridge by sliding it clicks into the slot on the left... Remove and clean each print cartridge one at the same time. Do not leave a print cartridge outside the HP All-in-One for ink and debris buildup. 5. Lightly press down on the product and open the print cartridge door. These can damage the print cartridges). Cause: The indicated print cartridges ...
User Guide
Page 91
...the control panel (such as printing a photo from the computer. Allow the print cartridges to be cleaned. Hold the print cartridge with the HP logo on top, and insert the print cartridge back into the back of the product. You can only print jobs from a ...print cartridges Solution: Replace the indicated print cartridge. Solve a problem 1 Copper-colored contacts 2 Ink nozzles (do not clean) 8. Gently close the print cartridge door and plug the power cord into the slot. NOTE: During ink-backup mode, the product can also remove the indicated print cartridge and print using ink-backup ...
...the control panel (such as printing a photo from the computer. Allow the print cartridges to be cleaned. Hold the print cartridge with the HP logo on top, and insert the print cartridge back into the back of the product. You can only print jobs from a ...print cartridges Solution: Replace the indicated print cartridge. Solve a problem 1 Copper-colored contacts 2 Ink nozzles (do not clean) 8. Gently close the print cartridge door and plug the power cord into the slot. NOTE: During ink-backup mode, the product can also remove the indicated print cartridge and print using ink-backup ...
User Guide
Page 93
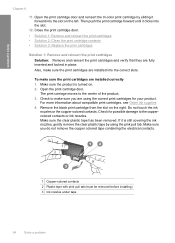
... sure you do not remove the copper colored tape containing the electrical contacts. 1 Copper-colored contacts 2 Plastic tape with pink pull tab (must be removed before installing) 3 Ink nozzles under tape Errors 91 If it is turned on the right. For more information about compatible print cartridges, see Order ink supplies 4. Remove the black print cartridge from the slot...
... sure you do not remove the copper colored tape containing the electrical contacts. 1 Copper-colored contacts 2 Plastic tape with pink pull tab (must be removed before installing) 3 Ink nozzles under tape Errors 91 If it is turned on the right. For more information about compatible print cartridges, see Order ink supplies 4. Remove the black print cartridge from the slot...
User Guide
Page 96
... 4. If it is turned on. 2. To make sure you do not remove the copper colored tape containing the electrical contacts. 1 Copper-colored contacts 2 Plastic tape with pink pull tab (must be removed before installing) 3 Ink nozzles under tape 94 Solve a problem Remove the black print cartridge from the slot on the left. Make sure the clear plastic...
... 4. If it is turned on. 2. To make sure you do not remove the copper colored tape containing the electrical contacts. 1 Copper-colored contacts 2 Plastic tape with pink pull tab (must be removed before installing) 3 Ink nozzles under tape 94 Solve a problem Remove the black print cartridge from the slot on the left. Make sure the clear plastic...


