User Guide - v216 LCD Monitor
Page 4
... exceed the rating of electric shock or damage to use with this monitor. Connect the equipment to the LCD screen; Not all power cords for your monitor, see Power Cord Set Requirements. Use a power strip whose manufacturer offers a damage replacement policy so you plug the power cord into is easily accessible to the operator and located as...
... exceed the rating of electric shock or damage to use with this monitor. Connect the equipment to the LCD screen; Not all power cords for your monitor, see Power Cord Set Requirements. Use a power strip whose manufacturer offers a damage replacement policy so you plug the power cord into is easily accessible to the operator and located as...
User Guide - v216 LCD Monitor
Page 5
...monitor pedestal base, you must not be blocked or covered. Do not walk on the power cord. You can easily reach. Do not use an antistatic screen cleaner. 4 Dust the monitor...cabinet requires additional cleaning, use . • Keep your monitor off the computer and the monitor. 2 Unplug your monitor cabinet or attempt to clean an LCD screen. 3 Wipe the screen with isopropyl alcohol. 5...drop your monitor near an outlet that requires special care when cleaning. Cleaning the Monitor The monitor is not operating properly or has been dropped or damaged, contact your HP authorized ...
...monitor pedestal base, you must not be blocked or covered. Do not walk on the power cord. You can easily reach. Do not use an antistatic screen cleaner. 4 Dust the monitor...cabinet requires additional cleaning, use . • Keep your monitor off the computer and the monitor. 2 Unplug your monitor cabinet or attempt to clean an LCD screen. 3 Wipe the screen with isopropyl alcohol. 5...drop your monitor near an outlet that requires special care when cleaning. Cleaning the Monitor The monitor is not operating properly or has been dropped or damaged, contact your HP authorized ...

User Guide - v216 LCD Monitor
Page 9
If your monitor and computer. If it does not display an image, see Technical Support FAQs and Using the Monitor. 9 4 Connect one end of the power cord to the back of the monitor and plug the other end into a grounded outlet. 5 Turn on your monitor displays an image, installation is complete.
If your monitor and computer. If it does not display an image, see Technical Support FAQs and Using the Monitor. 9 4 Connect one end of the power cord to the back of the monitor and plug the other end into a grounded outlet. 5 Turn on your monitor displays an image, installation is complete.
User Guide - v216 LCD Monitor
Page 10
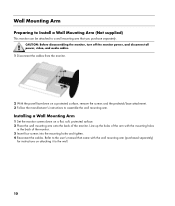
... four screws into the mounting holes and tighten. 4 Reconnect the cables. CAUTION: Before disassembling the monitor, turn off the monitor power, and disconnect all power, video, and audio cables. 1 Disconnect the cables from the monitor. 2 With the panel face-down on a protected surface, remove the screws and the pedestal/base attachment. 3 Follow the manufacturer's instructions...
... four screws into the mounting holes and tighten. 4 Reconnect the cables. CAUTION: Before disassembling the monitor, turn off the monitor power, and disconnect all power, video, and audio cables. 1 Disconnect the cables from the monitor. 2 With the panel face-down on a protected surface, remove the screws and the pedestal/base attachment. 3 Follow the manufacturer's instructions...
User Guide - v216 LCD Monitor
Page 11
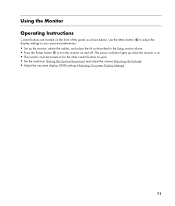
... on the front of the panel, as described in the Setup section above. • Press the Power button (F) to turn the monitor on for the other control buttons to your personal preferences: • Set up the monitor, attach the cables, and adjust the tilt as shown below. Use the Menu button (C) to adjust... (Setting the Optimal Resolution) and adjust the volume (Adjusting the Volume). • Adjust the onscreen display (OSD) settings (Adjusting On-screen Display Settings). 11 The power indicator lights up when the monitor is on. • The monitor must be turned on and off.
... on the front of the panel, as described in the Setup section above. • Press the Power button (F) to turn the monitor on for the other control buttons to your personal preferences: • Set up the monitor, attach the cables, and adjust the tilt as shown below. Use the Menu button (C) to adjust... (Setting the Optimal Resolution) and adjust the volume (Adjusting the Volume). • Adjust the onscreen display (OSD) settings (Adjusting On-screen Display Settings). 11 The power indicator lights up when the monitor is on. • The monitor must be turned on and off.
User Guide - v216 LCD Monitor
Page 12
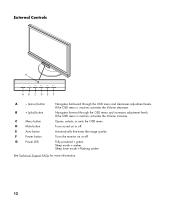
...Support FAQs for more information. 12 External Controls G Menu Mute Auto Power A B C D E F A - (minus) button B + (plus) button C Menu button D Mute button E Auto button F Power button G Power LED Navigates backward through the OSD menu and increases adjustment levels. Automatically ...fine-tunes the image quality. If the OSD menu is inactive, activates the Volume decrease. Turns the monitor on or off . Navigates ...
...Support FAQs for more information. 12 External Controls G Menu Mute Auto Power A B C D E F A - (minus) button B + (plus) button C Menu button D Mute button E Auto button F Power button G Power LED Navigates backward through the OSD menu and increases adjustment levels. Automatically ...fine-tunes the image quality. If the OSD menu is inactive, activates the Volume decrease. Turns the monitor on or off . Navigates ...
User Guide - v216 LCD Monitor
Page 14
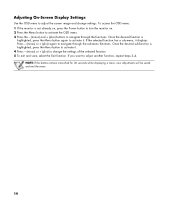
To access the OSD menu: 1 If the monitor is not already on, press the Power button to turn the monitor on. 2 Press the Menu button to activate the OSD menu. 3 Press the - (minus) and + (plus) buttons to navigate through the sub-menu functions. If you ...
To access the OSD menu: 1 If the monitor is not already on, press the Power button to turn the monitor on. 2 Press the Menu button to activate the OSD menu. 3 Press the - (minus) and + (plus) buttons to navigate through the sub-menu functions. If you ...

User Guide - v216 LCD Monitor
Page 16
... (continued) Level 1 Level 2 Language Deutsch Simplified Chinese Japanese English Español Français Management Italiano Nederlands Cancel Save and Return Power Saver Power On Recall Mode Display Power-On Status Display DDC/CI Support Sleep Timer Cancel Save and Return OSD Control Horizontal OSD Position Vertical OSD Position OSD Timeout Information...
... (continued) Level 1 Level 2 Language Deutsch Simplified Chinese Japanese English Español Français Management Italiano Nederlands Cancel Save and Return Power Saver Power On Recall Mode Display Power-On Status Display DDC/CI Support Sleep Timer Cancel Save and Return OSD Control Horizontal OSD Position Vertical OSD Position OSD Timeout Information...
User Guide - v216 LCD Monitor
Page 18
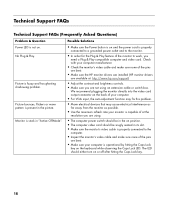
... problem. Possible Solutions • Make sure the Power button is on and the power cord is properly connected to a grounded power outlet and to work, you are bent. • Make sure your computer manufacturer. • Check the monitor's video cable and make sure none of at : http://www.hp.com/support) • Adjust the contrast...
... problem. Possible Solutions • Make sure the Power button is on and the power cord is properly connected to a grounded power outlet and to work, you are bent. • Make sure your computer manufacturer. • Check the monitor's video cable and make sure none of at : http://www.hp.com/support) • Adjust the contrast...
User Guide - v216 LCD Monitor
Page 20
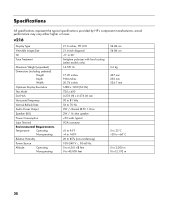
...Display Resolution Text Mode Dot Pitch Horizontal Frequency Vertical Refresh Rate Audio Power Output Speaker (R/L) Power Consumption Input Terminal Environmental Requirements Temperature: Operating Non-operating Relative Humidity Power Source Altitude: Operating Non-operating 21.6 inches, TFT LCD 21.6-inch diagonal -5° to 20° Antiglare polarizer with hard ... / channel @ PC 1 Vrms 2W / 16 ohm speaker Specifications All specifications represent the typical specifications provided by HP's component manufacturers; actual performance may vary either higher or lower.
...Display Resolution Text Mode Dot Pitch Horizontal Frequency Vertical Refresh Rate Audio Power Output Speaker (R/L) Power Consumption Input Terminal Environmental Requirements Temperature: Operating Non-operating Relative Humidity Power Source Altitude: Operating Non-operating 21.6 inches, TFT LCD 21.6-inch diagonal -5° to 20° Antiglare polarizer with hard ... / channel @ PC 1 Vrms 2W / 16 ohm speaker Specifications All specifications represent the typical specifications provided by HP's component manufacturers; actual performance may vary either higher or lower.
User Guide - v216 LCD Monitor
Page 22
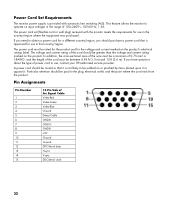
.... If you have questions about the type of power cord to operate on or pinched by items placed upon it or against it is provided with the monitor meets the requirements for use , contact your HP-authorized service provider. The power cord set (flexible cord or wall plug) received... with automatic line switching (ALS). This feature allows the monitor to use in the range of the Signal Cable...
.... If you have questions about the type of power cord to operate on or pinched by items placed upon it or against it is provided with the monitor meets the requirements for use , contact your HP-authorized service provider. The power cord set (flexible cord or wall plug) received... with automatic line switching (ALS). This feature allows the monitor to use in the range of the Signal Cable...

User Guide - v216 LCD Monitor
Page 27
Korean Notice Materials Disposal This HP product contains Mercury in the fluorescent lamp in the display LCD that manufacturers provide Material Content Declarations for certain categories of electronic products offered for this material can be regulated ...please contact your local authorities or the Electronic Industries Alliance (EIA) (www.eiae.org). 27 Disposal of this product, visit www.hp.com/go/jisc0950. Japanese Power Cord Notice Japanese Material Content Declaration A Japanese regulatory requirement, defined by Specification JIS C 0950, 2005, mandates that might require special...
Korean Notice Materials Disposal This HP product contains Mercury in the fluorescent lamp in the display LCD that manufacturers provide Material Content Declarations for certain categories of electronic products offered for this material can be regulated ...please contact your local authorities or the Electronic Industries Alliance (EIA) (www.eiae.org). 27 Disposal of this product, visit www.hp.com/go/jisc0950. Japanese Power Cord Notice Japanese Material Content Declaration A Japanese regulatory requirement, defined by Specification JIS C 0950, 2005, mandates that might require special...
User's Guide - HP f2105 LCD Monitor
Page 6
...Adjustment Function 4-3 Front-Panel Buttons 4-5 Using the Onscreen Display 4-7 Adjusting Monitor Settings 4-8 Main Menu 4-8 Advanced Menu 4-9 Selecting the Video Input Connectors 4-12 Identifying Monitor Conditions 4-13 Adjusting Screen Quality 4-14 Setting Optimal Display Resolution 4-14 ...Enhancing the Video Function 4-15 Optimizing Analog Video 4-17 Entering User Modes 4-18 Power-Saver Feature 4-19 A Troubleshooting Solving ...
...Adjustment Function 4-3 Front-Panel Buttons 4-5 Using the Onscreen Display 4-7 Adjusting Monitor Settings 4-8 Main Menu 4-8 Advanced Menu 4-9 Selecting the Video Input Connectors 4-12 Identifying Monitor Conditions 4-13 Adjusting Screen Quality 4-14 Setting Optimal Display Resolution 4-14 ...Enhancing the Video Function 4-15 Optimizing Analog Video 4-17 Entering User Modes 4-18 Power-Saver Feature 4-19 A Troubleshooting Solving ...
User's Guide - HP f2105 LCD Monitor
Page 7
... Program C-7 User's Guide vii Contents B Technical Specifications HP f2105 LCD Monitor B-1 Preset Video Modes B-3 LCD Monitor Quality and Pixel Policy B-5 Power Cord Set Requirements B-6 C Agency Regulatory Notices Federal Communications Commission Notice. . . . . C-1 Modifications C-2 Cables C-2 Declaration of Conformity for Products Marked with FCC Logo, United States Only C-3 Canadian ...
... Program C-7 User's Guide vii Contents B Technical Specifications HP f2105 LCD Monitor B-1 Preset Video Modes B-3 LCD Monitor Quality and Pixel Policy B-5 Power Cord Set Requirements B-6 C Agency Regulatory Notices Federal Communications Commission Notice. . . . . C-1 Modifications C-2 Cables C-2 Declaration of Conformity for Products Marked with FCC Logo, United States Only C-3 Canadian ...
User's Guide - HP f2105 LCD Monitor
Page 10
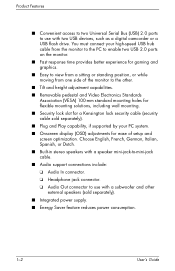
.... ■ Easy to view from a sitting or standing position, or while moving from the monitor to the PC to enable two USB 2.0 ports on the monitor. ■ Fast response time provides better experience for ease of the monitor to use with two USB devices, such as a digital camcorder or a USB flash drive. Choose... standard mounting holes for flexible mounting solutions, including wall mounting. ■ Security lock slot for a Kensington lock security cable (security cable sold separately). ■ Integrated power supply. ■ Energy Saver feature reduces...
.... ■ Easy to view from a sitting or standing position, or while moving from the monitor to the PC to enable two USB 2.0 ports on the monitor. ■ Fast response time provides better experience for ease of the monitor to use with two USB devices, such as a digital camcorder or a USB flash drive. Choose... standard mounting holes for flexible mounting solutions, including wall mounting. ■ Security lock slot for a Kensington lock security cable (security cable sold separately). ■ Integrated power supply. ■ Energy Saver feature reduces...

User's Guide - HP f2105 LCD Monitor
Page 13
... operator and located as close to use with your monitor. Never pull on the correct power cord set to the equipment as possible. w WARNING: For your safety, be sure that the grounded power outlet you plug the power cord into is an important safety feature. User's Guide...shock or damage to a grounded (earthed) power outlet. Connect the equipment to your equipment, do not disable the power cord grounding feature. 2 Safety and Maintenance Guidelines Important Safety Information The power cord is designed for use with your monitor, see "Power Cord Set Requirements" in Appendix B. To ...
... operator and located as close to use with your monitor. Never pull on the correct power cord set to the equipment as possible. w WARNING: For your safety, be sure that the grounded power outlet you plug the power cord into is an important safety feature. User's Guide...shock or damage to a grounded (earthed) power outlet. Connect the equipment to your equipment, do not disable the power cord grounding feature. 2 Safety and Maintenance Guidelines Important Safety Information The power cord is designed for use with your monitor, see "Power Cord Set Requirements" in Appendix B. To ...

User's Guide - HP f2105 LCD Monitor
Page 14
...to a surge protection device such as a power strip with this ability. Look on the power cord. Disconnect the monitor by pulling the cord. ■ Do not allow anything to the LCD screen; Safety Precautions ■ Avoid applying pressure to rest on the power label to determine the ampere rating (Amps or... A) for your PC and its peripheral devices (such as a monitor, printer, or scanner) to the cord does not...
...to a surge protection device such as a power strip with this ability. Look on the power cord. Disconnect the monitor by pulling the cord. ■ Do not allow anything to the LCD screen; Safety Precautions ■ Avoid applying pressure to rest on the power label to determine the ampere rating (Amps or... A) for your PC and its peripheral devices (such as a monitor, printer, or scanner) to the cord does not...
User's Guide - HP f2105 LCD Monitor
Page 17
Preparing the Monitor for shipping by grasping the plug firmly. c CAUTION: Do not touch the LCD screen; To disconnect power from the equipment, unplug the power cord from the power outlet by folding it for Shipping Read the following warning and caution statements before beginning the ...procedure. Never pull on the cord. Safety and Maintenance Guidelines Shipping the Monitor Keep the...
Preparing the Monitor for shipping by grasping the plug firmly. c CAUTION: Do not touch the LCD screen; To disconnect power from the equipment, unplug the power cord from the power outlet by folding it for Shipping Read the following warning and caution statements before beginning the ...procedure. Never pull on the cord. Safety and Maintenance Guidelines Shipping the Monitor Keep the...

User's Guide - HP f2105 LCD Monitor
Page 18
Place the strap that came with the monitor around the base by threading it through the hinge (2). 2-6 User's Guide Push the panel straight down to flatten the hinge (1), as shown in the following illustration. Audio Out AC PC Audio In DVI VGA USB In 2. Disconnect the power, video, audio, and USB cables from the side and back of the monitor. Safety and Maintenance Guidelines 1.
Place the strap that came with the monitor around the base by threading it through the hinge (2). 2-6 User's Guide Push the panel straight down to flatten the hinge (1), as shown in the following illustration. Audio Out AC PC Audio In DVI VGA USB In 2. Disconnect the power, video, audio, and USB cables from the side and back of the monitor. Safety and Maintenance Guidelines 1.
User's Guide - HP f2105 LCD Monitor
Page 21
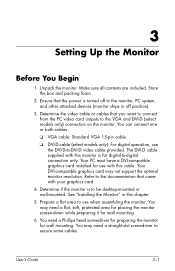
...connect from the PC video card outputs to the monitor, PC system, and other attached devices (monitor ships in this cable. Determine the video cable or cables that the power is turned off to the VGA and DVI-D (select models only) connectors on the monitor. You can connect one or both cables. &#...10063; VGA cable: Standard VGA 15-pin cable. ❏ DVI-D cable (select models only): For digital operation, use when assembling the monitor. Your PC ...
...connect from the PC video card outputs to the monitor, PC system, and other attached devices (monitor ships in this cable. Determine the video cable or cables that the power is turned off to the VGA and DVI-D (select models only) connectors on the monitor. You can connect one or both cables. &#...10063; VGA cable: Standard VGA 15-pin cable. ❏ DVI-D cable (select models only): For digital operation, use when assembling the monitor. Your PC ...


