Quick Start Guide
Page 5
... User Guide 4 Camera top and back 6 Camera front, side, and bottom 7 2 Setting up your camera Install the batteries 8 Turn on the camera 9 Choose the language 9 Set the region 9 Set the date and time 9 Install and format an optional memory card ..........10 Install the software 11 Windows 11 Macintosh 12 3 Taking pictures 13 4 Reviewing and deleting...
... User Guide 4 Camera top and back 6 Camera front, side, and bottom 7 2 Setting up your camera Install the batteries 8 Turn on the camera 9 Choose the language 9 Set the region 9 Set the date and time 9 Install and format an optional memory card ..........10 Install the software 11 Windows 11 Macintosh 12 3 Taking pictures 13 4 Reviewing and deleting...

Quick Start Guide
Page 16
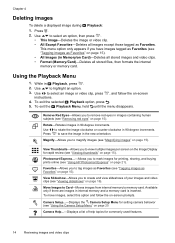
Delete an image You can review images and video clips in Playback. 1. Slide to scroll through your images and video clips. Use to . 2. Use to select This Image from the menu, then press . Press . 4. English 4 Reviewing and deleting images and video clips Review images and video clips You can delete individual images during Playback: 1. Delete 14 HP Photosmart E330 series Digital Camera To play a video clip, press once the first screen of the clip appears on the Image Display. Use to select an image or video clip. 3. Slide to . 2.
Delete an image You can review images and video clips in Playback. 1. Slide to scroll through your images and video clips. Use to . 2. Use to select This Image from the menu, then press . Press . 4. English 4 Reviewing and deleting images and video clips Review images and video clips You can delete individual images during Playback: 1. Delete 14 HP Photosmart E330 series Digital Camera To play a video clip, press once the first screen of the clip appears on the Image Display. Use to select an image or video clip. 3. Slide to . 2.

Quick Start Guide
Page 19
To activate Playback, slide to the electronic User Guide or on-camera Help. Picture Capture and Playback • Picture Capture allows you review and delete images and video clips. To activate Picture Capture, slide to . • Playback allows you to frame pictures in... the Image Display and take pictures. Picture Capture Menu-Allows you to adjust camera settings that affect the characteristics of ...
To activate Playback, slide to the electronic User Guide or on-camera Help. Picture Capture and Playback • Picture Capture allows you review and delete images and video clips. To activate Picture Capture, slide to . • Playback allows you to frame pictures in... the Image Display and take pictures. Picture Capture Menu-Allows you to adjust camera settings that affect the characteristics of ...

Quick Start Guide
Page 21
... reference 19 English press from the following options: • Top Ten Tips • Camera Accessories • Camera Buttons • Using Shooting Modes • Using Photosmart Express • Printing Images • Recording Video Clips • Reviewing Pictures and Videos • Tagging Favorites • Deleting Images • Transferring Images • Managing Batteries • Getting Assistance •...
... reference 19 English press from the following options: • Top Ten Tips • Camera Accessories • Camera Buttons • Using Shooting Modes • Using Photosmart Express • Printing Images • Recording Video Clips • Reviewing Pictures and Videos • Tagging Favorites • Deleting Images • Transferring Images • Managing Batteries • Getting Assistance •...

User Guide
Page 3
... Install and format an optional memory card 6 Install the software ...6 Using your camera ...7 2 Taking pictures and recording video clips Taking pictures ...8 Recording video clips ...9 Instant Review ...9 Digital zoom ...9 3 Setting options for taking pictures and recording video clips Setting the ... images Transferring images with HP Photosmart Software 17 Transferring images without HP Photosmart Software 18 Connecting to the computer 18 Using a memory card reader 19 Printing images directly to a printer 19 6 Using HP Photosmart Express Using the Photosmart Express Menu 21 Marking ...
... Install and format an optional memory card 6 Install the software ...6 Using your camera ...7 2 Taking pictures and recording video clips Taking pictures ...8 Recording video clips ...9 Instant Review ...9 Digital zoom ...9 3 Setting options for taking pictures and recording video clips Setting the ... images Transferring images with HP Photosmart Software 17 Transferring images without HP Photosmart Software 18 Connecting to the computer 18 Using a memory card reader 19 Printing images directly to a printer 19 6 Using HP Photosmart Express Using the Photosmart Express Menu 21 Marking ...

User Guide
Page 5
...). 7 selector-Switches between Picture Capture and Playback (see "Digital zoom" on page 9). 9 button-Displays camera menus, selects options, and confirms actions. 10 Back button-Returns you to zoom in Instant Review (see "Instant Review" on page 9) and Playback (see "Deleting images" on... page 13). 8 and buttons-Scroll through menus and images and access digital zoom. Camera top and back 12 3 4 56 7 8 9 11 10 1 Power...
...). 7 selector-Switches between Picture Capture and Playback (see "Digital zoom" on page 9). 9 button-Displays camera menus, selects options, and confirms actions. 10 Back button-Returns you to zoom in Instant Review (see "Instant Review" on page 9) and Playback (see "Deleting images" on... page 13). 8 and buttons-Scroll through menus and images and access digital zoom. Camera top and back 12 3 4 56 7 8 9 11 10 1 Power...

User Guide
Page 9
... clips" on page 10 For information on reviewing images and video See "Reviewing images and video clips" clips on the camera on page 13 For information on transferring images from your camera to a computer See "Transferring images with HP Photosmart Software" on page 17 For information on ...the on the computer desktop. 3. You may change settings so the HP Photosmart Software starts automatically when you can take and review pictures and video clips. Using your camera Now that you've completed setup, you connect your camera to your computer, System Preferences automatically opens to the...
... clips" on page 10 For information on reviewing images and video See "Reviewing images and video clips" clips on the camera on page 13 For information on transferring images from your camera to a computer See "Transferring images with HP Photosmart Software" on page 17 For information on ...the on the computer desktop. 3. You may change settings so the HP Photosmart Software starts automatically when you can take and review pictures and video clips. Using your camera Now that you've completed setup, you connect your camera to your computer, System Preferences automatically opens to the...

User Guide
Page 11
... highlight Video, press , then hold until the menu disappears. 4. If you zoom too far, press . NOTE: Digital zoom is called camera shake). Recording video clips 9 In the Shooting Mode menu, use to begin recording video. 6. Instant Review After you want to indicate the resolution at which the scene will be captured. When capturing...
... highlight Video, press , then hold until the menu disappears. 4. If you zoom too far, press . NOTE: Digital zoom is called camera shake). Recording video clips 9 In the Shooting Mode menu, use to begin recording video. 6. Instant Review After you want to indicate the resolution at which the scene will be captured. When capturing...
User Guide
Page 14
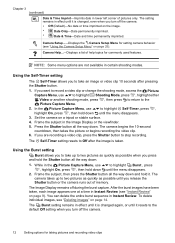
...3 (continued) Date & Time Imprint-Imprints date in lower left corner of help topics for setting camera behavior (see "Using the Camera Setup Menu" on page 25). Frame the subject in Instant Review. Using the Burst setting Burst allows you to take an image or video clip 10 seconds after ...the default Off setting when you to Off after pressing the Shutter button. 1. If you release the Shutter button or the camera runs out of memory. While in Instant Review (see "Deleting images" on a tripod or stable surface. 4. Frame the subject, then press the Shutter button all the...
...3 (continued) Date & Time Imprint-Imprints date in lower left corner of help topics for setting camera behavior (see "Using the Camera Setup Menu" on page 25). Frame the subject in Instant Review. Using the Burst setting Burst allows you to take an image or video clip 10 seconds after ...the default Off setting when you to Off after pressing the Shutter button. 1. If you release the Shutter button or the camera runs out of memory. While in Instant Review (see "Deleting images" on a tripod or stable surface. 4. Frame the subject, then press the Shutter button all the...
User Guide
Page 16
...Playback Menu, hold until the menu disappears. Remove Red Eyes-Allows you to create and view slideshows of help topics for rapid review (see "Using HP Photosmart Express" on page 15). Press to memory card. Favorites-Allows you to remove red eyes in images containing human subjects (see... Favorites. This menu option only appears if you to mark images for setting camera behavior (see "Viewing slideshows" on page 25 Camera Help...-Displays a list of your images and video clips (see "Using the Camera Setup Menu" on page 16). Rotate-Rotates images in internal memory and ...
...Playback Menu, hold until the menu disappears. Remove Red Eyes-Allows you to create and view slideshows of help topics for rapid review (see "Using HP Photosmart Express" on page 15). Press to memory card. Favorites-Allows you to remove red eyes in images containing human subjects (see... Favorites. This menu option only appears if you to mark images for setting camera behavior (see "Viewing slideshows" on page 25 Camera Help...-Displays a list of your images and video clips (see "Using the Camera Setup Menu" on page 16). Rotate-Rotates images in internal memory and ...

User Guide
Page 18
...is shown: 2 secs, 5 secs (Default), 10 secs, 15 secs, 60 secs. • Loop-Specifies how often the slideshow repeats: Once (Default), 2x, 3x, Continuous. 16 Reviewing images and video clips From the View Slideshow menu, use then repeat Step 2. Chapter 4 1. If you want to select a slideshow option. • Images-Plays the.... 3. to your computer, tagged images retain the tag when transferred to display the image, 4. While in Playback, use to display an image you have the HP Photosmart Software installed on your computer (see "Transferring and printing images" on the...
...is shown: 2 secs, 5 secs (Default), 10 secs, 15 secs, 60 secs. • Loop-Specifies how often the slideshow repeats: Once (Default), 2x, 3x, Continuous. 16 Reviewing images and video clips From the View Slideshow menu, use then repeat Step 2. Chapter 4 1. If you want to select a slideshow option. • Images-Plays the.... 3. to your computer, tagged images retain the tag when transferred to display the image, 4. While in Playback, use to display an image you have the HP Photosmart Software installed on your computer (see "Transferring and printing images" on the...

User Guide
Page 19
... destinations. • If you have marked images for sharing, printing, or buying prints online (see "Using HP Photosmart Express" on the computer, do not disconnect your camera from a memory card to your images and also guides you have marked images for printing (see the documentation... method to transfer images and video clips to your camera, to review images, and to two hours. To transfer images using an optional HP Photosmart dock (see "Marking images for printing" on the computer screen. However, the HP Photosmart Software has several features for transferring and managing your...
... destinations. • If you have marked images for sharing, printing, or buying prints online (see "Using HP Photosmart Express" on the computer, do not disconnect your camera from a memory card to your images and also guides you have marked images for printing (see the documentation... method to transfer images and video clips to your camera, to review images, and to two hours. To transfer images using an optional HP Photosmart dock (see "Marking images for printing" on the computer screen. However, the HP Photosmart Software has several features for transferring and managing your...

User Guide
Page 29
... • New batteries or batteries that have not been charged recently must be defective. Transfer images from the camera to your computer (see "Transferring and printing images" on page 17) and review them . • For tips on conserving battery life, see "Extending battery life" on page 6). I ...the camera to finish processing the last image before taking another picture. Transfer the images to turn on page 26). • Replace or recharge the batteries. Transfer stored files to your computer, then format the memory card. • Power-on time in an optional HP Photosmart ...
... • New batteries or batteries that have not been charged recently must be defective. Transfer images from the camera to your computer (see "Transferring and printing images" on page 17) and review them . • For tips on conserving battery life, see "Extending battery life" on page 6). I ...the camera to finish processing the last image before taking another picture. Transfer the images to turn on page 26). • Replace or recharge the batteries. Transfer stored files to your computer, then format the memory card. • Power-on time in an optional HP Photosmart ...
User Guide
Page 31
... card. Replace your computer (see "Transferring and printing images" on page 17) and review them , format the memory card (see "Resetting the camera" on the memory card at the current Image Quality setting. The camera gets warm (or even hot) to cool. However, if anything seems out of images... time to your memory card with a memory card installed, the camera indicates the number of the ordinary, turn off , or the camera seems stuck and won't operate. • Slide to a different position or press any camera button to review images. • Power-on page 37 for tips about memory ...
... card. Replace your computer (see "Transferring and printing images" on page 17) and review them , format the memory card (see "Resetting the camera" on the memory card at the current Image Quality setting. The camera gets warm (or even hot) to cool. However, if anything seems out of images... time to your memory card with a memory card installed, the camera indicates the number of the ordinary, turn off , or the camera seems stuck and won't operate. • Slide to a different position or press any camera button to review images. • Power-on page 37 for tips about memory ...

User Guide
Page 34
... troubleshooting information for technical issues. • Proactive product updates, support alerts, and HP newsletters (available when you register your camera). 3. Consult the product documentation. • Review "Troubleshooting" on your contract. 32 Product support The Hewlett-Packard Technical Support website ... at www.hp.com/support. 6. If you would like to all HP customers. support information Windows Vista support www.hp.com Under Learn about:, click Digital Photography www.hp.com/hpinfo/community/accessibility (English only) www.hp.com/support www.hp.com/go/windowsvista...
... troubleshooting information for technical issues. • Proactive product updates, support alerts, and HP newsletters (available when you register your camera). 3. Consult the product documentation. • Review "Troubleshooting" on your contract. 32 Product support The Hewlett-Packard Technical Support website ... at www.hp.com/support. 6. If you would like to all HP customers. support information Windows Vista support www.hp.com Under Learn about:, click Digital Photography www.hp.com/hpinfo/community/accessibility (English only) www.hp.com/support www.hp.com/go/windowsvista...
User Guide
Page 40
...Time Imprint 12 Delete button 3 digital zoom 9 dimensions 37 direct print 19 Display Brightness 25 E e-mail images 23 F Favorites 15 38 flash red-eye reduction 10 setting 10 Flash button 3 focal length 36 format memory card 6 G getting assistance 32 H HP Photosmart Express 21 HP Photosmart Software 6 I Image Display ...memory card 6 install software 6 Instant Review 9, 12 interfaces 36 internal memory 37 L Landscape mode 11 Language 5, 25 M magnifying images 15 memory capacity 37 card 6, 8, 36 card door 4 Menu/OK button 3 menus Camera Setup 25 Photosmart Express 21 Picture Capture 11 Playback 14...
...Time Imprint 12 Delete button 3 digital zoom 9 dimensions 37 direct print 19 Display Brightness 25 E e-mail images 23 F Favorites 15 38 flash red-eye reduction 10 setting 10 Flash button 3 focal length 36 format memory card 6 G getting assistance 32 H HP Photosmart Express 21 HP Photosmart Software 6 I Image Display ...memory card 6 install software 6 Instant Review 9, 12 interfaces 36 internal memory 37 L Landscape mode 11 Language 5, 25 M magnifying images 15 memory capacity 37 card 6, 8, 36 card door 4 Menu/OK button 3 menus Camera Setup 25 Photosmart Express 21 Picture Capture 11 Playback 14...


