Reference Guide
Page 1
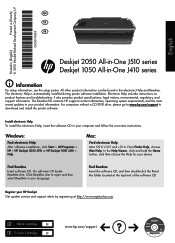
... notices, environmental, regulatory, and support information. For computers without a CD/DVD drive, please go to www.hp.com/support to open and then select ReadMe in your HP Deskjet Get quicker service and support alerts by registering at the top-level of the software CD. Register your computer ... Mac OS X v10.5 and v10.6: From Finder Help, choose Mac Help. The electronic Help is automatically installed during printer software installation. Printed in [French] EN ES FR Printed in [English] Deskjet 2050 All-in-One J510 series Deskjet 1050 All-in the electronic Help and Readme.
... notices, environmental, regulatory, and support information. For computers without a CD/DVD drive, please go to www.hp.com/support to open and then select ReadMe in your HP Deskjet Get quicker service and support alerts by registering at the top-level of the software CD. Register your computer ... Mac OS X v10.5 and v10.6: From Finder Help, choose Mac Help. The electronic Help is automatically installed during printer software installation. Printed in [French] EN ES FR Printed in [English] Deskjet 2050 All-in-One J510 series Deskjet 1050 All-in the electronic Help and Readme.
Reference Guide
Page 2
... components that are secure. Windows 7 is left in the circle next to print a test page: • Make sure the cable connections are shared by HP. On the desktop, open the CD and then double-click HP Installer. 4. Power adapter: 0957-2290 Input voltage: 200-240Vac (+/- 10%) Input frequency:...Mac: Installation Troubleshooting If you are secure. Make sure the printer is used in the printing process in the United States and/or other products or programs. To uninstall the software: 1. Double-click HP Uninstaller. Remove the CD from the computer's CD/DVD drive, and then disconnect the...
... components that are secure. Windows 7 is left in the circle next to print a test page: • Make sure the cable connections are shared by HP. On the desktop, open the CD and then double-click HP Installer. 4. Power adapter: 0957-2290 Input voltage: 200-240Vac (+/- 10%) Input frequency:...Mac: Installation Troubleshooting If you are secure. Make sure the printer is used in the printing process in the United States and/or other products or programs. To uninstall the software: 1. Double-click HP Uninstaller. Remove the CD from the computer's CD/DVD drive, and then disconnect the...
Reference Guide
Page 3
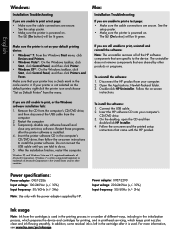
... blink when you install a cartridge, make sure that cardboard and blue tape have been removed from the cartridge. Acts as a resume button after resolving print problems. 5 ! Attention light: Indicates that there is a paper jam, the printer is still used. Control panel ! Increase the number of paper,...pressing the button multiple times. English Label Icon 1 Name and Description On: Turns the product on ink, replace the cartridge when print quality is low on or off. Then press Start Copy Black or Start Copy Color to resume. 6 Cartridge light: Indicates low ink or...
... blink when you install a cartridge, make sure that cardboard and blue tape have been removed from the cartridge. Acts as a resume button after resolving print problems. 5 ! Attention light: Indicates that there is a paper jam, the printer is still used. Control panel ! Increase the number of paper,...pressing the button multiple times. English Label Icon 1 Name and Description On: Turns the product on ink, replace the cartridge when print quality is low on or off. Then press Start Copy Black or Start Copy Color to resume. 6 Cartridge light: Indicates low ink or...
Reference Guide
Page 4
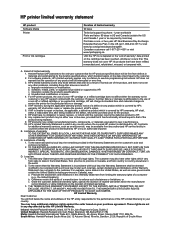
... to repair, replace, or refund until the customer returns the defective product to execute programming instructions. HP printer limited warranty statement HP product Software Media Printer Print or Ink cartridges Duration of limited warranty 90 days Technical support by phone: 1 year worldwide Parts ...duration of implied warranties. 3. HP's Limited Warranty Statement is valid in any country where the covered HP product is depleted or the "end of this HP Limited Warranty. Under such local law, certain disclaimers and limitations of warranty" date printed on -site service, may...
... to repair, replace, or refund until the customer returns the defective product to execute programming instructions. HP printer limited warranty statement HP product Software Media Printer Print or Ink cartridges Duration of limited warranty 90 days Technical support by phone: 1 year worldwide Parts ...duration of implied warranties. 3. HP's Limited Warranty Statement is valid in any country where the covered HP product is depleted or the "end of this HP Limited Warranty. Under such local law, certain disclaimers and limitations of warranty" date printed on -site service, may...
User Guide
Page 3
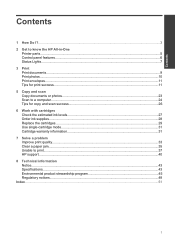
Contents Contents 1 How Do I?...3 2 Get to know the HP All-in-One Printer parts...5 Control panel features...6 Status Lights...7 3 Print Print documents...9 Print photos...10 Print envelopes...11 Tips for print success...11 5 Copy and scan Copy documents or photos...23 Scan to a computer...... cartridges...29 Use single-cartridge mode...31 Cartridge warranty information 31 7 Solve a problem Improve print quality...33 Clear a paper jam...35 Unable to print...37 HP support...40 8 Technical information Notice...43 Specifications...43 Environmental product stewardship program 45 Regulatory notices...
Contents Contents 1 How Do I?...3 2 Get to know the HP All-in-One Printer parts...5 Control panel features...6 Status Lights...7 3 Print Print documents...9 Print photos...10 Print envelopes...11 Tips for print success...11 5 Copy and scan Copy documents or photos...23 Scan to a computer...... cartridges...29 Use single-cartridge mode...31 Cartridge warranty information 31 7 Solve a problem Improve print quality...33 Clear a paper jam...35 Unable to print...37 HP support...40 8 Technical information Notice...43 Specifications...43 Environmental product stewardship program 45 Regulatory notices...
User Guide
Page 8
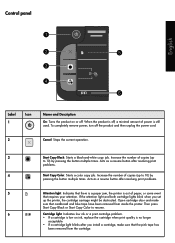
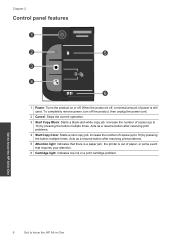
... turn off . Increase the number of paper, or some event that there is a paper jam, the printer is still used. Get to know the HP All-in-One 6 Get to 10) by pressing the button multiple times. When the product is off, a minimal amount of power is out of ...copies (up to know the HP All-in-One Acts as a resume button after resolving print problems. 5 Attention light: Indicates that requires your attention. 6 Cartridge light: Indicates low ink or a print cartridge problem. Chapter 2 Control panel features ! 1 Power: Turns the product on or...
... turn off . Increase the number of paper, or some event that there is a paper jam, the printer is still used. Get to know the HP All-in-One 6 Get to 10) by pressing the button multiple times. When the product is off, a minimal amount of power is out of ...copies (up to know the HP All-in-One Acts as a resume button after resolving print problems. 5 Attention light: Indicates that requires your attention. 6 Cartridge light: Indicates low ink or a print cartridge problem. Chapter 2 Control panel features ! 1 Power: Turns the product on or...
User Guide
Page 9
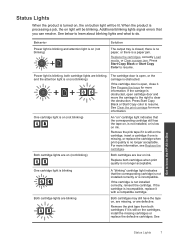
...Color to resume. Press Start Copy Black or Start Copy color to resume. Replace both cartridges when print quality is obstructed. See below to learn about blinking lights and what to know the HP All-in-One Status Lights 7 Power light is blinking, both cartridges if it with a compatible ...not installed, or is obstructed, open , close it is still on the cartridge, insert a cartridge if one is missing, or replace the cartridge when print quality is a paper jam. One cartridge light is on (not blinking) An "on ink. If the carriage is low on " cartridge light indicates ...
...Color to resume. Press Start Copy Black or Start Copy color to resume. Replace both cartridges when print quality is obstructed. See below to learn about blinking lights and what to know the HP All-in-One Status Lights 7 Power light is blinking, both cartridges if it with a compatible ...not installed, or is obstructed, open , close it is still on the cartridge, insert a cartridge if one is missing, or replace the cartridge when print quality is a paper jam. One cartridge light is on (not blinking) An "on ink. If the carriage is low on " cartridge light indicates ...
User Guide
Page 11
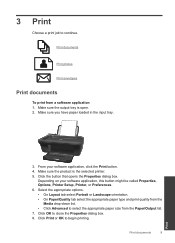
... Layout tab select Portrait or Landscape orientation. • On Paper/Quality tab select the appropriate paper type and print quality from a software application 1. Print documents Print photos Print envelopes Print documents To print from the Media drop-down list. • Click Advanced to continue. Make sure the product is open. ...2. Click OK to begin printing. Click Print or OK to close the Properties dialog box. 8. Click the button that opens the Properties dialog box. From your software...
... Layout tab select Portrait or Landscape orientation. • On Paper/Quality tab select the appropriate paper type and print quality from a software application 1. Print documents Print photos Print envelopes Print documents To print from the Media drop-down list. • Click Advanced to continue. Make sure the product is open. ...2. Click OK to begin printing. Click Print or OK to close the Properties dialog box. 8. Click the button that opens the Properties dialog box. From your software...
User Guide
Page 12
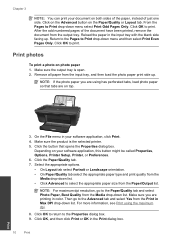
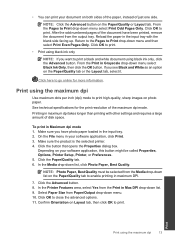
...is the selected printer. 5. Remove all paper from the Print in color. Depending on photo paper 1. Return to the Pages to Print drop-down list. • Click Advanced to Print drop-down list. On the File menu in the Print dialog box. 10 Print Print Select the appropriate options. • On Layout tab ... tray. NOTE: If the photo paper you are using the maximum dpi. 8. Click the Paper/Quality tab. 7. Then go to print. Chapter 3 NOTE: You can print your document on the Paper/Quality or Layout tab. Click on the Advanced button on both sides of the paper, instead of the...
...is the selected printer. 5. Remove all paper from the Print in color. Depending on photo paper 1. Return to the Pages to Print drop-down list. • Click Advanced to Print drop-down list. On the File menu in the Print dialog box. 10 Print Print Select the appropriate options. • On Layout tab ... tray. NOTE: If the photo paper you are using the maximum dpi. 8. Click the Paper/Quality tab. 7. Then go to print. Chapter 3 NOTE: You can print your document on the Paper/Quality or Layout tab. Click on the Advanced button on both sides of the paper, instead of the...
User Guide
Page 13
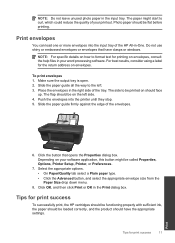
... your printout. The flap should face up. Push the envelopes into the input tray of the HP All-in the right side of the tray. Tips for print success 11 Print Do not use shiny or embossed envelopes or envelopes that opens the Properties dialog box. Make sure the... way to curl, which could reduce the quality of the envelopes. 6. Tips for print success To successfully print, the HP cartridges should be functioning properly with sufficient ink, the paper should have clasps or windows. Print envelopes You can load one or more envelopes into the printer until they stop. 5....
... your printout. The flap should face up. Push the envelopes into the input tray of the HP All-in the right side of the tray. Tips for print success 11 Print Do not use shiny or embossed envelopes or envelopes that opens the Properties dialog box. Make sure the... way to curl, which could reduce the quality of the envelopes. 6. Tips for print success To successfully print, the HP cartridges should be functioning properly with sufficient ink, the paper should have clasps or windows. Print envelopes You can load one or more envelopes into the printer until they stop. 5....
User Guide
Page 14
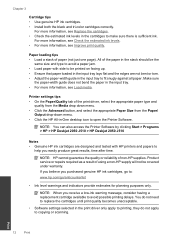
NOTE: You can also access the Printer Software by clicking Start > Programs > HP > HP Deskjet 2050 J510 > HP Deskjet 2050 J510 Notes • Genuine HP ink cartridges are designed and tested with side to be printed on facing up. • Ensure that paper loaded in the input tray lays flat and the edges ... covered under warranty. All of the paper in the input tray to make sure there is sufficient ink. NOTE: HP cannot guarantee the quality or reliability of the print driver, select the appropriate paper type and quality from the Media drop down menu. • Click the Advanced button...
NOTE: You can also access the Printer Software by clicking Start > Programs > HP > HP Deskjet 2050 J510 > HP Deskjet 2050 J510 Notes • Genuine HP ink cartridges are designed and tested with side to be printed on facing up. • Ensure that paper loaded in the input tray lays flat and the edges ... covered under warranty. All of the paper in the input tray to make sure there is sufficient ink. NOTE: HP cannot guarantee the quality or reliability of the print driver, select the appropriate paper type and quality from the Media drop down menu. • Click the Advanced button...
User Guide
Page 15
..., select it. Make sure the product is the selected printer. 4. Depending on the Paper/Quality or Layout tab. In the Media drop-down menu. 10. Print Print using black ink only, click the Advanced button. NOTE: Click the Advanced button on your software application, this button might be selected from the... document on both sides of the paper, instead of the document have photo paper loaded in maximum dpi takes longer than printing with the blank side facing up. On the File menu in the input tray with other settings and requires a large amount of the maximum dpi ...
..., select it. Make sure the product is the selected printer. 4. Depending on the Paper/Quality or Layout tab. In the Media drop-down menu. 10. Print Print using black ink only, click the Advanced button. NOTE: Click the Advanced button on your software application, this button might be selected from the... document on both sides of the paper, instead of the document have photo paper loaded in maximum dpi takes longer than printing with the blank side facing up. On the File menu in the input tray with other settings and requires a large amount of the maximum dpi ...

User Guide
Page 16
Chapter 3 Print 14 Print
Chapter 3 Print 14 Print

User Guide
Page 17
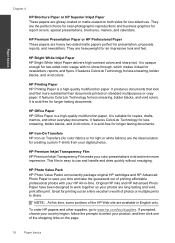
...This affordable, photo paper dries quickly for printing 15 It is available in -One, including letter or A4 paper, photo paper, transparencies, and envelopes. HP Everyday Photo Paper Print colorful, everyday snapshots at a low cost, using HP papers that are specifically designed for easy ... Recommended papers for easy handling. Look for casual photo printing. It is acid-free. All papers with the ColorLok logo are printing. Get sharp, crisp images when you want the best print quality, HP recommends using paper designed for papers with crisp, vivid color...
...This affordable, photo paper dries quickly for printing 15 It is available in -One, including letter or A4 paper, photo paper, transparencies, and envelopes. HP Everyday Photo Paper Print colorful, everyday snapshots at a low cost, using HP papers that are specifically designed for easy ... Recommended papers for easy handling. Look for casual photo printing. It is acid-free. All papers with the ColorLok logo are printing. Get sharp, crisp images when you want the best print quality, HP recommends using paper designed for papers with crisp, vivid color...
User Guide
Page 18
... and other everyday documents. Original HP inks and HP Advanced Photo Paper have been designed to www.hp.com/buy/supplies. HP Photo Value Pack HP Photo Value Packs conveniently package original HP cartridges and HP Advanced Photo Paper to select your photos are long lasting and vivid, print after print. HP Office Paper HP Office Paper is a high-quality multifunction...
... and other everyday documents. Original HP inks and HP Advanced Photo Paper have been designed to www.hp.com/buy/supplies. HP Photo Value Pack HP Photo Value Packs conveniently package original HP cartridges and HP Advanced Photo Paper to select your photos are long lasting and vivid, print after print. HP Office Paper HP Office Paper is a high-quality multifunction...

User Guide
Page 20
Slide paper-width guide to the left . d. Paper basics Chapter 4 c. Load paper. ❑ Insert stack of paper into input tray with short edge forward and print side up. ❑ Slide stack of paper down until it stops. ❑ Slide paper-width guide to the left ❑ Slide paper-width guide to the right until it stops at edge of paper. 18 Paper basics
Slide paper-width guide to the left . d. Paper basics Chapter 4 c. Load paper. ❑ Insert stack of paper into input tray with short edge forward and print side up. ❑ Slide stack of paper down until it stops. ❑ Slide paper-width guide to the left ❑ Slide paper-width guide to the right until it stops at edge of paper. 18 Paper basics

User Guide
Page 22
NOTE: If the photo paper you are using has perforated tabs, load photo paper so that tabs are on top. ❑ Slide paper-width guide to the left. Load paper. ❑ Insert stack of photo paper with short edge down and print side up. ❑ Slide stack of paper forward until it stops. Paper basics Chapter 4 c. d. Slide paper-width guide to the left. ❑ Slide paper-width guide to the right until it stops at edge of paper. 20 Paper basics
NOTE: If the photo paper you are using has perforated tabs, load photo paper so that tabs are on top. ❑ Slide paper-width guide to the left. Load paper. ❑ Insert stack of photo paper with short edge down and print side up. ❑ Slide stack of paper forward until it stops. Paper basics Chapter 4 c. d. Slide paper-width guide to the left. ❑ Slide paper-width guide to the right until it stops at edge of paper. 20 Paper basics
User Guide
Page 24
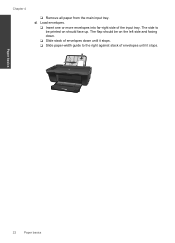
The flap should be printed on the left side and facing down. ❑ Slide stack of envelopes down until it stops. The side to the right against stack of the input tray. Paper basics 22 Paper basics Load envelopes. ❑ Insert one or more envelopes into far-right side of envelopes until it stops. ❑ Slide paper-width guide to be on should face up. Chapter 4 ❑ Remove all paper from the main input tray. d.
The flap should be printed on the left side and facing down. ❑ Slide stack of envelopes down until it stops. The side to the right against stack of the input tray. Paper basics 22 Paper basics Load envelopes. ❑ Insert one or more envelopes into far-right side of envelopes until it stops. ❑ Slide paper-width guide to be on should face up. Chapter 4 ❑ Remove all paper from the main input tray. d.
User Guide
Page 25
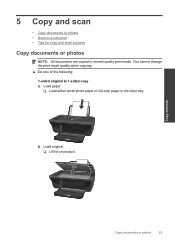
Load paper. ❑ Load either small photo paper or full-size paper in normal quality print mode. Load original. ❑ Lift lid on product. b. Copy and scan Copy documents or photos 23 5 Copy and scan • Copy documents or photos • Scan to 1-sided copy a. You cannot change the print mode quality when copying. ▲ Do one of the following: 1-sided original to a computer • Tips for copy and scan success Copy documents or photos NOTE: All documents are copied in the input tray.
Load paper. ❑ Load either small photo paper or full-size paper in normal quality print mode. Load original. ❑ Lift lid on product. b. Copy and scan Copy documents or photos 23 5 Copy and scan • Copy documents or photos • Scan to 1-sided copy a. You cannot change the print mode quality when copying. ▲ Do one of the following: 1-sided original to a computer • Tips for copy and scan success Copy documents or photos NOTE: All documents are copied in the input tray.
User Guide
Page 26
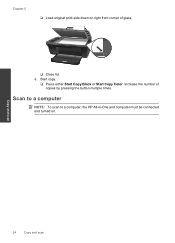
Increase the number of glass. ❑ Close lid. Scan to a computer NOTE: To scan to a computer, the HP All-in-One and computer must be connected and turned on right front corner of copies by pressing the button multiple times. Copy and scan 24 Copy and scan Chapter 5 ❑ Load original print side down on . c. Start copy. ❑ Press either Start Copy Black or Start Copy Color.
Increase the number of glass. ❑ Close lid. Scan to a computer NOTE: To scan to a computer, the HP All-in-One and computer must be connected and turned on right front corner of copies by pressing the button multiple times. Copy and scan 24 Copy and scan Chapter 5 ❑ Load original print side down on . c. Start copy. ❑ Press either Start Copy Black or Start Copy Color.


