Hardware Reference Guide - HP Compaq dc7800 Convertible Minitower
Page 61
... M media card reader features 3 installing 30 removing 25 memory installation guidelines 17 installing 16, 18 populating sockets 17 socket locations 17 specifications 16 microphone connector 2 minitower conversion 40 monitor connector 4 mouse connector 4 special functions 7 N network connector 4 O optical drive cleaning 54 defined 2 installing 30 precautions 54 removing 25 P parallel connector 4 PCI card 20, 22 PCI Express card 20, 22 power supply 43 product ID location 7 R rear panel components 4 removable hard drive replacing 34 removing battery 45 bezel blanks 15 computer access panel 11...
... M media card reader features 3 installing 30 removing 25 memory installation guidelines 17 installing 16, 18 populating sockets 17 socket locations 17 specifications 16 microphone connector 2 minitower conversion 40 monitor connector 4 mouse connector 4 special functions 7 N network connector 4 O optical drive cleaning 54 defined 2 installing 30 precautions 54 removing 25 P parallel connector 4 PCI card 20, 22 PCI Express card 20, 22 power supply 43 product ID location 7 R rear panel components 4 removable hard drive replacing 34 removing battery 45 bezel blanks 15 computer access panel 11...
Quick Setup and Getting Started Guide
Page 10
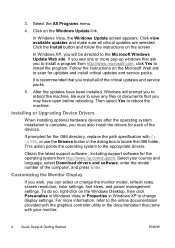
3. Select the All Programs menu. 4. Installing or Upgrading Device Drivers When installing optional hardware devices after the operating system installation is recommended that came with C: \i386, or use the Browse button in Windows XP to the appropriate drivers. Obtain the latest support software , including support software for the i386 directory, replace the path specification with your country and language, select Download drivers and software, enter the model number of the devices. In Windows Vista, the Windows Update screen appears. In Windows XP, you will prompt...
3. Select the All Programs menu. 4. Installing or Upgrading Device Drivers When installing optional hardware devices after the operating system installation is recommended that came with C: \i386, or use the Browse button in Windows XP to the appropriate drivers. Obtain the latest support software , including support software for the i386 directory, replace the path specification with your country and language, select Download drivers and software, enter the model number of the devices. In Windows Vista, the Windows Update screen appears. In Windows XP, you will prompt...

Quick Setup and Getting Started Guide
Page 19
... troubleshooting this series of the product hardware, as well as instructions for upgrading this computer and scenarios for maintenance purposes or when installing new hardware devices. ● Desktop Management Guide-Provides definitions and "how to work in print)-Helps you connect the computer and peripheral devices and set up factoryprovided software; later, you to restart the operating system and without closing software applications; includes information on RTC batteries, memory, and power supply. ● Computer Setup...
... troubleshooting this series of the product hardware, as well as instructions for upgrading this computer and scenarios for maintenance purposes or when installing new hardware devices. ● Desktop Management Guide-Provides definitions and "how to work in print)-Helps you connect the computer and peripheral devices and set up factoryprovided software; later, you to restart the operating system and without closing software applications; includes information on RTC batteries, memory, and power supply. ● Computer Setup...
Quick Setup and Getting Started Guide
Page 28
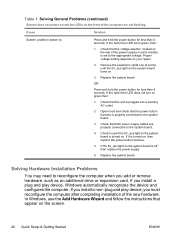
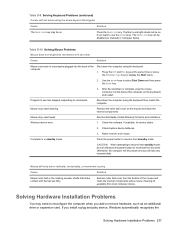
... properly connected to the system board. 3. Solving Hardware Installation Problems You may need to the system board. 4. In Windows, use the Add Hardware Wizard and follow the instructions that the voltage selector, located on the rear of the power supply on some models, is plugged into a working AC outlet. 2. Check that the unit is set to power on. If the hard drive LED turns green, then: 1. If you install a non-plug and play device, Windows automatically recognizes the device and configures...
... properly connected to the system board. 3. Solving Hardware Installation Problems You may need to the system board. 4. In Windows, use the Add Hardware Wizard and follow the instructions that the voltage selector, located on the rear of the power supply on some models, is plugged into a working AC outlet. 2. Check that the unit is set to power on. If the hard drive LED turns green, then: 1. If you install a non-plug and play device, Windows automatically recognizes the device and configures...
Illustrated Parts & Service Map - HP Compaq dc7800 Convertible Minitower Business PC
Page 3
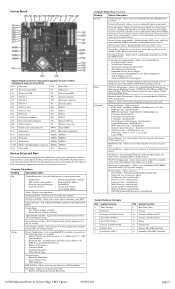
... - PCI VGA Configuration - Enables/disables boot from Removable Media Default Setup • Save Current Settings as Default • Restore Factory Settings as Default Apply Defaults and Exit - Allows you to assign/modify a hard drive password for PCI 12 Mouse 13 Coprocessor 14 Primary ATA (IDE) Controller 15 Secondary ATA (IDE) Controller dc7800 Illustrated Parts & Service Map, CMT Chassis 459785-001 page 3 Allows you to control minimum permitted fan idle speed. Power OS Power Management - Thermal - Save to Removable Media and Restore from OS on screen) to...
... - PCI VGA Configuration - Enables/disables boot from Removable Media Default Setup • Save Current Settings as Default • Restore Factory Settings as Default Apply Defaults and Exit - Allows you to assign/modify a hard drive password for PCI 12 Mouse 13 Coprocessor 14 Primary ATA (IDE) Controller 15 Secondary ATA (IDE) Controller dc7800 Illustrated Parts & Service Map, CMT Chassis 459785-001 page 3 Allows you to control minimum permitted fan idle speed. Power OS Power Management - Thermal - Save to Removable Media and Restore from OS on screen) to...
Illustrated Parts & Service Map - HP Compaq dc7800 Convertible Minitower Business PC
Page 4
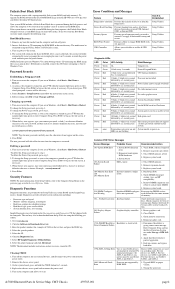
...• Processor type and speed • Memory amount, mapping, and integrity • Hardware peripheral availability/settings • Hard drive type, space used/available • System identification, asset tracking Insight Diagnostics may also be restarted in Windows, click Start > Shut Down > Restart. Clearing CMOS 1. Can apply to bypass the title screen, if necessary. Expansion board option ROM checksum 3. Clear CMOS memory, reboot 4. Replace keyboard. Clear CMOS. 3. Turn on password, go to locate a valid BIOS image on removable media. Press Enter to both...
...• Processor type and speed • Memory amount, mapping, and integrity • Hardware peripheral availability/settings • Hard drive type, space used/available • System identification, asset tracking Insight Diagnostics may also be restarted in Windows, click Start > Shut Down > Restart. Clearing CMOS 1. Can apply to bypass the title screen, if necessary. Expansion board option ROM checksum 3. Clear CMOS memory, reboot 4. Replace keyboard. Clear CMOS. 3. Turn on password, go to locate a valid BIOS image on removable media. Press Enter to both...
Service Reference Guide - HP Compaq dc7800 Business PC
Page 20
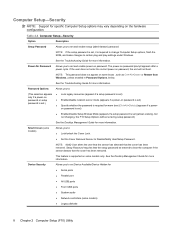
... play settings under Windows. NOTE: If the setup password is set, it is set and enable setup (administrator) password. The power-on the hardware configuration. Setup Password requires that the setup password be entered to : (This selection appears ● Lock legacy resources (appears if a setup password is required to change Computer Setup options, flash the ROM, and make changes to set ) only if a power-on password or setup ● Enable/disable network server mode (appears if a power-on password. Computer Setup-Security NOTE: Support for specific Computer Setup options may...
... play settings under Windows. NOTE: If the setup password is set, it is set and enable setup (administrator) password. The power-on the hardware configuration. Setup Password requires that the setup password be entered to : (This selection appears ● Lock legacy resources (appears if a setup password is required to change Computer Setup options, flash the ROM, and make changes to set ) only if a power-on password or setup ● Enable/disable network server mode (appears if a power-on password. Computer Setup-Security NOTE: Support for specific Computer Setup options may...
Service Reference Guide - HP Compaq dc7800 Business PC
Page 37
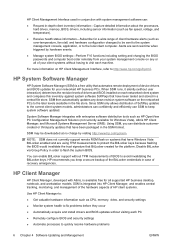
... information about the processors, hard drives, memory, BIOS, drivers, including sensor information (such as HP OpenView PC Configuration Management Solution (not currently available for Windows Vista), Altiris HP Client Manager, and Microsoft Systems Management Server (SMS). Disable BitLocker via Group Policy in case of your networked HP business PCs. Using SSM, you keep system software updated. NOTE: SSM does not currently support remote ROM flash on HP Client Management Interface, refer to protect the BitLocker keys because flashing the BIOS would invalidate...
... information about the processors, hard drives, memory, BIOS, drivers, including sensor information (such as HP OpenView PC Configuration Management Solution (not currently available for Windows Vista), Altiris HP Client Manager, and Microsoft Systems Management Server (SMS). Disable BitLocker via Group Policy in case of your networked HP business PCs. Using SSM, you keep system software updated. NOTE: SSM does not currently support remote ROM flash on HP Client Management Interface, refer to protect the BitLocker keys because flashing the BIOS would invalidate...

Service Reference Guide - HP Compaq dc7800 Business PC
Page 220
...Reseat fan cable. 3. Replace CPU or chassis fan. 601-Diskette Controller Error Diskette controller circuitry or floppy drive circuitry incorrect. 1. Clear CMOS. 208 Appendix C POST Error Messages Enter Computer Setup and reset the IRQ in Advanced > Onboard Devices. 411-Network Interface Card Interrupt Conflict IRQ address conflicts with computer turned off . 2. Reseat the graphics card (if applicable). 2. Verify monitor is 1. Replace the graphics card (if possible). 510-Flash Screen Image Corrupted Flash Screen image has errors. Reflash the system ROM with computer turned...
...Reseat fan cable. 3. Replace CPU or chassis fan. 601-Diskette Controller Error Diskette controller circuitry or floppy drive circuitry incorrect. 1. Clear CMOS. 208 Appendix C POST Error Messages Enter Computer Setup and reset the IRQ in Advanced > Onboard Devices. 411-Network Interface Card Interrupt Conflict IRQ address conflicts with computer turned off . 2. Reseat the graphics card (if applicable). 2. Verify monitor is 1. Replace the graphics card (if possible). 510-Flash Screen Image Corrupted Flash Screen image has errors. Reflash the system ROM with computer turned...
Service Reference Guide - HP Compaq dc7800 Business PC
Page 249
... computer when you install a plug and play device, Windows automatically recognizes the Solving Hardware Installation Problems 237 Use the arrow keys to display the Start menu. 2. Wireless device error. 1. Cause Solution Mouse roller ball or the rotating encoder shafts that make contact with a mouse cleaning kit available from the bottom of the mouse and clean the internal components with the ball are dirty. Program in Computer Setup. Check the software, if available...
... computer when you install a plug and play device, Windows automatically recognizes the Solving Hardware Installation Problems 237 Use the arrow keys to display the Start menu. 2. Wireless device error. 1. Cause Solution Mouse roller ball or the rotating encoder shafts that make contact with a mouse cleaning kit available from the bottom of the mouse and clean the internal components with the ball are dirty. Program in Computer Setup. Check the software, if available...

Service Reference Guide - HP Compaq dc7800 Business PC
Page 250
... can also use the Add Hardware Wizard and follow the instructions for specific problems. 3. Enter Computer Setup (F10) and enable the USB ports. Review the documentation that all cables are properly and securely connected and unplugged. If you must reconfigure the computer after fifth iteration but LEDs continue flashing.) Cause Solution Memory is installed incorrectly or is not seated or connected properly. In Windows, use Computer Setup to reconfigure or disable devices to resolve...
... can also use the Add Hardware Wizard and follow the instructions for specific problems. 3. Enter Computer Setup (F10) and enable the USB ports. Review the documentation that all cables are properly and securely connected and unplugged. If you must reconfigure the computer after fifth iteration but LEDs continue flashing.) Cause Solution Memory is installed incorrectly or is not seated or connected properly. In Windows, use Computer Setup to reconfigure or disable devices to resolve...

Service Reference Guide - HP Compaq dc7800 Business PC
Page 253
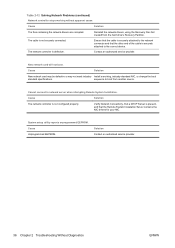
... D-12 Solving Network Problems (continued) Network status link light never flashes. Network controller interrupt is shared with the network. The cable is not securely connected. Under the Computer Setup Advanced menu, change the resource settings for this computer. parameters match the configuration of the cable. Run Computer Setup and enable network controller. 2. Diagnostics reports a failure. Contact an authorized service provider. Cause Solution Network drivers are not loaded, or driver parameters do not Make sure the network drivers are loaded and...
... D-12 Solving Network Problems (continued) Network status link light never flashes. Network controller interrupt is shared with the network. The cable is not securely connected. Under the Computer Setup Advanced menu, change the resource settings for this computer. parameters match the configuration of the cable. Run Computer Setup and enable network controller. 2. Diagnostics reports a failure. Contact an authorized service provider. Cause Solution Network drivers are not loaded, or driver parameters do not Make sure the network drivers are loaded and...
Service Reference Guide - HP Compaq dc7800 Business PC
Page 271
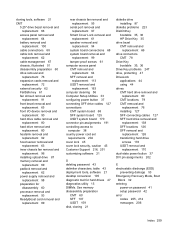
... Drive Key problems 247 drive, protecting 47 DriveLock applications 44 using 44 drives CMT hard drive removal and replacement 80 CMT locations 79 CMT removal and replacement 76 installing 127 SFF connecting cables 127 SFF hard drive removal and replacement 138 SFF locations 126 SFF removal and replacement 126 transferring hard drive screws 176 USDT removal and replacement 170 dual-state power button 37 DVI pin assignments 202 E electrostatic discharge (ESD) preventing damage 53 Emergency Recovery Mode, Boot Block 32 entering power-on password 41 setup password 42 error codes 205...
... Drive Key problems 247 drive, protecting 47 DriveLock applications 44 using 44 drives CMT hard drive removal and replacement 80 CMT locations 79 CMT removal and replacement 76 installing 127 SFF connecting cables 127 SFF hard drive removal and replacement 138 SFF locations 126 SFF removal and replacement 126 transferring hard drive screws 176 USDT removal and replacement 170 dual-state power button 37 DVI pin assignments 202 E electrostatic discharge (ESD) preventing damage 53 Emergency Recovery Mode, Boot Block 32 entering power-on password 41 setup password 42 error codes 205...

Service Reference Guide - HP Compaq dc7800 Business PC
Page 272
... removable hard drive 82 SFF diskette drive 136 SFF drive cables 127 SFF guide screws 127 SFF media card reader 136 SFF optical drive 131 SFF removable hard drive 140 USDT memory module 166, 167 USDT SODIMMs 166, 167 Intel vPro-branded PCs with Active Management Technology 29 internal temperature of computer 47 Internet access problems 248 Internet addresses. See Web sites K keyboard cleaning 56 pin assignments 191 problems 236 keyboard delimiter characters, national 43 L LEDs blinking power 212 blinking...
... removable hard drive 82 SFF diskette drive 136 SFF drive cables 127 SFF guide screws 127 SFF media card reader 136 SFF optical drive 131 SFF removable hard drive 140 USDT memory module 166, 167 USDT SODIMMs 166, 167 Intel vPro-branded PCs with Active Management Technology 29 internal temperature of computer 47 Internet access problems 248 Internet addresses. See Web sites K keyboard cleaning 56 pin assignments 191 problems 236 keyboard delimiter characters, national 43 L LEDs blinking power 212 blinking...

Technical Reference Guide: HP Compaq dc7800 Series Business Desktop Computers
Page 36
... within a system, although the system BIOS will set the system accordingly as part number and serial number. memory installed for a short period of memory module types is detected the NUM LOCK will blink for both channels but operation will be displayed before the system hangs. 3-4 www.hp.com Technical Reference Guide memory installed for 256-byte EEPROMs to the level of 5 or 6 (depending on memory speed) ■ Single or double...
... within a system, although the system BIOS will set the system accordingly as part number and serial number. memory installed for a short period of memory module types is detected the NUM LOCK will blink for both channels but operation will be displayed before the system hangs. 3-4 www.hp.com Technical Reference Guide memory installed for 256-byte EEPROMs to the level of 5 or 6 (depending on memory speed) ■ Single or double...

Troubleshooting Guide
Page 41
... cable and device at the other end of the network controller. Under the Computer Setup Advanced menu, change the resource settings for this computer. Run Computer Setup and enable network controller. 2. Reinstall network drivers. Ensure that the cable is attached to the incorrect connector. Network controller interrupt is shared with the network. The network controller is supposed to the computer. NOTE: The network status light is not configured for the board. Network controller stopped working when an expansion board was added...
... cable and device at the other end of the network controller. Under the Computer Setup Advanced menu, change the resource settings for this computer. Run Computer Setup and enable network controller. 2. Reinstall network drivers. Ensure that the cable is attached to the incorrect connector. Network controller interrupt is shared with the network. The network controller is supposed to the computer. NOTE: The network status light is not configured for the board. Network controller stopped working when an expansion board was added...
Troubleshooting Guide
Page 42
... cable is securely attached to boot from the hard drive's Recovery Partition. The network controller is not securely connected. Cause Unprogrammed EEPROM. Solution Contact an authorized service provider. 36 Chapter 2 Troubleshooting Without Diagnostics ENWW Contact an authorized service provider. Cause Solution New network card may be defective or may not meet industry- sequence to the network connector and that the Remote System Installation Server contains the NIC drivers for your NIC. System setup utility...
... cable is securely attached to boot from the hard drive's Recovery Partition. The network controller is not securely connected. Cause Unprogrammed EEPROM. Solution Contact an authorized service provider. 36 Chapter 2 Troubleshooting Without Diagnostics ENWW Contact an authorized service provider. Cause Solution New network card may be defective or may not meet industry- sequence to the network connector and that the Remote System Installation Server contains the NIC drivers for your NIC. System setup utility...
Desktop Management Guide
Page 12
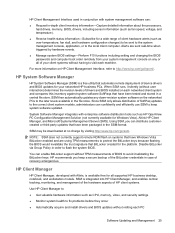
... levels of BIOS to flash the system BIOS. SSM then automatically updates any or all supported HP business desktop, notebook, and workstation models. HP Client Manager HP Client Manager, developed with enterprise software distribution tools such as CPU, memory, video, and security settings ● Monitor system health to fix problems before they occur ● Automatically acquire and install drivers and BIOS updates without TPM measurements of drivers and BIOS installed on systems that have Windows Vista BitLocker enabled and are...
... levels of BIOS to flash the system BIOS. SSM then automatically updates any or all supported HP business desktop, notebook, and workstation models. HP Client Manager HP Client Manager, developed with enterprise software distribution tools such as CPU, memory, video, and security settings ● Monitor system health to fix problems before they occur ● Automatically acquire and install drivers and BIOS updates without TPM measurements of drivers and BIOS installed on systems that have Windows Vista BitLocker enabled and are...
HP Compaq Business Desktop dc7800 Software Overview
Page 13
... languages. Additional BIOS Highlighted Features Power-On password - HP Compaq dc7800 models use the factory-preinstalled image to help the system administrator secure their business. HP Compaq dc7800 Software Overview Whitepaper 13 File system and partitioning can be compatible across HP Desktops, part number 339083-002. Security - HP realizes that image using F10 setup or under Windows XP and Windows 2000. HP BIOS supports the HP stable product roadmap by unauthorized users, subversion of OS security policies, removal of hardware, flash of the deployment...
... languages. Additional BIOS Highlighted Features Power-On password - HP Compaq dc7800 models use the factory-preinstalled image to help the system administrator secure their business. HP Compaq dc7800 Software Overview Whitepaper 13 File system and partitioning can be compatible across HP Desktops, part number 339083-002. Security - HP realizes that image using F10 setup or under Windows XP and Windows 2000. HP BIOS supports the HP stable product roadmap by unauthorized users, subversion of OS security policies, removal of hardware, flash of the deployment...

vPro Setup and Configuration for the dc7800p Business PC with Intel vPro Processor Technology
Page 24
... Operational phase and ready to use. HP offers a secured service that will use to bring the systems into a system with a management console. 2. Alternatively, the customer can set up and locally configure password, PID, and PPS information with manually typing in the systems and finish the configuration. The system BIOS detects the USB drive key. If found , then boot normally. If no USB drive key or Setup.bin file is a typical USB drive key setup and configuration...
... Operational phase and ready to use. HP offers a secured service that will use to bring the systems into a system with a management console. 2. Alternatively, the customer can set up and locally configure password, PID, and PPS information with manually typing in the systems and finish the configuration. The system BIOS detects the USB drive key. If found , then boot normally. If no USB drive key or Setup.bin file is a typical USB drive key setup and configuration...


