
Setup Poster
Page 2
61 2 7 Slide guide 81 2 Load white paper 3 Open cartridge door 4 Pull pink tab to remove clear tape 9 Push cartridges into carriage untill they snap 10 USB Close cartridge door 11 Connect USB. 連接 USB USB 电缆。 USB Insert software CD. Printed in English Printed in Simplified Chinese Printed in Korean www.hp.com Follow onscreen instructions CD www.hp.com/support © 2008 Hewlett-Packard Development Company, L.P.
61 2 7 Slide guide 81 2 Load white paper 3 Open cartridge door 4 Pull pink tab to remove clear tape 9 Push cartridges into carriage untill they snap 10 USB Close cartridge door 11 Connect USB. 連接 USB USB 电缆。 USB Insert software CD. Printed in English Printed in Simplified Chinese Printed in Korean www.hp.com Follow onscreen instructions CD www.hp.com/support © 2008 Hewlett-Packard Development Company, L.P.
User Guide
Page 3
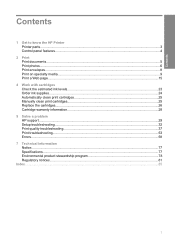
... to know the HP Printer Printer parts...3 Control panel features...4 2 Print Print documents...5 Print photos...6 Print envelopes...8 Print on specialty media...9 Print a Web page...15 4 Work with cartridges Check the estimated ink levels 23 Order ink supplies...24 Automatically clean print cartridges 25 Manually clean print cartridges 25 Replace the cartridges...26 Cartridge warranty information 28 5 Solve a problem HP support...29 Setup...
... to know the HP Printer Printer parts...3 Control panel features...4 2 Print Print documents...5 Print photos...6 Print envelopes...8 Print on specialty media...9 Print a Web page...15 4 Work with cartridges Check the estimated ink levels 23 Order ink supplies...24 Automatically clean print cartridges 25 Manually clean print cartridges 25 Replace the cartridges...26 Cartridge warranty information 28 5 Solve a problem HP support...29 Setup...
User Guide
Page 6
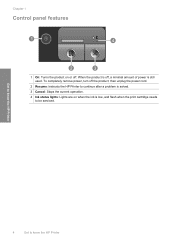
To completely remove power, turn off the product, then unplug the power cord. 2 Resume: Instructs the HP Printer to continue after a problem is solved. 3 Cancel: Stops the current operation. 4 Ink status lights: Lights are on or off , a minimal amount of power is low, and flash when the print cartridge needs to be serviced. When the product is off . Chapter 1 Control panel features 1 On: Turns the product on when the ink is still used. Get to know the HP Printer 4 Get to know the HP Printer
To completely remove power, turn off the product, then unplug the power cord. 2 Resume: Instructs the HP Printer to continue after a problem is solved. 3 Cancel: Stops the current operation. 4 Ink status lights: Lights are on or off , a minimal amount of power is low, and flash when the print cartridge needs to be serviced. When the product is off . Chapter 1 Control panel features 1 On: Turns the product on when the ink is still used. Get to know the HP Printer 4 Get to know the HP Printer
User Guide
Page 7
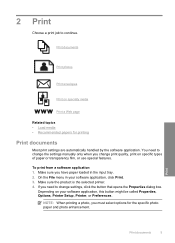
... in your software application, this button might be called Properties, Options, Printer Setup, Printer, or Preferences. Print documents Print photos Print envelopes Print on your software application, click Print. 3. Make sure the product is the selected printer. 4. Make sure you must select options for printing Print documents Most print settings are automatically handled by the software application. Depending on specialty media...
... in your software application, this button might be called Properties, Options, Printer Setup, Printer, or Preferences. Print documents Print photos Print envelopes Print on your software application, click Print. 3. Make sure the product is the selected printer. 4. Make sure you must select options for printing Print documents Most print settings are automatically handled by the software application. Depending on specialty media...
User Guide
Page 8
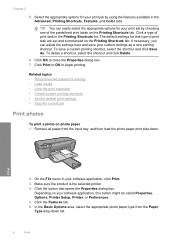
... your custom settings as a new printing shortcut. Depending on the Printing Shortcuts tab. Make sure the product is the selected printer. 4. If necessary, you can easily select the appropriate options for your software application, click Print. 3. Click OK to begin printing. Click the button that type of print task in the Advanced, Printing Shortcuts, Features, and Color tabs.
... your custom settings as a new printing shortcut. Depending on the Printing Shortcuts tab. Make sure the product is the selected printer. 4. If necessary, you can easily select the appropriate options for your software application, click Print. 3. Click OK to begin printing. Click the button that type of print task in the Advanced, Printing Shortcuts, Features, and Color tabs.
User Guide
Page 9
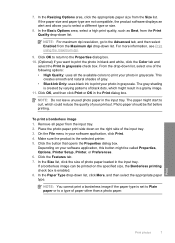
... patterns of the input tray. 3. Remove all the available colors to print your photo in grayscale. Click the button that opens the Properties dialog box. Print Print photos 7 Click the Features tab. 7. 7. Place the photo paper print side down list. The gray shading is enabled. 8. In...be called Properties, Options, Printer Setup, Printer, or Preferences. 6. On the File menu in grayscale check box. Depending on the right side of black dots, which could reduce the quality of gray. • Black Ink Only: uses black ink to print your printout. NOTE: For...
... patterns of the input tray. 3. Remove all the available colors to print your photo in grayscale. Click the button that opens the Properties dialog box. Print Print photos 7 Click the Features tab. 7. 7. Place the photo paper print side down list. The gray shading is enabled. 8. In...be called Properties, Options, Printer Setup, Printer, or Preferences. 6. On the File menu in grayscale check box. Depending on the right side of black dots, which could reduce the quality of gray. • Black Ink Only: uses black ink to print your printout. NOTE: For...
User Guide
Page 10
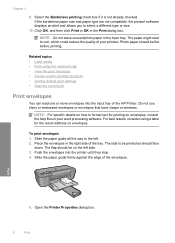
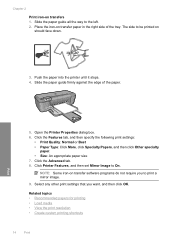
...unused photo paper in your printout. Slide the paper guide firmly against the edge of the HP Printer. Print 5. Related topics • Load media • Print using a label for printing on should be printed on envelopes, consult the help files in the input tray. Do not use shiny or ..., consider using the maximum dpi • View the print resolution • Create custom printing shortcuts • Set the default print settings • Stop the current job Print envelopes You can load one or more envelopes into the printer until they stop. 4. Slide the paper guide all the...
...unused photo paper in your printout. Slide the paper guide firmly against the edge of the HP Printer. Print 5. Related topics • Load media • Print using a label for printing on should be printed on envelopes, consult the help files in the input tray. Do not use shiny or ..., consider using the maximum dpi • View the print resolution • Create custom printing shortcuts • Set the default print settings • Stop the current job Print envelopes You can load one or more envelopes into the printer until they stop. 4. Slide the paper guide all the...
User Guide
Page 11
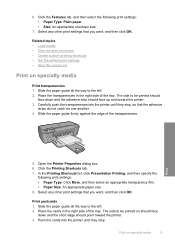
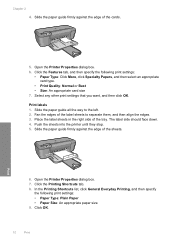
... that the adhesive strips do not catch on should face down and the adhesive strip should point toward the printer. 3. Click the Features tab, and then select the following print settings: • Paper Type: Click More, and then select an appropriate transparency film. • Paper ... right side of the tray. Carefully push the transparencies into the printer until they stop , so that you want , and then click OK. Print 5. Push the cards into the printer until they stop . Print on specialty media Print transparencies 1. Slide the paper guide all the way to the left...
... that the adhesive strips do not catch on should face down and the adhesive strip should point toward the printer. 3. Click the Features tab, and then select the following print settings: • Paper Type: Click More, and then select an appropriate transparency film. • Paper ... right side of the tray. Carefully push the transparencies into the printer until they stop , so that you want , and then click OK. Print 5. Push the cards into the printer until they stop . Print on specialty media Print transparencies 1. Slide the paper guide all the way to the left...
User Guide
Page 12
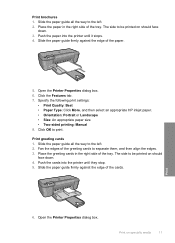
... edges. 3. Place the label sheets in the right side of the sheets. Click the Printing Shortcuts tab. 8. Print 6. Click OK. 10 Print Select any other print settings that you want, and then click OK. Print labels 1. Push the sheets into the printer until they stop. 5. Slide the paper guide firmly against the edge of the label...
... edges. 3. Place the label sheets in the right side of the sheets. Click the Printing Shortcuts tab. 8. Print 6. Click OK. 10 Print Select any other print settings that you want, and then click OK. Print labels 1. Push the sheets into the printer until they stop. 5. Slide the paper guide firmly against the edge of the label...
User Guide
Page 13
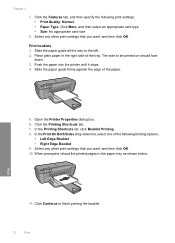
... Type: Click More, and then select an appropriate HP inkjet paper. • Orientation: Portrait or Landscape • Size: An appropriate paper size • Two-sided printing: Manual 8. Click OK to the left . 2. Fan the edges of the tray. Push the cards into the printer until they stop. 5. Print on should face down . 3. Push the paper...
... Type: Click More, and then select an appropriate HP inkjet paper. • Orientation: Portrait or Landscape • Size: An appropriate paper size • Two-sided printing: Manual 8. Click OK to the left . 2. Fan the edges of the tray. Push the cards into the printer until they stop. 5. Print on should face down . 3. Push the paper...
User Guide
Page 14
...: An appropriate card size 8. Slide the paper guide all the way to the left. 2. In the Printing Shortcuts list, click Booklet Printing. 8. Select any other print settings that you want , and then click OK. 10. Open the Printer Properties dialog box. 6. Slide the paper guide firmly against the edge of the tray. Place plain...
...: An appropriate card size 8. Slide the paper guide all the way to the left. 2. In the Printing Shortcuts list, click Booklet Printing. 8. Select any other print settings that you want , and then click OK. 10. Open the Printer Properties dialog box. 6. Slide the paper guide firmly against the edge of the tray. Place plain...
User Guide
Page 15
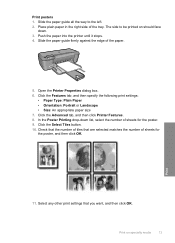
...in the right side of the paper. 5. Open the Printer Properties dialog box. 6. Print 11. Push the paper into the printer until it stops. 4. Check that the number of sheets for the poster. 9. Select any other print settings that are selected matches the number of tiles that you... 2. Slide the paper guide firmly against the edge of the tray. Click the Advanced tab, and then click Printer Features. 8. Click the Features tab, and then specify the following print settings: • Paper Type: Plain Paper • Orientation: Portrait or Landscape • Size: An appropriate paper...
...in the right side of the paper. 5. Open the Printer Properties dialog box. 6. Print 11. Push the paper into the printer until it stops. 4. Check that the number of sheets for the poster. 9. Select any other print settings that are selected matches the number of tiles that you... 2. Slide the paper guide firmly against the edge of the tray. Click the Advanced tab, and then click Printer Features. 8. Click the Features tab, and then specify the following print settings: • Paper Type: Plain Paper • Orientation: Portrait or Landscape • Size: An appropriate paper...
User Guide
Page 16
... More, click Specialty Papers, and then click Other specialty paper. • Size: An appropriate paper size 7. Slide the paper guide all the way to print a mirror image. 9. Open the Printer Properties dialog box. 6. Click the Advanced tab. 8. Place the iron-on should face down. 3. NOTE: Some iron-on transfers 1. Select any other...
... More, click Specialty Papers, and then click Other specialty paper. • Size: An appropriate paper size 7. Slide the paper guide all the way to print a mirror image. 9. Open the Printer Properties dialog box. 6. Click the Advanced tab. 8. Place the iron-on should face down. 3. NOTE: Some iron-on transfers 1. Select any other...
User Guide
Page 17
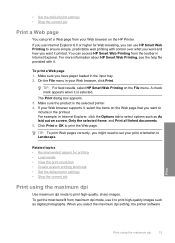
... help file provided with control over what you want it to print high-quality, sharp images. TIP: For best results, select HP Smart Web Printing on the HP Printer. If your Web browser supports it, select the items on screen, Only the selected frame, and Print all linked documents. 5. Related topics • Recommended papers for Web...
... help file provided with control over what you want it to print high-quality, sharp images. TIP: For best results, select HP Smart Web Printing on the HP Printer. If your Web browser supports it, select the items on screen, Only the selected frame, and Print all linked documents. 5. Related topics • Recommended papers for Web...
User Guide
Page 18
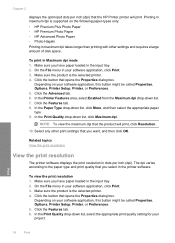
.... 5. Depending on the following paper-types only: • HP Premium Plus Photo Paper • HP Premium Photo Paper • HP Advanced Photo Paper • Photo Hagaki Printing in your software application, click Print. 3. The dpi varies according to the paper type and print quality that the HP Printer printer will print, click Resolution. 10. On the File menu in maximum...
.... 5. Depending on the following paper-types only: • HP Premium Plus Photo Paper • HP Premium Photo Paper • HP Advanced Photo Paper • Photo Hagaki Printing in your software application, click Print. 3. The dpi varies according to the paper type and print quality that the HP Printer printer will print, click Resolution. 10. On the File menu in maximum...
User Guide
Page 19
... to view the print resolution dpi. In the Paper Type drop-down list, select the type of 10 x 15 cm (4 x 6 inch) and 13 x 18 cm (5 x 7 inch) HP Photo Papers. • Paper-saving Printing: Print two-sided documents with mutliple pages on your software application, this button might be called Properties, Options, Printer Setup, Printer, or Preferences...
... to view the print resolution dpi. In the Paper Type drop-down list, select the type of 10 x 15 cm (4 x 6 inch) and 13 x 18 cm (5 x 7 inch) HP Photo Papers. • Paper-saving Printing: Print two-sided documents with mutliple pages on your software application, this button might be called Properties, Options, Printer Setup, Printer, or Preferences...
User Guide
Page 20
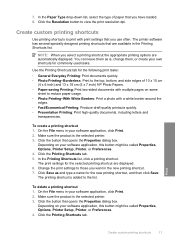
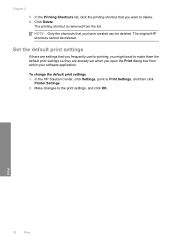
... already set when you want to delete. 6. Make changes to Print Settings, and then click Printer Settings. 2. To change the default print settings 1. In the Printing Shortcuts list, click the printing shortcut that you open the Print dialog box from the list. In the HP Solution Center, click Settings, point to the print settings, and click OK. Chapter...
... already set when you want to delete. 6. Make changes to Print Settings, and then click Printer Settings. 2. To change the default print settings 1. In the Printing Shortcuts list, click the printing shortcut that you open the Print dialog box from the list. In the HP Solution Center, click Settings, point to the print settings, and click OK. Chapter...
User Guide
Page 21
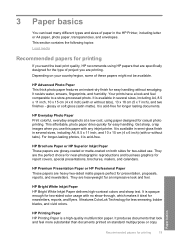
... might not be available. HP Bright White Inkjet Paper HP Bright White Inkjet Paper delivers high-contrast colors and sharp text. HP Advanced Photo Paper This thick photo paper features an instant-dry finish for an impressive look and feel comparable to a store-processed photo. They are printing. HP Printing Paper HP Printing Paper is available in the HP Printer, including letter or...
... might not be available. HP Bright White Inkjet Paper HP Bright White Inkjet Paper delivers high-contrast colors and sharp text. HP Advanced Photo Paper This thick photo paper features an instant-dry finish for an impressive look and feel comparable to a store-processed photo. They are printing. HP Printing Paper HP Printing Paper is available in the HP Printer, including letter or...

User Guide
Page 22
...vivid colors. HP Premium Inkjet Transparency Film HP Premium Inkjet Transparency Film make your product, and then click one of the shopping links on Transfers (for color fabrics or for copies, drafts, memos, and other supplies, go to meet high standards of reliability and print quality...ColorLok HP recommends plain papers with the ColorLok logo are available in a variety of everyday documents. All papers with the ColorLok logo for longer lasting documents. HP Office Paper HP Office Paper is acid-free for printing and copying of weights and sizes from your HP Printer.
...vivid colors. HP Premium Inkjet Transparency Film HP Premium Inkjet Transparency Film make your product, and then click one of the shopping links on Transfers (for color fabrics or for copies, drafts, memos, and other supplies, go to meet high standards of reliability and print quality...ColorLok HP recommends plain papers with the ColorLok logo are available in a variety of everyday documents. All papers with the ColorLok logo for longer lasting documents. HP Office Paper HP Office Paper is acid-free for printing and copying of weights and sizes from your HP Printer.
User Guide
Page 23
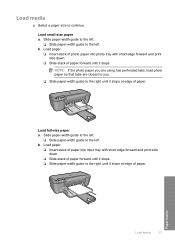
Load paper. ❑ Insert stack of photo paper into input tray with short edge forward and print side down . ❑ Slide stack of paper forward until it stops. ❑ Slide paper-width guide to the right until it stops. Paper basics Load ... paper-width guide to the left . Load small-size paper a. Load paper. ❑ Insert stack of paper into photo tray with short edge forward and print side down . ❑ Slide stack of paper forward until it stops at edge of paper. Slide paper-width guide to the left. ❑ Slide paper...
Load paper. ❑ Insert stack of photo paper into input tray with short edge forward and print side down . ❑ Slide stack of paper forward until it stops. ❑ Slide paper-width guide to the right until it stops. Paper basics Load ... paper-width guide to the left . Load small-size paper a. Load paper. ❑ Insert stack of paper into photo tray with short edge forward and print side down . ❑ Slide stack of paper forward until it stops at edge of paper. Slide paper-width guide to the left. ❑ Slide paper...


