
Full User Guide
Page 4
......9 Paper tray...9 Unfold the paper tray...10 Use the paper tray...11 Print cartridges...11 Replace print cartridges...11 Ink-backup mode...12 Ink-backup mode output...13 Exit ink-backup mode...13 4 Connect the printer USB...14 5 Print photos Print borderless photos...15 Print photos with a border...17... HP Real Life Technologies photo fix 19 Exif Print...19 Store and handle photo ...
......9 Paper tray...9 Unfold the paper tray...10 Use the paper tray...11 Print cartridges...11 Replace print cartridges...11 Ink-backup mode...12 Ink-backup mode output...13 Exit ink-backup mode...13 4 Connect the printer USB...14 5 Print photos Print borderless photos...15 Print photos with a border...17... HP Real Life Technologies photo fix 19 Exif Print...19 Store and handle photo ...
Full User Guide
Page 5
... Print a Web page...43 Presentation printing...44 8 Printer software Make the HP Deskjet the default printer 45 Set default print settings...45 Printer Properties dialog box...46 What's This? help...47 Download printer software updates 47 9 Maintenance Install print cartridges...48 Print cartridges...48 Selection numbers...48 Printing with one print cartridge 49 Installation instructions...49 Align the print...
... Print a Web page...43 Presentation printing...44 8 Printer software Make the HP Deskjet the default printer 45 Set default print settings...45 Printer Properties dialog box...46 What's This? help...47 Download printer software updates 47 9 Maintenance Install print cartridges...48 Print cartridges...48 Selection numbers...48 Printing with one print cartridge 49 Installation instructions...49 Align the print...

Full User Guide
Page 6
...appears 65 If no error message appears 65 Printer does not print...65 Verify the following...65 Unable to print...66 If the printer still does not print 71 Document prints slowly...71 Print cartridge problems...71 Resolving print cartridge error messages 72 Print cartridge carriage is stalled 74 Paper problems...76 ... For small photo paper 85 For small photo paper with a tear-off tab 85 Print quality is poor...86 Wrong, inaccurate, or bleeding colors 87 Ink is not filling the text or graphics completely 89 The printout has a horizontal band of distortion near the bottom of a borderless ...
...appears 65 If no error message appears 65 Printer does not print...65 Verify the following...65 Unable to print...66 If the printer still does not print 71 Document prints slowly...71 Print cartridge problems...71 Resolving print cartridge error messages 72 Print cartridge carriage is stalled 74 Paper problems...76 ... For small photo paper 85 For small photo paper with a tear-off tab 85 Print quality is poor...86 Wrong, inaccurate, or bleeding colors 87 Ink is not filling the text or graphics completely 89 The printout has a horizontal band of distortion near the bottom of a borderless ...
Full User Guide
Page 7
... A HP support Ink cartridge warranty information 99 Support process...99 HP support by phone...100 Phone support period...100 Placing a call...100 After the phone support period 100 B Technical information Printer specifications......101 Notice to Windows 2000 users 101 Environmental product stewardship program 101 Paper use...102 Plastics...102 Material safety data sheets 102 Recycling program...102 HP inkjet supplies recycling ...and hazardous substance table 106 HP Deskjet D1500 Printer series declaration of conformity 107 Index...108 4
... A HP support Ink cartridge warranty information 99 Support process...99 HP support by phone...100 Phone support period...100 Placing a call...100 After the phone support period 100 B Technical information Printer specifications......101 Notice to Windows 2000 users 101 Environmental product stewardship program 101 Paper use...102 Plastics...102 Material safety data sheets 102 Recycling program...102 HP inkjet supplies recycling ...and hazardous substance table 106 HP Deskjet D1500 Printer series declaration of conformity 107 Index...108 4

Full User Guide
Page 8
... a single sheet, preview a document, and use and replace the print cartridges. Learn how to connect the printer to your computer and the printer together, see Notice to make the HP Deskjet the default printer, set the page order, print multiple pages on the left in a print cartridge, print a test page, and remove ink stains. If you print...
... a single sheet, preview a document, and use and replace the print cartridges. Learn how to connect the printer to your computer and the printer together, see Notice to make the HP Deskjet the default printer, set the page order, print multiple pages on the left in a print cartridge, print a test page, and remove ink stains. If you print...

Full User Guide
Page 9
Welcome 6 Welcome Chapter 1 (continued) Section HP inkjet supplies recycling program Description Find out how to recycle print cartridges.
Welcome 6 Welcome Chapter 1 (continued) Section HP inkjet supplies recycling program Description Find out how to recycle print cartridges.

Full User Guide
Page 10
The HP Deskjet is equipped with one print cartridge. 2 Special features Congratulations! For information, see Print borderless photos. • Estimated ink levels: Know the approximate ink level of the paper by using the borderless ...: Print with several exciting features: • User friendly: Easy to install and operate. • Borderless printing: Print 4 x 6 inch photos to the edges of each print cartridge with the Estimated Ink Levels option in the printer Toolbox. For information, see Ink-backup mode.
The HP Deskjet is equipped with one print cartridge. 2 Special features Congratulations! For information, see Print borderless photos. • Estimated ink levels: Know the approximate ink level of the paper by using the borderless ...: Print with several exciting features: • User friendly: Easy to install and operate. • Borderless printing: Print 4 x 6 inch photos to the edges of each print cartridge with the Estimated Ink Levels option in the printer Toolbox. For information, see Ink-backup mode.
Full User Guide
Page 11
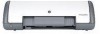
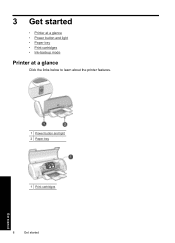
3 Get started • Printer at a glance • Power button and light • Paper tray • Print cartridges • Ink-backup mode Printer at a glance Click the links below to learn about the printer features. 1 Power button and light 2 Paper tray 1 Print cartridges 8 Get started Get started
3 Get started • Printer at a glance • Power button and light • Paper tray • Print cartridges • Ink-backup mode Printer at a glance Click the links below to learn about the printer features. 1 Power button and light 2 Paper tray 1 Print cartridges 8 Get started Get started
Full User Guide
Page 14
... pages on different sizes of the paper tray. You can print without a black print cartridge but doing so can be used with the printer. 1 Tri-color print cartridge 2 Black print cartridge NOTE: Your printer might be packaged with only a tri-color print cartridge. Print cartridges 11 Get started Use the paper tray Print on the top of media by...
... pages on different sizes of the paper tray. You can print without a black print cartridge but doing so can be used with the printer. 1 Tri-color print cartridge 2 Black print cartridge NOTE: Your printer might be packaged with only a tri-color print cartridge. Print cartridges 11 Get started Use the paper tray Print on the top of media by...
Full User Guide
Page 15
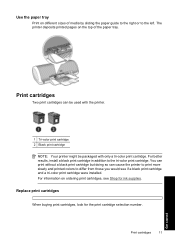
.... When plastic tape covers the print cartridge contacts, the printer cannot detect that the protective piece of print cartridge selection numbers, open the printer Toolbox, click the Estimated Ink Level tab, and then click the Print Cartridge Information button. For more information, see...If the message is installed. The printer can find the selection number in the printer, verify that the print cartridge is displayed and two print cartridges are replacing. 1 Selection number label • Printer documentation: For a list of print cartridge selection numbers, see the reference guide...
.... When plastic tape covers the print cartridge contacts, the printer cannot detect that the protective piece of print cartridge selection numbers, open the printer Toolbox, click the Estimated Ink Level tab, and then click the Print Cartridge Information button. For more information, see...If the message is installed. The printer can find the selection number in the printer, verify that the print cartridge is displayed and two print cartridges are replacing. 1 Selection number label • Printer documentation: For a list of print cartridge selection numbers, see the reference guide...
Full User Guide
Page 16
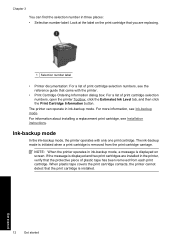
... copper strips are required electrical contacts. Do not remove the copper strips. Touching these parts will result in the printer to exit ink-backup mode. Installed print cartridge Black print cartridge Tri-color print cartridge Result Colors print as grayscale. Colors print but black is grayed and is not a true black. For more information about installing a print...
... copper strips are required electrical contacts. Do not remove the copper strips. Touching these parts will result in the printer to exit ink-backup mode. Installed print cartridge Black print cartridge Tri-color print cartridge Result Colors print as grayscale. Colors print but black is grayed and is not a true black. For more information about installing a print...

Full User Guide
Page 18
... x 6 inch photo paper with a 0.5 inch tab (10 x 15 cm with 1.25 cm tab). • Do not print borderless photos in a software program such as HP Photosmart Software and resize the photo. Verify that the photo paper is flat. Learn how to perform other photo printing tasks • Print an Exif... Print-formatted photo if you are using the product with a small border on the bottom edge that you have two print cartridges installed in the printer. Ensure that the size corresponds to the paper size that you want to make printing digital photos easier and improve photo quality. ...
... x 6 inch photo paper with a 0.5 inch tab (10 x 15 cm with 1.25 cm tab). • Do not print borderless photos in a software program such as HP Photosmart Software and resize the photo. Verify that the photo paper is flat. Learn how to perform other photo printing tasks • Print an Exif... Print-formatted photo if you are using the product with a small border on the bottom edge that you have two print cartridges installed in the printer. Ensure that the size corresponds to the paper size that you want to make printing digital photos easier and improve photo quality. ...
Full User Guide
Page 51
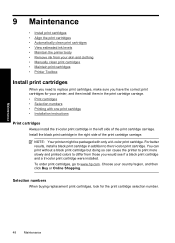
... side of the print cartridge carriage. NOTE: Your printer might be packaged with one print cartridge • Installation instructions Print cartridges Always install the tri-color print cartridge in the left side of the print cartridge carriage. To order print cartridges, go to www.hp.com. Maintenance 9 Maintenance • Install print cartridges • Align the print cartridges • Automatically clean print...
... side of the print cartridge carriage. NOTE: Your printer might be packaged with one print cartridge • Installation instructions Print cartridges Always install the tri-color print cartridge in the left side of the print cartridge carriage. To order print cartridges, go to www.hp.com. Maintenance 9 Maintenance • Install print cartridges • Align the print cartridges • Automatically clean print...

Full User Guide
Page 52
You can operate with the printer. • Print Cartridge Information dialog box: For a list of the printer. 3. The print cartridge carriage moves to turn on the print cartridge. Push down on the printer. 2. Maintenance Install print cartridges 49 For more information, see the reference guide that you are replacing. 1 Selection number label • Printer documentation: For a list of print...
You can operate with the printer. • Print Cartridge Information dialog box: For a list of the printer. 3. The print cartridge carriage moves to turn on the print cartridge. Push down on the printer. 2. Maintenance Install print cartridges 49 For more information, see the reference guide that you are replacing. 1 Selection number label • Printer documentation: For a list of print...

Full User Guide
Page 53
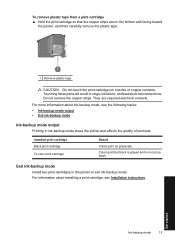
... connections. Do not remove the copper strips. Slide the print cartridge out of the carriage. 1 Press the Power button 2 Open the printer cover 3 Push down on the bottom and facing toward the printer. 1 Remove plastic tape CAUTION: Do not touch the print cartridge ink nozzles or copper contacts. Maintenance 50 Maintenance Hold the print...
... connections. Do not remove the copper strips. Slide the print cartridge out of the carriage. 1 Press the Power button 2 Open the printer cover 3 Push down on the bottom and facing toward the printer. 1 Remove plastic tape CAUTION: Do not touch the print cartridge ink nozzles or copper contacts. Maintenance 50 Maintenance Hold the print...
Full User Guide
Page 54
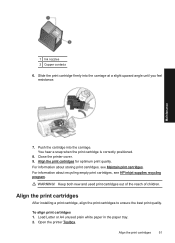
... when the print cartridge is correctly positioned. 8. Close the printer cover. 9. For information about storing print cartridges, see HP inkjet supplies recycling program. WARNING! For information about recycling empty print cartridges, see Maintain print cartridges. Align the print cartridges After installing a print cartridge, align the print cartridges to ensure the best print quality. Slide the print cartridge firmly into the carriage...
... when the print cartridge is correctly positioned. 8. Close the printer cover. 9. For information about storing print cartridges, see HP inkjet supplies recycling program. WARNING! For information about recycling empty print cartridges, see Maintain print cartridges. Align the print cartridges After installing a print cartridge, align the print cartridges to ensure the best print quality. Slide the print cartridge firmly into the carriage...

Full User Guide
Page 55
...the Estimated Ink level tab may be cleaned. Open the printer Toolbox. 2. If the print cartridges are still faded after it is used . For more ...cartridges automatically. CAUTION: Clean print cartridges only when necessary. Click Align, and then follow the onscreen instructions. For more information, see www.hp.com/go/inkusage. For more information, see Manually clean print cartridges. The HP Deskjet prints a test page, aligns the print cartridges, and calibrates the printer. Click Clean the Print Cartridges. 3. Maintenance Chapter 9 3. Open the printer...
...the Estimated Ink level tab may be cleaned. Open the printer Toolbox. 2. If the print cartridges are still faded after it is used . For more ...cartridges automatically. CAUTION: Clean print cartridges only when necessary. Click Align, and then follow the onscreen instructions. For more information, see www.hp.com/go/inkusage. For more information, see Manually clean print cartridges. The HP Deskjet prints a test page, aligns the print cartridges, and calibrates the printer. Click Clean the Print Cartridges. 3. Maintenance Chapter 9 3. Open the printer...
Full User Guide
Page 56
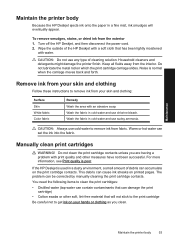
...to remove ink from the exterior 1. Do not clean the print cartridge contacts unless you clean. This debris can be corrected by manually cleaning the print cartridge contacts. Maintenance Maintain the printer body Because the HP Deskjet ejects ink onto the paper in a fine mist, ink smudges ... the HP Deskjet, and then disconnect the power cord. 2. The problem can cause ink streaks on which the print cartridge carriage slides. Keep all fluids away from your skin and clothing: Surface Skin White fabric Color fabric Remedy Wash the area with water. Maintain the printer body 53...
...to remove ink from the exterior 1. Do not clean the print cartridge contacts unless you clean. This debris can be corrected by manually cleaning the print cartridge contacts. Maintenance Maintain the printer body Because the HP Deskjet ejects ink onto the paper in a fine mist, ink smudges ... the HP Deskjet, and then disconnect the power cord. 2. The problem can cause ink streaks on which the print cartridge carriage slides. Keep all fluids away from your skin and clothing: Surface Skin White fabric Color fabric Remedy Wash the area with water. Maintain the printer body 53...

Full User Guide
Page 57
...: Do not touch the print cartridge ink nozzles. Insert the print cartridges in clogs, ink failure, and bad electrical connections. 1 Ink nozzles (do not touch) 2 Copper contacts 3. CAUTION: Do not leave the print cartridges outside the HP Deskjet for more information, see Installation ...instructions. Gently wipe the print cartridge copper contacts with the cotton swab. Repeat this process until the print cartridge carriage moves to the center of paper, with distilled...
...: Do not touch the print cartridge ink nozzles. Insert the print cartridges in clogs, ink failure, and bad electrical connections. 1 Ink nozzles (do not touch) 2 Copper contacts 3. CAUTION: Do not leave the print cartridges outside the HP Deskjet for more information, see Installation ...instructions. Gently wipe the print cartridge copper contacts with the cotton swab. Repeat this process until the print cartridge carriage moves to the center of paper, with distilled...

Full User Guide
Page 58
... with the Power button before you store the printer, always leave the active print cartridges inside the printer. Click the Features tab, and then click the Printer services button. • When you remove a print cartridge from the printer, store it . Reattaching the tape damages the print cartridge. This allows the printer to prevent the ink from drying out...
... with the Power button before you store the printer, always leave the active print cartridges inside the printer. Click the Features tab, and then click the Printer services button. • When you remove a print cartridge from the printer, store it . Reattaching the tape damages the print cartridge. This allows the printer to prevent the ink from drying out...


