Windows Help
Page 115
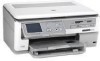
...functionality. NOTE: You can edit a scanned image and create special projects using a scanned image. To verify that the HP All-in-One software is running on a Windows computer, look for the photos on the display. TIP: Touch or to a CD/DVD • Scan slides or...NOTE: Closing the HP Digital Imaging Monitor icon in the Windows system tray can restore full functionality by restarting your original photo a. Touch Options. b. This section explains how to edit photos before reprinting your computer or by starting the HP Photosmart Software. f. To use the software you might be...
...functionality. NOTE: You can edit a scanned image and create special projects using a scanned image. To verify that the HP All-in-One software is running on a Windows computer, look for the photos on the display. TIP: Touch or to a CD/DVD • Scan slides or...NOTE: Closing the HP Digital Imaging Monitor icon in the Windows system tray can restore full functionality by restarting your original photo a. Touch Options. b. This section explains how to edit photos before reprinting your computer or by starting the HP Photosmart Software. f. To use the software you might be...
Windows Help
Page 156
... properly using the uninstall utility provided when you installed the software that came with the installation and restart the computer when prompted. Follow the onscreen instructions. 4. If you are deleted. On the Windows taskbar, click Start, Programs or All Programs, HP, Photosmart C8100 All-in -One from your computer. Make sure to remove shared files...
... properly using the uninstall utility provided when you installed the software that came with the installation and restart the computer when prompted. Follow the onscreen instructions. 4. If you are deleted. On the Windows taskbar, click Start, Programs or All Programs, HP, Photosmart C8100 All-in -One from your computer. Make sure to remove shared files...

Windows Help
Page 157
... Troubleshooting Troubleshooting After connecting and turning on . On the Windows taskbar, click Start, Settings, Control Panel (or just Control Panel). 2. Select HP Photosmart All-In-One Driver Software, and then click Change/ Remove. Insert the HP All-in -One to turn the HP All-in -One before restarting your computer's CD-ROM drive and then start the Setup program...
... Troubleshooting Troubleshooting After connecting and turning on . On the Windows taskbar, click Start, Settings, Control Panel (or just Control Panel). 2. Select HP Photosmart All-In-One Driver Software, and then click Change/ Remove. Insert the HP All-in -One to turn the HP All-in -One before restarting your computer's CD-ROM drive and then start the Setup program...

Windows Help
Page 233
...color effect 106 adjust brightness 106 crop 106 e-mail 101 edit scanned 117 flip horizontal 106 ink sprays 179 missing 193 print borderless 83 print on photo paper 83 remove red-eye 106 rotate 107 send using HP Photosmart... 169 from computer 75 from software application 75 iron-on transfers 90 labels 91 margins incorrect 177, 178 meaningless characters 175 multiple pages on one sheet 88 nothing happens 175...resizing options 79 resolution 78 saturation 79 speed 78 printer found screen, Windows 39 printer sharing Mac 28 Windows 28 printer, align 138 Printing Shortcuts tab 81 problems copy 186 error...
...color effect 106 adjust brightness 106 crop 106 e-mail 101 edit scanned 117 flip horizontal 106 ink sprays 179 missing 193 print borderless 83 print on photo paper 83 remove red-eye 106 rotate 107 send using HP Photosmart... 169 from computer 75 from software application 75 iron-on transfers 90 labels 91 margins incorrect 177, 178 meaningless characters 175 multiple pages on one sheet 88 nothing happens 175...resizing options 79 resolution 78 saturation 79 speed 78 printer found screen, Windows 39 printer sharing Mac 28 Windows 28 printer, align 138 Printing Shortcuts tab 81 problems copy 186 error...
Basics Guide
Page 31
... when the HP All-in -One from your computer. 5. Restart your computer. Reinstall the HP All-in -One. Do not simply delete the HP All-in -One before the software installation screen prompts you to your computer before restarting your software. Select HP Photosmart All-In-One Driver Software, and then... Restart your computer. 4. Insert the HP All-in -One. Disconnect the USB cable from a Windows computer and then reinstall 1. Turn off the HP All-in -One to uninstall and then reinstall the software. Do not connect the HP All-in -One, wait one minute, then turn on the computer....
... when the HP All-in -One from your computer. 5. Restart your computer. Reinstall the HP All-in -One. Do not simply delete the HP All-in -One before the software installation screen prompts you to your computer before restarting your software. Select HP Photosmart All-In-One Driver Software, and then... Restart your computer. 4. Insert the HP All-in -One. Disconnect the USB cable from a Windows computer and then reinstall 1. Turn off the HP All-in -One to uninstall and then reinstall the software. Do not connect the HP All-in -One, wait one minute, then turn on the computer....
Getting Started Guide
Page 6
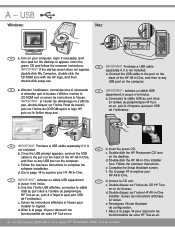
...233;s de votre HP Tout-en-un. 6 • HP Photosmart C8100 All-in -One, and then to the port on the back of the HP All-in -One series/HP Photosmart C8100 Tout-en-...Windows: Mac: EN a. a. EN b. Insert the green CD. d. Connectez le câble USB au port situé à l'arrière du périphérique HP Touten-un, puis à n'importe quel port USB de l'ordinateur. c. Double-click the HP All-in -One...suivez les instructions à l'écran. Connect the USB cable to complete the software installation. FR IMPORTANT : achetez un câble USB séparément si...
...233;s de votre HP Tout-en-un. 6 • HP Photosmart C8100 All-in -One, and then to the port on the back of the HP All-in -One series/HP Photosmart C8100 Tout-en-...Windows: Mac: EN a. a. EN b. Insert the green CD. d. Connectez le câble USB au port situé à l'arrière du périphérique HP Touten-un, puis à n'importe quel port USB de l'ordinateur. c. Double-click the HP All-in -One...suivez les instructions à l'écran. Connect the USB cable to complete the software installation. FR IMPORTANT : achetez un câble USB séparément si...


