Windows Help
Page 45
... the screen, touch or to scroll through all the menu options. 3. NOTE: If the menu option you to monitor status and order printer supplies. Touch one of the following topics: • Access the Embedded Web Server • Use the Embedded Web Server setup wizard 44 Finish setting up ...OK to confirm the setting. To change IP settings 1. The Embedded Web Server is connected to an HP All-in-One on the Embedded Web Server Home tab. Touch IP Settings. 5. Touch Manual. 6. To access Embedded Web Server help within the Embedded Web Server. This section contains the following IP...
... the screen, touch or to scroll through all the menu options. 3. NOTE: If the menu option you to monitor status and order printer supplies. Touch one of the following topics: • Access the Embedded Web Server • Use the Embedded Web Server setup wizard 44 Finish setting up ...OK to confirm the setting. To change IP settings 1. The Embedded Web Server is connected to an HP All-in-One on the Embedded Web Server Home tab. Touch IP Settings. 5. Touch Manual. 6. To access Embedded Web Server help within the Embedded Web Server. This section contains the following IP...

Windows Help
Page 76
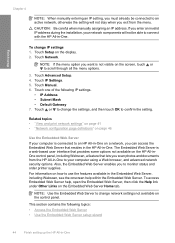
...you need to change the settings manually only when you must select options for your print job by choosing one of projects, such as the printer. You need to change settings..., click the button that type of print task are automatically handled by using the features available in the Advanced, Printing Shortcuts, Features, and Color... printing. On the File menu in the Printing Shortcuts list. Select the HP All-in -One the default printer • Change the print settings for the current job • Change the...
...you need to change the settings manually only when you must select options for your print job by choosing one of projects, such as the printer. You need to change settings..., click the button that type of print task are automatically handled by using the features available in the Advanced, Printing Shortcuts, Features, and Color... printing. On the File menu in the Printing Shortcuts list. Select the HP All-in -One the default printer • Change the print settings for the current job • Change the...

Windows Help
Page 78
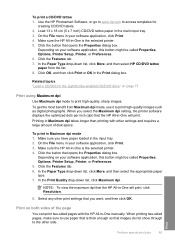
...Index cards Inkjet papers Iron-on your software application, click Print. 3. To set the paper type manually. Click the button that you have paper loaded in . (with or without tab), 4 x 6 in the input tray. 2. View the print resolution The printer software displays the print resolution in -One is the selected printer. 4. ...or if you experience poor print quality, you are not appropriate, you can set the paper type for the current job 77 Make sure the HP All-in dots per inch (dpi). Click the Features tab. 6. Print Change the print settings for printing 1. On the File menu in ...
...Index cards Inkjet papers Iron-on your software application, click Print. 3. To set the paper type manually. Click the button that you have paper loaded in . (with or without tab), 4 x 6 in the input tray. 2. View the print resolution The printer software displays the print resolution in -One is the selected printer. 4. ...or if you experience poor print quality, you are not appropriate, you can set the paper type for the current job 77 Make sure the HP All-in dots per inch (dpi). Click the Features tab. 6. Print Change the print settings for printing 1. On the File menu in ...
Windows Help
Page 86
... HP All-in -One manually. Click the button that opens the Properties dialog box. In the Paper Type drop-down list, click More, and then select HP...can print two-sided pages with the HP All-in -One is the selected printer. 4. On the File menu in -One is the selected printer. 5. Click the Features tab. ...Printer, or Preferences. 5. Click the Features tab. 7. Click OK, and then click Print or OK in the main input tray. 3. To get the most benefit from the list. 8. Make sure the HP All-in your software application, click Print. 4. Use the HP Photosmart Software, or go to www.hp...
... HP All-in -One manually. Click the button that opens the Properties dialog box. In the Paper Type drop-down list, click More, and then select HP...can print two-sided pages with the HP All-in -One is the selected printer. 4. On the File menu in -One is the selected printer. 5. Click the Features tab. ...Printer, or Preferences. 5. Click the Features tab. 7. Click OK, and then click Print or OK in the main input tray. 3. To get the most benefit from the list. 8. Make sure the HP All-in your software application, click Print. 4. Use the HP Photosmart Software, or go to www.hp...

Windows Help
Page 87
Make sure the HP All-in your document to print opposite of each other left-to-right. In the Paper saving options area, select Manual from your job. 9. This causes the odd and even pages of the following: • For binding on the top like a book or magazine, click to... your software application, this button might be called Properties, Options, Printer Setup, Printer, or Preferences. 5. This ensures that the top of the page is always at the top of your computer Print Click OK, and then click Print or OK in -One begins printing. Click Continue when done. 86 Print from the Two...
Make sure the HP All-in your document to print opposite of each other left-to-right. In the Paper saving options area, select Manual from your job. 9. This causes the odd and even pages of the following: • For binding on the top like a book or magazine, click to... your software application, this button might be called Properties, Options, Printer Setup, Printer, or Preferences. 5. This ensures that the top of the page is always at the top of your computer Print Click OK, and then click Print or OK in -One begins printing. Click Continue when done. 86 Print from the Two...

Windows Help
Page 88
...order. 10. In the Paper saving options area, select Manual from the output tray. Click OK, and then click Print or OK in -One begins printing. Print Perform special print jobs 87 Load paper into the input tray. The HP All-in the Print dialog box. Do not click ... 11. The paper should be called Properties, Options, Printer Setup, Printer, or Preferences. 5. Select the binding edge from the Booklet layout is time to staple the booklet. Click the Features tab. 6. Print a multiple-page document as a booklet The HP All-in-One allows you to -left, click Right edge binding. ...
...order. 10. In the Paper saving options area, select Manual from the output tray. Click OK, and then click Print or OK in -One begins printing. Print Perform special print jobs 87 Load paper into the input tray. The HP All-in the Print dialog box. Do not click ... 11. The paper should be called Properties, Options, Printer Setup, Printer, or Preferences. 5. Select the binding edge from the Booklet layout is time to staple the booklet. Click the Features tab. 6. Print a multiple-page document as a booklet The HP All-in-One allows you to -left, click Right edge binding. ...

Windows Help
Page 91
... On from your software application, click Print. 3. To print on Transfer from the list. 6. Make sure the HP All-in -One is the selected printer. 4. Click the Features tab. This feature is not available. Print on the back of the page, the Front...size in the Size list. 7. Make sure the HP All-in -One is the selected printer. 3. Depending on transfers 1. NOTE: To prevent jams, manually feed the iron-on your software application, this button might be called Properties, Options, Printer Setup, Printer, or Preferences. 4. Depending on transfer sheets into ...
... On from your software application, click Print. 3. To print on Transfer from the list. 6. Make sure the HP All-in -One is the selected printer. 4. Click the Features tab. This feature is not available. Print on the back of the page, the Front...size in the Size list. 7. Make sure the HP All-in -One is the selected printer. 3. Depending on transfers 1. NOTE: To prevent jams, manually feed the iron-on your software application, this button might be called Properties, Options, Printer Setup, Printer, or Preferences. 4. Depending on transfer sheets into ...


