Setup Guide
Page 1
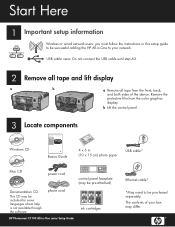
... All-in-One series Basics Guide Windows CD Basics Guide 4 x 6 in -One to be purchased separately. phone cord HP Photosmart C7100 All-in-One series Setup Guide ink cartridges Ethernet cable* *May need to your box may be successful adding the HP All-in (10 x 15 cm) photo paper USB cable* Mac CD power cord control panel... device. USB cable users: Do not connect the USB cable until step A2. 2 Remove all tape and lift display a b a Remove all tape from the color graphics display. Remove the protective film from the front, back, and both sides of your network.
... All-in-One series Basics Guide Windows CD Basics Guide 4 x 6 in -One to be purchased separately. phone cord HP Photosmart C7100 All-in-One series Setup Guide ink cartridges Ethernet cable* *May need to your box may be successful adding the HP All-in (10 x 15 cm) photo paper USB cable* Mac CD power cord control panel... device. USB cable users: Do not connect the USB cable until step A2. 2 Remove all tape and lift display a b a Remove all tape from the color graphics display. Remove the protective film from the front, back, and both sides of your network.

Setup Guide
Page 10
B2 Choose the correct CD Windows Users: a Turn on your computer, login if necessary, and then wait for the desktop to appear. d On the Connection Type screen, make sure to install ... screens, including the Setup Assistant. You should be disabled. f Continue to turn them back on additional computers, go to Step 16 of this Setup Guide 10 • HP All-in -One CD Note: If the startup screen does not appear, doubleclick My Computer, doubleclick the CD-ROM icon with the...
B2 Choose the correct CD Windows Users: a Turn on your computer, login if necessary, and then wait for the desktop to appear. d On the Connection Type screen, make sure to install ... screens, including the Setup Assistant. You should be disabled. f Continue to turn them back on additional computers, go to Step 16 of this Setup Guide 10 • HP All-in -One CD Note: If the startup screen does not appear, doubleclick My Computer, doubleclick the CD-ROM icon with the...
Basics Guide
Page 21
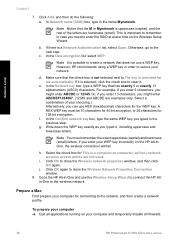
...OK to secure your computer and temporarily disable all firewalls. 18 HP Photosmart C7100 All-in case you need to close the Wireless network properties window, and then click OK again. Click OK again to enter the...use a WEP key. If it is important to remember in -One series To prepare your computer ➔ Quit all applications running on the HP All-inOne, the wireless connection will fail. This is selected, ...for the WEP key. Go to the HP All-in the name Mynetwork. Or, if you enter 13 characters, you typed it . Note You must be 10 characters for 40 bit encryption, or 26...
...OK to secure your computer and temporarily disable all firewalls. 18 HP Photosmart C7100 All-in case you need to close the Wireless network properties window, and then click OK again. Click OK again to enter the...use a WEP key. If it is important to remember in -One series To prepare your computer ➔ Quit all applications running on the HP All-inOne, the wireless connection will fail. This is selected, ...for the WEP key. Go to the HP All-in the name Mynetwork. Or, if you enter 13 characters, you typed it . Note You must be 10 characters for 40 bit encryption, or 26...
Basics Guide
Page 22
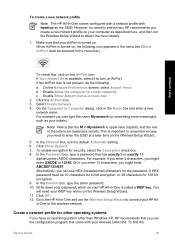
...remember in case you use HEX (hexadecimal) characters for other operating systems If you have an operating system other than Windows XP, HP recommends that you need your HP Allin-One to detect the new network. 1. On the Network Preferences screen, select Airport Panel. For example you might enter ABCDEF1234567..., you can type the name Mynetwork (or something more meaningful, such as the SSID. In the Confirm box, type the same password. 10. Go to turn on your computer as described here, and then run the Wireless Setup Wizard. 11. If the AirPort icon is turned on...
...remember in case you use HEX (hexadecimal) characters for other operating systems If you have an operating system other than Windows XP, HP recommends that you need your HP Allin-One to detect the new network. 1. On the Network Preferences screen, select Airport Panel. For example you might enter ABCDEF1234567..., you can type the name Mynetwork (or something more meaningful, such as the SSID. In the Confirm box, type the same password. 10. Go to turn on your computer as described here, and then run the Wireless Setup Wizard. 11. If the AirPort icon is turned on...
Basics Guide
Page 114
... dial send fax 68 SSID troubleshoot 94 wireless setting 31 start copy black 6 start copy color 6 start fax black 6 color 6 status, network 26 subnet mask 27, 29 subscriber identification code 55 support process 104...76 low signal 95 network connection 95 Passphrase, invalid 97 printer alignment 76 printer not found screen, Windows 12 printer, align 71 R radio, turn off 23 receive fax auto answer mode 53 rings to... 77 restore network defaults 23 right arrow 6 rings to answer 54 RJ-45 plug 10 rotate button 6 router 10 S save scanned image 62 scan button 6 change original type 64 documents 61 from ...
... dial send fax 68 SSID troubleshoot 94 wireless setting 31 start copy black 6 start copy color 6 start fax black 6 color 6 status, network 26 subnet mask 27, 29 subscriber identification code 55 support process 104...76 low signal 95 network connection 95 Passphrase, invalid 97 printer alignment 76 printer not found screen, Windows 12 printer, align 71 R radio, turn off 23 receive fax auto answer mode 53 rings to... 77 restore network defaults 23 right arrow 6 rings to answer 54 RJ-45 plug 10 rotate button 6 router 10 S save scanned image 62 scan button 6 change original type 64 documents 61 from ...


