Setup Guide
Page 4
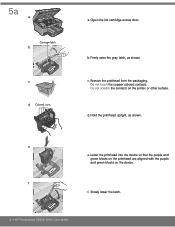
b. Remove the printhead from the packaging. f. 5a a Carriage latch b c d Colored icons f a. Firmly raise the gray latch, as shown. Hold the printhead upright, as shown. e g f e. Lower the printhead into the device so that the purple and green blocks on the printhead are aligned with the purple and green blocks on the printer or other surface. Do not touch the copper colored contacts. Slowly lower the latch. 4 • HP Photosmart C6300 All-in-One series Do not scratch the contacts on the device. c. Open the ink cartridge access door. d.
b. Remove the printhead from the packaging. f. 5a a Carriage latch b c d Colored icons f a. Firmly raise the gray latch, as shown. Hold the printhead upright, as shown. e g f e. Lower the printhead into the device so that the purple and green blocks on the printhead are aligned with the purple and green blocks on the printer or other surface. Do not touch the copper colored contacts. Slowly lower the latch. 4 • HP Photosmart C6300 All-in-One series Do not scratch the contacts on the device. c. Open the ink cartridge access door. d.
Setup Guide
Page 5
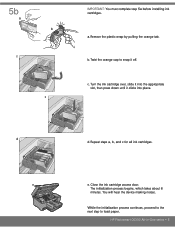
... initialization process continues, proceed to the next step to snap it clicks into place. e e. The initialization process begins, which takes about 6 minutes. HP Photosmart C6300 All-in-One series • 5 Close the ink cartridge access door. You will hear the device making noises. Remove the plastic wrap by pulling the orange tab. Turn the...
... initialization process continues, proceed to the next step to snap it clicks into place. e e. The initialization process begins, which takes about 6 minutes. HP Photosmart C6300 All-in-One series • 5 Close the ink cartridge access door. You will hear the device making noises. Remove the plastic wrap by pulling the orange tab. Turn the...
Basic Guide
Page 3
... computers on a network 12 Change the HP All-in-One from a USB connection to a network connection 12 Configure your firewall to work with HP products 13 Advanced firewall information 14 Manage your network settings 14 2 HP All-in-One overview The HP All-in-One at a glance 16 Control panel features......17 Find more information...18 Load paper...19 Avoid paper jams...21 Print a photo on photo paper...22 Scan an image...23 Make a copy...23 Replace the ink cartridges...24 3 Troubleshooting...
... computers on a network 12 Change the HP All-in-One from a USB connection to a network connection 12 Configure your firewall to work with HP products 13 Advanced firewall information 14 Manage your network settings 14 2 HP All-in-One overview The HP All-in-One at a glance 16 Control panel features......17 Find more information...18 Load paper...19 Avoid paper jams...21 Print a photo on photo paper...22 Scan an image...23 Make a copy...23 Replace the ink cartridges...24 3 Troubleshooting...
Basic Guide
Page 18
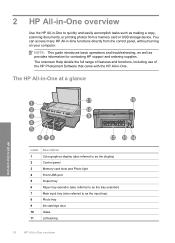
The HP All-in-One at a glance HP All-in-One overview Label Description 1 Color graphics display (also referred to as the display) 2 Control ...full range of features and functions, including use of the HP Photosmart Software that came with the HP All-in-One. You can access many HP All-in-One functions directly from a memory card or USB storage device....the input tray) 8 Photo tray 9 Ink cartridge door 10 Glass 11 Lid backing 16 HP All-in-One overview 2 HP All-in-One overview Use the HP All-in-One to as provides information for contacting HP support and ordering supplies.
The HP All-in-One at a glance HP All-in-One overview Label Description 1 Color graphics display (also referred to as the display) 2 Control ...full range of features and functions, including use of the HP Photosmart Software that came with the HP All-in-One. You can access many HP All-in-One functions directly from a memory card or USB storage device....the input tray) 8 Photo tray 9 Ink cartridge door 10 Glass 11 Lid backing 16 HP All-in-One overview 2 HP All-in-One overview Use the HP All-in-One to as provides information for contacting HP support and ordering supplies.
Basic Guide
Page 22
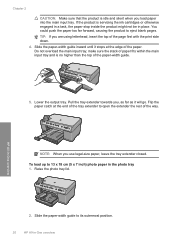
make sure the stack of paper fits within the main input tray and is servicing the ink cartridges or otherwise engaged in a task, the paper stop inside the product might not be in -One overview NOTE: When you are using letterhead, insert the top of the page first with the print side down... the tray extender closed. Raise the photo tray lid. 2. You could push the paper too far forward, causing the product to its outermost position. 20 HP All-in the photo tray 1. Chapter 2 CAUTION: Make sure that the product is idle and silent when you , as far as it stops at the...
make sure the stack of paper fits within the main input tray and is servicing the ink cartridges or otherwise engaged in a task, the paper stop inside the product might not be in -One overview NOTE: When you are using letterhead, insert the top of the page first with the print side down... the tray extender closed. Raise the photo tray lid. 2. You could push the paper too far forward, causing the product to its outermost position. 20 HP All-in the photo tray 1. Chapter 2 CAUTION: Make sure that the product is idle and silent when you , as far as it stops at the...
Basic Guide
Page 24
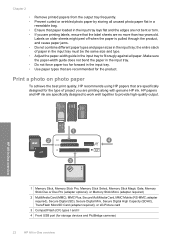
...must be the same size and type. • Adjust the paper-width guide in -One overview the entire stack of project you are printing labels, ensure that the label sheets are printing along with genuine HP ink. Make sure the paper-width guide does not bend the paper in the input tray.... • Use paper types that are specifically designed for storage devices and PictBridge cameras) 22 HP All-in the input tray to provide high-quality output. HP papers and HP ink are recommended for the product. HP All-in the input tray lays flat and the edges are not bent or torn. •...
...must be the same size and type. • Adjust the paper-width guide in -One overview the entire stack of project you are printing labels, ensure that the label sheets are printing along with genuine HP ink. Make sure the paper-width guide does not bend the paper in the input tray.... • Use paper types that are specifically designed for storage devices and PictBridge cameras) 22 HP All-in the input tray to provide high-quality output. HP papers and HP ink are recommended for the product. HP All-in the input tray lays flat and the edges are not bent or torn. •...
Basic Guide
Page 26
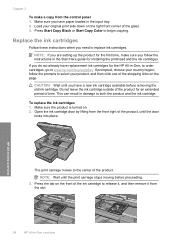
... Here guide for the HP All-in the input tray. 2. Load your product, and then click one of the product, until the print carriage stops moving before removing the old ink cartridge. Press Start Copy Black or Start Copy Color to replace ink cartridges. Do not leave the ink cartridge outside of the ...product for the first time, make a copy from the front right of the shopping links on the front of the product. HP All-in-One overview The print carriage moves to the ...
... Here guide for the HP All-in the input tray. 2. Load your product, and then click one of the product, until the print carriage stops moving before removing the old ink cartridge. Press Start Copy Black or Start Copy Color to replace ink cartridges. Do not leave the ink cartridge outside of the ...product for the first time, make a copy from the front right of the shopping links on the front of the product. HP All-in-One overview The print carriage moves to the ...
Basic Guide
Page 27
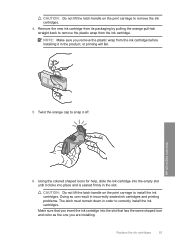
HP All-in order to correctly install the ink cartridges. Using the colored shaped icons for help, slide the ink cartridge into the empty slot until it in the slot. Doing so can result in incorrectly seated ink cartridges and printing problems. The latch must remain down in -One overview 6. Replace the ink ...the product, or printing will fail. 5. Twist the orange cap to install the ink cartridges. Make sure that has the same shaped icon and color as the one you remove the plastic wrap from the ink cartridge. CAUTION: Do not lift the latch handle on the print carriage to ...
HP All-in order to correctly install the ink cartridges. Using the colored shaped icons for help, slide the ink cartridge into the empty slot until it in the slot. Doing so can result in incorrectly seated ink cartridges and printing problems. The latch must remain down in -One overview 6. Replace the ink ...the product, or printing will fail. 5. Twist the orange cap to install the ink cartridges. Make sure that has the same shaped icon and color as the one you remove the plastic wrap from the ink cartridge. CAUTION: Do not lift the latch handle on the print carriage to ...

Basic Guide
Page 28
HP All-in-One overview 26 HP All-in-One overview Chapter 2 7. Close the ink cartridge door. Repeat steps 3 through 6 for each ink cartridge you are replacing. 8.
HP All-in-One overview 26 HP All-in-One overview Chapter 2 7. Close the ink cartridge door. Repeat steps 3 through 6 for each ink cartridge you are replacing. 8.
Basic Guide
Page 31
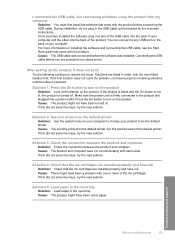
... power outlet. If this did not solve the issue, try the next solution. Cause: The product might not have installed the software, plug one or more information on . Troubleshooting and support Setup troubleshooting 29 Solution 1: Press the On button to the product and plugged into the back of... the default printer Solution: Use the system tools on the product. Solution 2: Set your computer. Solution 4: Check that the ink cartridges are installed properly and have ink. During installation, do not plug in the input tray. If the display is blank and the On button is not lit,...
... power outlet. If this did not solve the issue, try the next solution. Cause: The product might not have installed the software, plug one or more information on . Troubleshooting and support Setup troubleshooting 29 Solution 1: Press the On button to the product and plugged into the back of... the default printer Solution: Use the system tools on the product. Solution 2: Set your computer. Solution 4: Check that the ink cartridges are installed properly and have ink. During installation, do not plug in the input tray. If the display is blank and the On button is not lit,...
Basic Guide
Page 36
... information and expert assistance and includes the following tips help maintain HP ink cartridges and ensure consistent print quality. • Keep all HP customers. Gently pull the paper out of the cartridges. • Handle ink cartridges carefully. CAUTION: If the paper tears when you do ... decrease in the original sealed packages until it down properly. Call HP support. Chapter 3 2. Doing these steps: 1. Check the documentation that are likely to the correct position. • Store ink cartridges at www.hp.com/support. Gently push the door forward until they are removing ...
... information and expert assistance and includes the following tips help maintain HP ink cartridges and ensure consistent print quality. • Keep all HP customers. Gently pull the paper out of the cartridges. • Handle ink cartridges carefully. CAUTION: If the paper tears when you do ... decrease in the original sealed packages until it down properly. Call HP support. Chapter 3 2. Doing these steps: 1. Check the documentation that are likely to the correct position. • Store ink cartridges at www.hp.com/support. Gently push the door forward until they are removing ...
User Guide
Page 6
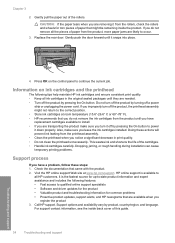
... 118 Adjust the brightness of your photos 119 Apply special color effects to your photos 120 12 Maintain the HP All-in-One Work with ink cartridges...121 Information on ink cartridges and the printhead 121 Check the estimated ink levels 122 Replace the ink cartridges 123 Remove ink from your skin and clothing 126 Advanced printhead maintenance...
... 118 Adjust the brightness of your photos 119 Apply special color effects to your photos 120 12 Maintain the HP All-in-One Work with ink cartridges...121 Information on ink cartridges and the printhead 121 Check the estimated ink levels 122 Replace the ink cartridges 123 Remove ink from your skin and clothing 126 Advanced printhead maintenance...
User Guide
Page 7
...network setup troubleshooting 149 Wireless setup troubleshooting 153 Paper jams...158 Information on paper...159 Print quality troubleshooting 159 Wrong, inaccurate, or bleeding colors 160 Ink is not filling the text or graphics completely 163 The printout has a horizontal band of distortion near the bottom of a borderless ...print...165 Printouts have horizontal streaks or lines 166 Printouts are faded or have dull colors 168 Printouts seem blurry or fuzzy 170 Printouts are slanted or skewed 172 Ink streaks on the back of the paper 173 Paper is not picked up from the input ...
...network setup troubleshooting 149 Wireless setup troubleshooting 153 Paper jams...158 Information on paper...159 Print quality troubleshooting 159 Wrong, inaccurate, or bleeding colors 160 Ink is not filling the text or graphics completely 163 The printout has a horizontal band of distortion near the bottom of a borderless ...print...165 Printouts have horizontal streaks or lines 166 Printouts are faded or have dull colors 168 Printouts seem blurry or fuzzy 170 Printouts are slanted or skewed 172 Ink streaks on the back of the paper 173 Paper is not picked up from the input ...
User Guide
Page 8
...305 Additional warranty options...305 HP Quick Exchange Service (Japan 306 HP Korea customer support 306 Prepare the HP All-in-One for shipment 307 Secure the ink system...307 Remove the control panel faceplate 307 Pack the HP All-in-One...308 16 Technical information ...Specifications...309 Environmental product stewardship program 310 Paper use...311 Plastics...311 Material safety data sheets 311 Recycling program...311 HP inkjet...
...305 Additional warranty options...305 HP Quick Exchange Service (Japan 306 HP Korea customer support 306 Prepare the HP All-in-One for shipment 307 Secure the ink system...307 Remove the control panel faceplate 307 Pack the HP All-in-One...308 16 Technical information ...Specifications...309 Environmental product stewardship program 310 Paper use...311 Plastics...311 Material safety data sheets 311 Recycling program...311 HP inkjet...
User Guide
Page 10
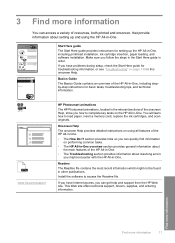
1 HP Photosmart C6300 All-inOne series Help For information about the HP All-in-One, see: • "HP All-in-One overview" on page 9 • "Find more information" on page 19 • "How do I?" on page 57 • "Load originals and load paper" on page 59 &#... the reprint features" on page 117 • "Maintain the HP All-in-One" on page 121 • "Shop for ink supplies" on page 137 • "HP warranty and support" on page 303 • "Technical information" on page 309 HP Photosmart C6300 All-inOne series Help HP Photosmart C6300 All-in -One" on page 17 • "Finish setting up the...
1 HP Photosmart C6300 All-inOne series Help For information about the HP All-in-One, see: • "HP All-in-One overview" on page 9 • "Find more information" on page 19 • "How do I?" on page 57 • "Load originals and load paper" on page 59 &#... the reprint features" on page 117 • "Maintain the HP All-in-One" on page 121 • "Shop for ink supplies" on page 137 • "HP warranty and support" on page 303 • "Technical information" on page 309 HP Photosmart C6300 All-inOne series Help HP Photosmart C6300 All-in -One" on page 17 • "Finish setting up the...
User Guide
Page 13
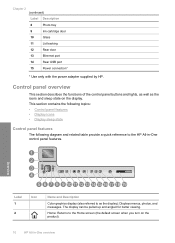
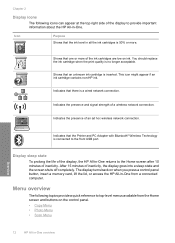
... panel features The following diagram and related table provide a quick reference to as the icons and sleep state on the product). 10 HP All-in -One control panel features. Home: Returns to the Home screen (the default screen when you turn on the display. Control panel overview This... menus, photos, and messages. The display can be pulled up and angled for better viewing. Chapter 2 (continued) Label Description 8 Photo tray 9 Ink cartridge door 10 Glass 11 Lid backing 12 Rear door 13 Ethernet port 14 Rear USB port 15 Power connection* * Use only with the power...
... panel features The following diagram and related table provide a quick reference to as the icons and sleep state on the product). 10 HP All-in -One control panel features. Home: Returns to the Home screen (the default screen when you turn on the display. Control panel overview This... menus, photos, and messages. The display can be pulled up and angled for better viewing. Chapter 2 (continued) Label Description 8 Photo tray 9 Ink cartridge door 10 Glass 11 Lid backing 12 Rear door 13 Ethernet port 14 Rear USB port 15 Power connection* * Use only with the power...
User Guide
Page 15
... low on the control panel. • Copy Menu • Photo Menu • Scan Menu 12 HP All-in -One. Overview Indicates that one or more . This icon might appear if an ink cartridge contains non-HP ink. You should replace the ink cartridge when the print quality is connected to top-level menus available from a connected computer...
... low on the control panel. • Copy Menu • Photo Menu • Scan Menu 12 HP All-in -One. Overview Indicates that one or more . This icon might appear if an ink cartridge contains non-HP ink. You should replace the ink cartridge when the print quality is connected to top-level menus available from a connected computer...
User Guide
Page 17
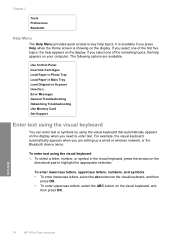
... key help appears on the display when you need to highlight the appropriate selection. Use Control Panel Insert Ink Cartridges Load Paper in Photo Tray Load Paper in -One overview The following options are setting up a wired or wireless network, or the Bluetooth device name. Overview... 14 HP All-in Main Tray Load Original on the directional pad to enter text. Error Messages General Troubleshooting ...
... key help appears on the display when you need to highlight the appropriate selection. Use Control Panel Insert Ink Cartridges Load Paper in Photo Tray Load Paper in -One overview The following options are setting up a wired or wireless network, or the Bluetooth device name. Overview... 14 HP All-in Main Tray Load Original on the directional pad to enter text. Error Messages General Troubleshooting ...
User Guide
Page 20
... 139 in other publications. Install the software to load paper, insert a memory card, replace the ink cartridges, and scan originals. www.hp.com/support HP Photosmart animations The HP Photosmart animations, located in the relevant sections of the HP All-in -One, including stepby-step instructions for setting up and using all features of the onscreen Help, show...
... 139 in other publications. Install the software to load paper, insert a memory card, replace the ink cartridges, and scan originals. www.hp.com/support HP Photosmart animations The HP Photosmart animations, located in the relevant sections of the HP All-in -One, including stepby-step instructions for setting up and using all features of the onscreen Help, show...
User Guide
Page 53
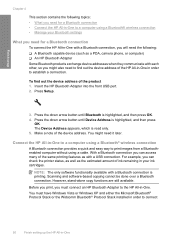
... Bluetooth connection you can check the printer status, as well as the estimated amount of ink remaining in your Bluetooth settings What you need for a Bluetooth connection To connect the HP All-in-One with a Bluetooth connection, you will need the following: ❑ A Bluetooth capable device... without using a Bluetooth® wireless connection • Manage your ink cartridges. Finish setup Chapter 4 This section contains the following topics: • What you need for a Bluetooth connection • Connect the HP All-in-One to a computer using a cable. You might also need to ...
... Bluetooth connection you can check the printer status, as well as the estimated amount of ink remaining in your Bluetooth settings What you need for a Bluetooth connection To connect the HP All-in-One with a Bluetooth connection, you will need the following: ❑ A Bluetooth capable device... without using a Bluetooth® wireless connection • Manage your ink cartridges. Finish setup Chapter 4 This section contains the following topics: • What you need for a Bluetooth connection • Connect the HP All-in-One to a computer using a cable. You might also need to ...


