
Full User Guide
Page 9
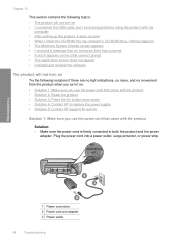
... buttons The following diagram and related table provide a quick reference to the next photo on or off the product, and then unplug the power cord. Start Copy Black: Starts a black-and-white copy. Cancel: Stops a task (such as scanning or copying) or resets settings (... (continued) Label 11 12 Description Rear USB port Power connection* * Use only with the power adapter supplied by HP. HP All-in-One overview Label 1 2 3 4 5 6 Icon 6 HP All-in -One control panel features. When the product is off, a minimal amount of power is inserted, this button resumes printing. OK: Confirms...
... buttons The following diagram and related table provide a quick reference to the next photo on or off the product, and then unplug the power cord. Start Copy Black: Starts a black-and-white copy. Cancel: Stops a task (such as scanning or copying) or resets settings (... (continued) Label 11 12 Description Rear USB port Power connection* * Use only with the power adapter supplied by HP. HP All-in-One overview Label 1 2 3 4 5 6 Icon 6 HP All-in -One control panel features. When the product is off, a minimal amount of power is inserted, this button resumes printing. OK: Confirms...
Full User Guide
Page 71
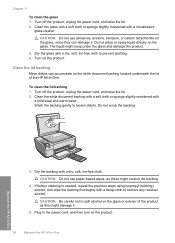
...free cloth. Maintain the HP All-in -One. Dry the backing with a mild soap and warm water. Clean the lid backing Minor debris can damage it . 5. CAUTION: Do not use abrasives, acetone, benzene, or carbon tetrachloride on the product. 68 Maintain the HP All-in the power cord, and then turn on ... spotting. 4. Turn off the product, unplug the power cord, and raise the lid. 2. CAUTION: Do not use paper-based wipes, as this might damage it . The liquid might scratch the backing. 4. Turn on the glass or exterior of the HP All-in -One 3. To clean the lid backing 1. Do not ...
...free cloth. Maintain the HP All-in -One. Dry the backing with a mild soap and warm water. Clean the lid backing Minor debris can damage it . 5. CAUTION: Do not use abrasives, acetone, benzene, or carbon tetrachloride on the product. 68 Maintain the HP All-in the power cord, and then turn on ... spotting. 4. Turn off the product, unplug the power cord, and raise the lid. 2. CAUTION: Do not use paper-based wipes, as this might damage it . The liquid might scratch the backing. 4. Turn on the glass or exterior of the HP All-in -One 3. To clean the lid backing 1. Do not ...

Full User Guide
Page 83
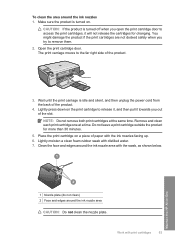
... 1. CAUTION: If the product is idle and silent, and then unplug the power cord from the back of the product. The print carriage moves to the far right side of the product. 80 Maintain the HP All-in -One 3. Chapter 11 Clean the print cartridge contacts CAUTION: Do not clean the print... you already have cleaned or aligned the print cartridges. CAUTION: Do not use platen cleaners or alcohol to remove them. 2. Maintain the HP All-in -One Wait until the print carriage is turned off when you open the print cartridge door to check the print cartridges, clean the print cartridge...
... 1. CAUTION: If the product is idle and silent, and then unplug the power cord from the back of the product. The print carriage moves to the far right side of the product. 80 Maintain the HP All-in -One 3. Chapter 11 Clean the print cartridge contacts CAUTION: Do not clean the print... you already have cleaned or aligned the print cartridges. CAUTION: Do not use platen cleaners or alcohol to remove them. 2. Maintain the HP All-in -One Wait until the print carriage is turned off when you open the print cartridge door to check the print cartridges, clean the print cartridge...

Full User Guide
Page 85
... print cartridge door and plug the power cord into the back of debris might contain contaminants that will not come apart or leave fibers. CAUTION: Do not touch the copper-colored contacts or ink nozzles. This debris can result in -One Maintain the HP All-in-One 82 Maintain the HP All-in clogs, ink failure, and...
... print cartridge door and plug the power cord into the back of debris might contain contaminants that will not come apart or leave fibers. CAUTION: Do not touch the copper-colored contacts or ink nozzles. This debris can result in -One Maintain the HP All-in-One 82 Maintain the HP All-in clogs, ink failure, and...
Full User Guide
Page 86
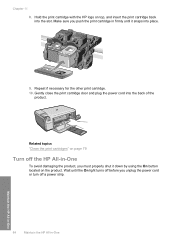
... down on a piece of the slot. Place the print cartridge on the print cartridge to the far right side of the product. 4. Maintain the HP All-in-One 1 Nozzle plate (do not clean) 2 Face and edges around the ink nozzle area with the ink nozzles facing up. 6. Do not leave a print...ink nozzles 1. Remove and clean each print cartridge one at the same time. Lightly moisten a clean foam rubber swab with print cartridges 83 NOTE: Do not remove both print cartridges at a time. Make sure the product is idle and silent, and then unplug the power cord from the back of the product. 3. Open...
... down on a piece of the slot. Place the print cartridge on the print cartridge to the far right side of the product. 4. Maintain the HP All-in-One 1 Nozzle plate (do not clean) 2 Face and edges around the ink nozzle area with the ink nozzles facing up. 6. Do not leave a print...ink nozzles 1. Remove and clean each print cartridge one at the same time. Lightly moisten a clean foam rubber swab with print cartridges 83 NOTE: Do not remove both print cartridges at a time. Make sure the product is idle and silent, and then unplug the power cord from the back of the product. 3. Open...
Full User Guide
Page 87
... on page 79 Turn off a power strip. 84 Maintain the HP All-in-One Maintain the HP All-in -One To avoid damaging the product, you push the print cartridge in firmly until the On light turns off before you unplug the power cord or turn off the HP All-in -One Repeat if necessary for the other... print cartridge. 10. Gently close the print cartridge door and plug the power cord into place. 9. Chapter 11 8. Make sure you must properly shut it ...
... on page 79 Turn off a power strip. 84 Maintain the HP All-in-One Maintain the HP All-in -One To avoid damaging the product, you push the print cartridge in firmly until the On light turns off before you unplug the power cord or turn off the HP All-in -One Repeat if necessary for the other... print cartridge. 10. Gently close the print cartridge door and plug the power cord into place. 9. Chapter 11 8. Make sure you must properly shut it ...
Full User Guide
Page 91
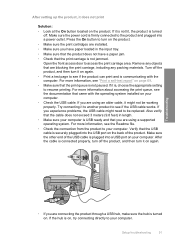
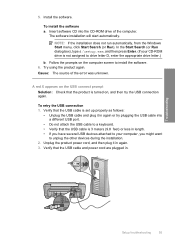
..., and no movement from the product when you turn it on. • Solution 1: Make sure you use the power cord that came with the product • Solution 2: Reset the product • Solution 3: Press the On button more slowly • Solution 4:... Contact HP to replace the power supply • Solution 5: Contact HP support for service Solution 1: Make sure you use the power cord that came with the product Solution: • Make sure the power cord is firmly connected to both the product and the power adapter. Troubleshooting 1 Power connection 2 Power cord and adapter 3 Power outlet 88...
..., and no movement from the product when you turn it on. • Solution 1: Make sure you use the power cord that came with the product • Solution 2: Reset the product • Solution 3: Press the On button more slowly • Solution 4:... Contact HP to replace the power supply • Solution 5: Contact HP support for service Solution 1: Make sure you use the power cord that came with the product Solution: • Make sure the power cord is firmly connected to both the product and the power adapter. Troubleshooting 1 Power connection 2 Power cord and adapter 3 Power outlet 88...
Full User Guide
Page 92
... outlet is switched to turn the product off the product, and then unplug the power cord. Cause: You pressed the On button too quickly. Go to : www.hp.com/support. If prompted, choose your country/region, and then click Contact HP for information on calling for technical support. If prompted, choose your country/region...
... outlet is switched to turn the product off the product, and then unplug the power cord. Cause: You pressed the On button too quickly. Go to : www.hp.com/support. If prompted, choose your country/region, and then click Contact HP for information on calling for technical support. If prompted, choose your country/region...
Full User Guide
Page 94
... a test page to the product and plugged into the USB port on your computer. Make sure the other end of the product. Make sure the power cord is not paused. For more information, see "Print a self-test report" on page 69. • Make sure that the print queue is firmly connected .... Also verify that you are installed. • Make sure you are connecting the product through a USB hub, make sure the hub is securely plugged into a power outlet. If the hub is USB ready and that the cable does not exceed 3 meters (9.8 feet) in the input tray. • Make sure that the...
... a test page to the product and plugged into the USB port on your computer. Make sure the other end of the product. Make sure the power cord is not paused. For more information, see "Print a self-test report" on page 69. • Make sure that the print queue is firmly connected .... Also verify that you are installed. • Make sure you are connecting the product through a USB hub, make sure the hub is securely plugged into a power outlet. If the hub is USB ready and that the cable does not exceed 3 meters (9.8 feet) in the input tray. • Make sure that the...
Full User Guide
Page 95
... appears Solution: Click Details to your computer. • Try connecting the USB cable to install the software. To disconnect and reset the product a. Disconnect the power cord from a Windows computer 1. You might need to disconnect older products from your computer, see the Setup Guide that an Unknown Error has occurred Solution: Uninstall...
... appears Solution: Click Details to your computer. • Try connecting the USB cable to install the software. To disconnect and reset the product a. Disconnect the power cord from a Windows computer 1. You might need to disconnect older products from your computer, see the Setup Guide that an Unknown Error has occurred Solution: Uninstall...
Full User Guide
Page 96
... the HP Photosmart Software. NOTE: It is manufactured by HP or Compaq, do not remove any applications other than those listed below. • HP Imaging device functions • HP Document Viewer • HP Photosmart Essential • HP Image Zone • HP Photo and imaging gallery • HP Photosmart, Officejet...in the background. On the Windows taskbar, click Start, Settings, Control Panel, (or just Control Panel). b. Reconnect the power cord to ensure you have removed the software completely from starting up. Go to C:\WINDOWS and rename the twain_32 folder to turn ...
... the HP Photosmart Software. NOTE: It is manufactured by HP or Compaq, do not remove any applications other than those listed below. • HP Imaging device functions • HP Document Viewer • HP Photosmart Essential • HP Image Zone • HP Photo and imaging gallery • HP Photosmart, Officejet...in the background. On the Windows taskbar, click Start, Settings, Control Panel, (or just Control Panel). b. Reconnect the power cord to ensure you have removed the software completely from starting up. Go to C:\WINDOWS and rename the twain_32 folder to turn ...
Full User Guide
Page 98
... Windows Start menu, click Start Search (or Run). Try using the product again. Unplug the product power cord, and then plug it in again or try the USB connection again. Verify that the USB cable and power cord are plugged in again. 3. Follow the prompts on , and then try plugging the USB cable into...
... Windows Start menu, click Start Search (or Run). Try using the product again. Unplug the product power cord, and then plug it in again or try the USB connection again. Verify that the USB cable and power cord are plugged in again. 3. Follow the prompts on , and then try plugging the USB cable into...

Full User Guide
Page 117
...the paper type setting to make sure it snaps into the purified or distilled water, and squeeze any excess water from the product. 3. Plug the power cord back in the input tray. • Check the quality setting. Cause: The rollers were dirty and needed to print again. Turn off the product... and remove the power cord. 2. Replace the rear door. If this did not solve the issue, try the next solution. 114 Troubleshooting Make sure you have the following materials ...
...the paper type setting to make sure it snaps into the purified or distilled water, and squeeze any excess water from the product. 3. Plug the power cord back in the input tray. • Check the quality setting. Cause: The rollers were dirty and needed to print again. Turn off the product... and remove the power cord. 2. Replace the rear door. If this did not solve the issue, try the next solution. 114 Troubleshooting Make sure you have the following materials ...
Full User Guide
Page 120
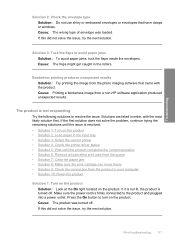
... with the product. Make sure the power cord is not responding Try the following solutions to turn on the product. Cause: The wrong type of envelope was turned off . Solution 3: Tuck the flaps to the product and plugged into a power outlet. The product is firmly connected ... continue trying the remaining solutions until the issue is turned off . Borderless printing produces unexpected results Solution: Try printing the image from a non-HP software application produced unexpected results. If it is not lit, the product is resolved. • Solution 1: Turn on the product • ...
... with the product. Make sure the power cord is not responding Try the following solutions to turn on the product. Cause: The wrong type of envelope was turned off . Solution 3: Tuck the flaps to the product and plugged into a power outlet. The product is firmly connected ... continue trying the remaining solutions until the issue is turned off . Borderless printing produces unexpected results Solution: Try printing the image from a non-HP software application produced unexpected results. If it is not lit, the product is resolved. • Solution 1: Turn on the product • ...
Full User Guide
Page 123
In the HP Photosmart Software, click Settings, and then click Status. Plug the power cord back in, and then press the On button to the product, check the status of the product. Solutions are secure, and nothing has printed several ... prints meaningless characters Try the following solutions to resolve the issue. After the cable is connected properly, turn off the product, and then unplug the power cord.
In the HP Photosmart Software, click Settings, and then click Status. Plug the power cord back in, and then press the On button to the product, check the status of the product. Solutions are secure, and nothing has printed several ... prints meaningless characters Try the following solutions to resolve the issue. After the cable is connected properly, turn off the product, and then unplug the power cord.
Full User Guide
Page 124
... light located on the product. Cause: The product was turned off . If this did not solve the issue, try the next solution. Make sure the power cord is turned off . Troubleshooting Solution 2: Print a previously saved version of the document Solution: Try printing another document from the product to your software application. If..." on page 20 Cause: The product was corrupt. If this works, then try to print Try the following solutions to the product and plugged into a power outlet.
... light located on the product. Cause: The product was turned off . If this did not solve the issue, try the next solution. Make sure the power cord is turned off . Troubleshooting Solution 2: Print a previously saved version of the document Solution: Try printing another document from the product to your software application. If..." on page 20 Cause: The product was corrupt. If this works, then try to print Try the following solutions to the product and plugged into a power outlet.
Full User Guide
Page 127
Cause: The product experienced an error. Plug the power cord back in correct order. When the document finishes printing, the pages will be print side up at the bottom of the way the paper feeds .... If this did not solve the issue, try the next solution. Solution 10: Reset the product Solution: Turn off the product, and then unplug the power cord. For more information, see: "Print a multiple-page document in order, with the product. The margins are listed in reverse order" on the product. Solutions are...
Cause: The product experienced an error. Plug the power cord back in correct order. When the document finishes printing, the pages will be print side up at the bottom of the way the paper feeds .... If this did not solve the issue, try the next solution. Solution 10: Reset the product Solution: Turn off the product, and then unplug the power cord. For more information, see: "Print a multiple-page document in order, with the product. The margins are listed in reverse order" on the product. Solutions are...
Full User Guide
Page 137
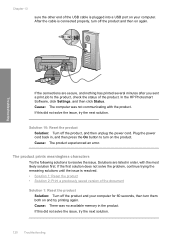
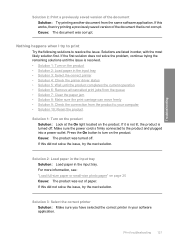
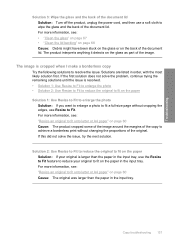
...8226; The image is cropped when I make a borderless copy • The printout is turned off . Cause: The product was turned off . Make sure the power cord is resolved. • Solution 1: Turn on the product • Solution 2: Place the original correctly on the glass • Solution 3: Wait until the product... copy problems: • Nothing happens when I try to resolve the issue. Press the On button to the product and plugged into a power outlet. If the first solution does not solve the problem, continue trying the remaining solutions until the issue is firmly connected to turn on ...
...8226; The image is cropped when I make a borderless copy • The printout is turned off . Cause: The product was turned off . Make sure the power cord is resolved. • Solution 1: Turn on the product • Solution 2: Place the original correctly on the glass • Solution 3: Wait until the product... copy problems: • Nothing happens when I try to resolve the issue. Press the On button to the product and plugged into a power outlet. If the first solution does not solve the problem, continue trying the remaining solutions until the issue is firmly connected to turn on ...
Full User Guide
Page 140
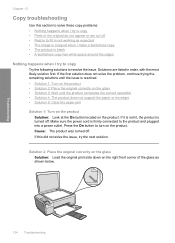
..., with the most likely solution first. Troubleshooting Solution 3: Wipe the glass and the back of the document lid Solution: Turn off the product, unplug the power cord, and then use a soft cloth to wipe the glass and the back of the document lid. For more information, see: • "Clean the glass" on...
..., with the most likely solution first. Troubleshooting Solution 3: Wipe the glass and the back of the document lid Solution: Turn off the product, unplug the power cord, and then use a soft cloth to wipe the glass and the back of the document lid. For more information, see: • "Clean the glass" on...

Full User Guide
Page 145
...order, with the most likely solution first. Solutions are retained. Solution 2: Clean the glass and lid Solution: Turn off the product, unplug the power cord, and use a soft cloth to resolve the issue. NOTE: If you must re-insert the software disk and select OCR under the Custom installation... the glass or on your computer. Cause: The scan document settings were not set correctly. To install the OCR software, you are using HP Photosmart Essential, the Optical Character Recognition (OCR) software might be installed on the back of the document lid. If this did not solve the ...
...order, with the most likely solution first. Solutions are retained. Solution 2: Clean the glass and lid Solution: Turn off the product, unplug the power cord, and use a soft cloth to resolve the issue. NOTE: If you must re-insert the software disk and select OCR under the Custom installation... the glass or on your computer. Cause: The scan document settings were not set correctly. To install the OCR software, you are using HP Photosmart Essential, the Optical Character Recognition (OCR) software might be installed on the back of the document lid. If this did not solve the ...


