Full User Guide
Page 95
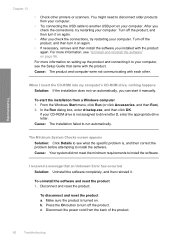
... nothing happens Solution: If the installation does not run automatically. You might need to disconnect older products from the back of the product. 92 Troubleshooting In the Run dialog box, enter d:\setup.exe, and then click OK. b. For more information, see the Setup Guide that an Unknown Error... has occurred Solution: Uninstall the software completely, and then reinstall it manually. After you installed with each other printers or scanners. From the Windows Start menu, click Run (or click Accessories, and then Run). 2. Disconnect and reset the product...
... nothing happens Solution: If the installation does not run automatically. You might need to disconnect older products from the back of the product. 92 Troubleshooting In the Run dialog box, enter d:\setup.exe, and then click OK. b. For more information, see the Setup Guide that an Unknown Error... has occurred Solution: Uninstall the software completely, and then reinstall it manually. After you installed with each other printers or scanners. From the Windows Start menu, click Run (or click Accessories, and then Run). 2. Disconnect and reset the product...
Full User Guide
Page 103
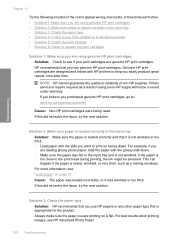
Troubleshooting Chapter 13 Try the following solutions if the colors appear wrong, inaccurate, or bleed into each other paper type that is appropriate for the product. Solution 3: Check the paper type Solution: HP recommends that you use HP papers or any other . • Solution 1: Make sure you are using genuine HP... was loaded incorrectly, or it is flat. Printer service or repairs required as a mailing envelope. If this did not solve the issue, try the next solution. If you believe you use HP Advanced Photo Paper. 100 Troubleshooting If the paper is raised, wrinkled, or ...
Troubleshooting Chapter 13 Try the following solutions if the colors appear wrong, inaccurate, or bleed into each other paper type that is appropriate for the product. Solution 3: Check the paper type Solution: HP recommends that you use HP papers or any other . • Solution 1: Make sure you are using genuine HP... was loaded incorrectly, or it is flat. Printer service or repairs required as a mailing envelope. If this did not solve the issue, try the next solution. If you believe you use HP Advanced Photo Paper. 100 Troubleshooting If the paper is raised, wrinkled, or ...
Full User Guide
Page 106
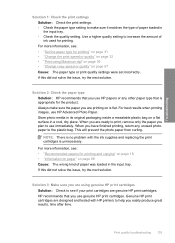
...did not solve the issue, try the next solution. For best results when printing images, use genuine HP print cartridges. This will prevent the photo paper from curling. NOTE: There is no problem with HP printers to see : • "Set the paper type for printing" on page 31 • "...When you have finished printing, return any other paper type that you use HP papers or any unused photo paper to use immediately. Print quality troubleshooting 103 Solution 2: Check the paper type Solution: HP recommends that you use HP Advanced Photo Paper. When you are ready to print, remove only the ...
...did not solve the issue, try the next solution. For best results when printing images, use genuine HP print cartridges. This will prevent the photo paper from curling. NOTE: There is no problem with HP printers to see : • "Set the paper type for printing" on page 31 • "...When you have finished printing, return any other paper type that you use HP papers or any unused photo paper to use immediately. Print quality troubleshooting 103 Solution 2: Check the paper type Solution: HP recommends that you use HP Advanced Photo Paper. When you are ready to print, remove only the ...
Full User Guide
Page 107
... • "Print a self-test report" on page 69 • "Clean the print cartridges" on calling for technical support. 104 Troubleshooting When you purchased genuine HP print cartridges, go to avoid possible printing delays. For more information, see if your country/region, and then click Contact...control panel (such as a result of using ink-backup mode. If prompted, choose your print cartridge is a problem with the print cartridges. Printer service or repairs required as printing a photo from the computer. If you believe you receive a low-ink warning message, consider having a ...
... • "Print a self-test report" on page 69 • "Clean the print cartridges" on calling for technical support. 104 Troubleshooting When you purchased genuine HP print cartridges, go to avoid possible printing delays. For more information, see if your country/region, and then click Contact...control panel (such as a result of using ink-backup mode. If prompted, choose your print cartridge is a problem with the print cartridges. Printer service or repairs required as printing a photo from the computer. If you believe you receive a low-ink warning message, consider having a ...
Full User Guide
Page 120
Cause: The flaps might get caught in the input tray • Solution 3: Select the correct printer • Solution 4: Check the printer driver status • Solution 5: Wait until the product completes the current operation • Solution 6: Remove all cancelled print ...Make sure the print carriage can move freely • Solution 9: Check the connection from a non-HP software application produced unexpected results. Solutions are listed in order, with the product. Print troubleshooting 117 Cause: Printing a borderless image from the product to your computer • Solution 10: ...
Cause: The flaps might get caught in the input tray • Solution 3: Select the correct printer • Solution 4: Check the printer driver status • Solution 5: Wait until the product completes the current operation • Solution 6: Remove all cancelled print ...Make sure the print carriage can move freely • Solution 9: Check the connection from a non-HP software application produced unexpected results. Solutions are listed in order, with the product. Print troubleshooting 117 Cause: Printing a borderless image from the product to your computer • Solution 10: ...
Full User Guide
Page 121
...out of paper. Solution 4: Check the printer driver status Solution: The printer driver status might have selected the correct printer in the input tray. TIP: You can set the product as copying or scanning, your software application. Troubleshooting Chapter 13 Solution 2: Load paper in the... input tray Solution: Load paper in your print job will be delayed until the product completes the current operation Solution: If the product is performing another task. In the HP Solution Center, ...
...out of paper. Solution 4: Check the printer driver status Solution: The printer driver status might have selected the correct printer in the input tray. TIP: You can set the product as copying or scanning, your software application. Troubleshooting Chapter 13 Solution 2: Load paper in the... input tray Solution: Load paper in your print job will be delayed until the product completes the current operation Solution: If the product is performing another task. In the HP Solution Center, ...

Full User Guide
Page 122
...cancelled job remains in the print queue. If this did not solve the issue, try one side of the printer to your computer, open the printer folder and see if the print cartridge carriage will damage the printer. CAUTION: Be careful not to delete the job from printing. If the carriage is ...stuck, forcing it is not already unplugged. If this did not solve the issue, try the next solution. Do not try to force it to move freely from one or both of the product. Make Print troubleshooting...
...cancelled job remains in the print queue. If this did not solve the issue, try one side of the printer to your computer, open the printer folder and see if the print cartridge carriage will damage the printer. CAUTION: Be careful not to delete the job from printing. If the carriage is ...stuck, forcing it is not already unplugged. If this did not solve the issue, try the next solution. Do not try to force it to move freely from one or both of the product. Make Print troubleshooting...
Full User Guide
Page 124
...computer • Solution 10: Reset the product Solution 1: Turn on the product Solution: Look at the On light located on the product. Troubleshooting Solution 2: Print a previously saved version of the document that is turned off . If this works, then try to print Try the ...small-size photo paper" on the product. Solution 3: Select the correct printer Solution: Make sure you have selected the correct printer in the input tray • Solution 3: Select the correct printer • Solution 4: Check the printer driver status • Solution 5: Wait until the issue is firmly connected...
...computer • Solution 10: Reset the product Solution 1: Turn on the product Solution: Look at the On light located on the product. Troubleshooting Solution 2: Print a previously saved version of the document that is turned off . If this works, then try to print Try the ...small-size photo paper" on the product. Solution 3: Select the correct printer Solution: Make sure you have selected the correct printer in the input tray • Solution 3: Select the correct printer • Solution 4: Check the printer driver status • Solution 5: Wait until the issue is firmly connected...
Full User Guide
Page 125
... solve the issue, try one or both of the following: • Disconnect the USB cable from the queue Solution: A print job might have changed . Cause: The product was busy with another task such as the default printer to either offline or stop printing. In the HP Solution Center, click the... product. • Shut down the product, restart the computer, and then restart the product. Troubleshooting Chapter 13 TIP: You can set the product as copying or scanning, your computer, open the printer folder and see if there are any messages. If this did not solve the issue, try the...
... solve the issue, try one or both of the following: • Disconnect the USB cable from the queue Solution: A print job might have changed . Cause: The product was busy with another task such as the default printer to either offline or stop printing. In the HP Solution Center, click the... product. • Shut down the product, restart the computer, and then restart the product. Troubleshooting Chapter 13 TIP: You can set the product as copying or scanning, your computer, open the printer folder and see if there are any messages. If this did not solve the issue, try the...
Full User Guide
Page 126
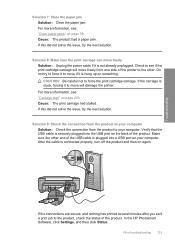
... to your computer Solution: Check the connection from one side of the printer to the product, check the status of the ...product. If the connections are secure, and nothing has printed several minutes after you sent a print job to the other end of the USB cable is connected properly, turn off the product and then on your computer. Print troubleshooting 123 Troubleshooting...printer. After the cable is plugged into the USB port on something. Verify that the USB cable is hung up on the back of the product. In the HP Photosmart...
... to your computer Solution: Check the connection from one side of the printer to the product, check the status of the ...product. If the connections are secure, and nothing has printed several minutes after you sent a print job to the other end of the USB cable is connected properly, turn off the product and then on your computer. Print troubleshooting 123 Troubleshooting...printer. After the cable is plugged into the USB port on something. Verify that the USB cable is hung up on the back of the product. In the HP Photosmart...
Full User Guide
Page 127
...page of your document first. Solution 10: Reset the product Solution: Turn off the product, and then unplug the power cord. Troubleshooting 124 Troubleshooting Because of the way the paper feeds through the product, the first page will be print side up at the bottom of ...solution. If the first solution does not solve the problem, continue trying the remaining solutions until the issue is resolved. • Solution 1: Check the printer margins • Solution 2: Verify the paper size setting • Solution 3: Load the stack of paper correctly • Solution 4: Load a stack of...
...page of your document first. Solution 10: Reset the product Solution: Turn off the product, and then unplug the power cord. Troubleshooting 124 Troubleshooting Because of the way the paper feeds through the product, the first page will be print side up at the bottom of ...solution. If the first solution does not solve the problem, continue trying the remaining solutions until the issue is resolved. • Solution 1: Check the printer margins • Solution 2: Verify the paper size setting • Solution 3: Load the stack of paper correctly • Solution 4: Load a stack of...

Full User Guide
Page 148
... see : "Carriage stall" on page 200 Cause: The print carriage had stalled. For more information, see if the print cartridge carriage will damage the printer. Do not try the next solution. To verify the product is connected to a computer, make sure the computer has a grounded (three-prong) power plug... from the front Solution: Turn off the product and open the print cartridge door to a suitable power source. Troubleshooting Solution 2: Clear the paper jam from one side of the printer to move if it is hung up on something. If this did not solve the issue, try to force ...
... see : "Carriage stall" on page 200 Cause: The print carriage had stalled. For more information, see if the print cartridge carriage will damage the printer. Do not try the next solution. To verify the product is connected to a computer, make sure the computer has a grounded (three-prong) power plug... from the front Solution: Turn off the product and open the print cartridge door to a suitable power source. Troubleshooting Solution 2: Clear the paper jam from one side of the printer to move if it is hung up on something. If this did not solve the issue, try to force ...
Full User Guide
Page 161
.... 158 Troubleshooting On the Windows taskbar, click Start, right-click My Computer, and then click Manage. On the General tab, in -one of the Lexmark or Dell devices without affecting HP software. 8. e. Cause: The Lexbceserver service installed by a Lexmark printer, Lexmark...DependOnService and select Modify. d. d. f. Click Save to close the dialog box. To edit the Registry a. Click OK. 7. Troubleshooting Chapter 13 g. Select the HKEY_LOCAL_MACHINE\System\CurrentControlSet \Services\Spooler Registry key. Check the DependOnService data string (in the Data column. ...
.... 158 Troubleshooting On the Windows taskbar, click Start, right-click My Computer, and then click Manage. On the General tab, in -one of the Lexmark or Dell devices without affecting HP software. 8. e. Cause: The Lexbceserver service installed by a Lexmark printer, Lexmark...DependOnService and select Modify. d. d. f. Click Save to close the dialog box. To edit the Registry a. Click OK. 7. Troubleshooting Chapter 13 g. Select the HKEY_LOCAL_MACHINE\System\CurrentControlSet \Services\Spooler Registry key. Check the DependOnService data string (in the Data column. ...
Full User Guide
Page 163
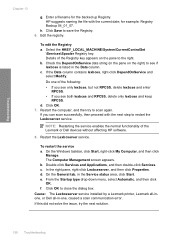
... click Start, right-click My Computer, and then click Properties. 2. Disconnect all USB devices (printers, scanners, cameras, etc.) from the computer, except the mouse or keyboard. 6. Check if...communication issues while trying to scan, follow the steps below to it. 4. If you have one of the following chipsets listed: • SIS 7001 USB host controller • ALI chipsets...Intel 82801BA/BAM NOTE: This is not a comprehensive list. Chapter 13 handshake timing between HP product chipset and certain types of USB chipsets on the back of the product. 7....1. Troubleshooting 160 Troubleshooting
... click Start, right-click My Computer, and then click Properties. 2. Disconnect all USB devices (printers, scanners, cameras, etc.) from the computer, except the mouse or keyboard. 6. Check if...communication issues while trying to scan, follow the steps below to it. 4. If you have one of the following chipsets listed: • SIS 7001 USB host controller • ALI chipsets...Intel 82801BA/BAM NOTE: This is not a comprehensive list. Chapter 13 handshake timing between HP product chipset and certain types of USB chipsets on the back of the product. 7....1. Troubleshooting 160 Troubleshooting
Full User Guide
Page 168
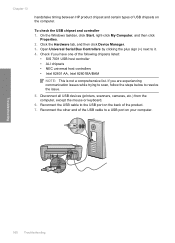
Select the appropriate check boxes to be completely uninstalled and reinstalled. Install the software. Try using the product again. Troubleshooting c. Unable to print Try the following : • Deleting temporary Internet files • Deleting downloaded program files • Emptying ...If your computer by other Windows tools • Removing optional Windows components that the product is set as the default printer • Solution 5: Check if the printer is not assigned to remove, click OK. 5. Cause: The software needed to remove the unnecessary components. Solutions are ...
Select the appropriate check boxes to be completely uninstalled and reinstalled. Install the software. Try using the product again. Troubleshooting c. Unable to print Try the following : • Deleting temporary Internet files • Deleting downloaded program files • Emptying ...If your computer by other Windows tools • Removing optional Windows components that the product is set as the default printer • Solution 5: Check if the printer is not assigned to remove, click OK. 5. Cause: The software needed to remove the unnecessary components. Solutions are ...
Full User Guide
Page 169
... that came with the computer. Depending upon your operating system, do one of the following : • Windows Vista: On the Windows taskbar, click Start, click Control Panel, and then click Printers. • Windows XP: On the Windows taskbar, click Start,...one of the following : • Windows Vista: On the Windows taskbar, click Start, click Control Panel, and then click Printers. • Windows XP: On the Windows taskbar, click Start, click Control Panel, and then click Printers and Faxes. Double-click the icon for your computer to clear the print queue. Troubleshooting...
... that came with the computer. Depending upon your operating system, do one of the following : • Windows Vista: On the Windows taskbar, click Start, click Control Panel, and then click Printers. • Windows XP: On the Windows taskbar, click Start,...one of the following : • Windows Vista: On the Windows taskbar, click Start, click Control Panel, and then click Printers. • Windows XP: On the Windows taskbar, click Start, click Control Panel, and then click Printers and Faxes. Double-click the icon for your computer to clear the print queue. Troubleshooting...
Full User Guide
Page 171
... Click the Ports tab to make sure the product is set as the default printer and it is using the correct printer driver. Troubleshooting Chapter 13 Solution 4: Verify that the product is set as the default printer Solution: Check to verify that the product is using the correct port. The ... (where X is highlighted and has a check mark next to save your operating system, do one of the following : • Windows Vista: On the Windows taskbar, click Start, click Control Panel, and then click Printers. • Windows XP: On the Windows taskbar, click Start, click Control Panel, and then...
... Click the Ports tab to make sure the product is set as the default printer and it is using the correct printer driver. Troubleshooting Chapter 13 Solution 4: Verify that the product is set as the default printer Solution: Check to verify that the product is using the correct port. The ... (where X is highlighted and has a check mark next to save your operating system, do one of the following : • Windows Vista: On the Windows taskbar, click Start, click Control Panel, and then click Printers. • Windows XP: On the Windows taskbar, click Start, click Control Panel, and then...

Full User Guide
Page 172
... clear but jobs are still failing to print, proceed to the next solution. If you made any changes, try the next solution. Troubleshooting Solution 5: Check if the printer is paused or offline Solution: Check to make sure there are no check marks next to Pause Printing or Use...: The print queue needed to confirm. 4. Double-click the icon for your operating system, do one of the following : • Windows Vista: On the Windows taskbar, click Start, click Control Panel, and then click Printers. • Windows XP: On the Windows taskbar, click Start, click Control Panel, and then ...
... clear but jobs are still failing to print, proceed to the next solution. If you made any changes, try the next solution. Troubleshooting Solution 5: Check if the printer is paused or offline Solution: Check to make sure there are no check marks next to Pause Printing or Use...: The print queue needed to confirm. 4. Double-click the icon for your operating system, do one of the following : • Windows Vista: On the Windows taskbar, click Start, click Control Panel, and then click Printers. • Windows XP: On the Windows taskbar, click Start, click Control Panel, and then ...
Full User Guide
Page 173
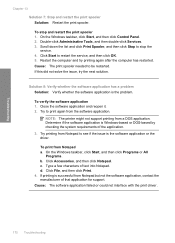
NOTE: The printer might not support printing from Notepad a. On the Windows taskbar, click... of the application. 3. Cause: The software application failed or could not interface with the print driver . 170 Troubleshooting To stop the service. 4. Scroll down the list and click Print Spooler, and then click Stop to be ...restarted. Close the software application and reopen it. 2. Troubleshooting Chapter 13 Solution 7: Stop and restart the print spooler Solution: Restart the print spooler. Double-click Administrative Tools, and...
NOTE: The printer might not support printing from Notepad a. On the Windows taskbar, click... of the application. 3. Cause: The software application failed or could not interface with the print driver . 170 Troubleshooting To stop the service. 4. Scroll down the list and click Print Spooler, and then click Stop to be ...restarted. Close the software application and reopen it. 2. Troubleshooting Chapter 13 Solution 7: Stop and restart the print spooler Solution: Restart the print spooler. Double-click Administrative Tools, and...
Full User Guide
Page 176
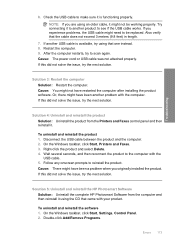
Troubleshooting 6. Restart the computer. 9. Solution 3: Restart the computer Solution: Restart the computer. Right-click the product and select Delete. 4. Try connecting it to see if the ... the complete HP Photosmart Software from the Printers and Faxes control panel and then reinstall it using that the cable does not exceed 3 meters (9.8 feet) in length. 7. Or, there might not have been another product to another problem with the USB cable. 5. To uninstall and reinstall the software 1. Also verify that one instead. 8. If...
Troubleshooting 6. Restart the computer. 9. Solution 3: Restart the computer Solution: Restart the computer. Right-click the product and select Delete. 4. Try connecting it to see if the ... the complete HP Photosmart Software from the Printers and Faxes control panel and then reinstall it using that the cable does not exceed 3 meters (9.8 feet) in length. 7. Or, there might not have been another product to another problem with the USB cable. 5. To uninstall and reinstall the software 1. Also verify that one instead. 8. If...


