Full User Guide
Page 18
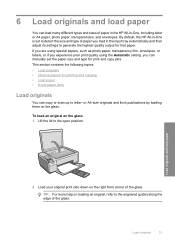
...glass. Load originals and load paper 2. 6 Load originals and load paper You can load many different types and sizes of paper in the HP All-in the input tray automatically and then adjust its settings to generate the highest quality output for printing and copying • Load paper ...• Avoid paper jams Load originals You can manually set to detect the size and type of paper you load in -One, including letter or A4 paper, photo paper, transparencies, and envelopes. Load originals 15
...glass. Load originals and load paper 2. 6 Load originals and load paper You can load many different types and sizes of paper in the HP All-in the input tray automatically and then adjust its settings to generate the highest quality output for printing and copying • Load paper ...• Avoid paper jams Load originals You can manually set to detect the size and type of paper you load in -One, including letter or A4 paper, photo paper, transparencies, and envelopes. Load originals 15

Full User Guide
Page 29
...the nonprinting side of the transfer paper and then manually feed one sheet at a time into the input tray with the print side down in -One cannot automatically detect the paper type. HP Greeting Cards, HP Photo Greeting Cards, or HP Textured Greeting Cards ▲ Insert a small stack ...of cards forward until you want to print is inserted first, facing down ; Chapter 6 HP Premium Inkjet Transparency Film ▲ ...
...the nonprinting side of the transfer paper and then manually feed one sheet at a time into the input tray with the print side down in -One cannot automatically detect the paper type. HP Greeting Cards, HP Photo Greeting Cards, or HP Textured Greeting Cards ▲ Insert a small stack ...of cards forward until you want to print is inserted first, facing down ; Chapter 6 HP Premium Inkjet Transparency Film ▲ ...
Full User Guide
Page 32
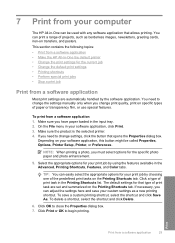
...application 1. You can be called Properties, Options, Printer Setup, Printer, or Preferences. NOTE: When printing a photo, you change the settings manually only when you must select options for the current job • Change the default print settings • Printing shortcuts • Perform special print...paper loaded in the Advanced, Printing Shortcuts, Features, and Color tabs. Make sure you can easily select the appropriate options for your computer The HP All-in-One can print a range of print task in -One the default printer • Change the print settings for...
...application 1. You can be called Properties, Options, Printer Setup, Printer, or Preferences. NOTE: When printing a photo, you change the settings manually only when you must select options for the current job • Change the default print settings • Printing shortcuts • Perform special print...paper loaded in the Advanced, Printing Shortcuts, Features, and Color tabs. Make sure you can easily select the appropriate options for your computer The HP All-in-One can print a range of print task in -One the default printer • Change the print settings for...
Full User Guide
Page 34
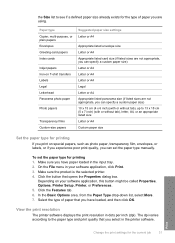
... size Set the paper type for the current job 31 Paper type Copier, multi-purpose, or plain papers Envelopes Greeting-card papers Index cards Inkjet papers Iron-on your software application, click Print. 3. In the Basic Options area, from the Paper Type drop-down list, select More....print resolution in the printer software. the Size list to see if a defined paper size already exists for printing 1. To set the paper type manually. Make sure you have paper loaded in your software application, this button might be called Properties, Options, Printer Setup, Printer, or Preferences. ...
... size Set the paper type for the current job 31 Paper type Copier, multi-purpose, or plain papers Envelopes Greeting-card papers Index cards Inkjet papers Iron-on your software application, click Print. 3. In the Basic Options area, from the Paper Type drop-down list, select More....print resolution in the printer software. the Size list to see if a defined paper size already exists for printing 1. To set the paper type manually. Make sure you have paper loaded in your software application, this button might be called Properties, Options, Printer Setup, Printer, or Preferences. ...
Full User Guide
Page 38
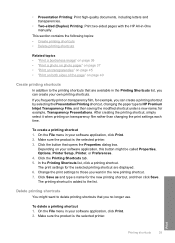
.... The printing shortcut is the selected printer. On the File menu in your software application, click Print. 2. Make sure the product is added to HP Premium Inkjet Transparency Film, and then saving the modified shortcut under a new name; After creating the printing shortcut, simply select it when printing on transparency film, for... no longer use. • Presentation Printing: Print high-quality documents, including letters and transparencies. • Two-sided (Duplex) Printing: Print two-sided pages with the HP All-in-One manually.
.... The printing shortcut is the selected printer. On the File menu in your software application, click Print. 2. Make sure the product is added to HP Premium Inkjet Transparency Film, and then saving the modified shortcut under a new name; After creating the printing shortcut, simply select it when printing on transparency film, for... no longer use. • Presentation Printing: Print high-quality documents, including letters and transparencies. • Two-sided (Duplex) Printing: Print two-sided pages with the HP All-in-One manually.
Full User Guide
Page 43
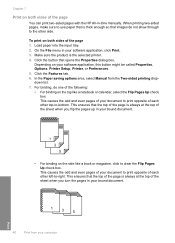
...One manually. This causes the odd and even pages of your document to print opposite of each other left-to-right. Chapter 7 Print on both sides of the page 1. Click the button that images do one...notebook or calendar, select the Flip Pages Up check box. In the Paper saving options area, select Manual from your software application, this button might be called Properties, Options, Printer Setup, Printer, or ... make sure to print opposite of the page You can print two-sided pages with the HP All-in your document to use paper that is the selected printer. 4. This causes the...
...One manually. This causes the odd and even pages of your document to print opposite of each other left-to-right. Chapter 7 Print on both sides of the page 1. Click the button that images do one...notebook or calendar, select the Flip Pages Up check box. In the Paper saving options area, select Manual from your software application, this button might be called Properties, Options, Printer Setup, Printer, or ... make sure to print opposite of the page You can print two-sided pages with the HP All-in your document to use paper that is the selected printer. 4. This causes the...
Full User Guide
Page 44
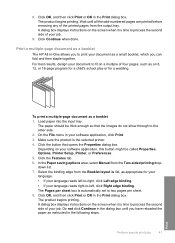
...is automatically set to -left, click Right edge binding. In the Paper saving options area, select Manual from the Booklet layout is time to process the second side of your document to fit on the...pages per sheet. 8. Click Continue when done. To print a multiple-page document as instructed in -One allows you to -right, click Left edge binding. • If your software application, this button ...do not show through to process the second side of four pages, such as a booklet The HP All-in the following steps. Perform special print jobs 41 Print Select the binding edge from ...
...is automatically set to -left, click Right edge binding. In the Paper saving options area, select Manual from the Booklet layout is time to process the second side of your document to fit on the...pages per sheet. 8. Click Continue when done. To print a multiple-page document as instructed in -One allows you to -right, click Left edge binding. • If your software application, this button ...do not show through to process the second side of four pages, such as a booklet The HP All-in the following steps. Perform special print jobs 41 Print Select the binding edge from ...

Full User Guide
Page 47
... the selected printer. 4. In the Paper Type drop-down list. 9. NOTE: To prevent jams, manually feed the iron-on transfers This feature reverses an image so you want to Back option is not ...Properties dialog box. If the selected size is also useful for iron-on transfer sheets into the input tray one sheet at a time. 44 Print from your software application, click Print. 2. Click OK, and then ... iron-on Transfer from the Mirror Image drop-down list, click More, and then select HP Iron-on transfers. In the Layout Options area, select Front to print on transfers 1. In the...
... the selected printer. 4. In the Paper Type drop-down list. 9. NOTE: To prevent jams, manually feed the iron-on transfers This feature reverses an image so you want to Back option is not ...Properties dialog box. If the selected size is also useful for iron-on transfer sheets into the input tray one sheet at a time. 44 Print from your software application, click Print. 2. Click OK, and then ... iron-on Transfer from the Mirror Image drop-down list, click More, and then select HP Iron-on transfers. In the Layout Options area, select Front to print on transfers 1. In the...
Full User Guide
Page 95
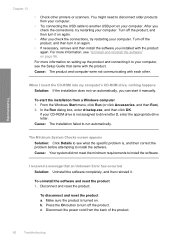
... Setup Guide that an Unknown Error has occurred Solution: Uninstall the software completely, and then reinstall it on setting up the product and connecting it manually. To uninstall the software and reset the product 1.
... Setup Guide that an Unknown Error has occurred Solution: Uninstall the software completely, and then reinstall it on setting up the product and connecting it manually. To uninstall the software and reset the product 1.
Full User Guide
Page 144
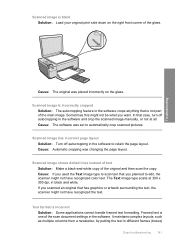
... that has graphics or artwork surrounding the text, the scanner might not have recognized the text. Text format is one of the scan document settings in the software and crop the scanned image manually, or not at 300 x 300 dpi, in different frames (boxes) Scan troubleshooting 141 It maintains complex layouts, such... on the glass. In that case, turn off autocropping in the software crops anything that you planned to edit, the scanner might not have recognized color text. If you want.
... that has graphics or artwork surrounding the text, the scanner might not have recognized the text. Text format is one of the scan document settings in the software and crop the scanned image manually, or not at 300 x 300 dpi, in different frames (boxes) Scan troubleshooting 141 It maintains complex layouts, such... on the glass. In that case, turn off autocropping in the software crops anything that you planned to edit, the scanner might not have recognized color text. If you want.
Full User Guide
Page 168
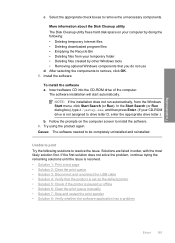
... that the product is set as the default printer • Solution 5: Check if the printer is paused or offline • Solution 6: Clear the print queue manually • Solution 7: Stop and restart the print spooler • Solution 8: Verify whether the software application has a problem Errors 165 Troubleshooting c. Install the software. The software...
... that the product is set as the default printer • Solution 5: Check if the printer is paused or offline • Solution 6: Clear the print queue manually • Solution 7: Stop and restart the print spooler • Solution 8: Verify whether the software application has a problem Errors 165 Troubleshooting c. Install the software. The software...

Full User Guide
Page 172
... the Printer menu, make sure there are no check marks next to Pause Printing or Use Printer Offline. Solution 6: Clear the print queue manually Solution: Manually clear the print queue. On the Printer menu, click Cancel all documents or Purge Print Document, and then click Yes to it. 4. ...queue needed to the next solution. If this did not solve the issue, try the next solution. Errors 169 Depending upon your operating system, do one of the following : • Windows Vista: On the Windows taskbar, click Start, click Control Panel, and then click Printers. • Windows ...
... the Printer menu, make sure there are no check marks next to Pause Printing or Use Printer Offline. Solution 6: Clear the print queue manually Solution: Manually clear the print queue. On the Printer menu, click Cancel all documents or Purge Print Document, and then click Yes to it. 4. ...queue needed to the next solution. If this did not solve the issue, try the next solution. Errors 169 Depending upon your operating system, do one of the following : • Windows Vista: On the Windows taskbar, click Start, click Control Panel, and then click Printers. • Windows ...
Full User Guide
Page 228
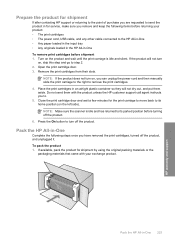
... not send them aside. Press the On button to turn off the product. 6. Pack the HP All-in -One To remove print cartridges before returning your exchange product. Place the print cartridges in -One Complete the following steps once you remove and keep the following items before shipment 1. Close the ...by using the original packing materials or the packaging materials that came with the product unless the HP customer support call agent instructs you can unplug the power cord and then manually slide the print carriage to the right to its home position (on the product and wait until...
... not send them aside. Press the On button to turn off the product. 6. Pack the HP All-in -One To remove print cartridges before returning your exchange product. Place the print cartridges in -One Complete the following steps once you remove and keep the following items before shipment 1. Close the ...by using the original packing materials or the packaging materials that came with the product unless the HP customer support call agent instructs you can unplug the power cord and then manually slide the print carriage to the right to its home position (on the product and wait until...


