

Basics Guide
Page 7
... have problems during setup, see Troubleshooting in the last section of the Setup Guide, or see "Troubleshooting and support" on page 37 in this guide. • Onscreen Help The onscreen Help provides detailed instructions on features of the HP All-in-One that are not described in this Basics Guide, including features that are only available using the software you installed with the HP All-in-One. • www.hp.com/support...
... have problems during setup, see Troubleshooting in the last section of the Setup Guide, or see "Troubleshooting and support" on page 37 in this guide. • Onscreen Help The onscreen Help provides detailed instructions on features of the HP All-in-One that are not described in this Basics Guide, including features that are only available using the software you installed with the HP All-in-One. • www.hp.com/support...

Basics Guide
Page 26
... service, use the default ring pattern, which setting to choose for your specific case in the printed documentation. Press the button next to OK. Press the button next to the appropriate setting and then press the button next to Scan/Fax. 2. Press the button next to Fax Menu. 4. Change settings on which setting to choose, refer to change the distinctive ring pattern from the control panel 1. To set up . Press the button next to Fax Setup...
... service, use the default ring pattern, which setting to choose for your specific case in the printed documentation. Press the button next to OK. Press the button next to the appropriate setting and then press the button next to Scan/Fax. 2. Press the button next to Fax Menu. 4. Change settings on which setting to choose, refer to change the distinctive ring pattern from the control panel 1. To set up . Press the button next to Fax Setup...

Basics Guide
Page 32
... there is dialing. Make a copy You can also crop, straighten, rotate, or resize the image. 4. NOTE: If the fax number you are no answer, the product automatically redials the number several times. Load paper in -One features or multiple-page black-and-white or color fax using the monitor dialing feature from the control panel. They are also useful when you need to respond to lose some of your dialing. The Scan/Fax menu appears. 3. You...
... there is dialing. Make a copy You can also crop, straighten, rotate, or resize the image. 4. NOTE: If the fax number you are no answer, the product automatically redials the number several times. Load paper in -One features or multiple-page black-and-white or color fax using the monitor dialing feature from the control panel. They are also useful when you need to respond to lose some of your dialing. The Scan/Fax menu appears. 3. You...
Basics Guide
Page 34
... letter or A4 unused plain white paper loaded in the input tray. 2. Press the button next to receive the fax, you open the print cartridge door to the far right side of the shopping links on the line. After the product begins to Scan/Fax. 5. The phone line is turned off when you can also check the ink levels by using the software installed with the sender, instruct the sender to answer the...
... letter or A4 unused plain white paper loaded in the input tray. 2. Press the button next to receive the fax, you open the print cartridge door to the far right side of the shopping links on the line. After the product begins to Scan/Fax. 5. The phone line is turned off when you can also check the ink levels by using the software installed with the sender, instruct the sender to answer the...

Basics Guide
Page 39
... delete the HP All-in -One to remove them properly using a USB cable before prompted by the software installation screen. Make sure to your computer's CD-ROM drive and then start the Setup program. Follow the onscreen instructions. 4. Do not connect the product to prevent TSR programs and services from your computer. 5. Insert the product CD-ROM into your computer before restarting your computer. These programs activate some operational topics. In Windows...
... delete the HP All-in -One to remove them properly using a USB cable before prompted by the software installation screen. Make sure to your computer's CD-ROM drive and then start the Setup program. Follow the onscreen instructions. 4. Do not connect the product to prevent TSR programs and services from your computer. 5. Insert the product CD-ROM into your computer before restarting your computer. These programs activate some operational topics. In Windows...

Basics Guide
Page 50
... the printed documentation that the Distinctive Ring setting on the product is selected as the Distinctive Ring setting. If this did not match. Solution 7: If you use a distintive ring service, make sure the Distinctive Ring setting matches the ring pattern for your phone company to All Rings (and you are having problems with a ring pattern of this type, ask your fax number Solution...
... the printed documentation that the Distinctive Ring setting on the product is selected as the Distinctive Ring setting. If this did not match. Solution 7: If you use a distintive ring service, make sure the Distinctive Ring setting matches the ring pattern for your phone company to All Rings (and you are having problems with a ring pattern of this type, ask your fax number Solution...

User Guide
Page 14
... of the HP All-in -One and installing software. Find more information Find more information You can get help and support from the HP Web site. Onscreen Help The onscreen Help provides detailed instructions on page 109 in other publications. If you might not be found in this onscreen Help. You will learn how to load paper, insert a memory card, replace the print cartridges, and scan originals. Readme The Readme file contains...
... of the HP All-in -One and installing software. Find more information Find more information You can get help and support from the HP Web site. Onscreen Help The onscreen Help provides detailed instructions on page 109 in other publications. If you might not be found in this onscreen Help. You will learn how to load paper, insert a memory card, replace the print cartridges, and scan originals. Readme The Readme file contains...

User Guide
Page 19
... • Change settings on the HP All-in-One to receive faxes 16 Finish setting up and configuring the HP All-in-One for later use the instructions in this section to complete your Setup Guide for faxing with other equipment and services you might already have on the same phone line as the HP All-in-One. For fax setup information in specific countries/regions, you can also see the Windows onscreen Help. Fax setup After...
... • Change settings on the HP All-in-One to receive faxes 16 Finish setting up and configuring the HP All-in-One for later use the instructions in this section to complete your Setup Guide for faxing with other equipment and services you might already have on the same phone line as the HP All-in-One. For fax setup information in specific countries/regions, you can also see the Windows onscreen Help. Fax setup After...

User Guide
Page 21
... ringing • Set up the HP All-in-One to check the paper type before printing faxes • Set up backup fax reception Set tone or pulse dialing You can set the dial mode for the HP All-in-One to either type of the following topics: • Set tone or pulse dialing • Set the fax speed • Choose the recommended answer setting for a specific fax option, refer to the detailed fax setup instructions provided in the printed documentation. If you...
... ringing • Set up the HP All-in-One to check the paper type before printing faxes • Set up backup fax reception Set tone or pulse dialing You can set the dial mode for the HP All-in-One to either type of the following topics: • Set tone or pulse dialing • Set the fax speed • Choose the recommended answer setting for a specific fax option, refer to the detailed fax setup instructions provided in the printed documentation. If you...

User Guide
Page 25
... highlight Clear Fax Log, and then press the button next to send faxes You can also delete any faxes stored in memory by turning off the product. Press the button next to Fax Menu. 3. Change settings on the HP All-in-One to OK. The Fax Log is not deleted when the HP All-in-One is memory available or until 30 faxes have been received. (If the memory becomes full, the HP Allin-One will...
... highlight Clear Fax Log, and then press the button next to send faxes You can also delete any faxes stored in memory by turning off the product. Press the button next to Fax Menu. 3. Change settings on the HP All-in-One to OK. The Fax Log is not deleted when the HP All-in-One is memory available or until 30 faxes have been received. (If the memory becomes full, the HP Allin-One will...

User Guide
Page 45
...-One the default printer You can set the paper size 1. This means that opens the Properties dialog box. On the File menu in the toolbar of the paper. Depending on the page. Make sure you have a borderless equivalent, which allows you click the Print button in your software application, this button might be called Properties, Options, Printer Setup, Printer, or Preferences. 5. The default printer is the selected printer. 4. Some of the paper size choices have paper loaded...
...-One the default printer You can set the paper size 1. This means that opens the Properties dialog box. On the File menu in the toolbar of the paper. Depending on the page. Make sure you have a borderless equivalent, which allows you click the Print button in your software application, this button might be called Properties, Options, Printer Setup, Printer, or Preferences. 5. The default printer is the selected printer. 4. Some of the paper size choices have paper loaded...

User Guide
Page 87
... "Set the fax speed" on page 18 Stop faxing You can only send and receive faxes by connecting a phone cord to the 1LINE port on the control panel to make sure their Internet phone service supports faxing. If the product does not stop a fax you experience problems sending and receiving faxes, use a FoIP service (provided by using IP phone You might subscribe to a low-cost phone service that connects to send and receive faxes with the HP All-in -One. Chapter 11 5. To cancel a number you are dialing ▲ Press Cancel to cancel a number...
... "Set the fax speed" on page 18 Stop faxing You can only send and receive faxes by connecting a phone cord to the 1LINE port on the control panel to make sure their Internet phone service supports faxing. If the product does not stop a fax you experience problems sending and receiving faxes, use a FoIP service (provided by using IP phone You might subscribe to a low-cost phone service that connects to send and receive faxes with the HP All-in -One. Chapter 11 5. To cancel a number you are dialing ▲ Press Cancel to cancel a number...

User Guide
Page 96
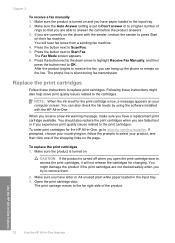
... to Print Settings, and then click Printer Toolbox. Replace the print cartridges Follow these instructions when the ink level is turned on. To replace the print cartridges 1. NOTE: You can also check the ink levels by using the software installed with a tri-color cartridge. In the Print Properties dialog box, click the Features tab, and then click the Printer Services button. In addition, some portions of cartridges for the print cartridge is low, a message appears on the page. Make sure...
... to Print Settings, and then click Printer Toolbox. Replace the print cartridges Follow these instructions when the ink level is turned on. To replace the print cartridges 1. NOTE: You can also check the ink levels by using the software installed with a tri-color cartridge. In the Print Properties dialog box, click the Features tab, and then click the Printer Services button. In addition, some portions of cartridges for the print cartridge is low, a message appears on the page. Make sure...

User Guide
Page 190
... Solution: If Backup Fax Reception is enabled and there is paper loaded in memory by turning off the product, remove any problems found. Cause: The memory of faxes that are using a splitter or extension cables, try removing them back one or more information. • There is an error condition on the error condition. If an error condition exists that is closed. If not, close the print cartridge door, as...
... Solution: If Backup Fax Reception is enabled and there is paper loaded in memory by turning off the product, remove any problems found. Cause: The memory of faxes that are using a splitter or extension cables, try removing them back one or more information. • There is an error condition on the error condition. If an error condition exists that is closed. If not, close the print cartridge door, as...

User Guide
Page 192
... printed documentation for faxing. If not, close the print cartridge door, as shown below: NOTE: If the product has an alignment message, you resolve any problems found, the product can begin answering incoming fax calls. Cause: An error condition was preventing the product from printing faxes, review the display for your fax number • Solution 4: If you do not use a distintive ring service, make sure the Distinctive Ring setting...
... printed documentation for faxing. If not, close the print cartridge door, as shown below: NOTE: If the product has an alignment message, you resolve any problems found, the product can begin answering incoming fax calls. Cause: An error condition was preventing the product from printing faxes, review the display for your fax number • Solution 4: If you do not use a distintive ring service, make sure the Distinctive Ring setting...

User Guide
Page 206
... using the 2-wire phone cord adapter, see the printed documentation that came with the product. • The product is turned on setting up the product, see the Setup Guide that came with the product. What to check • The product is set up properly, connected to a power supply, and is connected to your computer. If there is an error message, resolve the problem and run the fax test...
... using the 2-wire phone cord adapter, see the printed documentation that came with the product. • The product is turned on setting up the product, see the Setup Guide that came with the product. What to check • The product is set up properly, connected to a power supply, and is connected to your computer. If there is an error message, resolve the problem and run the fax test...

User Guide
Page 255
... present. Missing HP Photosmart Software Try the following additional applications from the product to function properly. If prompted, choose your computer Troubleshooting 252 Troubleshooting CAUTION: If the computer is resolved. • Solution 1: Install the HP Photosmart Software • Solution 2: Turn on the product • Solution 3: Turn on the computer • Solution 4: Check the connection from the Add/Remove Programs list, if they are listed in the Setup Guide that came with...
... present. Missing HP Photosmart Software Try the following additional applications from the product to function properly. If prompted, choose your computer Troubleshooting 252 Troubleshooting CAUTION: If the computer is resolved. • Solution 1: Install the HP Photosmart Software • Solution 2: Turn on the product • Solution 3: Turn on the computer • Solution 4: Check the connection from the Add/Remove Programs list, if they are listed in the Setup Guide that came with...

User Guide
Page 301
... printed pages per month Copy specifications • Digital image processing • Up to 9 copies from original (depends on model) • Copy speeds vary according to locate, access, and 298 Technical information HP recommends emptying the output tray frequently. * NOTE: For a complete list of the document and model • Maximum copy enlargement ranging from 200-400% (depends on model) • Maximum copy reduction ranging from the HP Web site. Fasteners and other connections are using...
... printed pages per month Copy specifications • Digital image processing • Up to 9 copies from original (depends on model) • Copy speeds vary according to locate, access, and 298 Technical information HP recommends emptying the output tray frequently. * NOTE: For a complete list of the document and model • Maximum copy enlargement ranging from 200-400% (depends on model) • Maximum copy reduction ranging from the HP Web site. Fasteners and other connections are using...

User Guide
Page 315
... regulatory model identification number 301 reinstall software 118 removing ink from skin and clothing 98 replace print cartridges 93 reports caller ID 86 confirmation, fax 85 error, fax 85 fax log 86 junk fax numbers 86 last fax transaction 86 log, fax 86 print cartridges 99 self-test 90 speed dial list 86 resolution print 44 resolution, fax 23 S saturation, change in print 45 save faxes in memory 21 photos to computer 65 scan blank 163 cancel 77 crop incorrect 163 documents 75 edit image 76 fails 162...
... regulatory model identification number 301 reinstall software 118 removing ink from skin and clothing 98 replace print cartridges 93 reports caller ID 86 confirmation, fax 85 error, fax 85 fax log 86 junk fax numbers 86 last fax transaction 86 log, fax 86 print cartridges 99 self-test 90 speed dial list 86 resolution print 44 resolution, fax 23 S saturation, change in print 45 save faxes in memory 21 photos to computer 65 scan blank 163 cancel 77 crop incorrect 163 documents 75 edit image 76 fails 162...

User Guide
Page 316
... Readme file 109 setup 109 USB cable 112 troubleshooting copy 156 error messages 211 memory card 151 print 138 scan 161 two-sided prints 52, 53 U uninstall software 118 USB cable communication lost 267 USB cable installation 112 V voice mail, set up with fax 19, 195 volume, adjust 17 W wall jack test, fax 204 warranty 291, 293 Web pages, print 58 313 Index Index software installation reinstall 118 uninstall 118 sound, adjust volume 17 speed copy 69 print 44 speed dial print list 86 send fax 79 start black 7 start color 7 stop copy 73 fax 84 print job 59 scan...
... Readme file 109 setup 109 USB cable 112 troubleshooting copy 156 error messages 211 memory card 151 print 138 scan 161 two-sided prints 52, 53 U uninstall software 118 USB cable communication lost 267 USB cable installation 112 V voice mail, set up with fax 19, 195 volume, adjust 17 W wall jack test, fax 204 warranty 291, 293 Web pages, print 58 313 Index Index software installation reinstall 118 uninstall 118 sound, adjust volume 17 speed copy 69 print 44 speed dial print list 86 send fax 79 start black 7 start color 7 stop copy 73 fax 84 print job 59 scan...


