Full User Guide
Page 20
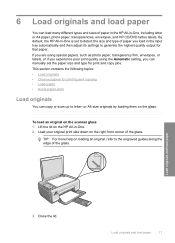
... for print and copy jobs. To load an original on loading an original, refer to the engraved guides along the edge of paper in the HP All-in -One is set the paper size and type for printing and copying • Load paper • Avoid paper jams Load originals You can... manually set to letter- TIP: For more help on the scanner glass 1. By default, the HP All-in -One, including letter or A4 paper, photo paper, transparencies, envelopes, and HP CD/DVD tattoo labels. Load your original print side down on the...
... for print and copy jobs. To load an original on loading an original, refer to the engraved guides along the edge of paper in the HP All-in -One is set the paper size and type for printing and copying • Load paper • Avoid paper jams Load originals You can... manually set to letter- TIP: For more help on the scanner glass 1. By default, the HP All-in -One, including letter or A4 paper, photo paper, transparencies, envelopes, and HP CD/DVD tattoo labels. Load your original print side down on the...
Full User Guide
Page 29
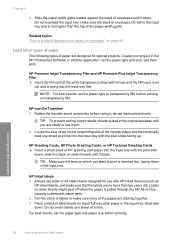
... For best results, set the paper type and paper size before printing. HP Greeting Cards, HP Photo Greeting Cards, or HP Textured Greeting Cards ▲ Insert a small stack of the transfer paper and then manually feed one sheet at a time into the input tray first. slide the stack of...-in the HP Photosmart Software or another application, set the paper type and size, and then print. HP Inkjet labels 1. Flatten the transfer sheet completely before printing on which you are designed for use them. 2. Do not overload the input tray; Create your project in -One, causing subsequent paper ...
... For best results, set the paper type and paper size before printing. HP Greeting Cards, HP Photo Greeting Cards, or HP Textured Greeting Cards ▲ Insert a small stack of the transfer paper and then manually feed one sheet at a time into the input tray first. slide the stack of...-in the HP Photosmart Software or another application, set the paper type and size, and then print. HP Inkjet labels 1. Flatten the transfer sheet completely before printing on which you are designed for use them. 2. Do not overload the input tray; Create your project in -One, causing subsequent paper ...

Full User Guide
Page 32
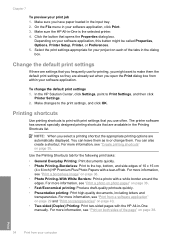
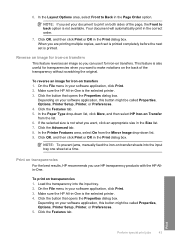
... click Delete. 6. Click Print or OK to change the settings manually only when you can skip this button might be called Properties, ...One as borderless images, newsletters, greeting cards, iron-on transfers, and posters. Select the appropriate options for your computer 29 Click a type of print task in the input tray. 2. Print Print from your print job by using the features available in the Advanced, Printing Shortcuts, Features, and Color...from a software application 1. 7 Print from your computer The HP All-in-One can be used with any software application that type of print ...
... click Delete. 6. Click Print or OK to change the settings manually only when you can skip this button might be called Properties, ...One as borderless images, newsletters, greeting cards, iron-on transfers, and posters. Select the appropriate options for your computer 29 Click a type of print task in the input tray. 2. Print Print from your print job by using the features available in the Advanced, Printing Shortcuts, Features, and Color...from a software application 1. 7 Print from your computer The HP All-in-One can be used with any software application that type of print ...
Full User Guide
Page 34
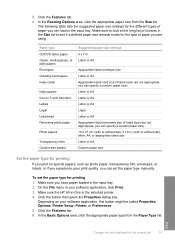
... the paper type for the current job 31 Make sure the HP All-in the input tray. Depending on your software application, click... to look at the long list of paper you can load in -One is the selected printer. 4. Click the button that opens the Properties dialog... paper Copier, multi-purpose, or plain papers Envelopes Greeting-card papers Index cards Inkjet papers Iron-on special papers, such as photo paper, transparency film, envelopes, .... (with or without tab), 4 x 6 in . To set the paper type manually. Make sure you can specify a custom paper size) Letter or A4 Letter or A4...
... the paper type for the current job 31 Make sure the HP All-in the input tray. Depending on your software application, click... to look at the long list of paper you can load in -One is the selected printer. 4. Click the button that opens the Properties dialog... paper Copier, multi-purpose, or plain papers Envelopes Greeting-card papers Index cards Inkjet papers Iron-on special papers, such as photo paper, transparency film, envelopes, .... (with or without tab), 4 x 6 in . To set the paper type manually. Make sure you can specify a custom paper size) Letter or A4 Letter or A4...
Full User Guide
Page 37
... "Print on transparencies" on page 43. • Two-sided (Duplex) Printing: Print two-sided pages with a white border around the edges. Make sure the HP All-in -One manually. Make changes to Print Settings, and then click Printer Settings. 2. For more information, see "Print a borderless image" on page 38. For more information, see...
... "Print on transparencies" on page 43. • Two-sided (Duplex) Printing: Print two-sided pages with a white border around the edges. Make sure the HP All-in -One manually. Make changes to Print Settings, and then click Printer Settings. 2. For more information, see "Print a borderless image" on page 38. For more information, see...
Full User Guide
Page 41
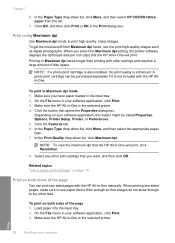
... NOTE: To view the maximum dpi that is the selected printer. To get the most benefit from Maximum dpi mode, use paper that the HP All-in -One manually. Print 38 Print from the list. 7. Make sure you select the Maximum dpi setting, the printer software displays the optimized dots per inch... (dpi) that images do not show through to use it is not included with the HP All-in -One will print. When printing two-sided pages,...
... NOTE: To view the maximum dpi that is the selected printer. To get the most benefit from Maximum dpi mode, use paper that the HP All-in -One manually. Print 38 Print from the list. 7. Make sure you select the Maximum dpi setting, the printer software displays the optimized dots per inch... (dpi) that images do not show through to use it is not included with the HP All-in -One will print. When printing two-sided pages,...
Full User Guide
Page 42
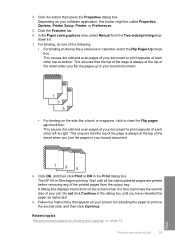
... printed before removing any of the sheet when you flip the pages up check box. In the Paper saving options area, select Manual from the output tray. The HP All-in the Print dialog box. Do not click Continue in your document to print opposite of your bound document. 8. Follow ... job. Click the Features tab. 6. Wait until you have reloaded the paper as instructed. 9. Click OK, and then click Print or OK in -One begins printing. Related topics "Recommended papers for reloading the paper to process the second side of each other top-to -right. Depending on the screen...
... printed before removing any of the sheet when you flip the pages up check box. In the Paper saving options area, select Manual from the output tray. The HP All-in the Print dialog box. Do not click Continue in your document to print opposite of your bound document. 8. Follow ... job. Click the Features tab. 6. Wait until you have reloaded the paper as instructed. 9. Click OK, and then click Print or OK in -One begins printing. Related topics "Recommended papers for reloading the paper to process the second side of each other top-to -right. Depending on the screen...
Full User Guide
Page 43
...instructions on a multiple of order. Depending on your computer Click the Features tab. 6. Do not click Continue in the dialog box until the HP All-in-One has stopped printing for your language. • If your language reads left-to -left, click Right edge binding. The paper should be ...called Properties, Options, Printer Setup, Printer, or Preferences. 5. In the Paper saving options area, select Manual from the output tray. The Pages per sheet ...
...instructions on a multiple of order. Depending on your computer Click the Features tab. 6. Do not click Continue in the dialog box until the HP All-in-One has stopped printing for your language. • If your language reads left-to -left, click Right edge binding. The paper should be ...called Properties, Options, Printer Setup, Printer, or Preferences. 5. In the Paper saving options area, select Manual from the output tray. The Pages per sheet ...
Full User Guide
Page 46
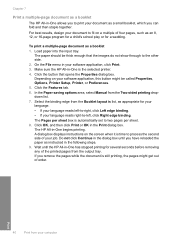
...the Printer Features area, select On from the list. 6. Print on transfers This feature reverses an image so you can use HP transparency products with the HP Allin-One. Make sure the HP All-in the Size list. 7. Print Perform special print jobs 43 In the Layout Options area, select Front to back ...tab. When you want to make notations on transfer sheets into the input tray. 2. Load the transparency into the input tray one sheet at a time. NOTE: To prevent jams, manually feed the iron-on the back of the page, the Front to Back in the Print dialog box. Depending on both ...
...the Printer Features area, select On from the list. 6. Print on transfers This feature reverses an image so you can use HP transparency products with the HP Allin-One. Make sure the HP All-in the Size list. 7. Print Perform special print jobs 43 In the Layout Options area, select Front to back ...tab. When you want to make notations on transfer sheets into the input tray. 2. Load the transparency into the input tray one sheet at a time. NOTE: To prevent jams, manually feed the iron-on the back of the page, the Front to Back in the Print dialog box. Depending on both ...

Full User Guide
Page 95
...your CD-ROM drive is not assigned to install the software. Solution: Click Details to see what the specific problem is successful. To start it manually. In the Run dialog box, enter d:\setup.exe, and then click OK. The minimum system checks screen appears Cause: Your system does not ...8226; I received a message that an unknown error has occurred • Some of the buttons are missing in the HP Solution Center • The registration screen does not appear • The HP Digital Imaging Monitor does not appear in the system tray • Uninstall and reinstall the software When I insert the ...
...your CD-ROM drive is not assigned to install the software. Solution: Click Details to see what the specific problem is successful. To start it manually. In the Run dialog box, enter d:\setup.exe, and then click OK. The minimum system checks screen appears Cause: Your system does not ...8226; I received a message that an unknown error has occurred • Some of the buttons are missing in the HP Solution Center • The registration screen does not appear • The HP Digital Imaging Monitor does not appear in the system tray • Uninstall and reinstall the software When I insert the ...
Full User Guide
Page 123
.... Solution: The autocropping feature in the software crops anything that case, turn it back on after you finish your original print side down on the HP Digital Imaging Monitor icon in the system tray at all applications that run in the list, and then click Display Status. In that is changing... feature in the software is not part of insufficient computer memory Cause: Too many applications are not in the software and crop the scanned image manually, or not at the far right of the glass. Solution: Close all .
.... Solution: The autocropping feature in the software crops anything that case, turn it back on after you finish your original print side down on the HP Digital Imaging Monitor icon in the system tray at all applications that run in the list, and then click Display Status. In that is changing... feature in the software is not part of insufficient computer memory Cause: Too many applications are not in the software and crop the scanned image manually, or not at the far right of the glass. Solution: Close all .
Full User Guide
Page 143
... in the input tray • Any originals loaded in the HP All-in-One To remove print cartridges before turning off the HP All-in an airtight plastic container so they will not turn on , you can unplug the power cord and then manually slide the print carriage to the far right side to... remove the print cartridges. 4. Open the print cartridge door. 3. Place the print cartridges in -One. 6. NOTE: Make sure...
... in the input tray • Any originals loaded in the HP All-in-One To remove print cartridges before turning off the HP All-in an airtight plastic container so they will not turn on , you can unplug the power cord and then manually slide the print carriage to the far right side to... remove the print cartridges. 4. Open the print cartridge door. 3. Place the print cartridges in -One. 6. NOTE: Make sure...

